Patient’s Guide to Posterior Lumbar Interbody Fusion
Introduction
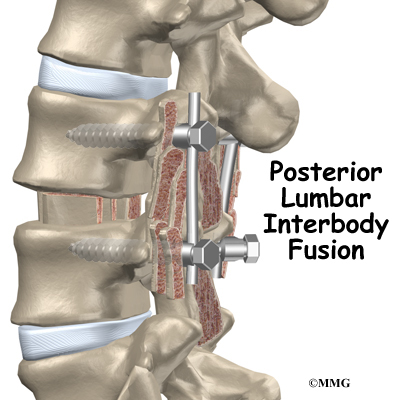
Posterior lumbar interbody fusion (PLIF) is a procedure used to treat problems such as disc degeneration, disc herniation, and spine instability. In this procedure, the surgeon works on the spine from the back (the posterior) and removes a spinal disc in the lower (lumbar) spine. The surgeon inserts bone graft material into the space between the two vertebrae where the disc was removed (the interbody space). The graft may be held in place with a special fusion cage. The goal of the procedure is to stimulate the vertebrae to grow together into one solid bone (known as a fusion). A fusion creates a rigid and immovable column of bone in the problem section of the spine.
This guide will help you understand
- what surgeons hope to achieve
- what happens during surgery
- what to expect as you recover
Anatomy
What parts of the spine and low back are involved?
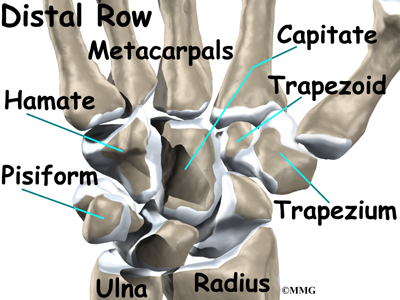
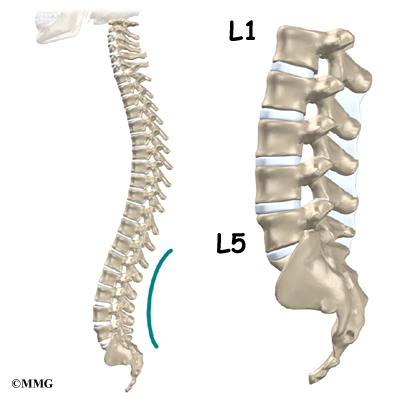
This surgery is done through an incision in the low back. The incision reaches to the spinous processes, the bony projections off the back of the vertebrae. A large block of bone, called the vertebral body makes up the front section of each vertebra. The vertebral bodies are separated by a soft cushion
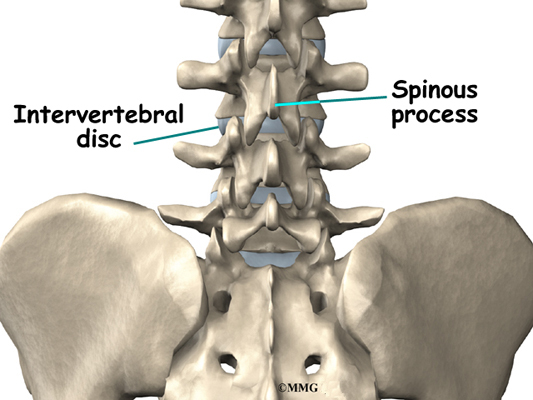
called an intervertebral disc.
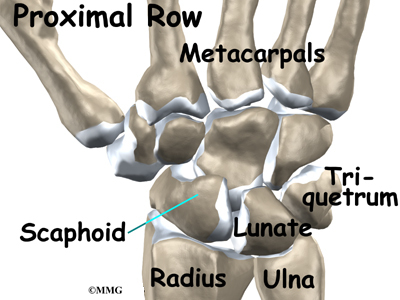
On the back of the vertebral body, the lamina and pedicle bones form a protective ring around the spinal canal. The spinal nerves are enclosed in the spinal canal and exit through small openings on the sides of each vertebral pair, one on the left and one on the right. These passageways are called the neural foramina. (The term neural foramen describes a
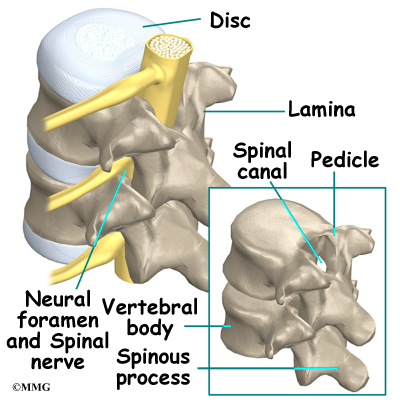
single passageway).
Related Document: A Patient’s Guide to Lumbar Spine Anatomy
Rationale
What do surgeons hope to achieve?
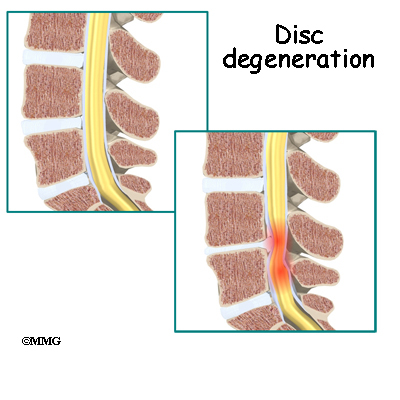
This procedure is often used to stop symptoms from lumbar disc disease. Discs degenerate, or wear out, as a natural part of aging and also from stress and strain on the back. Over time, the disc begins to collapse, and the space decreases between the vertebrae.
Related Document: A Patient’s Guide to Lumbar Degenerative Disc Disease
When this happens, the openings around the spinal nerves (the neural foramina) narrow and may put pressure on the nerves. The long ligaments in the spine slacken due to the collapse in vertebral height. These ligaments may even buckle and put pressure on the spinal nerves.
View animation of degeneration
Pain from disc degeneration can come from a tear in the outer portion of the disc, from chemical inflammation inside the disc, or from a herniated disc that pushes on a nearby spinal nerve. Mechanical pain can also occur from excess movement within the problem part of the spine.
Discectomy is the removal of the disc and any fragments between the vertebrae that are to be fused. Taking out the painful disc is intended to relieve symptoms. It also provides room for placing a graft that will allow the two vertebrae to fuse together.

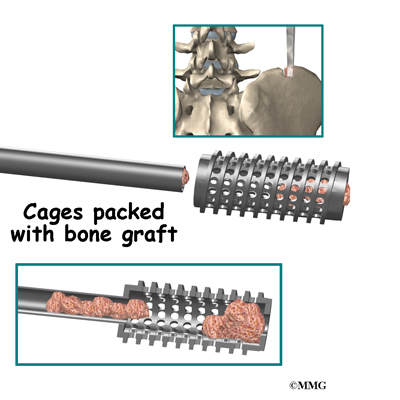
Once the disc is removed, the surgeon spreads the bones of the spine apart slightly to make room to implant bone graft material. Bone graft is commonly taken from the rim of the pelvis and packed in a special case, called a fusion cage. Bone taken from your own body is called autograft. Bone substitutes are also being used and avoid the need for taking bone from your pelvis.
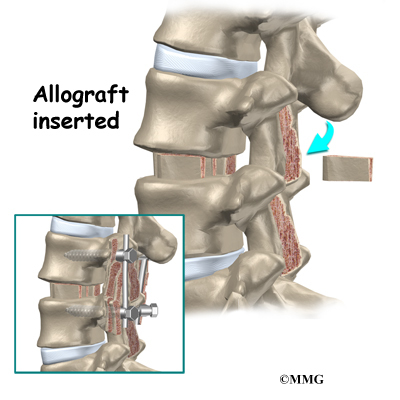
Another option is to use a wedge of hard, cortical bone taken from preserved human bone. This source of bone graft is called allograft. During the PLIF procedure, the cage or bone wedge is implanted into the interbody space. The PLIF method provides a large surface area for fusion to occur.
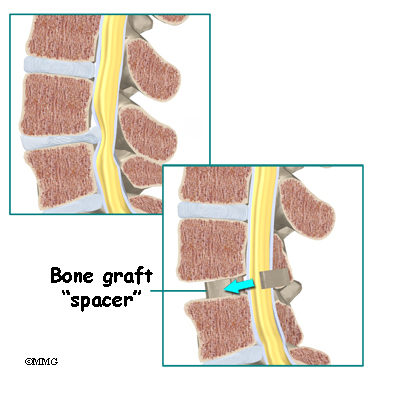
The graft creates a solid spacer to separate and hold the vertebrae apart. Enlarging the space between the vertebrae widens the opening of the neural foramina, taking pressure off the spinal nerves that pass through these openings. Also, the long ligaments that run up and down inside the spinal canal are pulled taut so they don’t buckle into the spinal canal.
View animation of creating a spacer
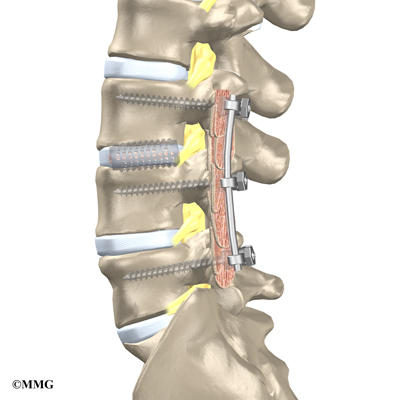
The surgeon also fixes the bones in place using pedicle screws. This instrumentation (or hardware, as it is sometimes called) holds the vertebrae together and prevents them from moving. The less motion there is between two bones trying to heal, the higher the chance they will successfully fuse. The use of instrumentation has increased the success rate of spinal fusions considerably.
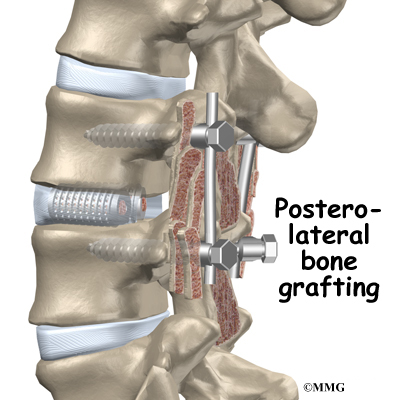
During the PLIF procedure, surgeons also commonly add bone graft material along the back sides of the spine. This step is called posterolateral bone grafting. When combined with instrumentation, this approach helps fuse a large surface area on the back (posterior column) of the spine.
In a successful fusion, the vertebrae that are fused together no longer move against one another. The fusion creates one solid bone. No movement happens within the bones that are fused. Instead, they move as one unit. This helps stop the mechanical pain that was coming from the moving parts of the back. Fusion also prevents additional wear and tear on the spinal segment that was fused. By fusing the bones together, surgeons hope to reduce future problems at the spinal segment.
Preparations
How will I prepare for surgery?
The decision to proceed with surgery must be made jointly by you and your surgeon. You should understand as much about the procedure as possible. If you have concerns or questions, you should talk to your surgeon.
Once you decide on surgery, your surgeon may suggest a complete physical examination by your regular doctor. This exam helps ensure that you are in the best possible condition to undergo the operation.
On the day of your surgery, you will probably be admitted to the hospital early in the morning. You shouldn’t eat or drink anything after midnight the night before.
Surgical Procedure
What happens during the operation?
Patients are given a general anesthesia to put them to sleep during most spine surgeries. As you sleep, your breathing may be assisted with a ventilator. A ventilator is a device that controls and monitors the flow of air to the lungs.
During surgery the patient usually kneels face down on a special operating table. The special table supports the patient so the abdomen is relaxed and free of pressure. This position reduces blood loss during surgery. It also gives the surgeon more room to work.
Two measurements are made before surgery begins. The first measurement ensures that the surgeon chooses a fusion cage or bone wedge that will fit inside the disc space. To correctly size the fusion cage or bone wedge, the surgeon uses an X-ray image to measure the disc space in a healthy disc, above or below the problem segment.
Second, to size the length of the pedicle screws, a CT scan is used to measure the length of the pedicle bone on the back of the vertebrae to be fused. The CT scan is a special type of X-ray that lets doctors see slices of bone tissue. The machine uses a computer and X-rays to create these slices.
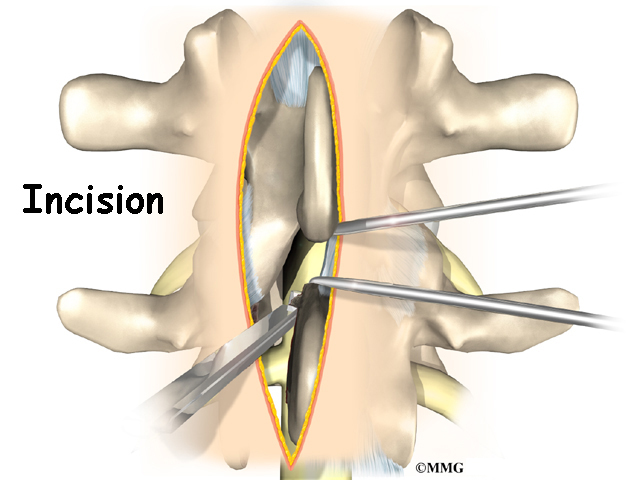
To begin the procedure, an incision is made down the middle of the low back. The tissues just under the skin are separated. Then the small muscles along the sides of the low back are moved aside, exposing the back of the spinal column. Next, the surgeon takes an X-ray to make sure that the procedure is being performed on the correct vertebrae.
The bone graft is prepared. When autograft (bone taken from your body) is used, the same incision made at the beginning of the surgery can be used. The surgeon reaches through the first incision and opens the tissues that cover the back of the pelvis. An osteotome is used to cut the surface of the pelvis bone. An instrument is used to gather a small amount of the pelvis bone. The graft material is prepared and will later be packed into the fusion cages. The tissues covering the pelvis bone are sutured.
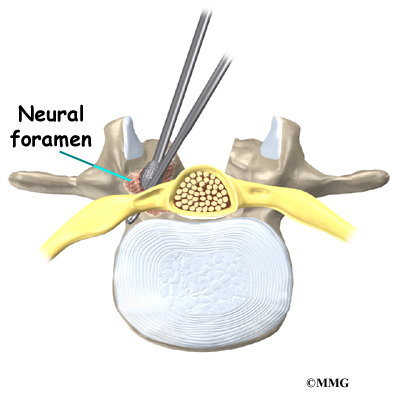
Then the surgeon prepares to implant bone graft into the space between the vertebral bodies. The surgeon removes the lamina bones that cover the back of the spinal canal. Next, the surgeon cuts a small opening in the ligamentum flavum, an elastic ligament separating the lamina bones and the spinal nerves. Removing the ligamentum flavum allows the surgeon to see inside the spinal canal. The nerves are checked for tension where they exit the spinal canal. If a nerve root is under tension, the surgeon enlarges the neural foramen, the opening where the nerve travels out of the spinal canal.
The surgeon locates the spot where the pedicle screws are to be placed. A fluoroscope is used to visualize the pedicle bones. A fluoroscope is a special type of X-ray that allows the surgeon to see an X-ray picture continuously on a TV screen. The surgeon uses the fluoroscope to guide one screw through the back of each pedicle, one on the left and one on the right.
The nerve roots inside the spinal canal are then pulled aside with a retractor so the problem disc can be examined. With the nerves held to the side, the surgeon is able to see the disc where it sits just in front of the spinal canal.
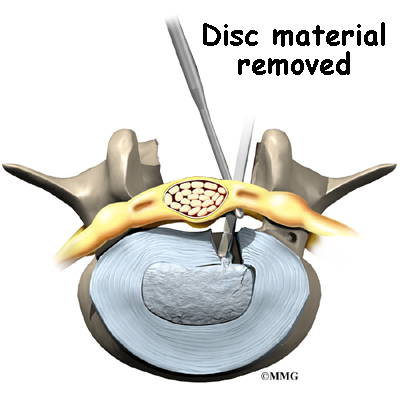
A hole is cut into the rim of the back of the disc. Forceps are placed inside the hole in order to clean out disc material within the disc. Reamers and scrapers are used to open up and remove additional disc material.
The surgeon prepares the disc space where the fusion cages or bone wedges are to be inserted. Special spreaders hold the two vertebral bodies apart. A layer of bone is shaved off the flat surfaces of the two vertebrae, causing the surfaces to bleed. Bleeding stimulates the bone graft to heal the bones together.
Adequate room is needed to get the bone graft implants through the spinal column and into the disc space. The nerve roots must be pulled as far to the side as possible to open up enough space.
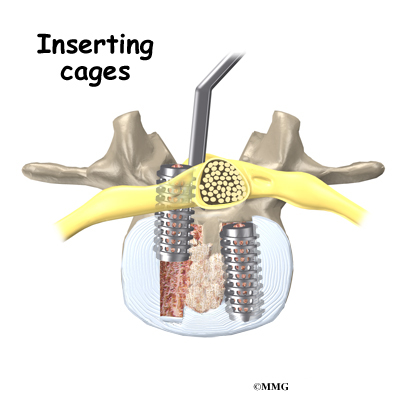
With the disc space held apart by the spreaders, the surgeon has enough room to place the bone graft between the two vertebral bodies. For the fusion cage method, the surgeon packs two cages with bone taken from the pelvis bone or with a suitable bone substitute. Two cages are inserted, one on the left and one on the right. When allograft bone wedges are used, the surgeon inserts the wedges and aligns them within the disc space.
The surgeon uses a fluoroscope to check the position and fit of the graft.
The spreaders used to hold the disc space apart are released. Then the doctor tests the graft by bending and turning the spine to make sure the graft is in the right spot and is locked in place.
Some surgeons add strips of bone graft along the back of the vertebrae to be fused. This is called posterolateral fusion. The bones that project out from each side of the back of the spine are called transverse processes. The back surface of the transverse processes are shaved, causing the surfaces to bleed. Small strips of bone, usually taken from the pelvis bone at the beginning of the surgery, are placed over the transverse processes. The combination of this graft material with the pedicle screws helps hold the spine steady as the interbody fusion heals.
A drainage tube may be placed in the wound. The muscles and soft tissues are then put back in place. The skin is stitched together. The surgeon may place you in a rigid brace that straps across the chest, pelvis, and low back to support the spine while it heals.
Complications
What might go wrong?
As with all major surgical procedures, complications can occur. Some of the most common complications following PLIF include
- problems with anesthesia
- thrombophlebitis
- infection
- nerve damage
- problems with the implant or hardware
- nonunion
- ongoing pain
This is not intended to be a complete list of possible complications.
Problems with Anesthesia
Problems can arise when the anesthesia given during surgery causes a reaction with other drugs the patient is taking. In rare cases, a patient may have problems with the anesthesia itself. In addition, anesthesia can affect lung function because the lungs don’t expand as well while a person is under anesthesia. Be sure to discuss the risks and your concerns with your anesthesiologist.
Thrombophlebitis (Blood Clots)
View animation of pulmonary embolism
Thrombophlebitis, sometimes called deep venous thrombosis (DVT), can happen after any operation. It occurs when the blood in the large veins of the leg forms blood clots. This may cause the leg to swell and become warm to the touch and painful. If the
blood clots in the veins break apart, they can travel to the lung, where they lodge in the capillaries and cut off the blood supply to a portion of the lung. This is called a pulmonary embolism. (Pulmonary means lung, and embolism refers to a fragment of something traveling through the vascular system.) Most surgeons take preventing DVT very seriously. There are many ways to reduce the risk of DVT, but probably the most effective is getting you moving as soon as possible. Two other commonly used preventative measures include
- pressure stockings to keep the blood in the legs moving
- medications that thin the blood and prevent blood clots from forming
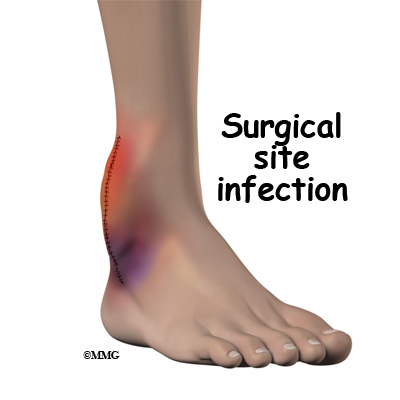
Infection
Infection following spine surgery is rare but can be a very serious complication. Some infections may show up early, even before you leave the hospital. Infections on the skin’s surface usually go away with antibiotics. Deeper infections that spread into the bones and soft tissues of the spine are harder to treat. They may require additional
surgery to treat the infected portion of the spine.
Nerve Damage

Any surgery that is done near the spinal canal can potentially cause injury to the spinal cord or spinal nerves. Injury can occur from bumping or cutting the nerve tissue with a surgical instrument, from swelling around the nerve, or from the formation of scar
tissue.
The nerve roots inside the spinal canal are especially at risk during the PLIF procedure. Retractors are used to hold the nerves aside and may cause muscle weakness and a loss of sensation to the areas supplied by an injured nerve. Pressure on the nerves that supply the bowels and bladder can cause incontinence. However, these types of nerve problems after PLIF usually go away soon after surgery.
Problems with the Implant or Hardware
Fusion surgery with cages requires bone grafting. The graft is commonly taken from the top rim of the pelvis (autograft). There is a risk of pain, infection, or weakness in the area where the graft is taken. These risks are avoided when a bone graft substitute is used in place of an autograft.
After the interbody implant is placed, the surgeon checks the position of the fusion cage or bone wedge before completing the surgery. However, the implant may shift slightly soon after surgery to the point that it is no longer able to hold the spine stable. If the implant migrates out of position, it can cause injury to the nearby tissues. A second surgery may be needed to align or replace the implant.
Hardware can also cause problems. Screws or pins may loosen and irritate the nearby soft tissues. Also, the metal plates can sometimes break. If this happens, the surgeon may suggest another surgery either to take out the hardware or to add more hardware to solve the problem.
Nonunion
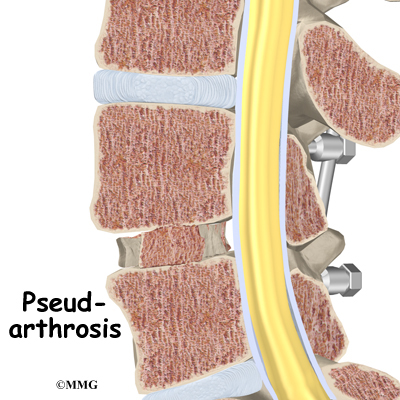
Sometimes the bones do not fuse as planned. This is called a nonunion, or pseudarthrosis. (The term pseudarthrosis means false joint.) When more than one level of the spine is fused at one time, there is a greater chance that nonunion will occur. (Fusion of more than one level means two or more consecutive discs are removed and replaced with bone graft.) If the joint motion from a nonunion continues to cause pain, the patient may need a second operation.
In the second procedure, the surgeon usually adds more bone graft. Additional instrumentation may also be needed to rigidly secure the bones so they will fuse together.
Ongoing Pain
PLIF is a complex surgery. Not all patients get complete pain relief with this procedure. As with any surgery, patients should expect some pain afterward. If the pain continues or becomes unbearable, talk to your surgeon about treatments that can help control your pain.
Afterward
What happens after surgery?
Patients are sometimes placed in a rigid body brace after surgery. The surgical drain is removed within one to two days.
Patients usually stay in the hospital after surgery for three to five days. During this time, patients work daily with a physical therapist. The therapist demonstrates safe ways to move, dress, and do activities without putting extra strain on the back. The therapist
may recommend that the patient use a walker for the first day or two. Before going home, patients are shown ways to help control pain and avoid problems.
Patients are able to return home when their medical condition is stable. However, they are usually required to keep their activities to a minimum in order to give the fusion time to begin healing. Patients are cautioned against bending, lifting, twisting, driving, and prolonged sitting for up to six weeks. Outpatient physical therapy is
usually started a minimum of six weeks after the date of surgery.
Rehabilitation
What should I expect as I recover?
Rehabilitation after PLIF can be a slow process. Many surgeons prescribe outpatient physical therapy beginning a minimum of six weeks after surgery. This delay is needed to make sure the graft has time to begin to fuse. You will probably need to attend therapy sessions for two to three months. You should expect full recovery to take up to eight months.
At first, treatments are used to help control pain and inflammation. Ice and electrical stimulation are commonly used to help with these goals. Your therapist may also use massage and other hands-on treatments to ease muscle spasm and pain.
Active treatments are slowly added. These include exercises for improving heart and lung function. Short, slow walks are generally safe to start with. Swimming and use of a stairclimbing machine are helpful in the later phases of treatment. Therapists also teach
specific exercises to help tone and control the muscles that stabilize the low back.
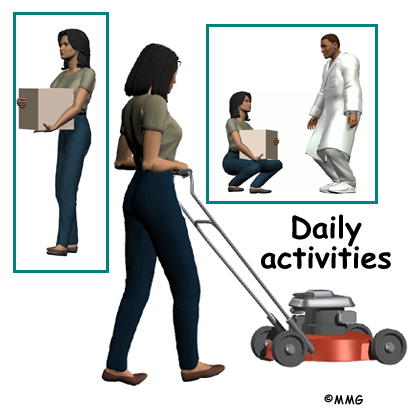
Your therapist also works with you on how to move and do activities. This form of treatment, called body mechanics, is used to help you develop new movement habits. This training helps you keep your back in safe positions as you go about your work and daily activities. Training includes positions you use when sitting, lying, standing, and walking. You’ll also work on safe body mechanics with lifting, carrying, pushing, and pulling.
As your condition improves, the therapist tailors your program to prepare you to go back to work. Some patients are not able to go back to a job that requires strenuous tasks. Your therapist may suggest changes in job tasks that enable you to go back to your previous job or to do alternate forms of work. You’ll learn to do these tasks in new ways that keep your back safe and free of strain.
Before your therapy sessions end, your therapist will teach you ways to avoid future problems.