Unicompartmental Knee Replacement

A Patient’s Guide to Unicompartmental Knee Replacement

Introduction

Unicompartmental Knee Replacement

A painful knee can severely affect your ability to lead a full, active life. Over the last 25 years, major advancements in artificial knee replacement have improved the outcome of the surgery greatly. One of the more recent advances in knee replacement surgery is the unicompartmental knee replacement (also known as a unicondylar knee replacement). This type of knee replacement is less invasive than a full knee replacement. The operation is designed to replace only the portions of the joint that are most damaged by arthritis. This can have significant advantages, especially in younger patients who may need to have a second artificial knee replacement as the first one begins to wear out. Removing less bone during the initial operation makes it much easier to perform a revision artificial knee replacement later in life.

This guide will help you understand:

  • what your surgeon hopes to achieve
  • what happens during the procedure
  • what to expect after your operation

Anatomy

Unicompartmental Knee Replacement

What is the normal anatomy of the knee?

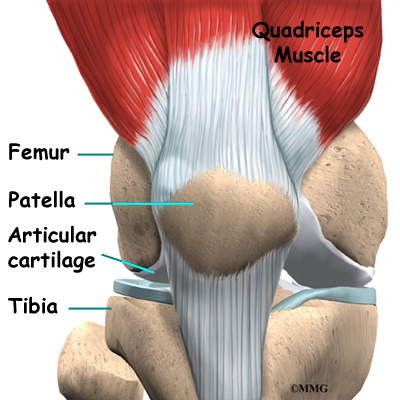
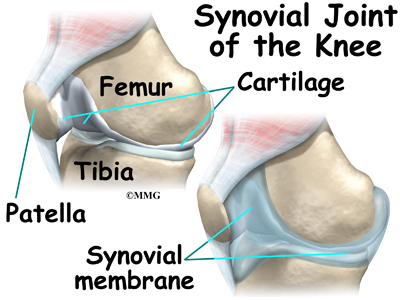
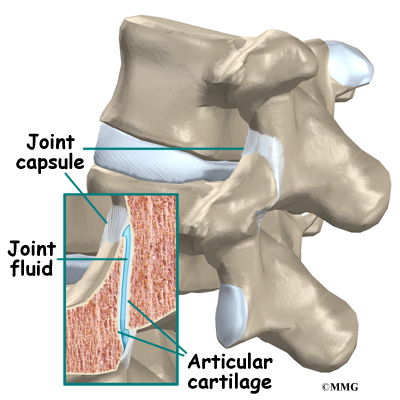
The knee joint is formed where the femur (thighbone) meets the tibia (shinbone). A smooth cushion of articular cartilage covers the end surfaces of both of these bones so that they slide against one another smoothly. The articular cartilage is kept slippery by joint fluid made by the synovial membrane (joint lining). The fluid is contained in a soft tissue enclosure around the knee joint called the joint capsule.

Unicompartmental Knee Replacement

View animation of smooth movement

The patella, or kneecap, is the movable bone on the front of the knee. It is wrapped inside a tendon that connects the large muscles on the front of the thigh, the quadriceps muscles, to the lower leg bone. The surface on the back of the patella is covered with articular cartilage. It glides within a groove on the front of the femur.

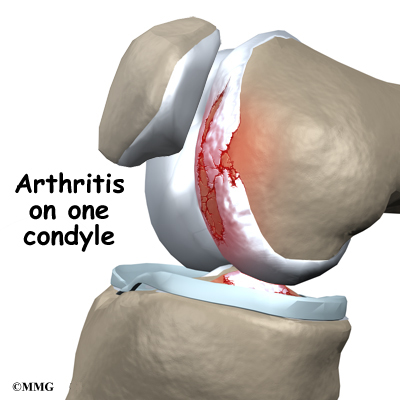
There are two femoral condyles in each knee. The medial femoral

Unicompartmental Knee Replacement

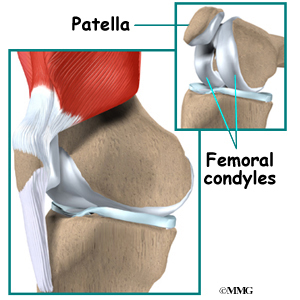
condyle (the one closest to the other knee) and the lateral femoral condyle (on the outside half of the knee joint).

Related Document: A Patient’s Guide to Knee Anatomy

Rationale

What does the surgeon hope to achieve?

Unicompartmental Knee Replacement

The main reason for replacing any arthritic joint with an artificial joint is to stop the bones from rubbing against each other. This rubbing causes pain. Replacing the painful and arthritic joint with an artificial joint gives the joint a new surface, which moves smoothly and without causing pain. The goal is to help people return to many of their activities with less pain and with greater freedom of movement.

View animation of smooth movement

Preparation

How should I prepare for surgery?

The decision to proceed with surgery should be made jointly by you and your surgeon. The decision should only be made after you feel that you understand as much as possible about the procedure.

Once you decide to proceed with surgery, several things may need to be done. Your orthopedic surgeon may suggest a complete physical examination by your regular doctor. This is to ensure that you are in the best possible condition to undergo the operation. You may also need to spend time with the physical therapist who will be managing your rehabilitation after the surgery. Your therapist will begin the teaching process before surgery to make sure you are ready for rehabilitation afterwards.

One purpose of the preoperative visit is to record a baseline of information. This includes measurements of your current pain levels, functional abilities, the presence of swelling, and the available movement and strength of each knee.

A second purpose of the preoperative therapy visit is to prepare you for your upcoming surgery. You will practice some of the exercises used just after surgery. You will also be trained in the use of either a walker or crutches. Whether the surgeon uses a cemented or uncemented artificial knee will determine how much weight you will initially apply through your foot while walking. Finally, an assessment will be made of any needs you will have at home once you’re released from the hospital.

Surgical Procedure

What happens during the operation?

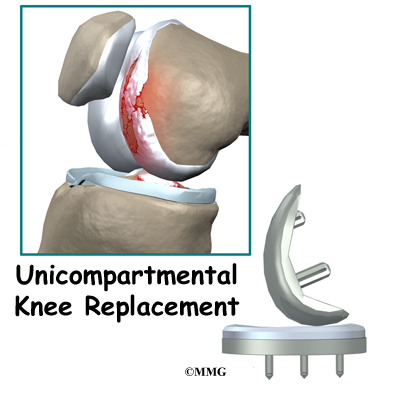
Before we describe the procedure, let’s look first at the unicompartmental artificial knee itself.

There are two major types of artificial knee replacements:

  • cemented prosthesis
  • uncemented prosthesis

Both are still widely used. In many cases a combination of the two types is used. The decision to use a cemented or uncemented artificial knee is usually made by the surgeon based on your age, your lifestyle, and the surgeon’s experience.

Each prosthesis is made up of two main parts.

Unicompartmental Knee Replacement

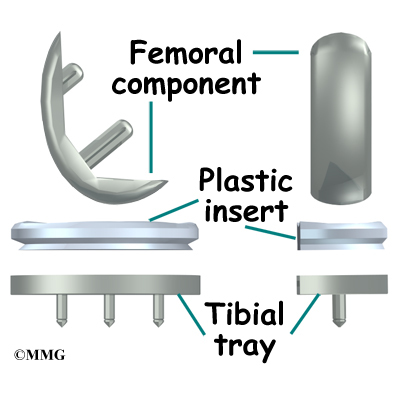
The tibial component (bottom portion) replaces the top surface of the lower bone, the tibia. The femoral component (top portion) replaces the bottom surface of the upper bone (the femoral condyle).

The femoral component is made of metal. The tibial component is usually made of two parts: a metal tray that is attached directly to the bone, and a plastic spacer that provides the slick surface. The plastic used is so tough and slick that you could ice skate on a sheet of it without much damage to the material.

A cemented prosthesis is held in place by a type of epoxy cement that attaches the metal to the bone. An uncemented prosthesis has a fine mesh of holes on the surface that allows bone to grow into the mesh and attach the prosthesis to the bone.

The Operation

To begin the procedure, the surgeon makes an incision on the front of the knee to allow access to the joint. Several different approaches can be used to make the incision depending on whether the outer half (the lateral compartment) or the inner half (the medial compartment) is being replaced. The incisions used to perform the unicompartmental knee replacement are much smaller than those used to perform a traditional artificial knee replacement. For this reason, this surgery is sometimes referred to as minimally invasive.

Unicompartmental Knee Replacement

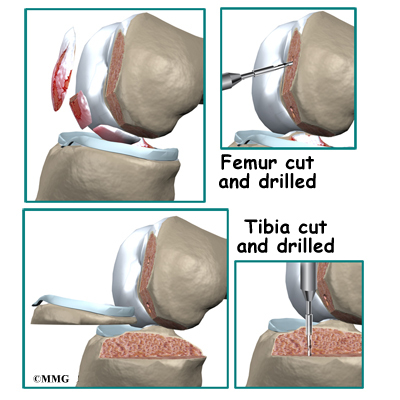
Once the knee joint is opened, a special positioning device (a cutting guide) is placed on the end of the femur. This cutting guide is used to ensure that the bone is cut in the proper alignment to the leg’s original angles, even if the arthritis has made you bowlegged or knock-kneed. With the help of the cutting guide, the surgeon cuts several pieces of bone from the end of the femur. The artificial knee will replace these worn surfaces with a metal surface.

View animation of removing the femoral joint surfaces

View animation of preparing the femoral joint surfaces

Next, the surface of the tibia is prepared. Another type of cutting guide is used to cut the tibia in the correct alignment.

View animation of preparing the tibial joint surfaces

The metal femoral component is then placed on the femur. In the uncemented prosthesis, the metal piece is held snugly onto the femur because the femur is tapered to accurately match the shape of the prosthesis. The metal component is pushed onto the end of the femur and held in place by friction. In the cemented variety, epoxy cement is used to attach the metal prosthesis to the bone.

The metal tray that holds the plastic spacer is then attached to the top of the tibia. This metal tray is either cemented into place or held with screws if the component is of the uncemented variety. The screws are primarily used to hold the tibial tray in place until bone grows into the porous coating. The screws remain in place and are not removed.

The plastic spacer is then attached to the metal tray of the tibial component. If this component should wear out while the rest of the artificial knee is sound, it can be replaced. The replacement procedure is sometimes called a retread.

View animation of component placement

View animation of completed unicompartmental knee replacement

Finally, the soft tissues are sewn back together, and staples are used to hold the skin incision together.

Complications

What might go wrong?

As with all major surgical procedures, complications can occur. This document doesn’t provide a complete list of the possible complications, but it does highlight some of the most common problems. Some of the most common complications following artificial knee replacement are

  • anesthesia complications
  • thrombophlebitis
  • infection
  • stiffness
  • loosening

Anesthesia Complications

Most surgical procedures require that some type of anesthesia be done before surgery. A very small number of patients have problems with anesthesia. These problems can be reactions to the drugs used, problems related to other medical complications, and problems due to the anesthesia. Be sure to discuss the risks and your concerns with your anesthesiologist.

Thrombophlebitis (Blood Clots)

View animation of pulmonary embolism

Thrombophlebitis, sometimes called deep venous thrombosis (DVT), can occur after any operation, but is more likely to occur following surgery on the hip, pelvis, or knee. DVT occurs when blood clots form in the large veins of the leg. This may cause the leg to swell and become warm to the touch and painful. If the blood clots in the veins break apart, they can travel to the lung, where they lodge in the capillaries and cut off the blood supply to a portion of the lung. This is called a pulmonary embolism. (Pulmonary means lung, and embolism refers to a fragment of something traveling through the vascular system.) Most surgeons take preventing DVT very seriously. There are many ways to reduce the risk of DVT, but probably the most effective is getting you moving as soon as possible after surgery. Two other commonly used preventative measures include

  • pressure stockings to keep the blood in the legs moving
  • medications that thin the blood and prevent blood clots from forming

Infection

Infection can be a very serious complication following an artificial joint surgery. The chance of getting an infection following artificial knee replacement is probably around one percent. Some infections may show up very early, even before you leave the hospital. Others may not become apparent for months, or even years, after the operation. Infection can spread into the artificial joint from other infected areas. Your surgeon may want you to take antibiotics when you have dental work or surgical procedures on your bladder and colon to reduce the risk of spreading germs to the joint.

Stiffness

In some cases, the ability to bend the knee does not return to normal after knee replacement surgery. To be able to use the leg effectively to rise from a chair, the knee must bend at least to 90 degrees. A desirable range of motion is greater than 110 degrees.

The most important factor in determining range of motion after surgery is whether the ligaments and soft tissues were balanced during surgery. The surgeon tries to get the knee in the best alignment so there is equal tension on all the ligaments and soft tissues.

Sometimes extra scar tissue develops after surgery and can lead to an increasingly stiff knee. If this occurs, your surgeon may recommend taking you back to the operating room, placing you under anesthesia once again, and manipulating the knee to regain motion. Basically, this allows the surgeon to break up and stretch the scar tissue without you feeling it. The goal is to increase the motion in the knee without injuring the joint.

Loosening

The major reason that artificial joints eventually fail continues to be a process of loosening where the metal or cement meets the bone. Great advances have been made in extending how long an artificial joint will last, but most will eventually loosen and require a revision. Hopefully, you can expect 12 to 15 years of service from an artificial knee, but in some cases the knee will loosen earlier than that. A loose prosthesis is a problem because it usually causes pain. Once the pain becomes unbearable, another operation will probably be required to revise the knee replacement.

Related Document: A Patient’s Guide to Revision Arthroplasty of the Knee

After Surgery

What happens after surgery

Some orthopedic surgeons recommend a device known as a continuous passive motion (CPM) machine immediately after surgery. The unit is thought to help prevent blood clots and speed healing of the wound. It may help patients get by with less need for medication. The unit may help improve knee mobility after knee replacement surgery. However, patients seem to do equally well in regaining knee motion by doing their exercises.

You may also have physical therapy treatments once or twice each day as long as you are in the hospital. Therapy treatments will address the range of motion in the knee. Gentle movement will be used to help you bend and straighten the knee. If you are using a CPM device, it will be checked for alignment and settings. Your leg may be elevated to help drain extra fluid in the leg.

Your therapist will also go over exercises to help improve knee mobility and to start exercising the thigh and hip muscles. Ankle movements are used to help pump swelling out of the leg and to prevent the possibility of a blood clot.

When you are stabilized, your therapist will help you get up for a short outing using your crutches or your walker.

Most patients are able to go home after spending one to two days in the hospital. In some cases, minimally invasive unicompartmental surgery can be done as an outpatient – meaning you can go home the same day.

You’ll be on your way home when you can demonstrate a safe ability to get in and out of bed, walk up to 75 feet with your crutches or walker, go up and down stairs safely, and access the bathroom. It is also important that you regain a good muscle contraction of the quadriceps muscle and that you gain improved knee range of motion. Patients who still need extra care may be sent to a different unit until they are safe and ready to go home.

Most orthopedic surgeons recommend regular checkups after your artificial joint replacement. How often you need to be seen varies from every six months to every five years, according to your situation and what your surgeon recommends. You should always consult your orthopedic surgeon if you begin to have pain in your artificial joint, or if you begin to suspect something is not working correctly.

Most patients who have an artificial joint will have episodes of pain, but when you have pain that lasts longer than a couple of weeks you should consult your surgeon. The surgeon will examine your knee in search of reasons for the pain. X-rays may be taken of your knee to compare with x-rays taken earlier to see whether the artificial joint shows any evidence of loosening.

Rehabilitation

What should I expect during my rehabilitation?

Once discharged from the hospital, you may see your therapist for one to six in-home treatments. This is to ensure you are safe in and about the home and getting in and out of a car. Your therapist will make recommendations about your safety, review your exercise program, and continue working with you on knee range of motion. In some cases you may require additional visits at home before beginning outpatient physical therapy. Home therapy visits end when you can safely leave the house.

Visits to the physical therapist’s office come next. Your therapist may use heat, ice, or electrical stimulation to reduce any remaining swelling or pain.

You should continue to use your walker or crutches as instructed. If you had a cemented procedure, you’ll advance the weight you place through your sore leg as much as you feel comfortable. If yours was a noncemented procedure, place only the toes down until you’ve had a follow-up x-ray and your surgeon or therapist directs you to put more weight through your leg (usually by the fifth or sixth week postoperatively).

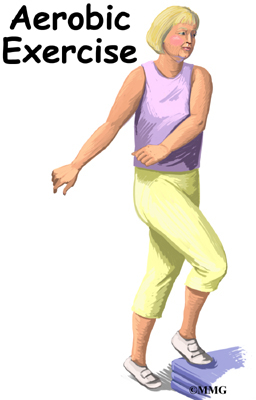
Your therapist may use hands-on stretches for improving range of motion. Strength exercises address key muscle groups including the buttock, hip, thigh, and calf muscles. Endurance can be achieved through stationary biking, lap swimming, and using an upper body ergometer (upper cycle).

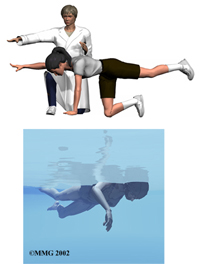
Therapists sometimes treat their patients in a pool. Exercising in a swimming pool puts less stress on the knee joint, and the buoyancy lets you move and exercise easier. Once you’ve gotten your pool exercises down and the other parts of your rehab program advance, you may be instructed in an independent program.

When you are safe in putting full weight through the leg, several types of balance exercises can be chosen to further stabilize and control the knee.

Finally, a select group of exercises can be used to simulate day-to-day activities, such as going up and down steps, squatting, rising on your toes, and bending down. Specific exercises may then be chosen to simulate work or hobby demands.

Many patients have less pain and better mobility after having knee replacement surgery. Your therapist will work with you to help keep your knee joint healthy for as long as possible. This may require that you adjust your activity choices to keep from putting too much strain on your new knee joint. Heavy sports that require running, jumping, quick stopping or starting, and cutting are discouraged. Cycling, swimming, and level walking are encouraged, as are low impact sports like golfing or bowling.

Your therapist’s goal is to help you improve knee range of motion, maximize strength, and improve your ability to do your activities. When you are well under way, regular visits to your therapist’s office will end. Your therapist will continue to be a resource, but you will be in charge of doing your exercises as part of an ongoing home program.

Piriformis Muscle Injections

A Patient’s Guide to Pain Management: Piriformis Muscle Injections

Introduction

Piriformis muscle injections are commonly used to determine what is causing buttock and sciatica type pain. Piriformis muscle injections are both diagnostic injections and therapeutic injections, meaning that they help your doctor determine the cause of your back pain and may or may not provide you with relief from the pain. These injections eliminate pain temporarily by paralyzing the piriformis muscle and stopping spasm in the muscle. If the piriformis muscle is injected and your pain goes away for several days, then it is very likely that a portion of your pain is caused by piriformis syndrome. Once you and your doctor know what structure is causing your pain, you can begin to explore options for treating the condition.

This guide will help you understand

  • where the injection is given
  • what your doctor hopes to achieve
  • what you need to do to prepare
  • what you can expect from the injection
  • what might go wrong

Anatomy

What parts of the body are involved?

To perform a piriformis muscle injection, your doctor inserts a needle into the piriformis muscle. The piriformis muscle begins inside the pelvis where it attaches to the sacrum and travels out of the pelvis to attach to the top of the femur or thigh bone. The sacrum is a triangular-shaped bone that connects the pelvic bones at the base of the spine.

Piriformis Muscle Injections

The piriformis muscle is one of the external rotators of the hip and leg. This means that as the muscle works, it helps to turn the foot and leg outward. The piriformis muscle can cause problems when spasm of the muscle irritates the sciatic nerve. The lower lumbar spinal nerves leave the spine and join to form the sciatic nerve. The sciatic nerve leaves the pelvis through an opening called the sciatic notch. The sciatic nerve runs under (and sometimes through) the piriformis muscle on its way out of the pelvis.

Related Document: A Patient’s Guide to Lumbar Spine Anatomy

Rationale

What does my physician hope to achieve?

Piriformis Muscle Injections

Your doctor is recommending a piriformis muscle injection to try and determineif piriformis muscle spasm is the cause of your pain. This type of injection is primarily a diagnostic injection. The injection may only help your pain temporarily, sometimes just for a few hours. Once your doctor is sure that it is the piriformis muscle causing your pain, other procedures may be recommended to reduce your pain for a longer period of time.

Piriformis Muscle Injections

The piriformis muscle and tendon travel over the top of the sciatic nerve as the nerve leaves the pelvis at the sciatic notch. Spasm in the piriformis muscle can cause pain by squeezing against the sciatic nerve. This causes the nerve to become irritated and inflamed – resulting in pain in the buttock and leg. This condition is referred to as piriformis syndrome.

Piriformis Muscle Injections

If the spasm continues, the muscle may become contracted (or shortened). This increases the pain and inflammation. To reverse the contracture, the muscle and tendon need to be stretched and lengthened back to normal. Paralyzing the muscle temporarily with an injection can make the stretching less painful, more effective, and speed up the process of lengthening the muscle and tendon.

Related Document: A Patient’s Guide to Piriformis Syndrome

If the stretching program fails to correct the problem, surgery to lengthen the tendon is an option. Before considering surgery, it is necessary to confirm the diagnosis as best as possible, so the information from the injection is important. If the injection temporarily relieves your symptoms, then the surgeon is more comfortable that the surgery is indicated and has a good chance of helping your problem. If the injection does not help, then some other cause of your symptoms may need to be considered.

During a piriformis muscle injection, the medications that are normally injected include a local anesthetic and cortisone. The anesthetic medication, such as lidocaine or bupivicaine, is the same medication used to numb an area when you are having dental work or having a laceration sutured. The medication causes temporary paralysis of the piriformis muscle lasting one hour to six hours, depending on which type of anesthetic is used.

Cortisone is an extremely powerful anti-inflammatory medication. When this medication is injected into a painful, inflamed muscle, it can reduce the inflammation and swelling. Reducing the inflammation reduces pain. If cortisone is also injected into the piriformis muscle at the same time, you may get several weeks’ worth of relief from your pain. This can allow you to get started in a physical therapy program, strengthening and stretching the piriformis muscle to reduce the contracture and the spasm in the muscle.

Preparation

How will I prepare for the procedure?

To prepare for the procedure your doctor may tell you to remain “NPO” for a certain amount of time before the procedure. This means that you should not eat or drink anything for the specified amount of time before your procedure. This means no water, no coffee, no tea – not anything. You may receive special instructions to take your usual medications with a small amount of water. Check with your doctor if you are unsure what to do.

You may be instructed to discontinue certain medications that affect the clotting of your blood several days before the injection. This reduces the risk of excessive bleeding during and after the injection. These medications may include the common Non-Steroidal Anti-Inflammatory Drugs (NSAIDs) such as aspirin, ibuprofen, naproxen, and many other medications that are commonly used to treat arthritis. If you are taking any type of blood thinning medication you should let your doctor know. You will most likely need to have this medication regulated or temporarily discontinued prior to the injection. Your doctor will need to determine if it is safe to discontinue these medications in order to have the injection.

You may need to arrange to have transportation both to and from the location where you will undergo the injection. Wear loose fitting clothing that is easy to take off and put on. You may wish to take a shower the morning of the procedure, using a bactericidal soap to reduce chances of infection. Do not wear jewelry or any type of scented oils or lotions.

Procedure

What happens during the procedure?

When you are ready to have the injection, you will be taken into the procedure area and an IV will be started. The IV allows the nurse or doctor to give you any medications that may be needed during the procedure. The IV is for your safety because it allows a very rapid response if you have a problem during the procedure, such as an allergic reaction to any of the medications injected. If you are in pain or anxious, you may also be given medications through the IV for sedation during the procedure.

Piriformis Muscle Injections

Piriformis muscle injections are done with the help of fluoroscopic guidance. The fluoroscope is an x-ray machine that allows the doctor to actually see an x-ray image while doing the procedure. This allows the doctor to watch where the needle goes as it is inserted. This makes the injection much safer and much more accurate. Once the needle is in the right location, a small amount of radiographic dye is injected. Once the needle is in the right location, a small amount of radiographic dye is injected. This liquid dye shows up on the x-ray image and the doctor can watch where it goes. The medication used for the injection will go in the same place, so the doctor wants to make sure that the medication will go to the right place to do the most good. Once the correct position is confirmed, the medication is injected and the needle is removed.

You will then be taken out of the procedure room to the recovery area. You will remain in the recovery area until the nurse is sure that you are stable and do not have an allergic reaction to the medications. The anesthetic may cause some temporary numbness and weakness. You will be free to go when these symptoms have resolved.

Complications

What might go wrong?

There are several complications that may occur during or after the piriformis muscle injection. Injection procedures are safe and unlikely to result in a complication, but no procedure is 100% foolproof. This document doesn’t provide a complete list of the possible complications, but it does highlight some of the most common problems. Complications are uncommon, but you should know what to watch for if they occur.

Allergic Reaction

Like most procedures where medications are injected, there is always a risk of allergic reaction. The medications that are commonly injected include lidocaine, bupivicaine, radiographic dye, and cortisone. Allergic reactions can be as simple as developing hives or a rash. They can also be life threatening and restrict breathing. Most allergic reactions will happen immediately while you are in the procedure room so that help is available immediately. Most reactions are treated and cause no permanent harm. You should alert your doctor if you have known allergies to any of these medications.

Infection

Several types of infections are possible complications of piriformis injections. Any time a needle is inserted through the skin, there is a possibility of infection. Before any injection is done, the skin is cleansed with a disinfectant and the health care provider doing the injection uses what is called sterile technique. This means that the needle and the area where the needle is inserted remains untouched by anything that is not sterile. The provider may also use sterile gloves.

Infections can occur just underneath the skin, in a muscle, or in the deep tissues of the buttock. You should watch for signs of increasing redness, swelling, pain, and fever. Almost all infections will need to be treated with antibiotics. If an abscess forms, then a surgical procedure may be necessary to drain the pus in the abscess. Antibiotics will also be necessary to treat the infection.

Increased pain

Not all injections work as expected. Sometimes, injections cause more pain. This may be due to increased spasm in the muscles around the injection. The increased pain is usually temporary, lasting a few hours or a few days. Once the medication has a chance to work, the injection may actually perform as expected and reduce your pain. Increased pain that begins several days after the injection may be a sign of infection. You should alert your doctor if this occurs.

After Care

What happens after the procedure?

If everything goes as planned, you will be able to go home soon after the injection, probably within one hour. After most types of pain injections, you will probably not have any restrictions on activity or diet following the procedure.

When the pain injection is a diagnostic injection, your doctor will be interested in how much the pain is reduced while the anesthetic, or the numbing medication, is working. You may be given a pain diary to record what you feel for the next several hours. This is important for making decisions, so keep track of your pain.

Most doctors will arrange a follow-up appointment, or phone consult, within one or two weeks after the procedure to see how you are doing and what effect the procedure had on your symptoms.

And remember, injections are not usually a cure for your pain; they are only a part of your overall pain management plan. You will still need to continue working with the other recommendations from your pain management team.

Sacroiliac Joint Injections

A Patient’s Guide to Pain Management: Sacroiliac Joint Injections

Introduction

Sacroiliac (SI) joint injections are commonly used to determine what is causing back pain. SI joint injections are primarily diagnostic injections, meaning that they help your doctor determine the cause of your back pain. These injections eliminate pain temporarily by filling the SI joint with an anesthetic medication that numbs the joint, the ligaments, and joint capsule around the SI joint.

This guide will help you understand:

  • where the injection is given
  • what your doctor hopes to achieve
  • what you need to do to prepare
  • what you can expect from the injection
  • what might go wrong

Anatomy

What parts of the body are involved?

Sacroiliac Joint Injections

To perform a sacroiliac joint injection, your doctor inserts a needle into the sacroiliac joint. The sacroiliac (also called the SI) joint connects the sacrum and the iliac bone. You can see these joints from the outside as two small dimples on each side of the lower back at the belt line. The sacrum is a triangular-shaped bone formed by the fusion of several vertebrae during development. It sits at the lower end of the spine, just below the lumbar spine.

The SI joint is one of the larger joints in the body. The surface of the joint is wavy and fits together similar to the way two gears fit together. Very little motion occurs in the SI joint. The motion that does occur is a combination of sliding, tilting and rotation. The most the joint moves in sliding is probably only a couple of millimeters, and it may tilt and rotate two or three degrees.

Sacroiliac Joint Injections

The SI joint is held together by several large, very strong ligaments. The strongest ligaments are in the back of the joint outside of the pelvis. Because the pelvis is a ring, these ligaments work somewhat like the hoops that hold a barrel together. The SI joint hardly moves in adults. It appears that the primary function of the joint is to be a shock absorber and to provide just enough motion and flexibility to lessen the stress on the pelvis and spine.

During the end of pregnancy as delivery nears, the hormones that are produced cause the joint to relax. This allows the pelvis to be more flexible so that birth can occur more easily. Multiple pregnancies seem to increase the amount of arthritis that forms in the joint later in life. Other than the role the joint plays in pregnancy, it does not appear that motion is important to the function of the joint. The older one gets, the more likely that the joint is completely immobile, or ankylosed. Ankylosis is a term that means a joint has become completely stiffened with no movement at all.

Related Document: A Patient’s Guide to Lumbar Spine Anatomy

Rationale

What does my physician hope to achieve?

Sacroiliac Joint Injections

Your doctor is recommending a SI joint injection to try and determine if one, or both, SI joints are the cause of your back pain. This type of injection is primarily a diagnostic injection. The injection may only help your pain temporarily, sometimes just for a few hours. Once your doctor is sure that it is the SI joint causing your pain, other procedures may be recommended to reduce your pain for a longer period of time.

During a SI joint injection, the medications that are normally injected include a local anesthetic and cortisone. The anesthetic medication, such as lidocaine or bupivicaine, is the same medication used to numb an area when you are having dental work or having a laceration sutured. The medication causes temporary numbness lasting one hour to six hours, depending on which type of anesthetic is used.

Cortisone is an extremely powerful anti-inflammatory medication. When this medication is injected into a painful, inflamed joint, it can reduce the inflammation and swelling. Reducing the inflammation reduces pain. If cortisone is also injected into the joint, you may get several weeks’ worth of relief from your pain. This can allow you to get started in a physical therapy program, strengthen the muscles, and begin normal movement again. When the cortisone wears off, the pain may not return.

Related Document: A Patient’s Guide to Sacroiliac Joint Dysfunction

Preparations

How will I prepare for the procedure?

To prepare for the procedure your doctor may tell you to remain “NPO” for a certain amount of time before the procedure. This means that you should not eat or drink anything for the specified amount of time before your procedure. This means no water, no coffee, no tea – not anything. You may receive special instructions to take your usual medications with a small amount of water. Check with your doctor if you are unsure what to do.

You may be instructed to discontinue certain medications that affect the clotting of your blood several days before the injection. This reduces the risk of excessive bleeding during and after the injection. These medications may include the common Non-Steroidal Anti-Inflammatory Drugs (NSAIDs) such as aspirin, ibuprofen, naproxen and many other medications that are commonly used to treat arthritis. If you are taking any type of blood thinning medication you should let your doctor know. You will most likely need to have this medication regulated or temporarily discontinued prior to the injection. Your doctor will need to determine if it is safe to discontinue these medications in order to have the injection.

You may need to arrange to have transportation both to and from the location where you will undergo the injection. Wear loose fitting clothing that is easy to take off and put on. You may wish to take a shower the morning of the procedure, using a bactericidal soap to reduce chances of infection. Do not wear jewelry or any type of scented oils or lotions.

Procedure

What happens during the procedure?

When you are ready to have the injection, you will be taken into the procedure area and an IV will be started. The IV allows the nurse or doctor to give you any medications that may be needed during the procedure. The IV is for your safety because it allows a very rapid response if you have a problem during the procedure, such as an allergic reaction to any of the medications injected. If you are in pain or anxious, you may also be given medications through the IV for sedation during the procedure.

Sacroiliac Joint Injections

SI joint injections are done with the help of fluoroscopic guidance. The fluoroscope is an x-ray machine that allows the doctor to actually see an x-ray image while doing the procedure. This allows the doctor to watch where the needle goes as it is inserted. This makes the injection much safer and much more accurate. Once the needle is in the right location, a small amount of radiographic dye is injected. Once the needle is in the right location, a small amount of radiographic dye is injected. This liquid dye shows up on the x-ray image and the doctor can watch where it goes. The medication used for the injection will go in the same place, so the doctor wants to make sure that the medication will go to the right place to do the most good. Once the correct position is confirmed, the medication is injected and the needle is removed.

You will then be taken out of the procedure room to the recovery area. You will remain in the recovery area until the nurse is sure that you are stable and do not have any allergic reaction to the medications. The anesthetic may cause some temporary numbness and weakness. You will be free to go when these symptoms have resolved.

Complications

What might go wrong?

There are several complications that may occur during or after the SI joint injection. Injection procedures are safe and unlikely to result in a complication, but no procedure is 100% foolproof. This document doesn’t provide a complete list of the possible complications, but it does highlight some of the most common problems. Complications are uncommon, but you should know what to watch for if they occur.

Allergic Reaction

Like most procedures where medications are injected, there is always a risk of allergic reaction. The medications that are commonly injected include lidocaine, bupivicaine, radiographic dye, and cortisone. Allergic reactions can be as simple as developing hives or a rash. They can also be life threatening and restrict breathing. Most allergic reactions will happen immediately while you are in the procedure room so that help is available immediately. Most reactions are treated and cause no permanent harm. You should alert your doctor if you have known allergies to any of these medications.

Infection

Several types of infections are possible complications of SI joint injections. Any time a needle is inserted through the skin, there is a possibility of infection. Before any injection is done, the skin is cleansed with a disinfectant and the health care provider doing the injection uses what is called a sterile technique. This means that the needle and the area where the needle is inserted remains untouched by anything that is not sterile. The provider may also use sterile gloves.

Infections can occur just underneath the skin, in a muscle, or in the sacroiliac joint. You should watch for signs of increasing redness, swelling, pain, and fever. Almost all infections will need to be treated with antibiotics. If an abscess forms, then a surgical procedure may be necessary to drain the pus in the abscess. Antibiotics will also be necessary to treat the infection.

Increased Pain

Not all injections work as expected. Sometimes, injections cause more pain. This may be due to increased spasm in the muscles around the injection site. The increased pain is usually temporary, lasting a few hours or a few days. Once the medication has a chance to work, the injection may actually perform as expected and reduce your pain. Increased pain that begins several days after the injection may be a sign of infection. You should alert your doctor if this occurs.

After Care

What happens after the procedure?

If everything goes as planned, you will be able to go home soon after the injection, probably within one hour. There are no restrictions on diet or activity after the injection. You can return to physical therapy or chiropractic care as soon as you like.

Your doctor will be interested in how much the pain is reduced while the anesthetic (numbing medication) is working. You may be given a pain diary to record what you feel for the next several hours. This is important for making decisions, so keep track of your pain.

Most doctors will arrange a follow-up appointment, or phone consult, within one or two weeks after the procedure to see how you are doing and what affect the procedure had on your symptoms.

And remember, a sacroiliac joint injection is not a cure for your pain – it is only a part of your overall pain management plan. You will still need to continue working with the other recommendations from your pain management team.

Facet Joint Injections

A Patient’s Guide to Pain Management: Facet Joint Injections

Introduction

Injections are commonly used by pain specialists, both to help diagnose the painful condition and to help treat the painful condition.

Facet joint injections are commonly used to determine what is causing back pain. Facet joint injections are primarily diagnostic injections, meaning that they help your doctor determine the cause of your back pain but may not provide you with any long-term relief from the pain. These injections eliminate pain temporarily by filling the facet joint with an anesthetic medication that numbs the facet joint, the ligaments, and joint capsule around the facet joint. If the facet joint is injected and your pain goes away for several hours, then it is very likely that the joint is causing your pain. Once you and your doctor know what structure is causing your pain, you can begin to explore options for treating the condition.

This guide will help you understand:

  • where the injection is given
  • what your doctor hopes to achieve
  • what you need to do to prepare
  • what you can expect from the injection
  • what might go wrong

Anatomy

What parts of the body are involved?

Facet Joint Injections

To perform a facet joint injection, your doctor inserts a needle into the facet joint so that the tip of the needle is inside the joint.

A facet joint is a small, bony knob that extends out from the vertebral body. Where these knobs meet, they form a joint that connects the two vertebrae. The surface of the facet joints are covered by articular cartilage. Articular cartilage is a smooth, rubbery material that covers the surface of all synovial joints. It allows the bone ends to move against each other smoothly without friction.

Facet Joint Injections

Each joint is surrounded by a joint capsule. The joint capsule is made up of the ligaments and connective tissues that help hold the joint together. The joint capsule forms a water tight sac that contains the joint fluid. The facet joints allow freedom of movement as you bend forward and back.

There are two facet joints between each vertebrae of the spine. The facet joints are located on the back of the spinal column in the lumbar and thoracic spine. In the neck, or cervical spine, they are located on the each side of the vertebra.

Like all joints, the facet joint can wear out – or degenerate. This condition is sometimes called degenerative arthritis or osteoarthritis. When this occurs in the facet joints it can cause back pain. In addition to back pain, the pain may radiate into the buttock and back of the thigh.

Facet Joint Injections

Related Document: A Patient’s Guide to Lumbar Spine Anatomy

Rationale

What does my physician hope to achieve?

Facet Joint Injections

Your doctor is recommending a facet joint injection to try and determine if the joints are the cause of your back pain. This type of injection is primarily a diagnostic injection. The injection may only reduce your pain temporarily, maybe only for a few hours. Once your doctor is sure that it is the facet joint causing your pain, other procedures may be recommended to reduce your pain for a longer period of time.

Facet Joint Injections

During a facet joint injection, the medications that are normally injected include a local anesthetic and cortisone. The anesthetic medication, such as lidocaine or bupivicaine, is the same medication used to numb an area when you are having dental work or having a laceration sutured. The medication causes temporary numbness lasting one hour to six hours, depending on which type of anesthetic is used.

Facet Joint Injections

Cortisone is an extremely powerful anti-inflammatory medication. When this medication is injected into a painful, inflamed joint, it can reduce the inflammation and swelling. Reducing the inflammation reduces pain. If cortisone is also injected into the joint at the same time, you may get several weeks of relief from your pain. This can allow you to get started in a physical therapy program, strengthen the muscles, and begin normal movement again. When the cortisone wears off, the pain may not return.

Related Document: A Patient’s Guide to Facet Joint Arthritis

Preparations

How will I prepare for the procedure?

To prepare for the procedure your doctor may tell you to remain “NPO” for a certain amount of time before the procedure. This means that you should not eat or drink anything for the specified amount of time before your procedure. This means no water, no coffee, no tea – not anything. You may receive special instructions to take your usual medications with a small amount of water. Check with your doctor if you are unsure what to do.

You may be instructed to discontinue certain medications that affect the clotting of your blood several days before the injection. This reduces the risk of excessive bleeding during and after the injection. These medications may include the common Non-Steroidal Anti-Inflammatory Drugs (NSAIDs) such as aspirin, ibuprofen, naproxen, and many other medications that are commonly used to treat arthritis. If you are taking any type of blood thinning medication you should let your doctor know. You will most likely need to have this medication regulated or temporarily discontinued prior to the injection. Your doctor will need to determine if it is safe to discontinue these medications in order to have the injection.

You may need to arrange to have transportation both to and from the location where you will undergo the injection. Wear loose fitting clothing that is easy to take off and put on. You may wish to take a shower the morning of the procedure, using a bactericidal soap to reduce chances of infection. Do not wear jewelry or any type of scented oils or lotions.

Procedure

What happens during the procedure?

When you are ready to have the injection, you will be taken into the procedure area and an IV will be started. The IV allows the nurse or doctor to give you any medications that may be needed during the procedure. The IV is for your safety because it allows very rapid response if you have a problem during the procedure, such as an allergic reaction to any of the medications injected. If you are in pain or anxious, you may also be given medications through the IV for sedation during the procedure.

Facet Joint Injections

Most injection procedures today are done with the help of fluoroscopic guidance. The fluoroscope is an x-ray machine that allows the doctor to actually see an x-ray image while doing the procedure. This allows the doctor to watch where the needle goes as it is inserted. This makes the injection much safer and much more accurate. Once the needle is in the right location, a small amount of radiographic dye is injected. This liquid dye shows up on the x-ray image and the doctor can watch where it goes. The medication used for the injection will go in the same place, so the doctor wants to make sure that the medication will go to the right place to do the most good. Once the correct position is confirmed, the medication is injected and the needle is removed.

You will then be taken out of the procedure room to the recovery area. You will remain in the recovery area until the nurse is sure that you are stable and do not have any allergic reaction to the medications. The anesthetic may cause some temporary numbness and weakness. You will be free to go when these symptoms have resolved.

Complications

What might go wrong?

There are several complications that may occur during or after the facet joint injection. Injection procedures are safe and unlikely to result in a complication, but no procedure is 100% foolproof. This document doesn’t provide a complete list of the possible complications, but it does highlight some of the most common problems. Complications are uncommon, but you should know what to watch for if they occur.

Allergic Reaction

Like most procedures where medications are injected, there is always a risk of allergic reaction. The medications that are commonly injected include lidocaine, bupivicaine, radiographic dye, and cortisone. Allergic reactions can be as simple as developing hives or a rash. They can also be life threatening and restrict breathing. Most allergic reactions will happen immediately while you are in the procedure room so that help is available immediately. Most reactions are treated and cause no permanent harm. You should alert your doctor if you have known allergies to any of these medications.

Infection

Several types of infections are possible complications of facet joint injections. Any time a needle is inserted through the skin, there is a possibility of infection. Before any injection is done, the skin is cleansed with a disinfectant and the health care provider doing the injection uses what is called sterile technique. This means that the needle and the area where the needle is inserted remains untouched by anything that is not sterile. The provider may also use sterile gloves.

Infections can occur just underneath the skin, in a muscle, or in the facet joint. You should watch for signs of increasing redness, swelling, pain, and fever. Almost all infections will need to be treated with antibiotics. If an abscess forms, then a surgical procedure may be necessary to drain the pus in the abscess. Antibiotics will also be necessary to treat the infection.

Nerve Damage

Many pain injections are done close to nerves. The facet joint injection is one of the safest spinal injections because the needle is usually not near the spinal nerves, but the needle used to do the injection may accidentally hit a nerve. This can cause damage to the nerve and result in increased pain. Numbness and weakness may also result. Nerves that have been punctured with a needle will usually recover and do not require any additional surgical procedures.

Increased Pain

Not all injections work as expected. Sometimes, injections cause more pain. This may be due to increased spasm in the muscles around the injection. The increased pain is usually temporary, lasting a few hours or a few days. Once the medication has a chance to work, the injection may actually perform as expected and reduce your pain. Increased pain that begins several days after the injection may be a sign of infection. You should alert your doctor if this occurs.

After Care

What happens after the procedure?

You will be able to go home soon after the procedure, probably within one hour. If all went as planned, you probably won’t have any restrictions on activity or diet.

Most doctors will arrange a follow-up appointment, or phone consult, within one or two weeks after the injection to see how you are doing and what effect the procedure had on your symptoms. Your doctor will be interested in how much the pain is reduced while the anesthetic (numbing medication) is working. You may be given a pain diary to record what you feel for the next several hours. This is important for making decisions, so keep track of your pain.

One question that always comes up is: How many injections are safe to have? There is no definite answer to that question. Most doctors would recommend that you limit the number of injections to three to five per year. The reason for this limit has to do with how much cortisone is safe to put in your body. Cortisone has bad side effects when you take the medication often, either as a pill or as an injection. These side effects are why doctors do not like to do these injections more often than necessary.

And remember, these injections are not a cure for your pain; they are only a part of your overall pain management plan. You will still need to continue working with the other recommendations from your pain management team.

Developmental Dysplasia of the Hip in Children

A Patient’s Guide to Developmental Dysplasia of the Hip in Children

Introduction

Developmental dysplasia of the hip (DDH), previously known as congenital hip dysplasia is a common disorder affecting infants and young children. The change in name reflects the fact that DDH is a developmental process that occurs over time. It develops either in utero (in the uterus) or during the first year of life. It may or may not be present at birth.

In this condition there is a disruption in the normal relationship between the head of the femur and the acetabulum (hip socket). DDH can affect one or both hips. It can be mild to severe. In mild cases called unstable hip dysplasia the hip is in the joint but easily dislocated. More involved cases are partially dislocated or completely dislocated. A partial dislocation is called subluxation.

This guide will help you understand

  • what part of the hip is involved
  • what causes the condition
  • what treatment options are available

Anatomy

What part of the hip is affected?

Developmental Dysplasia

The hip joint is where the femur (thighbone) connects to the pelvis. The joint is made up of two parts. The upper end of the femur is shaped like a ball. It is called the femoral head. The femoral head fits into a socket in the pelvis called the acetabulum. This ball and socket joint is what allows us to move our leg in many directions in relation to the body.

Developmental Dysplasia

The right amount of pressure and contact between the surfaces of these two parts helps make sure the hip joint develops normally. Most of the acetabulum is cartilage at birth. The head of the femur inside the acetabulum helps shape the joint as it continues to form. In DDH the usual contact between the femoral head and the acetabulum is disrupted.

Developmental Dysplasia

An abnormal position of the femoral head can result in a dysplastic hip. Sometimes the acetabulum is too shallow or sloping rather than a normal cup shape. It cannot hold the femoral head in place.

If the problem is not diagnosed and treated early, the soft tissues around the hip start to stretch out. There can be changes in the blood supply to the hip. Sometimes the hip joint tries to form another hip socket called a false acetabulum. Without the proper ligaments, soft tissues, and joint capsule to hold the femoral head in place, the false acetabulum creates even more problems.

Causes

How does this problem develop?

There isn’t one single known cause of DDH. In some cases there is laxity or looseness of the ligaments around the joint. This may be hereditary. In other cases the infant’s position may affect how the hip joint forms, either during growth inside the mother or after birth.

For example, a breech position (buttocks first position) in utero limits movement. It also puts the hips in a position with the hips bent, knees straight, and legs together. This position puts abnormal stresses on the joint that do not foster normal development.

Hip position and free hip movement remain important during the first months after birth. This is when the hip continues to develop and forms a deep socket and stable joint. An infant carried on a parent’s hip with the child’s hips bent and open wide is less likely to develop DDH. Infants in some cultures are swaddled or wrapped with the legs together and extended out straight. For example, in some Native American cultures infants are carried on a papoose board. The infant is wrapped on the papoose board with the legs straight down and bound together. An infant that spends a good deal of time in this position is at greater risk for DDH. DDH is more common in Chinese, Korean, and African American infants.

DDH is much more common in girls than boys. This may be linked with hormonal differences. Estrogens and a hormone called relaxin present during development in utero and still present at the time of birth may cause generalized laxity or looseness of the ligaments. The left hip is affected more than the right hip. Again, this is probably linked with position before birth. The most common position in utero places the child’s left hip next to the mother’s spine and limits hip motion.

Children with developmental disabilities who do not move normally or who can’t stand up and walk are also at risk for DDH.

Symptoms

What does this problem feel like?

Developmental Dysplasia

The newborn, infant, or young child may not have any symptoms such as pain to signal a problem. There may be some differences in how the legs and buttocks look from side to side. Sometimes the problem isn’t noticed until the child starts to walk. If only one hip is affected, the child may walk with a limp. If DDH is present in both hips, the child may sway from side to side or waddle. When both hips are dislocated, it is sometimes very difficult to see an abnormality in the way the child walks.

Diagnosis

<How do doctors identify the problem?

Early diagnosis in the newborn and young infant is important to avoid major problems later. The physical examination performed by the pediatrician is the most important diagnostic tool. All newborns and infants should be screened as early as possible. Babies born breech or with a family history of DDH are of special concern.

Developmental Dysplasia

Special tests are performed by the doctor while the infant is still in the nursery, The doctor is trying to look for signs of an unstable hip. The two most reliable physical exam tests are Ortolani’s maneuver and Barlow’s test. These tests are designed to detect if the hip is sliding in and out of the acetabulum. To perform these tests, the doctor places the infant on a table in a supine position (on his or her back). The doctor then abducts the hips by moving the bent hips and knees apart. If the hip feels like it can be pushed out the back of the socket, this is considered abnormal. This is called a positive Barlow’s Test and is a sign of instability in the hip. As the hip is abducted further, the doctor might feel the ball portion (the femoral head) slide forward as it slips back into the socket. This is called a positive Ortolani Maneuver and is also a sign of hip instability. If either one of these tests are positive, the child will be watched closely or immediate treatment with a brace may be considered.

Developmental Dysplasia

For the infant three months or older, Galeazzi’s or Allis’ test can be performed. The child is placed in the supine position with the hips and knees bent and the feet flat. The examiner looks for any unevenness between the knees. If one knee is lower than the other, there may be a dislocated hip on the lower side.

Since DDH can develop over time, repeated exams are advised. Well-baby check-ups should include repeated hip examination. This is done until the child begins to walk normally with no sign of a limp or altered gait (walking) pattern. The doctor also looks for changes in hip range of motion, uneven skin folds around the thighs and buttocks, and a difference in leg length from side to side.

X-rays aren’t reliable in infants but may be of some diagnostic value in the older child. Ultrasound is more accurate in the first six months of life.

Treatment

What treatment options are available?

The goal of treatment is to keep the femoral head in good contact with the acetabulum. A stable hip encourages the development of a normally shaped socket and rounded head of the femur. The proper hip position must be maintained for enough time to stabilize the joint. The hip should be flexed to 95 degrees and abducted (apart) at least 90 degrees. This position keeps the ball (the femoral head) in the best position and allows the ligaments and joint capsule to tighten up.

Nonsurgical Treatment

Developmental Dysplasia

There are several ways to treat DDH depending on the child’s age and the severity of the condition. Double and triple diapering may be all that is needed in the first six weeks. If the problem persists, a special harness called the Pavlik harness can be used for three to nine months. The harness keeps the hip in flexion and abduction. It may be worn until the doctor can no longer move the hip in and out of the socket. In the older child, x-rays may be used to confirm that the hip is stable.

For children with developmental disabilities, a standing program may be required. Special standing boxes or equipment to hold them upright are used to give the hip the mechanical force it needs to develop normally.

Surgery

In the infant older than 6 months, the Pavlik harness may not work. The child may be too large to wear the harness or may be too active to keep the harness on all day. In this age group, a closed reduction under general anesthesia may be the best option. If the hip cannot be easily reduced, the child may be placed in traction to loosen the soft tissues around the hip. When the surgeon thinks it may be time to reduce the hip, the child is taken to the operating room and placed under general anesthesia. There the surgeon gently moves the hip and feels to see if the hip can be placed in the socket. Fluoroscopy is used to watch the bones of the pelvis and hip as they line up. Fluoroscopy is a type of x-ray where the surgeon can watch the x-ray picture on a TV screen.

Developmental Dysplasia

Once the hip can be put back in the socket easily, the child is put in a hip spica cast from waist to toe. This cast holds both legs so that the hip joint remains in one position – in the socket while the soft tissues around the hip tighten to hold the hip reduced. The cast may be needed for several months to hold the hip in place. The cast usually is replaced every two weeks to one month while it is needed. Each time the cast is changed, the child is taken to the operating room and placed under general anesthesia. This treatment is called a closed reduction.

Surgery may be needed when the hip cannot be stabilized and kept in the socket. Surgery is more likely required in the child older than 18 months. Before the surgery, the child may be placed in traction to loosen the soft tissues around the hip. Then the child is put in a full hip spica cast from waist to toe. The cast may be needed for several months to hold the hip in place. An open reduction is a surgical procedure used most often in children two years old or older when hip dysplasia has not been corrected. During this operation, the surgeon removes any abnormal tissues that are keeping the femoral head from fitting inside the acetabulum and cuts any tight ligaments in the joint capsule around the hip joint. The surgeon may perform a tenotomy during the surgery to cut the tightly contracted tendons or muscles in the hip area. This relaxes the tight structures around the hip joint and allows the hip to be placed in the socket. These tissues grow back with scar tissue as the child heals. The child is usually placed in a spica cast after this type of surgery and will need to wear this cast for several months.

An operation called derotational osteotomy may be needed. In this surgical procedure, the femur is cut and rotated to make it easier to keep the femoral head inside the acetabulum. When this procedure is done, the soft tissues loosen up and the forces of the muscles tend to keep the femoral head reduced. Once again, the child is put in a spica cast for several months while the bone heals. A CT scan may be used to confirm successful reduction before removing the cast. A CT scan is a special type of x-ray that takes slices of the body. This allows a much better picture of the hip and acetabulum than plain x-rays.

Developmental Dysplasia

In children older than 18 months, the problem may require additional surgery to change the acetabulum (socket) in addition to the femur (thighbone). The problem has been present longer and the anatomy has grown more distorted over the longer period of time. Your doctor may recommend surgery to change the way that the acetablum is aligned in this situation. There are many different types of pelvic osteotomies that have been designed and are still used.

Several different types of osteotomies are used to tilt the acetabulum in a more horizontal angle to the floor. By doing this, the femoral head is less likely to slide up and out of the socket with weightbearing. These include the Steele, the Salter and the Pemberton osteotomies.

Developmental Dysplasia

In the Chiari osteotomy, the bone of the pelvis just above the acetabulum is cut to allow the bone to slide out and form a new roof over the hip joint. This can stop the femoral head from sliding up and out of the socket. Over time this shelf of bone above the acetabulum remodels and forms a deeper acetabulum.

Developmental Dysplasia

The Staheli osteotomy uses a bone graft placed just above the hip joint to create a new, wider roof, or shelf over the acetabulum. This keeps the femoral head from sliding up and out of the socket and, as it heals, makes a larger weightbearing surface to spread out the weight that needs to be transferred from the femoral head to the acetabulum and pelvis. The Dial osteotomy is not as common. In this procedure, the entire acetabulum is cut free of the pelvis and moved or dialed at the best angle and then allowed to heal in that position.

Young children have incredible powers of healing. Because the skeleton is still forming, many of the changes created at surgery will remodel dramatically and create a hip socket that will serve the child well into adulthood with minimal problems. All children that require surgery to address a dysplastic hip have a higher risk of developing wear and tear arthritis of the hip as they age into adulthood. Many will age well into their 40s and 50s before experiencing significant problems with the hip. Some may never have any additional problems.

Rehabilitation

What should I expect after treatment?

Nonsurgical Rehabilitation

The child in a Pavlik harness benefits from as much motion in the hip as possible – while still keeping the hip reduced. Motion allows for nutrition of the developing bone and cartilage inside the hip joint. The therapist will review positions to avoid such as sidelying with the top leg down toward the other leg past the midline. The harness must be used continuously until the hip is stable. Use may be gradually decreased to just nighttime wear before finally stopping.

For the infant in a harness, care must be taken not to set the harness in too much abduction. Abduction is the motion when the thighs are pulled away from one another. The Pavlik harness is designed to hold the legs bent at 95 degrees at the hip and abducted, or pulled apart, about 45 degrees each. The harness can be tightened too much, pulling the legs apart too much. Too much force into abduction can block the blood supply to the femoral head causing a condition called avascular necrosis. This is a serious complication that can prolong the treatment of the hip and may lead to other problems. Your surgeon or physical therapist should instruct you on how to correctly adjust the Pavlik harness. Make sure you understand how to do this properly. Ask questions if you do not feel you understand.

After Surgery

The child who has surgery will not be able to walk afterwards because of the spica cast. A special hole is cut open to allow the older child to go to the bathroom. Younger children remain in diapers. Your physical therapist will help the family with any special equipment needed for daily tasks and transportation. Special tips for positioning and handling will be reviewed as well.

Special care must be taken not to get the cast wet with water or urine. The cast may be removed and replaced only if the child grows and there are signs that the cast is too small or if there is evidence of skin breakdown. The child should be checked several times each day for changes in skin color or sensation. Leg or foot pain, cool or numb toes, or loss of motion in the feet must be reported to the physician right away.

Physical and occupational therapy is important during the postoperative period in the cast. Opportunities to move and develop gross motor skills are limited. The therapist will closely monitor overall gross and fine motor skills normally occurring during this time.

Septic Arthritis of the Hip in Children

A Patient’s Guide to Septic Arthritis of the Hip in Children

Introduction

Septic arthritis of the hip in children is a painful joint condition caused by a bacterial infection. Septic arthritis of the hip can occur at any age from newborn to older child. The infection is caused by different bacteria at different ages, but the disease behaves the same. About half of all cases occur in children younger than three years old.

In most cases the condition is monoarticular, meaning it only affects one joint. The knee is most often involved, followed by the hip then ankle. If untreated, disastrous results can occur, especially in the hip.

This guide will help you understand

  • what part of the hip is involved
  • what causes the condition
  • what treatment options are available

    Anatomy

    What part of the hip is affected?

    Septic Arthritis of the Hip

    The hip joint is where the femur (thighbone) connects to the pelvis. The joint is made up of two parts. The upper end of the femur is shaped like a ball. It is called the femoral head. The femoral head fits into a socket in the pelvis called the acetabulum. This ball and socket joint is what allows us to move our leg in many directions in relation to the body.

    Causes

    What causes this condition?

    Infections are a part of growing up. Young children commonly get many different types of bacterial infections, such as sore throats, skin infections and wound infections from scrapes and cuts. As we are exposed to these infections, our immune system develops better protection from these infections. When a bacterial infection occurs anywhere in the body, bacteria from the infected area can enter the bloodstream. These bacteria are then transported all over the body. Usually our immune system kills these bacteria quickly, before they have an opportunity to begin to reproduce and cause another infected area. Because young children have not completely developed their immune system, their bodies are not quite as good at rapidly destroying the bacteria.

    Septic Arthritis of the Hip

    Sometimes, these bacteria in the bloodstream move into the hip joint. If they are not destroyed quickly, they can set up an infection. Blood containing bacteria moves from the bone across the synovial membrane into the joint. The synovium is a protective layer of fluid around the joint. Bacteria can also move into the joint cavity indirectly by moving from the growth plate at the end of the femur (thighbone) into the joint.

    Septic Arthritis of the Hip

    It’s not always clear what causes septic arthritis to get started. In some cases an injury seems to lead to a joint becoming infected. In other cases, the child may have other medical problems that create an altered immune system and reduce the ability of the body to fight off an infection. Either one of these problems can increase the risk of infection.

    Low-birth weight babies are at risk for infection from the commonly present bacteria Streptococcus also known as strep. Invasive procedures such as fetal monitoring through the scalp or drawing blood from the heel can also introduce the bacteria into the bloodstream. Once bacteria are in the bloodstream, they can settle in the hip joint and create an infection.

    Infection from Staphylococcus (staph infection) can occur just from being in the hospital setting. These bacteria are very common in the hospital, where many patients undergoing treatment have active infections. The chance of exposure is much greater while the child is in the hospital rather than at home. Both strep and staph infections affect children from birth to three months and children older than two or three years old most often.

    There are many other different bacteria and underlying infections besides the two named here. In each case the infection behaves a little differently and is more common in a slightly different age group.

    Bacteria that can cause meningitis can also cause septic arthritis of the hip. The bacteria enter through the nose and throat, then quickly enter the bloodstream and travel to distant joints.

    Symptoms

    What does this condition feel like?

    Some children with septic hip arthritis have no apparent symptoms at first. The most common symptoms are sudden fever, hip pain and a limp. The young child will commonly refuse to put weight on the affected leg. The child who can walk may limp. Infants may be irritable and refuse to eat.

    Pain or tenderness is usually in the front of the hip and may travel down to the knee. The skin may be warm and red over the area of tenderness. Both are signs of inflammation from the infection in the joint.

    Hip extension or straightening the hip back and rotating it inward increase the painful symptoms. The child prefers to lie on his or her back with the hip flexed (bent) and externally rotated (rotated outward). This position takes the pressure off the joint.

    Diagnosis

    How do doctors identify this condition?

    Early diagnosis is important. The infection in the hip joint can damage the joint and the sooner treatment is started the better. The history and physical examination are usually enough to make your doctor highly suspicious of septic hip arthritis. Blood tests help confirm the diagnosis. A high erythrocyte sedimentation rate (ESR) or “sed rate” and a white blood count greater than 12,000 are red flags to suggest inflammation or infection. Sudden onset of symptoms with fever and positive blood tests all point to septic arthritis.

    Septic Arthritis of the Hip

    It may be necessary to remove a small amount of synovial fluid from the hip joint for laboratory analysis. Because the hip joint is deep in the pelvis, ultrasound or fluoroscope is sometimes used to help the physician locate the joint cavity and guide the needle into the joint. This procedure is called arthrocentesis. Some type of sedation is usually required for the procedure as well. Once the fluid is removed from the hip, it is sent to the laboratory where it will be analyzed for signs of infection. If the initial tests are suspicious for infection, the fluid will also be cultured to determine the type of organism that is causing the infection.

    Treatment

    What can be done to relieve the symptoms?

    Nonsurgical Treatment

    Antibiotic therapy is the first step in treatment. The type of antibiotic given depends on which bacteria are present. Results are best if antibiotics are started as soon as possible after the diagnosis of a joint infection. First, medication is given intravenously (directly into blood stream) for about seven days and then orally (pills taken by mouth) for another two or three weeks.

    Surgery

    Surgery is usually required to drain the joint of all infected material. The joint is thoroughly rinsed with a saline solution. The goal is to remove any products of inflammation and reduce the number of bacteria present. Both actions give the antibiotics a better chance of working quickly. A drain may be placed in the joint for 24 to 48 hours to clear any fluid that has leaked into the nearby tissues.

    The surgeon may have to drill into the bone if there is any sign of bone infection. This procedure helps bring increased blood flow to the area to clean away bacteria, infection, and dead tissue.

    Rehabilitation

    What should I expect after treatment?

    Nonsurgical Treatment

    The child should respond to the antibiotics with decreased fever and increased energy and appetite. Hip range-of-motion will return to normal and the child will be able to put weight on the hip (leg) again. Children who can walk will gradually resume normal activities. Infants and babies will also start holding the head up, eating, and moving freely on the floor again.

    After Surgery

    Bed rest is advised for the first 24 hours to allow time for inflammation of the synovial fluid to resolve. The physical therapist will perform and teach family members how to do passive range-of-motion (motion performed by others) for the entire leg. Movement is very important to prevent other joint problems from developing.

    More surgery may be needed later if the hip loses too much motion or develops deformity and/or dislocation. Release of tendons and muscles, bone grafts, or reconstruction surgery may be needed.

    Long-term follow-up is very important for any child who has had septic arthritis. This is true even for those children who have had early diagnosis, early treatment, and a good result. Changes can occur later in the hip with degeneration of the joint leading to treatment failure.

Spondyloarthropathies

A Patient’s Guide to Spondyloarthropathies

Introduction

Spondyloarthropathies

There are many different types of rheumatological diseases that affect the spine. A rheumatological disease is a problem that affects the entire body as a whole – such as the relatively well known rheumatoid arthritis. When a rheumatological disease affects the spine, the resulting conditon is called a spondyloarthropathy. The term is made up of Greek words: “Spondylo” means “vertebra,” “arthro” means “joint” and “pathos” means “disease.”

The most common diseases in the spondyloarthropathies include:

  • Ankylosing Spondylitis (AS)
  • Psoriatic Arthritis (PsA)
  • Reactive Arthritis (ReA)
  • Enteropathic Arthritis (EA)
  • Rheumatoid Arthritis (RA)

This guide will help you understand

  • which parts of the spine are affected
  • what causes these diseases
  • what the most common symptoms are
  • what tests your doctor may recommend
  • what treatment options are available

Anatomy

What parts of the spine are involved?

This group of diseases cause damage by creating inflammation that attacks the connective tissues of the body. In most cases, the cause of these diseases is unknown. There is increasing evidence that the underlying cause may be a combination of genetics and infection. A person born with certain genes may react differently to certain types of infections. Once that person is exposed to certain infections, the body responds by defending itself. The way the body defends itself against infection is through an inflammatory response. This is normal. What is not normal is that long after the infection
is gone, the inflammation continues. This chronic inflammation causes damage to many of the connective tissue structures in the body and leads to the symptoms.

There are several rheumatological diseases that can affect the spine. The rheumatological diseases that affect the spine primarily affect the connective tissues. One of the most common rheumatological diseases is rheumatoid arthritis (RA). RA primarily attacks the synovial joints.

Spondyloarthropathies

Most of the joints in the body are synovial joints – such as the knee, hip and shoulder. A synovial joint is where two bones come together to form a connection that needs to be flexible – the two bones need to move against one another. The ends of the bones are covered with articular cartilage. Articular cartilage is a white, shiny material that is very slippery. It provides shock absorption and allows the bones to glide against one another easily. The synovial joint is completely enclosed by a joint capsule made up of tough connective tissue on the outside and a thin layer of tissue on the inside called the synovial lining. The joint is water tight. Inside the joint there is a small amount of fluid called synovial fluid. Articular cartilage does not have any blood vessels. The synovial fluid brings nutrients to the articular cartilage as it lubricates the joint.

Spondyloarthropathies

In RA, the synovial lining of the joint is affected. The normally thin tissue of the synovial lining becomes inflamed and thickened. This material begins to produce inflammatory chemicals that damage the articular cartilage and bone underneath. The joint is slowly destroyed until bone rubs against bone. There are synovial joints between each vertebra in the spine and between the skull and the first cervical vertebra. It is easy to see why RA affects the spine.

Spondyloarthropathies

In some rheumatological diseases, the inflammatory process affects other connective tissue structures. One structure that is commonly affected is where ligaments and tendons attach to the bone. This area is called an enthesis. There are entheses located all over the body – wherever tendons and ligaments need to attach to bone. There are also many entheses in the spine itself, such as where the intervertebral disc attaches to the vertebra. Many of the rheumatological diseases that affect the spine seem to attack these areas of the spine. It is unclear why this occurs.

Related Document: A Patient’s Guide to Lumbar Spine Anatomy

Causes

What causes this problem?

The cause, or causes, of all of these rheumatological diseases is still unknown. There is increasing evidence that the underlying cause in many of these conditions is a combination of a person’s genetic makeup and how that person responds to certain types of infections.

For many years, doctors have been aware that people with these diseases have a higher percentage of a gene called HLA-B27. The HLA-B27 gene plays a role in determining how the cells of the body react against infection. Not everyone with this gene will develop a rheumatological disease, but the vast majority of people with any of the diseases have the gene. Recently, more research has shown that there are a number of variations of the HLA-B27 gene. This further complicates a very complex situation in trying to understand what role genetics plays in the cause of these diseases.

There are also a number of different infections that have been found to be related to the development of the rheumatological diseases. When patients with these diseases are studied, there seems to be certain bacterial infections that are more likely to precede the development of the rheumatological disease. The infection may be over, but the body continues to mount an inflammatory response that instead attacks the connective tissue
structures of the body itself.

The current evidence suggests that people with certain genes are more likely to react to certain types of infections by developing a rheumatological disease.

Related Document: A Patient’s Guide to Rheumatoid Arthritis

Symptoms

What does the condition feel like?

Most of these diseases cause pain and stiffness as the primary symptoms affecting the spine. The pain and stiffness is worse in the morning and improves with activity. The flexibility of the spine decreases as time passes and the disease progresses.

Spondyloarthropathies

In diseases that affect the synovial joints, destruction of the joints can result in instability of the spine and may cause pressure on the spinal nerves or spinal cord. In the diseases that affect the entheses, the spine more commonly develops large bone spurs and may fuse together and become stiff. Instability occurs if the stiff spine is fractured.

Because these diseases are systemic, meaning that they affect the entire body, the symptoms also affect the entire body. The symptoms include pain in areas that are affected, such as the other synovial joints, and the other entheses of the body.

Besides back pain, sacroiliac, hip, and shoulder pain are also common. The exact location of symptoms depends on the type of spondyloarthropathy (SpA) present. Some of the diseases may include a skin rash, such as psoriasis. Several of the spondyloarthropathies affect the eyes, causing uveitis (inflammation of the iris). Inflammation of the urethra (the tube from the bladder to the outside) can cause pain when urinating, called urethritis. Ankylosing Spondylitis (AS) can also affect the gut, aorta, or heart. All of the symptoms mentioned here are called extraskeletal manifestations. This means the symptoms affect some part of the body other than the tendons and bones.

Diagnosis

How do doctors diagnose the problem?

The diagnosis requires a careful history followed by a thorough physical examination. Many patients have someone directly related to them that suffers from the same disease. Your doctor may ask questions about symptoms of recent infections such as diarrhea, burning with urination, difficulty with vision and eye pain.

The laboratory evaluation is very useful in the diagnosis. Tests such as C-reactive protein (CRP) level and erythrocyte sedimentation rate (ESR) may be ordered to look for signs of infection and chronic inflammation other tests can be done for rheumatoid arthritis and the presence of the HLA-B27 gene. The HLA-B27 gene is not always present in patients with spondyloarthropathy. And it may be present in normal, healthy individuals without spondyloarthropathies.

Analysis of synovial fluid may be needed to rule out septic (infectious) arthritis. Additional tests may be ordered for patients with inflammatory bowel disease (IBD) or when reactive arthritis is suspected.

Spondyloarthropathies

X-rays can be very useful to show the changes in the spine, joints and pelvis that are common with many of these diseases. X-rays are usually the first test ordered before any of the more specialized tests. In the early stages the x-rays may be negative, but as time passes, the changes may appear and confirm the diagnosis.

Other radiological imaging tests may be useful. A bone scan can show the sites of inflammation before the changes appear on x-rays. A bone scan is a special test where radioactive tracers are injected into your blood stream. The tracers then show up on special x-rays of your back. The tracers build up in areas where bone is undergoing a rapid repair process, such as a healing fracture or the area surrounding an infection or tumor. Usually the bone scan is used to locate the problem. Other tests such as the computed tomography (CT) scan or magnetic resonance imaging (MRI) scan are then used to look at the area in detail.

Spondyloarthropathies

If there are symptoms suggesting the spinal nerves or spinal cord are in danger, an MRI scan may be recommended to look at the spine more closely. The MRI scan uses magnetic waves to create pictures of the lumbar spine in slices. The MRI scan shows the lumbar spine bones as well as the soft tissue structures such as the discs, joints and nerves. MRI scans are painless and don’t require needles or dye. Specialized MRI techniques are now available that can detect inflammatory changes in the sacroiliac and vertebral joints long before they appear on x-rays.

Treatment

What treatment options are available?

There is no cure for any of these diseases. The goal of treatment is to manage the pain and, when possible, to slow the progression of the damage to the underlying structures.

Remaining as active as possible is critical to maintaining your function. A physical therapy program can teach you how to maximize your function and retain as much flexibility as possible. Learn all you can about what you can do to control your symptoms and remain as healthy as possible.

If you smoke or use tobacco products, long-term outcomes are worse. You should quit as soon as possible. Your doctor can help you with this important step.

Spondyloarthropathies

Medications are the primary tools available for treatment. Non-steroidal anti-inflammatory drugs (NSAIDs) are the main drugs used for treatment of the pain associated with these diseases. These drugs include aspirin, ibuprofen, indomethacin and naprosyn. There are others in the group as well. These drugs reduce the inflammation and control pain. There is no evidence that they stop or slow the progression of the disease.

Cortisone can be used to control flare-ups of pain. Cortisone is a powerful anti-inflammatory medication. When used for short periods of time, the medication is safe and well tolerated. When used continuously over a period of months, the side effects can be significant. Your doctor will probably not want to use cortisone if possible. In some cases, such as with advanced rheumatoid arthritis it may become necessary to use cortisone indefinitely to control the disease.

There are newer medications that have been developed to control rheumatoid arthritis that are sometimes beneficial in the spondyloarthropathies. Some of these medications actually slow the progression of the damage from the disease. These medications are known as disease modifying anti-rheumatic drugs (DMARDs). DMARDs include gold injections, methotrexate, sulfasalazine and azothioprine. These medications may be used primarily to control the symptoms in other parts of the body, but may also improve the spinal disease as well.

Recently, new medications have been available that may prove to be very beneficial for these diseases. One of the chemicals that seems to make the inflammation worse in these diseases is tumor necrosis factor (TNF). Drugs that block the effect of this chemical are called tumor necrosis factor-a inhibitors. TNF-a inhibitors are used to treat a variety of inflammatory diseases. These have recently begun to be used to treat a variety of inflammatory diseases. These drugs have shown promise in helping control the inflammation and symptoms of the spondyloarthropathies as well. TNF-a inhibitors result in dramatic decreases in CRP levels and ESR improvements are also seen on MRIs.

Treatment with TNF-a inhibitors must be kept up over the long-term to stay in control of the disease. If one agent doesn’t work, your doctor may switch you to another. There are some serious side effects with these agents, so they aren’t used with everyone. We don’t know yet if these agents will prevent the bony changes that lead to spinal fusion. More study is needed to determine this.

Surgery is rarely indicated in the treatment of these diseases, except where the damage caused by the disease has caused pressure on the spinal nerves or spinal cord. Total joint replacement may be needed for patients with severe damage to the hip or knee. Some patients elect to have surgery to correct kyphosis (forward curve or humpback of the upper spine) or to correct spine instability from fracture.

Finally, learning as much as you can about how you can take care of yourself is an important part of managing these chronic diseases. Support groups are available online and in many cities where people can come together and help with information and support. There is nothing as valuable as getting advice and guidance from someone who has experience with the disease and can provide tips and pointers for living with the disease on a daily basis. It is always nice to know that you are not alone.

Injections for Pain

Pain Management: A Patient’s Guide to Injections for Pain

Introduction

Injections for Pain

Injections are commonly used by pain specialists, both to help diagnose the painful condition and to help treat the painful condition.

This guide will help you understand

  • the difference between diagnostic and therapeutic injections
  • what the common medications injected are intended to do
  • the risks and benefits of injections for pain

Rationale

What is the difference between diagnostic and therapeutic injections?

Injections used for pain management can be divided into two categories: diagnostic injections and therapeutic injections.

Diagnostic injections are intended to help your doctor determine what part of the body is causing the pain you are experiencing. The part that is causing the pain is sometimes referred to as the pain generator. Diagnostic injections are used by your doctor to determine the pain generator by a process of elimination. You should also understand that there may be more than one part that is painful. There may be several pain generators.

The process of finding the pain generator begins with a careful history and physical examination. This may lead to a differential diagnosis. The differential diagnosis is a list of all the possibilities that the physician can think of that best fit with the findings from the initial history and physical examination. Once the differential diagnosis list has been determined, the goal is to figure out which item on the list is actually causing your symptoms.

Injections for Pain

The next step may be to obtain x-rays, MRI scan, or CT scans. Each of these radiological tests gives your doctor information about the structure of your spine, bones and joints. These images may show abnormalities that may account for your pain. For example, a spine x-ray may show arthritis of the joints of the spine that could be causing the pain that you are experiencing. But, simply because the structural abnormality could be causing your pain does not mean that it is. Structural abnormalities are commonly seen on radiological tests. Many of these abnormalities are not necessarily causing pain.

Injections for Pain

The rationale behind diagnostic injections is simple: If a structural abnormality identified on the radiological tests is causing your pain, and if your doctor can inject that structure to temporarily numb that and only that specific structure and the pain stops temporarily, then it makes sense that this is what is actually causing your pain.

It is also likely that you may have several abnormalities visible on the radiological tests. It may be unclear which abnormality is the cause of your symptoms. For example, you may have several intervertebral discs that appear worn out on the MRI scan of your lumbar spine. It could be that all of the discs are causing your pain – or it could be that there is only one disc causing your pain. If you are considering surgery, you would want to be sure which disc is causing the pain so that you did not undergo any additional, unnecessary surgery.

Finally, your pain may actually be coming from somewhere else in your body altogether. For example, it is not uncommon for a patient to have a worn out hip joint and a worn out lower back. When a patient with this combination of problems has hip and thigh pain, it is not always obvious whether the pain is coming from the hip joint or being referred from the lower spine – or both.

By injecting the hip joint with medication to temporarily numb the hip joint and eliminate the pain that is coming only from the hip, the physician can determine what portion of the pain is coming from the hip joint – if any – and what pain is originating from the spine. This helps diagnose the problem accurately and prevent any unnecessary procedures.

Injections for Pain

Almost all diagnostic injections follow a similar strategy. First, determine what could be causing the pain. Next, inject the structure that is most likely the cause of the pain with a medication that should reduce or eliminate the pain temporarily. If the pain is eliminated, then the structure injected is almost surely the cause of the pain. It is the pain generator.

Injections for Pain

Unlike diagnostic injections, therapeutic injections are intended to treat your problem. Therapeutic injections are used when your doctor already has a very good idea what structure is the pain generator. This means that therapeutic injections should be expected to reduce, or eliminate, your symptoms for some period of time. Injections rarely eliminate pain permanently. But, some injections may last weeks to months.

Preparations

How do I prepare for this procedure?

To prepare for the procedure your doctor may tell you to remain “NPO” for a certain amount of time before the procedure. This means that you should not eat or drink anything for the specified amount of time before your procedure. This means no water, no coffee, no tea – not anything. You may receive special instructions to take your usual medications with a small amount of water. Check with your doctor if you are unsure what to do.

You may be instructed to discontinue certain medications that affect the clotting of your blood several days before the injection. This reduces the risk of excessive bleeding during and after the injection. These medications may include the common Non-Steroidal Anti-Inflammatory Drugs (NSAIDs) such as aspirin, ibuprofen, naproxen and many other medications that are commonly used to treat arthritis. If you are taking any type of blood thinning medication you should let your doctor know. You will most likely need to have this medication regulated or temporarily discontinued prior to the injection. Your doctor will need to determine if it is safe to discontinue these medications in order to have the injection.

You may need to arrange to have transportation both to and from the location where you will undergo the injection. Wear loose fitting clothing that is easy to take off and put on. You may wish to take a shower the morning of the procedure, using a bactericidal soap to reduce chances of infection. Do not wear jewelry or any type of scented oils or lotions.

Procedure

What happens during the procedure?

Injections are commonly performed in several different settings. Some simple injections may be done in the office. Other injections that require special equipment may be done in the operating room, the radiology department or a surgery center.

Injections for Pain

Many injections are done with the help of fluoroscopic guidance. The fluoroscope is an x-ray machine that allows the doctor to actually see an x-ray image while doing the procedure. This allows the doctor to watch where the needle goes as it is inserted. This makes the injection much safer and much more accurate. Once the needle is in the right location, a small amount of radiographic dye is injected. This liquid dye shows up on the x-ray image, and the doctor can watch where it goes. The medication used for the injection will go in the same place. The doctor wants to make sure the injection will put the medication where it can do the most good. Once the correct position is confirmed, the medication is injected, and the needle is removed.

The medications that are normally injected during a therapeutic pain injection include a local anesthetic and some type of cortisone, or steroid, medication. A local anesthetic medication, such as lidocaine or bupivicaine, is the same medication that is used numb the area when you are having dental work or having minor surgery, such as a laceration sutured. The medication causes temporary numbness lasting one hour to six hours, depending on which type of anesthetic is used.

Cortisone is an extremely powerful anti-inflammatory medication. When this medication is injected around inflamed, swollen nerves and connective tissues, it can reduce the inflammation and swelling. Decreasing inflammation reduces pain in joints. Reduced swelling can allow the nerves to function better, reducing numbness and weakness.

Complications

What might go wrong?

There are several complications that may occur during or after these injection procedures. Injections are safe and unlikely to result in a complication, but no procedure is 100% foolproof. This document doesn’t provide a complete list of the possible complications, but it does highlight some of the most common problems. Complications are uncommon, but you should know what to watch for if they occur.

Allergic Reaction

Like most procedures where medications are injected, there is always a risk of allergic reaction. The medications that are commonly injected include lidocaine, bupivicaine, radiographic dye, and cortisone. Allergic reactions can be as simple as developing hives or a rash. They can also be life threatening and restrict breathing. Most allergic reactions will happen immediately while you are in the procedure room, so that help is available immediately. Most reactions are treated effectively and cause no permanent harm. You should alert your doctor if you have known allergies to any of these medications.

Bleeding

Bleeding is rarely a problem after the injection, but can be serious if it occurs. An epidural hematoma occurs when one of the small blood vessels around the spinal sac continues to bleed after the procedure. The bleeding can cause a large pocket of blood to form around the nerves and cause too much pressure on the nerves. If this complication occurs, you will probably need a surgical procedure to drain the blood and remove the pressure from the nerves.

Infection

Several types of infections are possible complications of pain injections. Any time a needle is inserted through the skin, there is a possibility of infection. Before any injection is done the skin is cleansed with a disinfectant and the health care provider doing the injection uses what is called sterile technique. This means that the needle and the area where the needle is inserted remains untouched by anything that is not sterile. The provider may also use sterile gloves.

Infections may occur just underneath the skin, in a muscle, in a joint or in the spinal canal itself. You should watch for signs of increasing redness, swelling, pain, and fever. Almost all infections will need to be treated with antibiotics. If an abscess forms, then a surgical procedure may be necessary to drain the pus in the abscess.

When the infection occurs in the spinal canal, it may be much more serious. A condition called an epidural abscess may form inside the spinal canal. This infection can cause a large pocket of pus to form around the nerves creating pressure on the nerves. If this complication occurs, you will probably need a surgical procedure to drain the infection and remove the pressure from the nerves. Antibiotics will also be necessary to treat the infection.

Nerve Damage

Many pain injections are done close to nerves. The needle used to do the injection may accidentally puncture the nerve itself. This can cause damage to the nerve and result in increased pain. Numbness and weakness may also result. Nerves that have been punctured with a needle will usually recover and not require any additional surgical procedures.

Increased Pain

Not all injections work as expected. Sometimes, injections cause more pain. This may be due to increased spasm in the muscles around a trigger point injection into a muscle. The increased pain is usually temporary, lasting a few hours or a few days. Once the medication has a chance to work, the injection may actually work as expected and reduce your pain. The pressure from injecting the liquid medication may increase pressure on nerves. This may irritate the nerves and cause increased pain. The increased pain is usually temporary. Increased pain that begins several days after the injection may be a sign of infection. You should alert your doctor if this occurs.

Spinal Fluid Leak

Injections for Pain

Probably the most common complication of injections that enter the spinal canal is a wet tap. This occurs when the needle penetrates the spinal sac and enters the spinal fluid. This is the same thing that happens when your doctor performs a spinal tap or a spinal anesthetic. In itself, it is not dangerous. Because the epidural needle is larger than the spinal needle, the hole in the spinal sack may continue to leak and not seal itself off immediately. This causes a spinal fluid leak – or wet tap – and a very bad headache. The headache is worse when you are sitting or standing upright. It may cause nausea and vomiting. It will go away if you lie flat or with your head a bit lower that your feet.

The headache occurs because the spinal fluid pressure in the skull decreases. That is why the headache goes away when you lie down – the spinal fluid pressure goes back to normal in your skull. Most spinal headaches go away in a few days when the hole in the spinal sac heals and closes. You may be instructed to stay flat for a couple of days until this occurs.

There are ways to speed up the healing of the puncture in the spinal sac. The most common treatment for a spinal headache that does not go away on its own is a blood patch. This may be done at the time of the injection if the doctor sees that the spinal sac has been punctured before he removes the needle. If not it may be done several days later if the headache has not gone away. This procedure involves taking a small amount of blood from a vein in your arm and injecting it into your back in the epidural space. The blood clots and patches the hole.

After Care

What happens after the procedure?

If everything goes as planned, you will be able to go home soon after the injection, probably within one hour. After most types of pain injections, you will probably not have any restrictions on activity or diet following the procedure.

When the pain injection is a diagnostic injection, your doctor will be interested in how much the pain is reduced while the anesthetic, or the numbing medication, is working. You may be given a pain diary to record what you feel for the next several hours. This is important for making decisions, so keep track of your pain.

Most doctors will arrange a follow-up appointment, or phone consult, within one or two weeks after the procedure to see how you are doing and what effect the procedure had on your symptoms.

And remember, injections are not usually a cure for your pain; they are only a part of your overall pain management plan. You will still need to continue working with the other recommendations from your pain management team.

Epidural Steroid Injections

Pain Management: A Patient’s Guide to Epidural Steroid Injections

Introduction

Epidural steroid injections (ESI) are commonly used to control back and leg pain from many different causes. These injections control pain by reducing inflammation and swelling. They do not cure any of the diseases they are commonly used for, but can control the symptoms for prolonged periods of time. In some cases, the ESI may be used to control the symptoms so that you can participate in a physical therapy program, become more active, and be better able to control the symptoms with a conservative program.

This guide will help you understand

  • where the injection is given
  • what your doctor hopes to achieve
  • what you need to do to prepare
  • what might go wrong

Anatomy

What parts of the body are involved?

Epidural Steroid Injections

When doing an ESI, the doctor inserts a needle through the skin so that the tip of the needle is in the epidural space. This space is the area between the bony ring of the spine and the covering of the spine called the dura. The dura is the sac that encloses the spinal fluid and nerves of the spine. In the cervical spine and thoracic spine, the spinal cord also is contained within the dura and the spinal sac. The spinal cord actually stops at the second lumbar vertebra, so in the lower lumbar spine there are only spinal nerves running within the spinal sac.

Epidural Steroid Injections

The epidural space is normally filled with fat and blood vessels. Fluid such as the lidocaine and cortisone that is injected during an ESI is free to flow up and down the spine and inside the epidural space to coat the nerves that run inside the spinal canal.

There are several openings in the bones that surround the epidural space where a needle can be placed. An ESI can be performed by placing the needle in one of three of these openings. Each of these three types of ESI injections has advantages.

Related Document: A Patient’s Guide to Lumbar Spine Anatomy

Epidural Steroid Injections

An interlaminar injection is performed by placing the needle directly in from the back of the spine between the lamina of two adjacent vertebra. The laminae (plural) form the outer rim of the bony ring of the vertebra. This places the tip of the needle in the back side of the spine. The advantage to this type of injection is that it is easy to do, even without the guidance of a fluoroscopic x-ray machine. The injection is usually done between the two vertebra that are most likely causing your pain. This puts the medications as close as possible to the problem. The disadvantage to this type of injection is that injected medication may stay in the back side of the spine away from the intervertebral disc.

Epidural Steroid Injections

A caudal injection is also relatively easy to perform even without x-ray guidance. The caudal injection is performed at the very lower end of the spine through a small opening in the bones of the sacrum. The sacrum is made up of several vertebrae that fuse together during development to form a single large bone. This bone is where the pelvis connects to the spine.

Epidural Steroid Injections

The opening at the tip of the sacrum leads directly to the epidural space. Fluid injected through this opening can flow upward through the epidural space to coat the nerves throughout the lower lumbar spine.

A transforaminal injection is a newer type of injection that is done from the side of the spine, through the neural foramen. The neural foramen is the opening where the nerve root exits the spine. There are two neural foramen between each vertebrae, one on each side.

Epidural Steroid Injections

The doctor places the tip of the needle into the neural foramen using the fluoroscopic x-ray machine to watch and guide the needle into the correct position. The advantage to this type of injection is that it places the medication in the front of the spinal canal, near the intervertebral disc. The disadvantage is that this type of injection requires using the fluoroscopic x-ray to guide the needle placement.

Rationale

What does my physician hope to achieve?

Your doctor is recommending an ESI to try and reduce your pain. The ESI may also reduce numbness and weakness. During an ESI the medications that are normally injected include an anesthetic and cortisone. An anesthetic medication (such as novacaine, lidocaine or bupivicaine) is the same medication that is used numb an area when you are having dental work or having a laceration sutured. The medication causes temporary numbness lasting 1 hour to 6 hours, depending on which type of anesthetic is used.

Cortisone is an extremely powerful anti-inflammatory medication. When this medication is injected around inflamed swollen nerves and connective tissues, it can reduce the inflammation and swelling. Reducing the inflammation reduces pain. Reducing swelling can allow the nerves to function better – reducing numbness and weakness.

Epidural Steroid Injections

These injections are temporary and may last from a couple of weeks to a couple of months. They may be used to reduce your symptoms so that you can more easily begin a physical therapy program with less pain. They may also be used to reduce symptoms and let the body repair the underlying condition. For example, most disc herniations cause a great deal of pain when they first happen. This is due to the chemicals that leak from the torn disc and inflame the nerves. Over several weeks to months, the disc heals enough to stop leaking these chemicals. If the cortisone can reduce the symptoms at the beginning, then when the cortisone injection wears off, the chemical irritation may be gone and the pain may not return. The cortisone itself does not heal the disc herniation.

Epidural Steroid Injections

In other conditions, the cortisone injection is repeated 1 to 3 times per year to help control the symptoms. This is usually recommended when surgery is too risky or you choose not to have surgery. For example, in older adults with spinal stenosis, this may be the less risky treatment. Spinal stenosis occurs when the spinal canal where the nerves travel is too tight. This results in inflammation and swelling of the nerves and soft tissues. The swelling makes the spinal canal even tighter. The nerves do not have enough room to function correctly and begin to cause pain, numbness and weakness. An ESI once every six months may reduce the swelling enough to reduce the pressure on the nerves and the symptoms of pain, numbness and weakness.

Preparations

How will I prepare for the procedure?

Your doctor may tell you to be “NPO” for a certain amount of time before the procedure. This means that you should not eat or drink anything for the amount of time before your procedure. This means no water, no coffee, no tea – not anything. You may receive special instructions to take your usual medications with a small amount of water. Check with your doctor if you are unsure what to do.

You should tell your doctor if you are taking any medications that “thin” your blood or interfere with blood clotting. The most common blood thinner is coumadin. Other medications also slow down blood clotting. Aspirin, ibuprofen and nearly all of the anti-inflammatory medications affect blood clotting. So do medications used to prevent strokes such as Plavix. These medications usually need to be stopped 7 days prior to the injection. Be sure to let your doctor know if you are on any of these medications.

Procedure

What happens during the procedure?

When you are ready to have the ESI, you will be taken into the procedure area and an IV will be started. The IV allows the nurse or doctor to give you any medications that may be needed during the procedure. The IV is for your safety because it allows very rapid response if you have a problem during the procedure, such as an allergic reaction to any of the medications injected. If you are in pain or anxious, you may also be given medications through the IV for sedation during the procedure.

Epidural Steroid Injections

Most ESI procedures today are done with the help of fluoroscopic guidance. The fluoroscope is an x-ray machine that allows the doctor to actually see an x-ray image while doing the procedure. This allows the doctor to watch where the needle goes as it is inserted. This makes the injection much safer and much more accurate. Once the needle is in the right location, a small amount of radiographic dye is injected. This liquid dye shows up on the xray image and the doctor can watch where it goes. The anesthetic medication and the cortisone will go in the same place, so the doctor wants to make sure that the injection will put the medication in the right place to do the most good. Once the correct position is confirmed, the anesthetic and cortisone are injected and the needle is removed.

You will then be taken out of the procedure room to the recovery area. You will remain in the recovery area until the nurse is sure that you are stable and do not have any allergic reaction to the medications. The anesthetic may cause some temporary numbness and weakness. You will be free to go when these symptoms have resolved.

Complications

What might go wrong?

There are several complications that may occur during or after the procedure. The ESI procedure is safe and unlikely to result in a complication, but no procedure is 100% foolproof. This document doesn’t provide a complete list of the possible complications, but it does highlight some of the most common problems. Complications are uncommon, but you should know what to watch for if they occur. Like most procedures where medications are injected, there is always a risk of allergic reaction.

Epidural Steroid Injections

Probably the most common complication of an ESI is a wet tap. This occurs when the needle penetrates the spinal sac and enters the spinal fluid. This is the same thing that happens when your doctor performs a spinal tap or a spinal anesthetic. In itself, it is not dangerous. Because the epidural needle is larger than the spinal needle, the hole in the spinal sack may continue to leak and not seal itself off immediately. This causes a spinal fluid leak – or wet tap. This causes a very bad headache. The headache is worse when you are sitting or standing upright. It may cause nausea and vomiting. It will go away if you lie flat or with your head a bit lower than your feet. The headache occurs because the spinal fluid pressure in the skull decreases. That is why the headache goes away when you lie down – the spinal fluid pressure goes back to normal in your skull. Most spinal headaches go away in a few days when the hole in the spinal sac heals and closes. You may be instructed to stay flat for a couple of days until this occurs.

There are ways to speed up the healing of the puncture in the spinal sac. The most common treatment for a spinal headache that does not go away on its own is a blood patch. If the doctor sees that the spinal sac has been punctured before he removes the needle, this may be done at the time of the ESI. If not it may be done several days later if the headache has not gone away. This procedure involves taking a small amount of blood from a vein in your arm and injecting it into your back in the epidural space. The blood clots and “patches” the hole.

There are several other very rare possible complications of the ESI. These include epidural hematoma, epidural abscess and nerve damage. The epidural hematoma occurs when one of the small blood vessels around the spinal sac continues to bleed after the procedure. The bleeding can cause a large pocket of blood to form around the nerves putting too much pressure on the nerves. The epidural abscess is when an infection occurs inside the spinal canal. The infection can cause a large pocket of pus to form around the nerves and puts too much pressure on the nerves. Both of these complications will probably require surgery to correct or improve.

Finally, because the the injection is done inside the spinal canal, the spinal nerves can be damaged by the needle itself. This usually will recover and will not require any additional procedures to correct.

After Care

What happens after the procedure?

You will be able to go home soon after the procedure, probably within one hour. If all went as planned, you probably won’t have any restrictions on activity or diet.

Most doctors will arrange a followup appointment, or phone consult, within one or two weeks after the ESI to see how you are doing and what effect the procedure had on your symptoms.

You can return to physical therapy immediately.

One question that always comes up is “How many ESIs can I have?” There is no definite answer to that question. Most doctors would recommend that you limit the number of injections to 3-5 per year. The limit is not the injection but the amount of cortisone put in your body. Cortisone has bad side effects when you take the medication often – either as a pill or as an injection. The side effects are why doctors do not like to do these injections more often than necessary.

Chronic Pain Management

A Patient’s Guide to Chronic Pain Management

Introduction

According to the National Center for Health Statistics chronic pain health care costs and lost productivity has reached nearly $100 billion a year. It affects approximately 76.2 million people – more individuals than diabetes, heart disease and cancer combined.

The primary goals in chronic pain management are to assess, understand and treat your pain condition.

This sounds simple. It is not simple or easy. The process requires a great deal of time and effort on both the part of the pain management team and you.

This guide will help you understand

  • what chronic pain is
  • what pain management is
  • how chronic pain is managed
  • what you can expect from pain management

What is chronic pain?

Chronic pain is sometimes defined officially as pain lasting more than 6 months. It may also be accurate to define chronic pain as pain that has no clear end in sight. It may be something that you will have to learn to live with – or around. Anyone who has lived with chronic pain, or has treated patients with chronic pain, eventually comes to the understanding that the chronic pain is a disease in itself, regardless of what is causing the pain. It is this disease – chronic pain – that pain management specialists treat.

This does not mean that the team will ignore what is causing your pain. The first goal is to assess your pain. This means that your healthcare provider must try to determine, if possible, what is causing your pain..

The first question that should be asked is: “Does the pain have a source that can be eliminated by doing something to you – such as a medical treatment or surgery?”

Usually, the doctors that you have seen before you arrive at a pain management center have already done this. They refer you to the pain management center because they have not found anything that will reliably eliminate your pain. The pain management team will start from scratch and review all the tests and imaging studies that have been done and examine you. Sometimes the pain specialist may uncover new things or make new diagnoses. Usually they do not.

Once your pain management specialists have satisfied themselves that there is no reliable way to eliminate your pain through a medical treatment or surgery, they will begin the process of understanding your pain. This is a complex process. It does not end as long as you have the pain. The pain management team will constantly reevaluate what they think about your pain, how it is affecting you and what is needed to change the approach to helping you live with your pain.

Understanding your pain and treating your pain go hand in hand. How you respond to certain treatments gives your pain specialists a better understanding of your pain. They probably will not get the right, or best, combination on the first try – or the second. But they will continue to work with you to refine the treatment plan so that you get the best plan that can be can offered. Understanding your pain is a never ending process – for you or for your healthcare providers. Have patience both with yourself and with your pain management team.

In the majority of chronic pain patients, the sensation of pain will NOT be eliminated. BUT, with treatment you can drastically change how much the pain affects your life. Chronic pain is a disease that can be managed effectively. You should expect your pain management team to work with you and your primary care provider to effectively manage your chronic pain condition with all of the expertise and tools available as long as you need help.

Once the process of creating a treatment plan with you begins, there are many different options that can be explored. An important thing for you to realize is that these options are divided into two groups:

  • Things people do to you
  • Things you learn to do for yourself

Each of these approaches are important and have value in treating your pain. The goal is to find a balance where you are in control of as much of your treatment plan as possible – while you minimize the treatment options that require something to be delivered that is controlled by someone else. This situation just makes more sense in the long run – because it puts you more in control of managing your pain. It’s cheaper, requires less time spent in providers’ offices and ultimately it is more effective.

Most chronic pain patients do require some passive modalities — “things people do to you” – such as medications, massage and injections to deaden the pain at times. Early on this seems to be more important as you learn the skills that will allow you to move beyond dependence on some of these passive modalities. Remember, the main goal is to help you manage your pain in a way that is effective for you. If that requires some passive modalities, then so be it.

Things People Do To You

In our current healthcare culture, we are used to going to see a practitioner when we are ill and saying, “Fix it!” Most practitioners are quite willing to try to do just that – give you a prescription medication or suggest a surgical procedure that is designed to cure or fix your problem. Our expectation is that everything can be fixed if we just find the real problem and match this with the real cure.

Pain doesn’t necessarily work that way. In fact, most things in healthcare don’t really work that way, but we all pretend they do – patients and doctors alike. With the exception of things like appendicitis and broken bones, most healthcare conditions have lifelong effects that must be dealt with sooner or later. In chronic pain, it just happens sooner rather than later. Quit fooling yourself early and get on with the business of managing chronic pain.

Most of the passive modalities in the category of “things people do to you” are temporary fixes rather than cures. They are useful in managing symptoms while you and your providers work on the category of “things you learn to do for yourself”. That is not to say that many of these things people do to you are not beneficial. Some may control your symptoms for years. Some may need to be returned to and used even years from now when you are having a flare up of pain. Just don’t think of them as a “cure”. They are tools in your toolbox. Use the right tool for the job. If a small tap is needed – don’t use a sledgehammer.

Some of the more common things that fall into the “things people do to you” category are:

  • Invasive interventions
  • Medications
  • Physical modalities

Invasive Interventions

Chronic Pain Management

Invasive interventions are treatments that require surgery or some type of procedure that involves physically invading the body – such as an injection. Clearly, many surgical and invasive procedures are done to reduce or eliminate pain. Many are successful – some are not. You may already have had one or several invasive procedures. You may need more in the future.

Many of the patients in chronic pain management programs are not expecting any invasive procedures in the near future. This is usually because there are no procedures to recommend that have a reasonable chance of success. Your pain specialist never stops considering invasive interventions to help treat your pain because things constantly change. BUT, continuing to look for the ultimate cure can lead to delays in getting down to managing the chronic pain disease itself.

Medications

Medications treat the symptoms of chronic pain – not the disease itself. Nearly every patient with chronic pain will have the following symptoms at some point in their management program:

  • Depression
  • Sleep difficulty
  • Anxiety

Medications can help control these symptoms to a degree. Medications alone are not the answer. Any medication treatment must be combined with other treatments. For example, many studies show that depression responds exceedingly well to exercise and psychotherapy – possibly better than to medications. The same is true for sleep difficulty and anxiety – both cannot be adequately treated with medications alone.

Anytime a medication is used for control of the symptoms of chronic pain, realize that you must weigh the side effects versus the benefits. All medications have side effects. No medications are risk free.

Narcotic pain medications are especially difficult to use due to the side effects of physical dependence and addiction. Chronic pain patients use narcotic medications frequently – but do so with a respect for the potential harm that they can cause. The real goal is to treat your pain effectively so that you do not need narcotic pain medications if possible. That is not always achievable.

Medications are one piece of the puzzle – not the total answer. The goal is to use the minimum amount of medication necessary to treat your pain. If that is a lot of medications then fine, if it is none, that’s fine too. In general, the less medication the better.

Physical Modalities

Physical modalities include things like massage, acupuncture, ultrasound,

Chronic Pain Management

TENS and chiropractic. These are treatments that require someone else to touch you, stick a needle in you or manipulate your body. In some cases (such as TENS), you need to attach yourself to some type of machine that does something to you. None of these things are necessarily bad or good. If they help relieve any of the symptoms of chronic pain, then they may be useful.

Unlike medications and invasive treatments, most of these modalities are relatively risk free. But, similar to medications, these modalities usually provide temporary relief. Pain specialists use these modalities frequently as part of a comprehensive symptom management program. The biggest risk in coming to rely more and more on these passive modalities for reducing symptoms is that you give up some control of your management program.

As is true in every aspect of managing chronic pain, reaching a balance is necessary.

Things You Learn To Do For Yourself

The things you learn to do for yourself to manage your chronic pain are the most important in the long run.

That bears repeating:

The things you learn to do for yourself to manage your chronic pain are the most important in the long run.

The more pain management skills you master, the more YOU control your chronic pain without relying on other people to do something to you or control your treatment. You become more empowered. You are in charge, not the healthcare provider.

Some of the more common things that fall into “the things you learn to do for yourself” category are:

  • Ergonomics
  • Exercise
  • Mind body techniques

Ergonomics

Ergonomics is simply a fancy word for describing a relatively simple concept – how we use our bodies to interact with our physical surroundings. Learning about good ergonomics means learning how to get things done without aggravating your underlying condition and causing pain. It is amazing how many people come into a pain program who never realize how many things they do during the day are actually causing problems. Once they learn new ways of doing things and new ways to arrange their home and work environment, their pain decreases.

Exercise

Chronic Pain Management

Developing an exercise routine is critical in the management of chronic pain. You will not be able to effectively manage your pain without incorporating some form of exercise as part of your daily routine. This is not a one-size-fits-all approach to exercise. We realize that each patient is different, with a different set of physical problems that affect what type of exercise is reasonable. Everyone will have a different program designed specifically with their unique problems in mind.

Chronic Pain Management

Exercise will reduce many of the symptoms of chronic pain. Even small doses of regular exercise cause physiologic changes in the body chemistry that are beneficial. Exercise increases the body’s internal pain killing chemicals called endorphins. These chemicals act just like morphine to reduce pain. Exercise is effective in reducing depression and can help burn off the excess adrenaline that causes anxiety. Most chronic pain patients find that they sleep much better when they begin a regular exercise program.

Chronic Pain Management

If you allow chronic pain to greatly reduce your activity level, deconditioning of muscles and ligaments occurs. Bones become weaker. Injury is more likely and pain actually increases. Moderate amounts of exercise will protect you from the effects of deconditioning and help you improve your ability to function.

Remember, the goal is not necessarily to become pain free, but to strike a balance between reducing pain and maintaining function. Some degree of discomfort is not necessarily a bad thing. Many people are afraid that discomfort means they are doing some type of damage to their body. That is not necessarily true. A bit of discomfort is warranted to maintain a higher level of function as long as you are not doing further damage. Doing nothing will certainly result in further damage to your body. Part of what you will be learning is how to tell when enough is enough.

Mind Body Techniques

Many of the symptoms of chronic pain disease are actually made much worse by our minds. The way we react to the sensation of pain is a combination of primitive reflexes (designed or evolved to protect us from harmful things) and learned behavior (not necessarily useful to us at all). For example, think about the muscle pain you might have when you have overdone your spring gardening. You know by experience that it is a simple muscle soreness and you are certain it will go away in a few days. You are not too concerned. You ignore it. It goes away.

Chronic Pain Management

Now imagine you wake up one morning with a pain for no good reason. It doesn’t go away in a few days. You become concerned because you don’t know what the pain MEANS. Is it serious? Does the pain mean I am damaging my body when I do things that make the pain worse? You become anxious. This releases chemicals in your body that increase the sensitivity of your nerves to the pain – the pain feels worse!

All of these changes occur at the subconscious level – so you are not necessarily aware of this change that comes over you. The result is that you are turning the volume up on your pain. Mind body techniques teach you how to turn down the volume on your pain. The pain song might still be playing in the background – but it’s more like elevator music than hard rock.

Chronic Pain Management

Most mind body techniques try to tap into what we call physiologic quieting. The mind has a great deal of influence over the hormones and chemicals that are released when we are stressed. These are the chemicals that increase the volume of your pain. You can train yourself to reduce the release of these chemicals and turn down the volume. These are very powerful tools to have in your toolbox. No chronic pain management program will be successful without incorporating some of these mind body techniques.

Back Care Boot Camp

No treatment program for low back pain is complete without a great deal of attention to the prevention of further back problems.

It is a common belief that most episodes of low back pain simply get better in 6 or 8 weeks no matter what type of treatment a patient receives. The problem with this thinking is that 90 percent of these patients will have recurring bouts of back pain. Without proper instruction on how to protect the spine, they will continue to do things that lead to further injury and deterioration of the spine. Without information about how to practice good spine health, patients are at risk for having increasing problems with low back pain and are more apt to eventually develop disabling back pain.

The truth is that most people who’ve had back pain once don’t get completely better by themselves. They may begin to have less pain, but that isn’t always a sign that everything has returned to normal.

Scientists have determined that having back pain, even once, can alter the way your back and abdominal muscles work, which can leave your spine unsupported and prone to another injury. That’s where Back Care Boot Camp comes in. It details these new facts. It also teaches you ways to energize your muscles again to protect your back and to reduce the chances of having a future problem. Back Care Boot Camp gives immediate guidance to help you head off potential long-term problems—before they occur.

The Back Care Boot Camp program is designed to be used with a physical therapist as a guide. The program consists of 8 formal sessions of physical therapy and usually takes about four weeks to complete. The progam is designed to educate you about the importance of spine health and give you the proper tools to protect your spine into the future.


The entire program is available online at:

www.backcarebootcamp.com/

or you can purchase a printed manual in a high quality,
full color softback book format here:

www.backcarebootcamp.com

<!– Click here to download Order Form PDF –>

Slipped Capital Femoral Epiphysis

A Patient’s Guide to Slipped Capital Femoral Epiphysis

Introduction

Slipped Capital Femoral Epiphysis

Slipped capital femoral epiphysis (SCFE) is a condition that affects the hip in teenagers between the ages of 12 and 16 most often. Cases have been reported as early as age nine years old. In this condition, the growth center of the hip (the capital femoral epiphysis) actually slips backwards on the top of the femur (the thighbone). If untreated this can lead to serious problems in the hip joint later in life. Fortunately, the condition can be treated and the complications avoided or reduced if recognized early. Surgery is usually necessary to stabilize the hip and prevent the situation from getting worse.

This guide will help you understand

  • what part of the hip is involved
  • what causes the condition
  • what treatment options are available

Anatomy

What part of the hip is affected?

The hip joint is where the thighbone (femur) connects to the pelvis. The joint is made up of two parts. The upper end of the femur is shaped like a ball. It is called the femoral head. The femoral head fits into a socket in the pelvis called the acetabulum. This ball-and-socket joint is what allows us to move our leg in many directions in relation to our body.

In the growing child, there are special structures at the end of most bones called growth plates. The growth plate is sandwiched between two special areas of the bone called the epiphysis and the metaphysis. The growth plate is made of a special type of cartilage that builds bone on top of the end of the metaphysis and lengthens the bone as we grow. In the hip joint, the femoral head is one of the epiphyses of the femur.

The capital femoral epiphysis is somewhat unique. It is one of the few epiphyses in the body that is inside the joint capsule. (The joint capsule is the tissue that surrounds the joint.)

The blood vessels that go to the epiphysis run along the side of the femoral neck and are in danger of being torn or pinched off if something happens to the growth plate. This can result in a loss of the blood supply to the epiphysis.

Causes

How does this problem develop?

Slipped Capital Femoral Epiphysis

SCFE develops at a specific age. The changes occurring in the growing skeleton during puberty play into the chances that a child will develop SCFE. The cartilage epiphyseal plate is weaker than the surrounding bone. Children who are overweight are more prone to developing SCFE. This suggests that the main cause of SCFE is from increased force on the hip at a time when the femoral head is not quite ready to support these forces. The femoral head fails at the weakest point, through the epiphyseal plate. As a result, a condition similar to a stress fracture develops.

Slipped Capital Femoral Epiphysis

SCFE may affect both hips. In fact, 20 to 40 percent of the time the condition is bilateral (meaning that it affects both hips). Only one hip may be painful, so it is common for doctors to carefully watch the other hip to recognize the disease as early as possible. The earlier the diagnosis is made, the more effective the treatment. Studies have shown that the more severe the slip, the worse the long-term outcomes. The earlier the diagnosis is made, the more effective the treatment.

Symptoms

What does the problem feel like?

Slipped Capital Femoral Epiphysis

Most teenagers with SCFE develop pain in the hip, and they begin to walk with a limp. When the doctor examines the hip, the motion of the hip is abnormal and restricted. Because the anatomy of the hip joint is altered, patients usually walk with the foot and leg turned out on the affected side.

Interestingly, problems in the hip sometimes do not cause pain in the hip itself. The knee is where the pain is felt. This can be confusing both to patients and physicians. In general, a teenager with knee pain and who has no clear-cut reason to have knee pain should be examined for possible SCFE. This usually includes X-rays of the hips to make sure that SCFE is not missed.

The main problem with SCFE is that it changes the structure of the hip joint. How much it affects the way the hip joint works depends on how much the epiphysis slips. The more the slip, the more likely there will be problems later in life.

In general, the most common problem later in life is the development of arthritis in the hip joint. The type of arthritis that develops in the hip is osteoarthritis (also known as wear-and-tear arthritis). Just like a machine that is out of balance, the hip joint wears out and becomes painful.

Slipped Capital Femoral Epiphysis

There are two complications of SCFE that may occur immediately after the condition develops. One complication is chondrolysis, a condition where the articular cartilage of the hip joint is destroyed. Articular cartilage is the smooth material that covers the joint surface. It is unclear why this develops. It may occur with or without surgery. This condition results in narrowing of the joint space and a painful, stiff hip.

Slipped Capital Femoral Epiphysis

The other possible complication is called avascular necrosis of the capital femoral epiphysis. This usually occurs when the blood vessels that provide blood to the epiphysis are damaged, torn, or pinched. This can happen when the SCFE develops very rapidly and presents like a true fracture. This can also occur when attempting to reduce, or align, the two parts of the femoral head before inserting a screw. The result is that the epiphysis dies and the bone collapses causing further deformity. This can lead to early arthritis in the hip joint.

Diagnosis

How do doctors identify the problem?

The history and physical examination are usually enough to make the doctor highly suspicious about the diagnosis of SCFE.

X-rays are usually necessary to make the diagnosis in SCFE. Based on X-ray findings of the lateral head-to-shaft angle, the slip can be graded. Grades are defined as mild (less than 30 degrees), moderate (30 to 50 degrees), or severe (more than 50 degrees). In the past, SCFE was classified as acute or chronic. The terms stable or unstable are used now because this status is a better predictor of osteonecrosis.

Treatment

What treatment options are available?

Nonsurgical Treatment

Treatment of SCFE usually requires surgery. If surgery is absolutely not possible for other reasons, then placing the child in a type of body cast called a hip spica may be an option. This is not as successful as surgery and is not the preferred choice.

Surgery

The primary goal of the treatment of SCFE is to stop any further slippage of the capital femoral epiphysis. The less slip, the lower the risk of problems in the hip during the child’s life.

Once the epiphysis has closed, slippage will stop. Epiphysis closure occurs when the two areas of bone–the epiphysis and metaphysis–join, or fuse, into one single bone. At that point there is no cartilage growth plate remaining between the two parts of the femur. Surgery usually speeds up the process of epiphysis closure.

Once the diagnosis of SCFE is made, surgery is usually suggested immediately. The surgery is scheduled within a few days following the diagnosis. Until the surgery can be performed, it is highly advisable to use crutches and restrict activities to a minimum. The surgery can usually be done as an outpatient. General anesthesia (where the patient is put completely to sleep) is usually recommended, unless there are reasons not to use a general anesthetic. If so, a spinal block may be used instead.

Slipped Capital Femoral Epiphysis

The preferred method for stopping the epiphysis from slipping further is to place a large screw into the epiphysis to hold it in place. This screw is placed using a special X-ray machine called a fluoroscope. The fluoroscope allows the surgeon to see an X-ray image on a TV monitor while doing the surgery. In this way, the surgeon is able to accurately place a screw into the epiphysis using a small incision in the side of the thigh.

Other types of surgery have been used in the past. For many years surgeons thought it necessary to use two or three screws to hold the epiphysis. This has been shown to be unnecessary in most cases. Using additional screws may actually increase the risk of complications. Open operations using much larger incisions have also been used in the past. These procedures have been abandoned because using a single screw works better and is easier to do.

If there is a serious structural change in the anatomy of the hip, there may need to be further surgery to restore the alignment closer to normal. This procedure is usually not considered until the child is done growing. As a child grows, there will be some remodeling that occurs in the hip joint. This may improve the situation such that further surgery is unnecessary.

In the case of unilateral (one-sided) SCFE, experts also recommend pinning the normal hip. This is called prophylactic pinning. The child with moderate to severe unilateral SCFE is at risk for slippage to occur on the other side.

Prophylactic treatment is easy to do and can be done at the time of the operation on the involved side. Taking this step reduces the need for repeated X-rays to check the normal side for any sign of SCFE. The child can remain more active without constant worry that the hip will slip. The complications of chondrolysis, avascular necrosis, and/or degenerative arthritis can also be avoided.

Rehabilitation

What should I expect from treatment?

Crutches are required following surgery for SCFE. Within three to five days, most patients will be able to start putting some weight down while standing or walking. Over the next few weeks and as pain subsides, the crutches may be discarded. Physicians differ in their postoperative regimen, so make sure you are clear on what your surgeon recommends, especially how long crutches are needed.

The surgeon will take X-rays during the follow up visits to make sure that the screw remains in the right place. The X-rays are also required to determine when the epiphyseal plate fuses. At that point, there won’t be any chance that the slip will get worse. When this is known, the follow up visits will be focused on whether the abnormality is likely to need any additional surgery to realign the hip.

Opinions differ on the need to remove the screw once the epiphysis has fused. Removing the screw requires a second surgery that can be expensive and carries a slight risk due to the need for anesthesia. The hole left when the screw is removed also increases the risk of fracture after the screw is taken out. If the screw is removed, the surgeon may recommend crutches for three to six weeks afterward. Many surgeons feel that the screw should be left in place if it isn’t causing problems.

Perthes Disease

A Patient’s Guide to Perthes Disease of the Hip

Introduction

Perthes disease is a condition that affects the hip in children between the ages of four and eight. The condition is also referred to as Legg-Calve-Perthes disease in honor of the three physicians who each separately described the disease. In this condition, the blood supply to the growth center of the hip (the capital femoral epiphysis) is disturbed, causing the bone in this area to die. The blood supply eventually returns, and the bone heals. How the bone heals determines what problems the condition will cause in later life. Perthes disease may affect both hips. In fact, 10 to 12 percent of the time the condition is bilateral (meaning that it affects both hips). This condition can lead to serious problems in the hip joint later in life.

This guide will help you understand

  • what part of the hip is involved
  • what causes the condition
  • what treatment options are available

Anatomy

What part of the hip is affected?

The hip joint is where the thighbone (femur) connects to the pelvis. The joint is made up of two parts. The upper end of the femur is shaped like a ball. It is called the femoral head. The femoral head fits into a socket in the pelvis called the acetabulum. This ball and socket joint is what allows us to move our leg in many directions in relation to our body.

In the growing child, there are special structures at the end of most bones called growth plates. The growth plate is sandwiched between two special areas of the bone called the epiphysis and the metaphysis. The growth plate is made of a special type of cartilage that builds bone on top of the end of the metaphysis and lengthens the bone as we grow. In the hip joint, the femoral head is one of the epiphyses of the femur.

The capital femoral epiphysis is somewhat unique. It is one of the few epiphyses in the body that is inside the joint capsule. (The joint capsule is the tissue that surrounds the joint.) The blood vessels that go to the epiphysis run along the side of the femoral neck and are in danger of being torn or pinched off if something happens to the growth plate. This can result in a loss of the blood supply to the epiphysis. The dead bone cells are eventually replaced by new bone cells but this can take several years. In the meantime, pressure and load from weight on the bone causes the bone to flatten. The smooth, round head of the femur that sets inside the hip socket (acetabulum) becomes oval shaped (ovoid) or misshapen. Instead of fitting tightly inside the acetabulum, bone extrudes or expands outside the confines of the socket.

Causes

How does this problem develop?

Perthes Disease of the Hip

Perthes disease results when the blood supply to the capital femoral epiphysis is blocked. There are many theories about what causes this problem with the blood supply, yet none have been proven. Many experts believe Perthes disease is the result of several or even many factors. Another way to say this is that Perthes is a multifactorial disease with both genetic and mechanical contributing factors.

On the genetic side, it’s possible some children are more susceptible (more likely) than others to develop this problem. But it takes one or more “triggers” (environmental or external factors) to start the process. For example, there appears to be some relationship to nutrition. Children who are malnourished are more likely to develop this condition.

Children who have abnormal blood clotting (a condition called thrombophilia) may have a higher risk of developing Perthes disease. These children have blood that clots easier and quicker than normal. This may lead to blood clotting that blocks the small arteries going to the femoral head. As a result of new evidence, the certainty of thrombophilia as a cause of Perthes is now under debate. This will remain an area of study until scientists clear up the significance of thrombophilia as a possible cause of Perthes.

There is some new evidence that Perthes disease is genetic as a result of a mutation (abnormal change) in the type II collagen (fibers that make up soft tissue structures). Previously there was no known increase in risk for children whose parent had Perthes disease as a child. But this belief may no longer be accurate.

Studies among Asian families who have many members with this disease have been found with this mutation in the type II collagen gene. Scientists think that the mutation results in weakening of the hip joint cartilage that also affects the blood vessels within the cartilage.

Other potential biologic factors that may be linked with Perthes disease include low levels of abnormal insulin-like growth factor (IGF-1), low birth weight, and short body length at birth. Exposure to nicotine and other chemicals from tobacco is an important factor recently discovered. Likewise LCP may be triggered by exposure to tobacco if the mother smokes during pregnancy or the child is exposed to second hand smoke during infancy and early childhood.

There is some evidence that Perthes disease can develop after a single episode of ischemia (lack of blood to the area) no matter what the cause. But the risk goes up with repeated (multiple) episodes of blood loss. Whatever the true cause of ischemia (lack of blood to the area), the result is bone death (called necrosis) of the femoral head. Without a normal blood supply, the bone loses its strength and shape. The loss of bone density and softening of the head result in a misshapen head. With the hip supporting the weight of the body, tiny microfractures in the soft, necrotic bone fail to heal.

The dead bone cells are eventually replaced by new bone cells but this can take several years. In the meantime, pressure and load from weight on the bone causes the bone to flatten. The smooth, round head of the femur that sets inside the hip socket (acetabulum) becomes oval-shaped (ovoid) or misshapen. Instead of fitting tightly inside the acetabulum, bone extrudes or expands outside the confines of the socket. This is another reason why normal wear and tear results in deformity.

Symptoms

What does this problem feel like?

Most children with Perthes disease develop discomfort in the hip and walk with a limp. Children will not usually complain of pain unless specifically asked. The most common way that the disease is discovered is when someone, usually a parent, notices the limp and consults a physician.

When the doctor examines the hip, the motion of the hip is abnormal and restricted. Turning the leg inward produces pain. This usually indicates that the hip is inflamed and may have inflammatory fluid (called an effusion) present in the hip joint.

Interestingly, problems in the hip sometimes do not cause pain in the hip itself. The knee is where the pain is felt. This can be confusing both to patients and physicians. In general, a child with knee pain (who has no clear-cut reason to have knee pain), or an abnormal gait, should be examined for possible Perthes disease. This usually includes X-rays of the hips to make sure that Perthes disease is not missed.

Perthes Disease of the Hip

The main problem with Perthes disease is that it changes the structure of the hip joint. How much it affects the way the hip joint works depends on how much the hip joint is deformed. Muscle weakness and atrophy affecting the thigh and calf muscles may develop over time. The affected leg can shorten as a result of the changes in the hip. The result may be a significant leg length difference. Problems later in life are more likely the greater the deformity after the condition has healed.

In general, the most common problem later in life is the development of arthritis in the hip joint. The type of arthritis that develops in the hip is osteoarthritis (also known as wear and tear arthritis). Just like a machine that is out of balance, the hip joint wears out and becomes painful.

Diagnosis

How do doctors identify the problem?

The history and physical examination are usually enough to make the doctor highly suspicious about the diagnosis of Perthes disease. X-rays are usually necessary to make the diagnosis.

It is usually not necessary to get an MRI scan to make the diagnosis. However, this test may be useful to determine whether the other hip is involved in the disease. A special MRI using a dye called gadolinium may help show changes in blood supply before anything shows up on an X-ray.

In planning treatment another test, called an arthrogram, may be required. In this test, dye is injected into the hip joint to outline the cartilage surface of the joint. Much of the child’s hip joint is made up of cartilage. Cartilage does not usually show up on X-rays. The dye is necessary to see what the hip will actually look like when the cartilage turns to bone.

Treatment

What treatment options are available?

Age is the determining factor in this condition. Recovery is more likely in children under the age of eight. Development in teens is infrequent but with a poorer prognosis. But the good news is that many children have mild Perthes disease, and they are able to heal and recover fully even without treatment. The hip actually remodels itself and remains smooth moving. Early degenerative hip arthritis does not always occur and these children have no hip problems in adulthood related to their childhood history of Perthes disease.

The primary goal of treatment for Perthes disease is to help the femoral head recover and grow to a normal shape. The closer to normal the femoral head is when growth stops, the better the hip will function in later life. The way that surgeons achieve this goal is using a concept called containment.

Containment is a simple concept. The femoral head can be molded as it heals. This is very similar to molding plastic. Plastic is poured into a molded and held in the mold as it cools. It then holds the shape of the mold. The hip socket, or acetabulum, is not affected when the femoral head loses its blood supply. It can be used as a mold to shape the femoral head as it heals. The trick is that the femoral head must be held in the joint socket (acetabulum) as much as possible. It is better if the hip is allowed to move and is not held completely still in the joint socket. Joint motion is necessary for nutrition of the cartilage and for healthy growth of the joint.

All treatment options for Perthes disease try to position and hold the hip in the acetabulum as much as possible. Giving the hip every opportunity to heal itself by limiting load on the joint may prevent the flattening of the femoral head and deformity that can develop. The only problem is — it can take two to four years for the necrotic bone to get resorbed and replaced by new bone. And in some cases, new bone never forms. Instead, there is new granulation (healing) tissue, but that area doesn’t harden into bone, it just forms cartilage.

Many children who are diagnosed with Perthes disease do not require any treatment except careful watching. When the condition is mild, the results of not doing anything are often as good as aggressive treatment. Active treatment is advised when more than half the epiphysis is affected.

The majority of children who are treated for Perthes disease these days require only a program for maintaining a near-normal range of motion. This may include nighttime splinting, home traction, and physical therapy. Your doctor will determine treatment based on your child’s age and the classification of the severity of the disease. The classification is determined by the X-ray findings.

Bracing may be recommended if the child is six years old or younger. Surgery may be a best option for children who are seven or older and who have severe disease. Most of the studies support the idea that treatment of any kind just doesn’t seem to make a difference for mild to moderate disease in younger children.

Nonsurgical Treatment

Hip motion, as near to normal as possible, is critical to the successful treatment of Perthes disease. The disease causes inflammation in the joint. This leads to loss of motion and contracture (tightening) of the muscles surrounding the hip joint. Treating these problems to restore normal motion is common.

Perthes Disease of the Hip

When lack of motion has become a problem, the child may be admitted to the hospital and placed in traction. Traction is used to quiet the inflammation.

Anti-inflammatory medications may be prescribed. Antiresorptive agents may also protect the bone and help decrease deformity. Studies are being done to fully test the effect of these medications in children with Perthes.

Physical therapy is used to restore the hip motion as the inflammation comes under control. This process usually takes about a week. Home traction may also be an option.

Perthes Disease of the Hip

In the past, surgeons have tried to hold the hip in the best position where the femoral head was molded by the acetabulum using casts and braces. The most common way of doing this today is the Scottish Rite Orthosis. This brace fits around the waist and thighs and has hinges at the hip joints. The brace allows the child to walk and play while it holds the hip joint in the best position for containment.

Evidence from recent studies have changed our thinking about the usefulness of bracing. Bracing just doesn’t seem to change the anatomy or alignment of the hip. There are some children who might benefit but they must be evaluated carefully and selected individually for this type of treatment.

Children who are younger and have significant (more than 50 per cent) of the epiphysis affected may benefit the most from bracing. Children who have chronic synovitis (inflammation of the synovial fluid inside the hip joint) may also benefit from bracing. Holding the hip in place with less load or force helps quiet the inflammatory process.

When X-rays show involvement of the lateral pillar (outside portion of the femoral head), bracing is used to contain the flattened head in the hip socket. The role of bracing is to restore the natural round shape needed for normal hip motion. Results should be followed closely and discontinuation of bracing if no benefit is observed.

Surgery

In some cases, surgery will be required to obtain adequate containment. Sometimes, adequate motion cannot be regained with traction and physical therapy alone. If the condition is longstanding, the muscles may have contracted or shrunk and cannot be stretched back out. To help restore motion, the surgeon may recommend a tenotomy of the contracted muscles. When a tenotomy is performed, the tendon of the muscle that is overly tight is cut and lengthened. This is a simple procedure that requires only a small incision. The tendon eventually scars down in the lengthened position, and no functional loss is noticeable.

Perthes Disease of the Hip

Surgical treatment for containment may be best in older children who are not compliant with brace treatment or where the psychological effects of wearing braces may outweigh the benefits. Surgical containment does not require long-term braces or casts. Once the procedure has been performed and the bones have healed, the child can pursue normal activities as tolerated.

Surgical treatment for containment usually consists of procedures that realign either the femur (thighbone), the acetabulum (hip socket), or both.

Realignment of the femur is called a femoral osteotomy. This procedure changes the angle of the femoral neck so that the femoral head points more towards the socket. To perform this procedure, an incision is made in the side of the thigh. The bone of the femur is cut and realigned in a new position. A large metal plate and screws are then inserted to hold the bones in the new position until the bone has healed. The plate and screws may need to be removed once the bone has healed.

Realignment of the acetabulum is called a pelvic osteotomy. This procedure changes the angle of the acetabulum (socket) so that it better covers, or contains, the femoral head. To perform this procedure, an incision is made in the side of the buttock. The bone of the pelvis is cut and realigned in a new position. Large metal pins or screws are then inserted to hold the bones in the new position until the bone has healed. The pins usually must be removed once the bone has healed.

Perthes Disease of the Hip

If there is a serious structural change in the anatomy of the hip, there may need to be further surgery to restore the alignment closer to normal. This is usually not considered until growth stops. As a child grows, there will be some remodeling that occurs in the hip joint. This may improve the situation such that further surgery is unnecessary.

In severe cases, both femoral osteotomy and pelvic osteotomy may be combined to obtain even more containment.

Osteotomy Types

Rehabilitation

What should I expect from treatment?

Follow-up visits are used to monitor the symptoms, hip mobility, and to make sure that the condition is not deteriorating. The surgeon will take X-rays during the recheck visits to follow the healing of the femoral head. Patients with Perthes disease are always at higher risk of developing osteoarthritis of the hip. The more flattened the bone and the more misshapen the round femoral head becomes, the more likely degenerative arthritis will occur at an early age. The reason for this is that joint surfaces need to be evenly matched or congruent. Without this tight fit, the bones rub against each other unevenly. Over time with repeated movements, the joint degenerates where the greatest amount of pressure has been applied.

The end result is that most patients with Perthes disease will require an artificial hip at some point in the future. Most patients do not develop problems for 40 years or more. How soon patients have problems with their hip is directly related to how much deformity is present once the condition heals. In general, the more round the femoral hip is at that time, the longer the hip will stay free of pain.

Piriformis Syndrome

A Patient’s Guide to Piriformis Syndrome

Introduction

Piriformis Syndrome

Pain in the buttock that radiates down the leg is commonly called sciatica. The most common cause for sciatica is irritation of the spinal nerves in or near the lumbar spine. Sometimes the nerve irritation is not in the spine but further down the leg. One possible cause of sciatica is piriformis syndrome. Piriformis syndrome can be painful, but it is seldom dangerous and rarely leads to the need for surgery. Most people with this condition can reduce the pain and manage the problem with simple methods, such as physical therapy.

This guide will help you understand

  • how the problem develops
  • how doctors diagnose the condition
  • what treatment options are available

Anatomy

What parts of the body are involved?

The lower lumbar spinal nerves leave the spine and join to form the sciatic nerve. The sciatic nerve leaves the pelvis through an opening called the sciatic notch.

Piriformis Syndrome

The piriformis muscle begins inside the pelvis. It connects to the sacrum, the triangular shaped bone that sits between the pelvic bones at the base of the spine. The connection of the sacrum to the pelvis bones forms the sacroiliac joint. There is one sacroiliac joint on the left and one on the right of the low back. The other end of the piriformis muscle connects by a tendon to the greater trochanter, the bump of bone on the top side of your hip.

Piriformis Syndrome

The piriformis muscle is one of the external rotators of the hip and leg. This means that as the muscle works, it helps to turn the foot and leg outward. Problems in the piriformis muscle can cause problems with the sciatic nerve. This is because the sciatic nerve runs under (and sometimes through) the piriformis muscle on its way out of the pelvis. The piriformis muscle can squeeze and irritate the sciatic nerve in this area, leading to the symptoms of sciatica.

Related Document: A Patient’s Guide to Lumbar Spine Anatomy

Causes

What causes this problem?

Piriformis Syndrome

The symptoms of sciatica come from irritation of the sciatic nerve. It’s still a mystery why the piriformis muscle sometimes starts to irritate the sciatic nerve. Many doctors think that the condition begins when the piriformis muscle goes into spasm and tightens
against the sciatic nerve, squeezing the nerve against the bone of the pelvis.

In some cases, the muscle may be injured due to a fall onto the buttock. Bleeding in and around the piriformis muscle forms a hematoma. A hematoma describes the blood that has pooled in that area.

Piriformis Syndrome

The piriformis muscle begins to swell and put pressure on the sciatic nerve. Soon the hematoma dissolves, but the muscle goes into spasm.

The sciatic nerve stays irritated and continues to be a problem. Eventually the muscle heals, but some of the muscle fibers inside the piriformis muscle are replaced by scar tissue. Scar tissue is not nearly as flexible and elastic as normal muscle tissue. The
piriformis muscle can tighten up and put constant pressure against the sciatic nerve.

Symptoms

What does the condition feel like?

Piriformis Syndrome

Piriformis syndrome commonly causes pain that radiates down the back of the leg. The pain may be felt only on one side, though it is sometimes felt on both sides. The pain can radiate down the leg all the way to the foot and may be confused for a herniated disc in the lumbar spine. Changes in sensation and weakness in the leg or foot are rare. Some people say they feel a sensation of vague tingling down the leg.

Sitting may be difficult. Usually people with piriformis syndrome do not like to sit. When they do sit down, they tend to sit with the sore side buttock tilted up rather than sitting flat in the chair.

Diagnosis

How do doctors diagnose the problem?

Diagnosis begins with a complete history and physical exam. Your doctor will ask questions about your symptoms and how the pain is affecting your daily activities. Your doctor will also want to know what positions or activities make your symptoms worse or better. You will be asked about any injuries in the past and about any other medical problems you might have such as any arthritis that runs in the family.

Next the doctor examines you by checking your posture, how you walk, and where your pain is located. Your doctor checks to see which back movements cause pain or other symptoms.

Your skin sensation, muscle strength, and reflexes are also tested because it is difficult to distinguish pain coming from the sacroiliac joint from pain coming from other spine conditions.

If there is any question whether you might have an infection or some type of arthritis affecting multiple joints, laboratory tests may be ordered. You may need to have blood drawn and give a urine sample to send to the laboratory for special tests.

X-rays are commonly ordered of both the low back and pelvis. X-rays can give your doctor an idea about how much wear and tear has developed in the sacroiliac joint. X- rays of the lumbar spine and hips are also helpful to rule out problems in these areas that may look and act like sacroiliac joint problems.

Other radiological tests may also be useful. A magnetic resonance imaging (MRI) scan can be used to look at the lumbar spine and pelvis in much more detail and rule out other conditions in the area conditions. The MRI scan uses magnetic waves rather than X-rays and shows a very detailed picture of the soft tissues of the body.

A special type of MRI scan called neurography is being used more frequently to look at nerves. This uses a regular MRI scanner, but the computer settings are set to look for areas of irritation along a nerve. This may change the way doctors use the MRI to diagnose nerve problems such as piriformis syndrome, thoracic outlet syndrome, and carpal tunnel syndrome.

A bone scan is useful to see how the skeleton is reacting to any type of “stress,” such as an injury, an infection, or inflammation from arthritis. Chemical “tracers” are injected into your blood stream. The tracers then show up on special spine X- rays. The tracers collect in areas where the bone tissue is reacting strongly to some type of stress to the skeleton, such as arthritis and infection of the sacroiliac joint.

The most accurate way to tell if the piriformis muscle is the cause of pain is with a diagnostic injection into the muscle. The muscle is deep inside the buttock, so the injection requires X-ray guidance with a fluoroscope, a CT scanner, or an open MRI machine. Once the needle is placed in the muscle, an anesthetic can be injected into the muscle to paralyze the piriformis muscle. If the pain goes away after the injection, your doctor can be reasonably sure that the pain you are feel is from piriformis syndrome.

Treatment

What treatment options are available?

Nonsurgical Treatment

Doctors often begin by prescribing nonsurgical treatment for piriformis syndrome. In some cases, doctors simply monitor their patients’ condition to see if symptoms improve. Anti-inflammatory medications, such as ibuprofen and naproxen, are commonly used to treat the pain and inflammation caused by the irritation on the nerve. Acetaminophen (for example Tylenol®) can be used to treat the pain but will not control the inflammation.

You’ll probably work with a physical therapist. After evaluating your condition, the therapist uses treatments to ease spasm and pain in the piriformis muscle. Exercises, particularly stretching exercises, are given to try and relieve irritation on the sciatic nerve.

Piriformis Syndrome

If you still have pain after trying these treatments, your doctor may suggest injections.The main use of injections is to see if your pain is from piriformis syndrome. An injection of local anesthetic such as lidocaine can be injected into the muscle to temporarily relax it. This loosens up the muscle and reduces the irritation on the sciatic nerve. Other medications have also been injected into the piriformis muscle. Cortisone, for example, may be mixed with the anesthetic medication to reduce the inflammation on the sciatic nerve. Cortisone is a potent anti-inflammatory medication that is commonly used both in pill form and in injections to treat inflammation.

Related Document: A Patient’s Guide to Piriformis Muscle Injections

Botulism injection therapy (also known as Botox® injections) can be used to actually paralyze the piriformis muscle. This makes the muscle relax, which helps take pressure off the sciatic nerve. The effect of the Botox® injection isn’t permanent; it generally only lasts a few months. In the meantime, however, it is hoped that a stretching program can be used to fix the problem. In other words, when the injection wears off, the muscle may have been stretched enough so that the symptoms do not return.

Surgery

Surgery may be considered but usually only as a last resort. There are two procedures in use. The first is to cut the piriformis tendon where it attaches on the greater trochanter (the bump on the side of your hip). The other method is to cut through the piriformis muscle to take pressure off the sciatic nerve.

These procedures are usually done on an outpatient basis, meaning that you will be able to go home the same day as the surgery. In some cases, you may need to stay in the hospital for one night. Both procedures can be done under general anesthesia or under a spinal type of anesthetic.

Piriformis Syndrome

The surgeon begins by making a small incision, usually about three inches long, in the buttock. The fibers of the gluteus maximus, the largest buttock muscle, are split. This gives the surgeon a way to see deep into the buttock and locate the piriformis muscle. When the piriformis muscle and tendon can be seen, the surgeon then cuts (releases) the tendon where it connects to the greater trochanter.

If more room is needed to release the pressure on the nerve, a portion of the piriformis muscle may be removed.

Piriformis Syndrome

This usually doesn’t cause problems with strength because there are several much stronger muscles that help turn the leg outward.

Rehabilitation

What should I expect as I recover?

Nonsurgical Rehabilitation

Most patients with piriformis syndrome work with a physical therapist. Plan to attend physical therapy sessions two to three times each week for six to eight weeks.

Your therapist begins by evaluating your condition. This includes attention to the low back, as well as the sacroiliac and hip joints.

Physical therapy treatments for piriformis syndrome often begin with heat applications. Heat is used to help the piriformis muscle relax, easing spasm and pain. Your physical therapist may place a hot pack over your buttocks muscle.

Ultrasound is another treatment choice that can be set for deep heating in the buttock area. Ultrasound uses high frequency sound waves that are directed through the skin. The deep heating effect of ultrasound is ideal for preparing the piriformis muscle for hands-
on forms of treatment and for getting the muscle to stretch out.

Hands-on treatments such as deep massage and specialized forms of soft-tissue mobilization may be used initially. Your therapist may also position your hip and leg in a way that helps to relax nerve signals to the piriformis.

The keystone treatment for piriformis treatment is stretching. Stretching is especially effective following heat and hands on treatments. Your therapist will position you in ways that help you get a good stretch on the piriformis muscle. Along with the stretches
you’ll do in the clinic, you’ll be shown several ways to stretch the muscle on your own. You need to do your stretches every few hours. Be gentle and cautious as you stretch to avoid overdoing it.

As your symptoms ease, your therapist will gradually advance your program to include posture training, muscle strengthening, and general conditioning.

After Surgery

Your surgeon may prescribe physical therapy after surgery for piriformis syndrome. You’ll probably only need to attend sessions for four to six weeks. Expect full recovery to take up to three months.

During therapy after surgery, your therapist may use treatments such as heat or ice, electrical stimulation, massage, and ultrasound to help calm pain and muscle spasm. Then you’ll begin learning how to move safely with the least strain on the healing area.

As the rehabilitation program evolves, you’ll begin doing more challenging exercises. The goal is to safely advance strength and function.

As the therapy sessions come to an end, your therapist helps you get back to the activities you enjoy. Ideally, you’ll be able to resume normal activities. You may need guidance on which activities are safe or how to change the way they go about their activities.

When treatment is well under way, regular visits to your therapist’s office will end. Your therapist will continue to be a resource. But you’ll be in charge of doing your exercises as part of an ongoing home program.

Sacroiliac Joint Dysfunction

A Patient’s Guide to Sacroiliac Joint Dysfunction

Introduction

Sacroiliac Joint Dysfunction

A painful sacroiliac joint is one of the more common causes of mechanical low back pain. Sacroiliac (SI) joint dysfunction is a term that is used to describe the condition – because it is still unclear why this joint becomes painful and leads to low back pain. Sacroiliac joint dysfunction can be a nuisance but it is seldom dangerous and rarely leads to the need for surgery. Most people who suffer from this problem can reduce the pain and manage the problem with simple methods.

This guide will help you understand

  • how the problem develops
  • how doctors diagnose the condition
  • what treatment options are available

Anatomy

What part of the back is involved?

At the lower end of the spine, just below the lumbar spine lies the sacrum. The sacrum is a triangular shaped bone that is actually formed by the fusion of several vertebrae during development. The sacroiliac (SI) joint sits between the sacrum and the iliac bone (thus the name “sacroiliac” joint). You can see these joints from the outside as two small dimples on each side of the lower back at the belt line.

Sacroiliac Joint Dysfunction

The SI joint is one of the larger joints in the body. The surface of the joint is wavy and fits together similar to the way Legos® fit together. Very little motion occurs in the SI joint. The motion that does occur is a combination of sliding, tilting and rotation. The most the joint moves in sliding is probably only a couple of millimeters, and may tilt and rotate two or three degrees.

Sacroiliac Joint Dysfunction

The SI joint is held together by several large, very strong ligaments. The strongest ligaments are in the back of the joint outside of the pelvis. Because the pelvis is a ring, these ligaments work somewhat like the hoops that hold a barrel together. If these ligaments are torn, the pelvis can become unstable. This sometimes happens when a fracture of the pelvis occurs and the ligaments are damaged. Generally, these ligaments are so strong that they are not completely torn with the usual injury to the SI joint.

The SI joint hardly moves in adults. During the end of pregnancy as delivery nears, the hormones that are produced causes the joint to relax. This allows the pelvis to be more flexible so that birth can occur more easily. Multiple pregnancies seem to increase the amount of arthritis that forms in the joint later in life. Other than the role the joint plays in pregnancy, it does not appear that motion is important to the function of the joint. The older one gets, the more likely that the joint is completely ankylosed, a term that means the joint has become completely stiffened with no movement at all. It appears that the primary function of the joint is to be a shock absorber and to provide just enough motion and flexibility to lessen the stress on the pelvis and spine.

Related Document: A Patient’s Guide to Lumbar Spine Anatomy

Causes

What causes this problem?

There are many different causes of SI joint pain. Pregnancy may be a factor in the the development of SI joint problems later in life. Also, if a person has one leg is shorter that the other, the abnormal alignment may end up causing SI joint pain and problems. Often, an exact cause leading to a painful SI joint condition can’t be found. The joint simply gets painful, and the patient and provider don’t have an answer as to why the joint has become painful.

Sacroiliac Joint Dysfunction

The SI joint is a synovial joint, similar to all joints such as the knee, hip and shoulder. Because of this, different types of arthritis that affect all the joints of the body will also affect the sacroiliac joint. This includes conditions such as rheumatoid arthritis, gout and psoriasis. The joint can be infected when bacteria that travel in the blood settle in the joint causing a condition called septic arthritis. This is perhaps the most worrisome cause of SI joint pain and may well require surgery to drain the infection.

Sacroiliac Joint Dysfunction

Injury to the SI joint is thought to be a common cause of pain. Injury can occur during an automobile accident. One common pattern of injury occurs when the driver of a vehicle places one foot on the brake before a collision. The impact through the foot on the brake is transmitted to the pelvis causing a twisting motion to this side of the pelvis. This can injure the SI joint on that side resulting in pain. A similar mechanism occurs with a fall on one buttock. The force again causes a twisting motion to the pelvis and may injure the ligaments around the joint.

Symptoms

What does the condition feel like?

Sacroiliac Joint Dysfunction

The most common symptoms from SI joint dysfunction are low back and buttock pain. The pain may affect one side or both SI joints. The pain can radiate down the leg all the way to the foot and may be confused with a herniated disc in the lumbar spine. The pain may radiate into the groin area. People often feel muscle spasm in one or both of their buttocks muscles.

Problems with the SI joint may make sitting difficult. Pain in one SI joint may cause a person to sit with that buttock tilted up. It is usually uncomfortable to sit flat in a chair.

Diagnosis

How do doctors diagnose the problem?

Diagnosis begins with a complete history and physical exam. Your doctor will ask questions about your symptoms and how the pain is affecting your daily activities. Your doctor will also want to know what positions or activities make your symptoms worse or better. You will be asked about any injuries in the past and about any other medical problems you might have such as any arthritis that runs in the family.

Your doctor then examines you by checking your posture, how you walk and where your pain is located. Your doctor checks to see which back movements cause pain or other symptoms. Your skin sensation, muscle strength, and reflexes are also tested because it is difficult to distinguish pain coming from the SI joint from pain coming from other spine conditions.

Laboratory tests may be ordered if there is any question whether you might have an infection or some type of arthritis affecting multiple joints. You may also need to have blood drawn and give a urine sample to send to the laboratory for special tests.

X-rays are commonly ordered of both the low back and pelvis. X-rays can give your doctor an idea about how much wear and tear has occurred in the SI joint. X-rays of the lumbar spine and hips are also helpful to rule out problems in these areas that may act and look like SI joint dysfunction.

Other radiological tests may be useful as well. The magnetic resonance imaging (MRI) scan can be used to look at the lumbar spine and pelvis in much more detail and to rule out other conditions in the area. The MRI scan uses magnetic waves rather than x-rays and shows a very detailed picture of the soft tissues of the body.

A computed tomography (CAT) scan may also be used to show a much more detailed look at the bone of the pelvis and the sacroiliac joint.

A bone scan is useful to see how the skeleton is reacting to any type of “stress,” such as an injury, an infection, or inflammation from arthritis. This test involves injecting chemical “tracers” into your blood stream. The tracers then show up on special spine X-rays. The tracers collect in areas where the bone tissue is reacting strongly to some type of stress to the skeleton, such as arthritis and infection of the SI joint.

Sacroiliac Joint Dysfunction

The most accurate way of determining whether the SI joint is causing pain is to perform a diagnostic injection of the joint. Because the joint is so deep, this must be done using X-ray guidance with a fluoroscope (a type of realtime X-ray). Once the doctor places a needle in the joint, an anesthetic is injected into the joint to numb the joint. If your pain goes away while the anesthetic is in the joint, then your doctor can be reasonably sure that the pain you are experiencing is coming from the SI joint.

Treatment

What treatment options are available?

Nonsurgical Treatment

Doctors often begin by prescribing nonsurgical treatment for SI joint dysfunction. In some cases, doctors simply monitor the patient’s condition to see if symptoms improve. Anti-inflammatory medications, such as ibuprofen and naproxen, are commonly used to treat the pain and inflammation in the joint. Acetominiphen (for example, Tylenol) can be used to treat the pain, but it will not control the inflammation.

Sacroiliac Joint Dysfunction

Your doctor may ask that you rest your back by limiting your activities. The purpose of this is to help decrease inflammation and calm the muscle spasm. Some patients benefit from wearing a special brace called a sacroiliac belt. This belt wraps around the hips to hold the sacroiliac joint tightly together, which may ease your pain.

Patients often work with a physical therapist. After evaluating your condition, a therapist can assign positions and exercises to ease your symptoms. The therapist may design an exercise program to improve the strength and control of your back and abdominal muscles. Some therapists are trained in manipulative techniques that attempt to treat the pain in this manner. You may be able to learn how to adjust your SI joint yourself and ease the symptoms. If your physical therapist is not trained in manipulation, he/she may be able to suggest a chiropractic physician or osteopathic physician in your area who can provide this treatment.

If conservative treatment is unsuccessful, injections may be suggested by your doctor. As described above, injections are used primarily to confirm that the pain is coming from the SI joint. A series of cortisone injections may be recommended to try to reduce the inflammation in and around the SI joint. Cortisone is a powerful anti-inflammatory medication that is commonly used to control pain from arthritis and inflammation. Other medications have been injected into the joint as well. A chemical called hyaluronic acid has been used for years to treat osteoarthritis of the knee. This chemical is thought to reduce pain due to its lubricating qualities and the fact that it nourishes the articular cartilage in the synovial joints. The true mechanism of action remains unknown, but it has been used with some success in the SI joint. All of these injections are temporary and are expected to last several months at the most.

Related Document: A Patient’s Guide to Sacroiliac Joint Injections

Sacroiliac Joint Dysfunction

Another procedure that has been somewhat successful is called radiofrequency ablation. After a diagnostic injection has confirmed that the pain is coming from the SI joint, the small nerves that provide sensation to the joint can be “burned” with a special needle called a radiofrequency probe. In theory, this destroys any sensation coming from the joint, making the joint essentially numb. This procedure is not always successful. It is temporary but can last for up to two years. It can be repeated if needed.

Surgery

Surgery may be considered if other treatments don’t work. Surgery consists of fusing the painful SI joint. A fusion is an operation where the articular cartilage is removed from both ends of the bones forming the joint. The two bones are held together with plates and screws until the two bones grow together, or fuse, into one bone. This stops the motion between the two bones and theoretically eliminates the pain from the joint.

Sacroiliac Joint Dysfunction

This is a big operation and is not always successful at relieving the pain. The operation is not commonly performed unless the pain is debilitating. SI joint pain is seldom this severe.

Rehabilitation

What should I expect as I recover?

Nonsurgical Rehabilitation

Doctors often recommend physical therapy for patients with SI joint dysfunction. Patients are normally seen a few times each week for four to six weeks. In severe and chronic cases, patients may need a few additional weeks of care.

When movement of a joint is limited, the pain and symptoms of SI joint dysfunction may worsen. Getting more motion can give you the relief you need for daily activities. If you don’t have full range of motion, your therapist has several ways to help you get more movement including joint manipulation, stretching, and exercises. Active movement and stretching as part of a home program can also help restore movement and get you better faster.

Therapists commonly prescribe a set of stretches to improve flexibility in the muscles of the trunk, buttocks, and thighs. In addition to the treatment you receive by your therapist, you may be given ways to help your own SI joint if your pain returns. These
exercises usually require that you position your hip and pelvis in a certain way and either stretch or contract and relax specific muscles. Follow the instructions of your therapist when doing these exercises.

If the SI joint has too much mobility and problems keep coming back, you may need extra help to stabilize the SI joint. You may be issued a SI belt to stabilize the joint. A belt like this can often ease pain enough to let you exercise comfortably.

You’ll learn some exercises to help you build strength, muscle control, and endurance in the muscles that attach around the SI joint. Unfortunately, few muscles actually connect to both the sacrum and the pelvis. Key muscles to work are the gluteus maximus, as well as the abdominal and low back muscles.

After Surgery

You will normally need to wait at least six weeks before beginning a rehabilitation program after having SI joint fusion surgery. You should plan on attending therapy sessions for six to eight weeks. Expect full recovery to take up to six months.

During therapy after SI joint surgery, your therapist may use treatments such as heat or ice, electrical stimulation, massage, and ultrasound to help calm your pain and muscle spasm. Then you’ll begin learning how to move safely with the least strain on the healing area.

As your rehabilitation program evolves, you’ll begin doing more challenging exercises. The goal is to safely advance your strength and function.

As your therapy sessions come to an end, your therapist helps you get back to the activities you enjoy. Ideally, you’ll be able to resume your normal activities. You may need guidance on which activities are safe or how to change the way you go about your
activities.

When treatment is well under way, regular visits to your therapist’s office will end. Your therapist will continue to be a resource. But you’ll be in charge of doing your exercises as part of an ongoing home program.

Osgood-Schlatter Disease

A Patient’s Guide to Osgood-Schlatter Lesion of the Knee

Introduction

An Osgood-Schlatter lesion involves pain and swelling in the small bump of bone on the front of the tibia (shinbone), right below the kneecap. It occurs in children and adolescents. The problem affects the area where bone growth occurs. Too much stress on the growing bone causes the pain and swelling. The pain often worsens with activity and eases with rest. Fortunately, the condition is not serious. It is usually only temporary.

The condition is the most frequent cause of knee pain in children between the ages of 10 and 15. The problem used to happen mostly in boys. But with more girls playing sports, boys and girls are now affected equally. Because girls’ skeletons begin to mature earlier than boys, girls tend to have this condition when they are one to two years younger than boys. Kids who play sports have this condition 20 percent more often than nonathletes. And the lesion seems to run in families; when one child is affected, there’s a 30 percent chance a sibling will have it, too.

This guide will help you understand

  • why the condition develops
  • how doctors diagnose the condition
  • what treatment options are available

Anatomy

What part of the knee is affected?

Osgood-Schlatter Disease

The Osgood-Schlatter lesion affects the tibial tuberosity. The tibial tuberosity is the bump on the top of the tibia (shinbone) where the patellar tendon connects. Tendons connect muscles to bones. The patellar tendon stretches over the top of the patella (kneecap). The patellar tendon connects the large quadriceps muscle on the front of the thigh to the tibial tuberosity. As the quadriceps muscle works, it pulls on the patellar tendon and extends (straightens) the knee joint.

Osgood-Schlatter Disease

A small bursa sometimes develops where the patellar tendon meets the tibial tuberosity. A bursa is a normal structure that often forms in areas where friction occurs, such as between muscles, tendons, and bones. A bursa is a thin sac of tissue filled with fluid. The fluid lubricates the area and reduces friction.

Related Document: A Patient’s Guide to Knee Anatomy

Causes

How did this problem develop?

Osgood-Schlatter Disease

Osgood-Schlatter lesions fit in a category of bone development disorders known as osteochondroses. (Osteo means bone, and chondro means cartilage.) In normal development, specialized bone growth centers (called growth plates) change over time from cartilage to bone. The growth centers expand and finally unite. This is how bones grow in length and width. Bone growth centers are located throughout the body.

Children with bone development problems in one area are likely to develop similar problems elsewhere. For example, among young athletes with growth plate problems in the back of the heel (Sever’s syndrome), about two-thirds also develop an Osgood-Schlatter lesion. Children who have an Osgood-Schlatter lesion also have a small chance of problems at the top of the patellar tendon, where it attaches to the bottom tip of the kneecap. This condition is known as Sinding-Larsen-Johansson disorder.

Related Document: A Patient’s Guide to Sever’s Syndrome

Related Document: A Patient’s Guide to Jumper’s Knee in Children and Adolescents

The main cause of Osgood-Schlatter lesions is too much tension in the patellar tendon. The tension can come from overuse from sports activity and from growth spurts. Usually both happen together. Both put extra stress on the tibial tuberosity.

Osgood-Schlatter Disease

During growth spurts, the tendon may not be able to keep up with the growth of the lower leg. The tendon becomes too short. It constantly pulls at the tibial tuberosity. Tension from sports activity comes from overuse. When the quadriceps muscle on the front of the thigh works, it pulls on the patellar tendon. The tendon in turn pulls on the tibial tuberosity. If the tension is too great and occurs too often while the bone is developing, it can pull the growth area of the tibial tuberosity away from the growth area of the shinbone.

Osgood-Schlatter Disease

The bump forms because the separated growth plates keep growing and expanding. The area between the bone fragments fills in with new tissue, either cartilage or bone. The new tissue causes the tibial tuberosity to become enlarged and painful.

Osgood-Schlatter Disease

Another possible cause of Osgood-Schlatter lesions is abnormal alignment in the legs. Kids who are knock-kneed or flat-footed seem to be most prone to the condition. These postures put a sharper angle between the quadriceps muscle and the patellar tendon. This angle is called the Q-angle. A large Q-angle puts more tension on the bone growth plate of the tibial tuberosity, increasing the chances for an Osgood-Schlatter lesion to develop. A high-riding patella, called patella alta, is also thought to contribute to development of Osgood-Schlatter lesions.

Symptoms

What does an Osgood-Schlatter lesion feel like?

In an Osgood-Schlatter lesion, the tibial tuberosity will probably be enlarged and painful. It hurts when bumped. It also hurts when pressure is put on it, such as when kneeling. Activities like running, jumping, climbing, and kicking may hurt because of the tension of the patellar tendon pulling on the tibial tuberosity.

Symptoms generally go away gradually over a period of one to two years. However, the condition may leave a permanent, painless bump below the knee. The area may always be tender. Many adults who had a lesion as a child still have pain when kneeling on that knee.

Osgood-Schlatter Disease

Complications can occur if the area between the bone fragments fills in with cartilage rather than bone. Normally, the bone growth plates join together with solid bone in between. If cartilage fills in the space, the condition is called a nonunion.

Diagnosis

How do doctors diagnose the condition?

A doctor can usually make the diagnosis from the history and physical examination. The doctor will want to know the child’s age and activity level, and whether there are any siblings who’ve had an Osgood-Schlatter lesion.

The doctor will press on and around the patella and patellar tendon to see if there is any tenderness. The doctor will compare the sore knee and the healthy knee. The doctor may also ask the patient to straighten the knee against resistance. This makes the quadriceps muscle work, putting tension on the patellar tendon. Pain during this test can help the doctor make the diagnosis of an Osgood-Schlatter lesion.

The history and physical examination are usually the only tests necessary, but sometimes an X-ray is ordered. A knee X-ray may show a raised area of irregular bone in the tibial tuberosity. Most often it will show swelling in the soft tissues in front of the tibial tuberosity. In more severe cases, the X-ray may show small bony fragments that are separated from the rest of the tibial tuberosity.

Osgood-Schlatter Disease

An X-ray is necessary if the tibial tuberosity hurts after an injury such as a fall. In this case, the X-ray will help the doctor see if the tibial tuberosity fractured as a result of the trauma.

Treatment

What can be done for the problem?

Nonsurgical Treatment

The passing of time may be all that is needed. It takes one to two years for the bone growth plates of the tibial tuberosity to grow together and form one solid bone. When this occurs, symptoms usually go away completely.

In some cases, the patient may need to stop sport activities for a short period. This gets the pain and inflammation under control. Usually patients don’t need to avoid sports for a long time. It is unlikely that the bone will completely separate, so not all athletes need to completely avoid sports.

Osgood-Schlatter Disease

The doctor may prescribe anti-inflammatory medicine to help reduce swelling. Physical therapists might use ice, heat, or ultrasound to control inflammation and pain. A variety of pads, straps, and sleeves are available that can help keep pain to a minimum. For example, wearing a knee pad cushions the sore area while kneeling.

As symptoms ease, the physical therapist works on flexibility, strength, and muscle balance in the knee. Posture exercises can help improve knee alignment. The therapist may also design special shoe inserts, called orthotics, to support flat feet or to correct knock-kneed posture.

Cortisone injections are commonly used to control pain and inflammation in other types of injuries. However, a cortisone injection is usually not appropriate for Osgood-Schlatter lesions. Cortisone injections haven’t shown consistently good results for this condition. There is also a high risk that the cortisone will cause the patellar tendon to rupture.

Severe pain and problems may require a knee brace or cast for up to six weeks. The goal is to stop the knee from moving so that inflammation and pain go away.

Surgery

Surgery is not considered unless bone growth is complete and symptoms are still bothersome despite nonsurgical treatments. Even then, surgery for an Osgood-Schlatter lesion is rarely recommended.

Osgood-Schlatter Disease

When surgery is needed, the usual operation involves removing the raised area of the tibial tuberosity, the bursa, and irritated tissue nearby. The surgeon makes a small incision down the front of the lower knee, just over the tibial tuberosity. The patellar tendon is split in half. Retractors are used to pull the skin and the patellar tendon apart. This makes it easy for the surgeon to see and work on the tibial tuberosity. The surgeon uses an osteotome to cut away the raised area of the tibial tuberosity. Care is taken while removing the bursa and nearby tissue.

The retractors are removed. The cut edges of the patellar tendon are brought together. Scar tissue eventually binds the edges back together. To complete the operation, the surgeon stitches up the skin.

Rehabilitation

What can be expected from treatment?

Nonsurgical Rehabilitation

With nonsurgical rehabilitation, the goal is to reduce pain and inflammation. These measures can help. However, most Osgood-Schlatter lesions still get better over time, as the bones mature.

Some doctors have their patients work with a physical therapist. Therapists work on the possible causes of the problem. For example, flexibility exercises for the hamstring and quadriceps muscles can help reduce tension in the patellar tendon where it attaches to the tibial tuberosity. Orthotics are sometimes issued to put the leg and knee in good alignment. Strengthening exercises to improve muscle balance can help the kneecap move correctly during activity. Therapists work with athletes to improve form and to reduce knee strain during sports.

When symptoms are especially bad, patients may be instructed to avoid any activity that makes their pain worse, including sports. In severe cases, bracing or casting may be needed for up to six weeks.

After Surgery

After surgery, daily activities can be resumed gradually. The knee should be propped up routinely during the day to help reduce swelling and throbbing. Medicines should be taken exactly as prescribed by the surgeon.

The surgeon may recommend using crutches or a cane for awhile. Vigorous activities and exercise should be avoided for six weeks after surgery. Athletes should not take part in high-level sports for two to three months. Some surgeons have their patients attend physical therapy after surgery.

Jumper’s Knee

A Patient’s Guide to Jumper’s Knee in Children and Adolescents

Introduction

When a child or adolescent complains of pain and tenderness near the bottom of the kneecap, the problem might be from jumper’s knee. Kids in sports that require a lot of kicking, jumping, or running are affected most. Doing these actions over and over can lead to pain in the tendon that stretches over the front of the kneecap.

Sometimes the bone growth center at the bottom tip of the kneecap is affected. This condition is known as Sinding-Larsen-Johansson disorder. It is mostly likely to occur during growth spurts. Disruption within the developing bone in the bottom tip of the kneecap may produce pain and tenderness in the front of the knee. Fortunately, this condition is not serious. It is usually only temporary and will improve with age.

This guide will help you understand

  • what part of the knee is involved
  • what causes the condition
  • what treatment options are available

Anatomy

What part of the knee is involved?

Jumper's Knee

Jumper’s knee affects the patellar tendon. The patellar tendon connects the large and powerful quadriceps muscle in the front of the thigh to the tibia (shinbone). The patellar tendon wraps over the front of the patella (kneecap). The upper end of the patellar tendon connects to the bottom tip of the patella. This area is called the inferior pole of the patella. The lower end of the patellar tendon connects to a small bump of bone on the front surface of the tibia. This bump is called the tibial tuberosity.

Related Document: A Patient’s Guide to Knee Anatomy

Causes

How does this problem develop?

Jumper’s knee is usually caused by overuse of the patellar tendon. Kids who play sports with lots of squatting and jumping seem to be most at risk. In order to squat and to land softly from a jump, the quadriceps muscle must work extra hard to slow the body down and protect the knee. It does this by lengthening as it works, which is called an eccentric contraction. This muscle action places unusually high tension on the patellar tendon. When squatting and jumping are done over and over, the repetitive stress on the tendon causes injury to the individual fibers of the tendon. The tendon becomes inflamed and painful. This is the condition called jumper’s knee.

Jumper's Knee

Another possible cause of jumper’s knee is from abnormal alignment of the lower limbs. Kids who are knock-kneed or flat-footed seem to be most prone to the condition. These altered postures put a sharper angle between the quadriceps muscle and the patellar tendon. This angle is called the Q-angle. A large Q-angle means there is already more tension on the patellar tendon. The risk of developing jumper’s knee is thus higher. A large Q-angle also places abnormal tension on the bone growth plate of the inferior pole of the patella, increasing the risk for Sinding-Larsen-Johansson disorder. A high-riding patella, called patella alta, is also thought to contribute to development of jumper’s knee in children and adolescents.

Patellar tendon pain has a slightly different cause in an active child whose bones are not done growing. Increased tension in the tendon starts during growth spurts. The patellar tendon is unable to keep up with the growth of the lower leg. As a result, the tendon is too short. This causes the tendon to pull on the bottom tip of the kneecap. Heavy or repetitive sports activity stresses this area even more. Eventually the increased tension disrupts normal growth of the bottom tip of the patella. When this happens, the condition is known as Sinding-Larsen-Johansson disorder.

Jumper's Knee

This unique condition is part of a category of bone development disorders known as the osteochondroses. (Osteo means bone, and chondro means cartilage.) In normal development, specialized (called growth plates) change over time from cartilage to bone. The growth plates expand and unite. This is how bones grow in length and width. Bone growth centers are located throughout the body.

Jumper's Knee

Children with bone development disorders in one part of their body are likely to develop similar problems elsewhere. For example, children who have Sinding-Larsen-Johansson disorder also have a small chance of bone growth problems where the lower end of the patellar tendon attaches to the tibial tuberosity. This is known as an Osgood Schlatter lesion.

Related Document: A Patient’s Guide to Osgood Schlatter’s Lesion

Symptoms

What does this problem feel like?

Jumper’s knee commonly produces pain and tenderness directly over the patellar tendon, just below the kneecap. Sometimes there is a small amount of swelling. Kneeling on the sore knee usually hurts. Activities where the quadriceps muscle works eccentrically, such as squatting, jumping, and going down stairs, are often painful.

Kids with Sinding-Larsen-Johansson disorder may feel similar symptoms along the top of the kneecap, where the quadriceps muscle meets the patellar tendon. Sometimes they feel tightness in this area, especially when they try to fully bend the knee.

Diagnosis

How do doctors identify the problem?

The history and physical examination are usually enough to make the diagnosis of jumper’s knee. The doctor will need information about the child’s age and activity level. The doctor will press on and around the patella and patellar tendon to see if there is any tenderness. The doctor will compare the sore knee and the healthy knee. The doctor may also ask the patient to straighten the knee against resistance. This makes the quadriceps muscle work, putting tension on the patellar tendon. Pain during this test can help the doctor make the diagnosis of jumper’s knee.

If the doctor suspects problems with Sinding-Larsen-Johansson disorder, it is likely that an X-ray will be ordered. The X-ray is taken from the side of the knee. This view may show small fragments of bone where tension in the patellar tendon has disrupted the growth plate in the bottom tip of the patella. The X-ray may also show calcification or roughness around the bottom of the patella.

An X-ray will be needed if the kneecap is painful from trauma such as a fall. In this case, the X-ray will help the doctor see if a patellar fracture has occurred.

Occasionally, a magnetic resonance imaging (MRI) scan may show more detail. The MRI can give a better view of any calcification in the patellar tendon where it attaches on the bottom tip of the kneecap. The MRI can detect swelling. It can also show if injury or inflammation is present within the patellar tendon.

Treatment

What treatment options are available?

Nonsurgical Treatment

In some cases of jumper’s knee, the patient may need to stop sports activities for a short period. This gets the pain and inflammation under control. Usually patients don’t need to avoid sports for a long time.

When jumper’s knee is affecting a patient before the skeleton has stopped growing (Sinding-Larsen-Johansson disorder), the passing of time may be all that is needed. It takes one to two years for the bone growth plates that make up the inferior pole of the patella to grow together and form one solid bone. At this point, pain and symptoms usually go away completely.

To treat jumper’s knee, the doctor may prescribe anti-inflammatory medicine to help reduce swelling. A variety of knee straps and sleeves are available that may help keep pain to a minimum. The doctor may also suggest working with a physical therapist.

Physical therapy treatments might use ice, heat, or ultrasound to control inflammation and pain. As symptoms ease, the physical therapist works on flexibility, strength, and muscle balance in the knee. Posture exercises can help improve knee alignment. The therapist may also design special shoe inserts, called orthotics, to support flat feet or to correct knock-kneed posture.

Cortisone injections are commonly used to control pain and inflammation in other types of injuries. However, a cortisone injection is usually not appropriate for this condition. Cortisone injections haven’t shown consistently good results for jumper’s knee. There is also a high risk that the cortisone will cause the patellar tendon to rupture.

Surgery

Surgery is rarely needed for jumper’s knee. Surgery is really not even an option when symptoms are caused by Sinding-Larsen-Johansson disorder, unless bone growth is complete and symptoms have not gone away with nonsurgical treatment. Even then, surgery for Sinding-Larsen-Johansson disorder is unusual.

Surgery may be considered if the problem involves only the tendon (not the growth plate) and if symptoms have not gone away with other forms of treatment. In these cases, the surgeon may do an operation to strip away inflamed and damaged tissue on the surface of the patellar tendon.

Jumper's Knee

In this procedure, a small incision is made down the front of the knee, below the patella. The skin is opened to expose the patellar tendon. Next, the surgeon carefully peels damaged tissue off the surface of the tendon. Three to five thin lengths of the tendon are removed. In some cases, small drill holes are made in the bottom tip of the patella. The drilling causes a small amount of bleeding, which signals the body to begin healing the area. Then the surgeon removes any damaged tissue nearby.

To complete the operation, the surgeon stitches up the skin and wraps the area with a bandage.

Rehabilitation

What can be expected from treatment?

Nonsurgical Rehabilitation

In nonsurgical rehabilitation, the goal is to reduce pain and inflammation. Nonsurgical treatment can help ease symptoms of jumper’s knee. Some doctors have their patients work with a physical therapist. Treatments such as heat, ice, and ultrasound may be used to ease pain and swelling.

Therapists also work on the possible causes of the problem. For example, flexibility exercises for the hamstring and quadriceps muscles can help reduce tension in the patellar tendon where it attaches to the patella. Orthotics are sometimes issued to put the leg and knee in good alignment. Strengthening exercises to improve muscle balance can help the kneecap to move correctly during activity. Therapists work with athletes to help them improve their form and reduce knee strain during their sports. When symptoms are especially bad, patients may need to avoid activities that make their pain worse, including sports.

When the problem involves the bone growth plate (Sinding-Larsen-Johannson disorder), the symptoms tend to go away slowly over time. This means nonsurgical rehabilitation probably won’t cure the problem. Treatments can only give short-term relief.

After Surgery

The surgeon may recommend wearing a hinged knee brace for a few weeks after surgery. The brace lets the knee bend, but it doesn’t let the quadriceps muscle fully straighten the knee. Crutches may be needed for a few days after the operation, until the patient can bear weight without pain or problems.

Patients need to check in with the surgeon 10 to 14 days after surgery. Stitches are taken out, and patients are encouraged to begin actively bending and straightening the knee.

The surgeon may recommend physical therapy after the operation. The first few physical therapy treatments are designed to help control the pain and swelling from the surgery. The physical therapist will choose exercises to help improve knee motion and to get the quadriceps muscles toned again.

Daily activities can be resumed gradually. Vigorous activities and exercise should be avoided for at least six weeks after surgery. Athletes should hold off high-level sports for six months. After that they should be safe to go back to their sports, as long as they have regained normal strength in the quadriceps muscle.

Sever’s Syndrome

A Patient’s Guide to Sever’s Syndrome

Introduction

Sever’s syndrome is a painful heel condition that affects growing adolescents between the ages of nine and 14. In this condition, the growing part of the heelbone grows faster than the tendon that connects on the back of the heel. This tightens up the tendon and creates tension where it attaches to the heel. Eventually, the tension causes the area to become inflamed and painful. Fortunately, the condition is not serious. It is usually only temporary.

Youth who play running and jumping sports are most prone to this problem. Sever’s syndrome used to happen mostly in boys. But with more girls playing sports, boys and girls are now affected equally. Both heels hurt in more than half the cases.

This guide will help you understand

  • what part of the heel is involved
  • what causes the condition
  • what treatment options are available

Anatomy

What part of the heel is affected?

Sever's Syndrome

Sever’s syndrome affects the bone growth center in the back of the heelbone (the calcaneus). The Achilles tendon connects the calf muscles in the back of the lower leg to the back of the calcaneus. (Tendons attach muscles to bones.)

Related Document: A Patient’s Guide to Foot Anatomy

Causes

How does this problem develop?

Sever's Syndrome

This unique condition is part of a category of bone development disorders known as osteochondroses. (Osteo means bone, and chondro means cartilage.) In normal development, specialized bone growth centers (called growth plates) change over time from cartilage to bone. The growth plates expand and unite. This is how bones grow in length and width. Bone growth centers are located throughout the body.

Sever's Syndrome

As the bones of the leg begin to grow longer, they sometimes grow at a faster pace than the Achilles tendon. The Achilles tendon is then too short. It begins to put tension on the back of the heel. When this happens in kids who are active in running and jumping sports, pain occurs where the Achilles tendon attaches to the heel.

Other factors have a role in the development of Sever’s syndrome. Kids with tight hamstring and calf muscles seem to have a greater risk for the condition. The problem is compounded when they play sports on hard surfaces, such as playing soccer on hard outdoor fields. The constant impact can disrupt the bone growth centers in the back of the heel, causing inflammation and pain.

Symptoms

What does this problem feel like?

The back of the heel may appear red and swollen. It will probably be tender to the touch. Squeezing the heel is painful. The heel tends to hurt during activity and feel better with rest.

The heel and foot may feel stiff, especially first thing in the morning. The calf muscles and Achilles tendon may also feel tight.

Diagnosis

How do doctors identify the problem?

The history and physical examination are usually enough to make the diagnosis of Sever’s syndrome. The doctor will need information about the age and activity level of the child. The doctor will press on and around the back of the heel and may even squeeze both sides of the heel to see if there is any tenderness. The doctor will compare both heels.

The doctor may also ask the patient to rise up on the toes. This makes the calf muscles work, which puts tension on the Achilles tendon. Pain during this test can help the doctor make the diagnosis of Sever’s syndrome.

X-rays aren’t that helpful in diagnosing Sever’s syndrome. The X-ray may appear to show small cracks within the bone at the back of the heel. However, even kids who have no pain at all may seem to have these cracks on X-rays. The cracks are the bone growth center and are normal. Doctors may order an X-ray anyway to make sure there are no other problems, such as a fracture.

Treatment

What treatment options are available?

Nonsurgical Treatment

In some cases of Sever’s syndrome, the patient may need to stop sports activities for a short period. This gets the pain and inflammation under control. Usually patients don’t need to avoid sports for a long time.

Sometimes, the passing of time may be all that is needed. It takes one to two years for the bone growth plates that make up the back of the heel to grow together and form one solid bone. At this point, pain and symptoms usually go away completely.

The doctor may prescribe anti-inflammatory medicine to help reduce pain and swelling. A small lift or pad placed under the sore heel may help, too. The lift angles the foot down slightly. This angle relaxes the Achilles tendon and reduces stress where the tendon attaches on the back of the heel.

The doctor may also suggest working with a physical therapist. Physical therapists might use ice, heat, or ultrasound to control inflammation and pain. As symptoms ease, the physical therapist works on flexibility, strength, and muscle balance in the leg. The therapist may also design special shoe inserts, called orthotics, to support the arch and take tension off the Achilles attachment. Taping the arch is an option when orthotics won’t work, such as in footwear used by gymnasts and ballet dancers.

Children with Sever’s syndrome should avoid running on hard surfaces. Running barefoot should be avoided. The impact worsens the pain and inflammation.

Cortisone injections are commonly used to control pain and inflammation in other types of injuries. However, a cortisone injection is usually not appropriate for this condition. Cortisone injections haven’t shown consistently good results for Sever’s syndrome. There is also a high risk that the cortisone will cause the Achilles tendon to rupture.

In severe cases, when other forms of treatment don’t give relief, doctors may recommend a walking cast for six to 12 weeks. The goal is to stop the foot from moving so that inflammation and pain go away.

Surgery

The symptoms of Sever’s syndrome usually disappear when the growth plates in the heel grow together. Surgery is not generally an option for Sever’s syndrome.

Rehabilitation

What should I expect from treatment?

Nonsurgical Rehabilitation

In nonsurgical rehabilitation, the goal is to reduce pain and inflammation. Nonsurgical treatment can help ease symptoms of Sever’s syndrome. Some doctors have their patients work with a physical therapist. Therapists also work on the possible causes of the problem. The major treatment for Sever’s syndrome is stretching exercises for the Achilles tendon. Ice is often applied after the stretching program for up to 20 minutes. The stretches and ice treatments reduce tension and inflammation.

It is also important to stretch the hamstring and quadriceps muscles. This can help reduce tension in the Achilles tendon where it attaches to the heel. Orthotics are sometimes issued to put the leg and foot in good alignment.

Therapists work with young athletes to help them improve their form and reduce strain on the heel during their sports. When symptoms are especially bad, patients may need to avoid activities that make their pain worse, including sports.

Symptoms from Sever’s syndrome tend to go away slowly over time. This means nonsurgical rehabilitation doesn’t really cure the problem. Treatments only help by giving short-term relief.

Adolescent Osteochondritis Dissecans of the Elbow

A Patient’s Guide to Adolescent Osteochondritis Dissecans of the Elbow

Introduction

Young gymnasts and overhand athletes, particularly baseball pitchers and racket-sport players, are prone to an odd and troubling elbow condition. The forceful and repeated actions of these sports can strain the immature surface of the outer part of the elbow joint. The bone under the joint surface weakens and becomes injured, which damages the blood vessels going to the bone. Without blood flow, the small section of bone dies. The injured bone cracks. It may actually break off. This condition is called osteochondritis dissecans (OCD).

In the past, this condition was called Little Leaguer’s elbow. It got its name because it was so common in baseball pitchers between the ages of 12 and 20. Now it is known that other sports, primarily gymnastics and racket sports, put similar forces on the elbow. These sports can also lead to elbow OCD in adolescent athletes.

This guide will help you understand

  • how this problem develops
  • how doctors identify the problem
  • what treatment options are available

Anatomy

Adolescent Osteochondritis Dissecans of the Elbow

What part of the elbow does this problem affect?

The elbow is the connection of the upper arm bone (the humerus) and the two bones of the forearm (the ulna and the radius). The radius runs from the outer edge of the elbow down the forearm to the thumb-side of the wrist.

Adolescent Osteochondritis Dissecans of the Elbow

The joint where the humerus meets the radius is called the humeroradial joint. This joint is formed by a knob and a shallow cup. The knob on the end of the humerus is called the capitellum. The capitellum fits into the cup-shaped end of the radius. This cup is called the head of the radius.

Adolescent Osteochondritis Dissecans of the Elbow

When the head of the radius spins on the capitellum, the forearm rotates so that the palm faces up toward the ceiling (supination) or down toward the floor (pronation). The joint also hinges as the elbow bends and straightens.

Adolescent Osteochondritis Dissecans of the Elbow

In the elbow joint, the ends of the bones are covered with articular cartilage. Articular cartilage is a slick, smooth material. It protects the bone ends from friction when they rub together as the elbow moves. Articular cartilage is soft enough to act as a shock absorber. It is also tough enough to last a lifetime, if it is not injured.

Elbow OCD affects the articular cartilage in the capitellum. It also affects the layer of bone just below the cartilage, which is called the subchondral bone. In advanced stages of OCD, the upper end of the radius, particularly the head of the radius, is also involved.

Related Document: A Patient’s Guide to Elbow Anatomy

Causes

How does this problem develop?

The cause of elbow OCD in adolescents is unknown. Scientists think that genetics is one possibility. This means that certain families are more likely to develop OCD. The condition often occurs among relatives, and it is sometimes seen in several generations of the same family.

Another possible cause is that the tiny blood supply to the humeroradial joint is somehow blocked. Only the ends of a few small blood vessels enter the back of the humeroradial joint. If this scarce blood supply is damaged, there is no back-up.

Although the exact cause of elbow OCD in adolescents is not known, most experts agree that overuse of the elbow plays a major role in its development.

Adolescent Osteochondritis Dissecans of the Elbow

Pitching can lead to overuse strain and, in turn, elbow OCD. Throwing puts a lot of force on the elbow joint. When the throwing action is repeated over and over again, it can damage the immature joint surface of an adolescent’s elbow. After winding up and cocking the arm back, the pitcher must quickly accelerate the arm to gain ball speed. Then, almost immediately, the pitcher has to slow the arm down and follow through. The pitcher may angle the elbow outward slightly during the acceleration phase to get more ball speed. This action jams the head of the radius against the capitellum. During the slowing and follow-through after a pitch, the forearm is fully pronated. This action puts extra pressure on the humeroradial joint.

Hitting a ball with a racket can strain the elbow just like pitching a baseball. The player may angle the racket and elbow out slightly to gain ball speed. Hitting the ball with the arm and racket in this position jams the radial head against the capitellum, similar to what can happen during pitching motions. Gymnasts are also at risk for high forces on the capitellum when they repeatedly do maneuvers on their hands with their elbows locked out straight.

Adolescent Osteochondritis Dissecans of the Elbow

These actions done over and over again can eventually cause an overuse injury to the humeroradial joint of adolescent athletes. Adolescents’ articular cartilage is newly formed and so can’t handle these types of forces. The subchondral bone (under the articular cartilage) in the capitellum takes the brunt of the stress. A portion of the bone may eventually weaken, and possibly even crack. When the bone is damaged, the tiny blood supply going to the area is somehow blocked. Without blood supply, the small area of bone dies. This type of cell death is called avascular necrosis. (Avascular means without blood, and necrosis means death.)

The crack may begin to separate. Eventually, the small piece of dead bone may break loose. This produces a separation between the articular cartilage and the subchondral bone, which is the condition called OCD. If the dead piece of bone comes completely detached, it becomes a loose body. The loose body is free to float around inside the joint.

Another condition, called Panner’s disease, also affects the capitellum in children. It is not the same as elbow OCD in adolescents. Panner’s disease affects the bone growth center (the growth plate) of the capitellum. Panner’s disease generally occurs in kids (mainly boys) between five and 10. Panner’s disease is a childhood condition that involves the entire capitellum and usually heals completely when bone growth is complete.

Elbow OCD in adolescents is different. It occurs after growth in the capitellum has stopped, which is usually between the ages of 12 and 15. Elbow OCD in adolescents affects only a portion of the capitellum, generally along the inside and lower edges of the bony knob. Unless elbow OCD is diagnosed and treated early, the results are not as good as the results for Panner’s disease. The adolescent with elbow OCD sometimes ends up with elbow arthritis by early adulthood.

Related Document: A Patient’s Guide to Panner’s Disease of the Elbow

Symptoms

What does this problem feel like?

Only about 20 percent of kids with elbow OCD remember hurting their elbow. The remainder usually develop symptoms over time, which is typical with overuse problems.

In the absence of a specific injury, the athlete may at first feel bothersome elbow discomfort only while playing sports. The soreness generally goes away quickly when the elbow is rested. Over time, however, the elbow pain worsens, is hard to pinpoint, and may linger after using the arm. The elbow feel may feel stiff, and it may not completely straighten out.

In advanced cases of elbow OCD, the patient may notice that the joint grinds (called crepitus). The elbow may catch, or even lock up occasionally. These sensations may mean that a loose body is floating around inside the elbow joint. The joint may also feel warm and swollen, and the muscles around the elbow may appear to have shrunk (atrophied).

Adolescent Osteochondritis Dissecans of the Elbow

Bad cases of elbow OCD, and those that are not caught and treated early, tend to create bigger problems later in life. The joint may become arthritic early in adulthood. As a result, the patient may always have greater difficulty using the problem elbow.

Related Document: A Patient’s Guide to Osteoarthritis of the Elbow

Diagnosis

How do doctors identify the problem?

The doctor begins by asking questions about the patient’s age and sports participation. In the physical exam, the sore elbow and healthy elbow will be compared. The doctor checks for tenderness by pressing on and around the elbow. The amount of movement in each elbow is measured. The doctor checks for pain and crepitus when the forearm is rotated and when the elbow is bent and straightened.

X-rays are needed to confirm the diagnosis. A front and a side view of the elbow are generally the most helpful. Early in the course of the problem, the X-rays may appear normal.

As the condition worsens, the X-ray image may show changes in the capitellum. The normal shape of the bony knob may appear irregular. In bad cases of elbow OCD, the capitellum might even look like it has flattened out, suggesting that the bone has collapsed. The X-ray could show a crack in the capitellum or even a loose body. In the late stages of elbow OCD, the radial head may appear enlarged, and the humeroradial joint not be aligned as it normally should. These findings suggest early arthritis.

A magnetic resonance imaging (MRI) scan may show more detail. The MRI can give an idea of the size of the affected area. It can show bone irregularities and also help detect swelling. Doctors may repeat the MRI test at various times to see if the area is healing.

The doctor might order a computed tomography (CT) scan. The CT scan helps confirm the diagnosis. A CT scan clearly shows bone tissue. The doctor can compare CT scans over a period of time to monitor changes in the bones of the elbow.

Treatment

What treatment options are available?

Nonsurgical Treatment

At first, athletes may need to stop their usual sport activities. This gives the elbow a rest so that healing can begin.

The doctor may prescribe anti-inflammatory medicine to help reduce pain and swelling. Patients are shown how to apply ice to the area. When sport activities are resumed, ice treatments should be used after activity. Ice treatments are simple to do. Place a wet towel on the elbow. Then lay an ice pack or bag of ice over the elbow for 10 to 15 minutes.

The doctor may also suggest working with a physical therapist. Physical therapists might use ice, heat, or ultrasound to control inflammation and pain. As symptoms ease, the physical therapist works on flexibility, strength, and muscle balance in the elbow.

Therapists also work with athletes to help them improve their form in ways that reduce strain on the elbow during sports. Pitchers and racket-sport players might benefit from keeping the elbow aligned correctly, instead of angled outward, during the acceleration phase of the pitch or swing.

When symptoms are especially bad, athletes may need to make changes that require less overhand activity. For example, pitchers could shift to playing first base. Gymnasts could focus on maneuvers that don’t stress the sore elbow. However, if the piece of bone is loose but still attached, all sports activities must be stopped. Sports can begin again when the patient has no pain and shows full elbow movement.

In severe cases, patients may need to wear a sling or a long-arm splint for several weeks before starting elbow motion exercises. As symptoms ease and elbow movement improves, a guided program of strengthening and sport training begins.

Surgery

Patients may need surgery if the elbow locks up, if it won’t straighten out, or if pain continues even after a period of rest and physical therapy. Unfortunately, surgery isn’t 100 percent successful. The various procedures don’t necessarily improve athletes’ chances for returning to high-level competition. Patients often lose the ability to fully straighten the elbow. And even after surgery, they are prone to elbow arthritis in early adulthood.

Surgical procedures to treat elbow OCD are done from the outside edge of the elbow. The joint may be opened up to allow the surgeon to see and work on the joint. Opening up the joint is called arthrotomy. Many surgeons prefer instead to use an arthroscope. An arthroscope is a slender instrument with a TV camera on the end. The arthroscope can be inserted into a very small incision. It lets the surgeon see the area where he or she is working on a TV screen.

Debridement

Adolescent Osteochondritis Dissecans of the Elbow

Debridement is the most common procedure used for elbow OCD. It is especially helpful when the damaged part of the capitellum is loose but still attached. The surgeon uses a small shaver to clear away (debride) irritated tissue from the area. All the dead tissue is shaved away until the bone bleeds.

Adolescent Osteochondritis Dissecans of the Elbow

This allows the defect to fill with scar tissue. Often, surgeons use a small instrument to poke holes through the damaged area and into the healthy bone just below. Bleeding from the holes promotes healing. The surgeon looks for and removes any loose fragments of bone.

Pinning

Adolescent Osteochondritis Dissecans of the Elbow

If the section of bone has completely detached from the capitellum, the surgeon may surgically pin the bone back in place. The spot where the bone detached is prepared. As in debridement, the bone tissue is shaved until it bleeds. Then the surgeon attempts to replace the loose piece of bone exactly in its original position. Small lengths of surgical wire are inserted through the bone fragment and into the main bone. The wires hold the piece of bone in place so that it can heal. The wires are usually left in place and not removed at a later date.

Graft Method

Adolescent Osteochondritis Dissecans of the Elbow

Damage to a small area of the capitellum may be replaced with a graft (replacement tissue). The idea is to fill in the spot in order to reshape the knob of the capitellum. By using a piece of living tissue for the graft, it is hoped that the graft will restore the normal function of the original articular cartilage. The results of this procedure are not always optimal. The goal is that, by reshaping the capitellum, the alignment of the humeroradial joint will be improved. When it works, the joint has a better chance of lasting longer before becoming arthritic.

This procedure uses an autograft, a graft of tissue from the patient’s own body. The surgeon takes a small piece of bone and cartilage from a nearby area and puts it in the damaged area on the capitellum. The biggest challenge is getting the surface of the graft to match the original shape of the capitellum.

Rehabilitation

What can be expected from treatment?

Nonsurgical Rehabilitation

In nonsurgical rehabilitation, the goal is to calm pain and inflammation and to protect the elbow from further harm. The doctor may prescribe anti-inflammatory medicine to help reduce pain and swelling.

The elbow may need to be rested. When symptoms are especially bad, patients may need to avoid activities that make their pain worse, including sports. Even after symptoms ease up, activity may need to be restricted for another six to eight weeks.

Some doctors have their patients work with a physical therapist. Treatments such as heat, ice, and ultrasound may be used to ease pain and swelling. Therapists also work with young athletes to help them improve their form and reduce strain on the elbow during sports.

When the elbow starts to feel better, exercises are begun to get the elbow moving. At first, the movements are done passively, meaning that the therapist moves the arm. This is followed with active motion exercise, which means the patient’s muscles help do the work of moving the arm. As elbow motion and strength improve, patients progress in more advanced strengthening exercises.

After Surgery

A bandage or dressing is worn for a week following the procedure. The stitches are generally removed in 10 to 14 days. However, if the surgeon used sutures that dissolve, patients don’t need to have the stitches taken out.

Patients are shown ways to protect the elbow after surgery. Although elbow motions are avoided early on, patients are shown ways to keep motion in their shoulder, wrist, and hand.

The surgeon may have the patient take part in formal physical therapy a few weeks after surgery. The first few physical therapy treatments are designed to help control the pain and swelling from the surgery.

Exercises are chosen to help improve elbow motion and to get the muscles toned and active again. At first, the elbow is exercised in positions and movements that don’t strain the healing cartilage. As the program evolves, more challenging exercises are chosen to safely advance the elbow’s strength and function.

Most patients will need to modify their activities after surgery. Most pitchers are unable to throw hard and without pain afterward. In general, most athletes with elbow OCD need to stop playing high-level sports due to lingering elbow pain and reduced elbow motion.

If symptoms come back again, patients must modify their activities until symptoms subside. They’ll need to avoid heavy sports activity until symptoms go away and they are able to safely begin exercising the elbow again.

Panner’s Disease

A Patient’s Guide to Panner’s Disease of the Elbow

Introduction

Panner’s disease affects the dominant elbow of children, mainly boys, between the ages of five and 10. For unknown reasons, normal growth in the outer edge of the elbow is disrupted, which causes the small area of bone to flatten out. The child begins to complain of pain during activity. The pain eases with rest. Over a period of one to two years, the bone slowly rebuilds itself. During this time, symptoms gradually disappear, although the elbow may never fully straighten out.

Panner’s disease is similar to osteochondritis dissecans, a condition that occurs after the skeleton is done growing. Both conditions are most common among certain young athletes, especially baseball pitchers and gymnasts.

This guide will help you understand

  • what part of the elbow is involved
  • how this problem develops
  • what treatment options are available

Anatomy

What part of the elbow is affected?

Panner's Disease

The elbow is the connection of the humerus (upper arm bone) and the two bones of the forearm (the ulna and the radius). The radius starts on the outer edge of the elbow and runs down the forearm to the thumb-side of the wrist.

The joint where the humerus meets the radius is called the humeroradial joint. This joint is formed by a knob and a shallow cup. The knob on the end of the humerus is called the capitellum. The capitellum fits into the cup-shaped end of the radius, also called the head of the radius.

When the head of the radius spins on the capitellum, the forearm rotates so that the palm faces up toward the ceiling (supination) or down toward the floor (pronation). The joint also hinges as the elbow bends and straightens.

Panner’s disease affects the developing bone within the capitellum of the humerus.

Related Document: A Patient’s Guide to Elbow Anatomy

Related Document: A Patient’s Guide to Adolescent Osteochondritis Dissecans of the Elbow

Causes

How does this problem develop?

Panner's Disease

This unique condition is part of a category of bone development disorders known as the osteochondroses. (Osteo means bone, and chondro means cartilage.) In normal development, specialized bone growth centers (called growth plates) change over time from cartilage to bone. The cartilage cells within the growth plates actually change into bone cells. As this occurs, the growth centers expand and unite. This is how bones grow in length and width. Bone growth centers are located throughout the body. Panner’s disease involves disruption of the growth plate of the capitellum.

Scientists are not exactly sure how the growth plate within the capitellum is disrupted. Some think the problem is hereditary (handed down in the genes). Others believe that small strains add up over time, such as from repeatedly throwing a ball.

Another possible cause is that the tiny blood supply to the humeroradial joint is somehow blocked. During development, only the ends of a few small blood vessels enter the back of the humeroradial joint. If this scarce blood supply is damaged, there is no back-up. The cells within the growth plate of the capitellum die, causing the knob of bone to collapse.

Panner's Disease

Regardless of how the problem starts, the next stage in Panner’s disease is cell death within the growth plate of the capitellum. The death of these cells comes from avascular necrosis. Avascular means without blood, and necrosis means death.) When necrosis occurs, the bony knob of the capitellum begins to flatten out. It flattens out because the newly formed bone begins to be absorbed by the body.

Then, over a period of one to two years, new blood vessels enter the area, and new cells begin to form within the growth plate. These cells help gradually rebuild the original shape of the capitellum.

Panner’s disease affects the growth plate of the capitellum in children under the age of 11. As mentioned earlier, a separate but similar condition that affects the capitellum of older children and adolescents. This separate condition is called osteochondritis dissecans (OCD). In older children, OCD of the capitellum doesn’t involve the growth plate. Instead, the problem affects the smooth covering of the capitellum called the articular cartilage. OCD also affects the bone just below the articular cartilage, called the subchondral bone.

Symptoms

What does this problem feel like?

Symptoms usually come on without notice. The child rarely remembers a specific event or injury to explain the symptoms.

The child may report tenderness on the outside edge of the elbow, near the capitellum. Pain generally worsens with activity and eases with rest. The elbow often feels stiff, and the child is unable to completely straighten out the elbow.

Symptoms from Panner’s disease generally go away gradually as the bones mature, usually over a period of one to two years. However, the condition may leave the child unable to fully straighten the elbow.

Diagnosis

How do doctors identify the problem?

The doctor will want to know the child’s age, activity level, and which arm is dominant. In the physical exam, the sore elbow and healthy elbow will be compared. The doctor checks for tenderness by pressing on and around the elbow. The amount of movement in each elbow is measured. The doctor checks for pain when the forearm is rotated and when the elbow is bent and straightened.

X-rays are needed to confirm the diagnosis. X-rays let doctors see the shape of the capitellum. An elbow X-ray may show an irregular surface on the capitellum. The entire growth plate may appear fragmented and transparent. Transparent areas mean that the bone that makes up the capitellum has been absorbed. The capitellum may appear flattened out, which means that the bone has collapsed. Within a period of one to two years, an X-ray comparison will usually show that the capitellum has completely grown back to its normal shape in patients with Panner’s disease.

Occasionally, a magnetic resonance imaging (MRI) scan may show more detail. The MRI can give a better view of bone irregularities. The MRI can also detect swelling.

Treatment

What treatment options are available?

Nonsurgical Treatment

In some cases of Panner’s disease, children may need to stop sports activities for a short time. This gets the pain and inflammation under control. Usually children don’t need to avoid sports for long.

Sometimes, the passing of time may be all that is needed. It takes one to two years for the growth plate that makes up the capitellum to grow into solid bone. At this point, pain and symptoms usually go away completely.

The doctor may prescribe anti-inflammatory medicine to help reduce pain and swelling. Physical therapy treatment may also be recommended.

In severe cases, when regular treatment is not effective, doctors may recommend that the child wear a long-arm splint or cast for three to four weeks. The goal is to stop the elbow from moving so that inflammation and pain go away.

Surgery

The symptoms of Panner’s disease usually disappear when the growth plate in the capitellum finishes growing. Surgery is not generally an option for Panner’s disease.

Rehabilitation

What should I expect from treatment?

Nonsurgical Rehabilitation

In nonsurgical rehabilitation, the goal is to reduce pain and inflammation. Nonsurgical treatment can help ease symptoms of Panner’s disease. Some doctors have their patients work with a physical therapist. Treatments such as heat, ice, and ultrasound may be used to ease pain and swelling.

Therapists also work with young athletes to help them improve their form and reduce strain on the elbow during sports. When symptoms are especially bad, patients may need to avoid activities that make their pain worse, including sports.

Symptoms from Panner’s disease tend to go away slowly over time. This means that nonsurgical rehabilitation doesn’t really cure the problem. Treatments can only help by giving short-term relief from symptoms.