Shoulder
Osteonecrosis of the Humeral Head
A Patient’s Guide to Osteonecrosis of the Humeral Head
Introduction
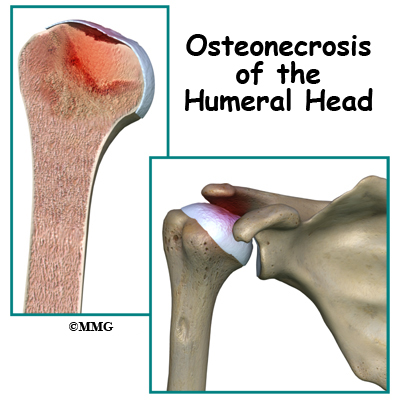
Osteonecrosis of the humeral head is a condition where a portion of the bone of the humeral head (the top of the humerus or upper arm bone) loses its blood supply, dies and collapses. Another term used for osteonecrosis is avascular necrosis. The term avascular means that a loss of blood supply to the area is the cause of the problem and necrosis means death.
This condition has been reported in all age groups but seems more common between the ages of 20 and 50. Men are affected by osteonecrosis of the shoulder twice as often as women but women with osteonecrosis from an autoimmune disease (e.g., lupus) develop this condition more often than men with the same disease.
This guide will help you understand
- how osteonecrosis develops
- how doctors diagnose the condition
- what treatment options are available
Anatomy
Where does this condition occur?
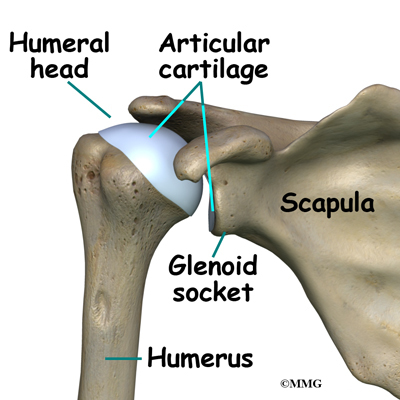
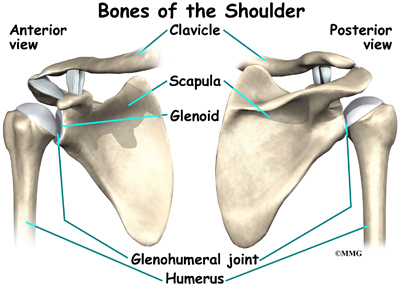
The shoulder joint is a ball-and-socket joint. The ball portion of the joint is called the humeral head. The humeral head is the uppermost part of the humerus, or upper arm bone. The shoulder socket is called the glenoid fossa. This socket is shallow and is part of the scapula (shoulder blade). The surface of the humeral head and the inside of the fossa are covered with articular cartilage. Articular cartilage is a tough, slick material that allows the surfaces to slide against one another with very little friction. The cartilage is about one-quarter of an inch thick in most large weight-bearing joints, but a bit thinner in the shoulder, which normally doesn’t support much weight.
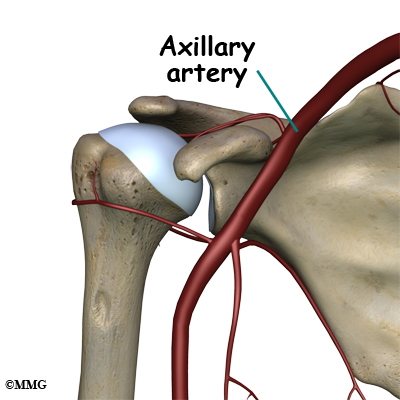
Large blood vessels supply the arm with blood. The large axillary artery travels through the axilla (armpit). If you place your hand in your armpit, you may be able to feel the pulsing of this large artery. The axillary artery has many smaller branches that supply blood to different parts of the shoulder. The shoulder has a very rich blood supply. But if this blood supply is damaged, there is no backup.
Causes
What causes this condition?

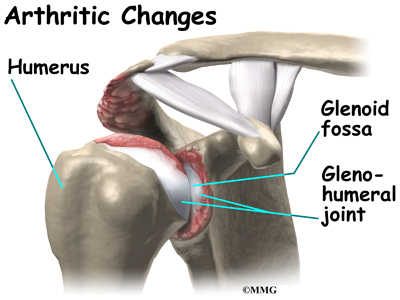
When osteonecrosis occurs in the shoulder joint, the top of the humeral head (the ball portion) collapses and begins to flatten. The flattening creates a situation where the ball no longer fits perfectly inside the socket. Like two pieces of a mismatched piece of machinery, the joint begins to wear itself out. This leads to osteoarthritis of the joint and pain.
Bone tissue is constantly being remodeled – old bone is removed and replaced with new bone. Osteonecrosis occurs when there is a loss of blood circulation in the bone of the humeral head. This causes the cells that remove and produce new bone to die in the area of lost circulation. New bone is no longer produced, but the old bone matrix still survives. Without the constant ability to repair itself through remodeling, the dead bone matrix eventually begins to lose strength and crumble. This causes the bone matrix to collapse. New blood vessels begin to grow into the area, but this is a slow process. The situation becomes a race to see whether new blood vessels will grow into the area and restore the ability to remodel the bone or whether collapse will occur.
The articular cartilage on the surface of the humeral head does not rely on the blood supply of the bone to survive. The articular surface is nourished by the synovial fluid; it survives the loss of blood flow to the bone. But, the articular cartilage relies on the bone underneath to keep its round shape. When the bone underneath collapses, the articular cartilage loses its round shape and no longer fits, or matches, the shape of the glenoid socket. The constant abnormal friction between the two mismatched joint surfaces causes mechanical wear and tear in both the humeral head and the glenoid socket. This degeneration is called osteoarthritis.
There are two forms of humeral head osteonecrosis: traumatic and atraumatic. The traumatic type can develop after an injury such as a bone fracture or shoulder dislocation. The nontraumatic form occurs with the use of corticosteroids, or it can be associated with other diseases or blood disorders (e.g., sickle cell disease, problems with coagulation or making blood clots). Sometimes it develops with no known cause. In those cases, it is called idiopathic (unknown cause).
There does seem to be a genetic link but exposure to certain risk factors is also part of the picture. For example, alcohol abuse, tobacco use, chemotherapy, radiation, pregnancy, inflammatory bowel disease, and organ transplantation are considered associated risk factors. A clear link exists between osteonecrosis and alcoholism. Excessive alcohol intake somehow damages the blood vessels and leads to osteonecrosis. Organ recipients must be on lifelong steroids to prevent inflammation, infection, and rejection of the organ. These medications have the adverse side effect of endangering blood supply and weakening the bone.
Symptoms
What does osteonecrosis feel like?
The first symptom of osteonecrosis of the humeral head is shoulder and arm pain. The location of the pain is difficult to isolate. You may not be able to point to it with one finger. You may feel like the pain is deep and throbbing. You may have difficulty reaching your arms out to the sides or overhead.
At first, the symptoms seem to come and go, but as the problem progresses (gets worse), the symptoms become more constant and stiffness develops in the shoulder joint. Pain may radiate, or travel, from your shoulder down to your elbow. There may be a sound and sensation of crunching called crepitus and locking in the joint. With arthritic changes, range of motion decreases. Eventually, the pain will also be present at rest and may even interfere with sleep. In a small number of cases, there are no symptoms despite X-rays that show advanced disease.
Diagnosis
How do doctors diagnose this condition??
Your doctor will conduct a thorough history and carry out a clinical exam. The history helps identify associated risk factors, which will have to be addressed during treatment in order to get the most successful results. Your doctor will also check other joints for any signs of similar problems. In about half the patients, osteonecrosis is also present at the hip, knee, ankle, wrist, and/or elbow.
Lab studies can be done to rule out infection or test for systemic diseases or blood disorders that can cause osteonecrosis.
Standard X-rays are usually ordered to confirm the diagnosis. Several different views are needed. Besides the usual anterior-posterior (AP) views, radiographs should include views with the joint in external (outward) and internal (inward) rotation. That will help show all areas of the diseased humeral head, important information for planning treatment.
X-rays don’t always show all of the changes until the condition has been present for quite some time. MRIs may be used to define more clearly early changes in fat and water content of the bone marrow that won’t be seen on X-ray. Bone scans have fallen out of favor for the detection and diagnosis of osteonecrosis. Studies show only one-third of true cases are successfully identified with this imaging tool.
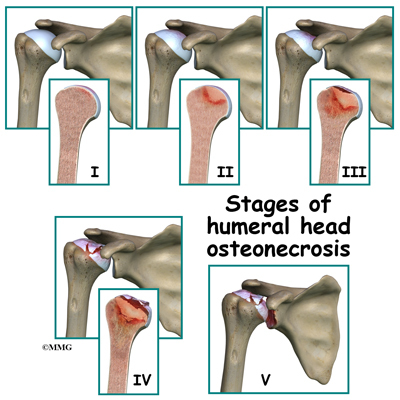
Treatment is based on the severity of disease, so part of the diagnosis is to identify what stage the disease is in. The stages start with stage I, which means no changes are seen on X-ray images and go up to stage V. In stage V (the most advanced disease) the humeral head is collapsed and the socket is damaged as well. There may be soft tissue tears present in the more advanced stages.
Treatment
What treatment options are available?
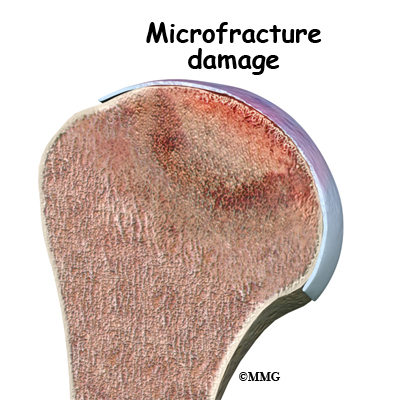
The first goal in treating osteonecrosis of the humeral head is to save the bone. Left untreated, the disease process will continue until the layer of bone just under the joint surface cracks causing small microfractures. Once enough microfactures happen, the bone begins to collapse and the articular cartilage covering the joint surface also starts to collapse. Eventually, there will be damage to the entire shoulder joint. The second goal is to keep shoulder function while relieving pain. Various nonsurgical and surgical methods have been used to treat this problem.
Nonsurgical Treatment
The first line of treatment is medication to restore blood supply and allow new bone growth. Some of the more common drugs used include lipid-lowering (cholesterol-lowering) agents, vasodilators (opens up the blood vessels), anticoagulants (prevents blood clotting), and bisphosphonates (prevents bone loss). The type of medication used depends on the underlying systemic disease causing the bone problem. Nonsteroidal antiinflammatory drugs (NSAIDs) may provide some symptom relief of the osteoarthritis but they do not slow or stop the osteonecrosis.
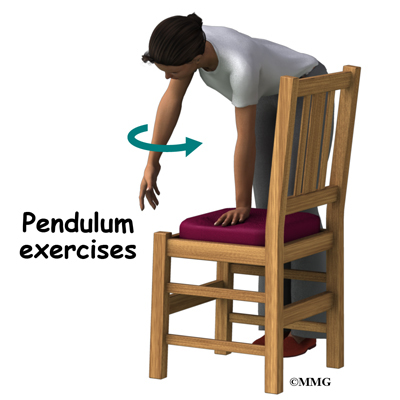
Depending on your symptoms and limitations in motion and strength, you may be started on a series of exercises called pendulum exercises. These are designed to help keep full motion in the shoulder joint but without stressing the joint. You may be told to avoid lifting your arm overhead or away from the body against resistance. You should also avoid lifting or holding anything heavy. Your doctor may give you a weight restriction (i.e., don’t lift anything more than two to five pounds). Putting away heavy groceries for example should be avoided at this time.
Physical therapy that include modalities for pain control and progression of range-of-motion exercises with subsequent strengthening is helpful in all stages, particularly in stage I and stage II.
Patients are advised to stop using tobacco or alcohol. Anyone taking corticosteroids should consult with the prescribing physician to review the need for and use of these medications because of their possible adverse effect on bone.
Surgery
Core Decompression
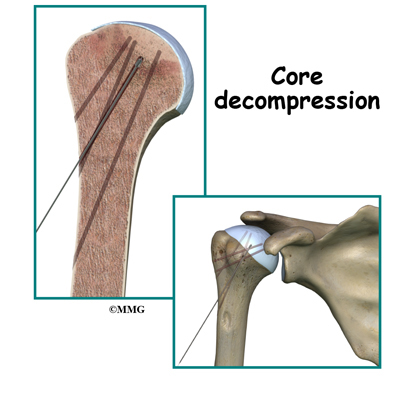
Surgical intervention may be needed in the more advanced stages of osteonecrosis. When the condition is in the early stages, a procedure called core decompression is used to reduce bone marrow pressure and allow the formation of new blood supply to the area. The new blood vessels help the necrotic area start to form new, healthy bone.
Core decompression is done by drilling small holes from the healthy bone to the area of necrosis in the humeral head. This creates channels that allow new blood vessels to grow into the necrotic area. The surgeon uses a special type of X-ray called fluoroscopy to guide the placement of the pins used to drill the holes. Removing some of the dead bone also causes bleeding into the region of necrotic bone and stimulates new bone growth.
Arthroscopy
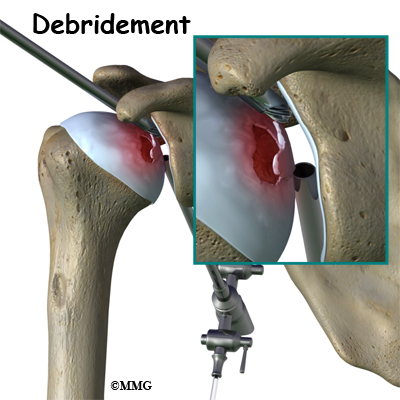
If there are any loose bits of bone or cartilage in the joint, then the surgeon may have to perform arthroscopic debridement . The arthroscope is a small fiberoptic camera that can be inserted into the joint allowing the surgeon to see the inside of the joint. Other instruments can be inserted into the joint though small incisions to remove tissue and smooth the surface of the joint. The shoulder joint is cleaned up of any debris. Any frayed edges of joint cartilage are smoothed down. Sometimes the surgeon combines these two procedures (decompression and arthroscopy). The arthroscopic exam shows the location and extent of the disease in the joint while the decompression addresses the necrotic area of bone.
Bone Grafting
Bone grafting replaces the necrotic (dead) bone with donor bone that is usually taken from the patient’s own hip. This treatment approach is used for mild to moderate disease. It is not advised for late stage disease as studies show patients with more advanced disease do better with arthroplasty (joint replacement). The bone graft gives the joint surface support needed to keep it from collapsing. With that support in place, the bone can begin to heal.
Arthroplasty
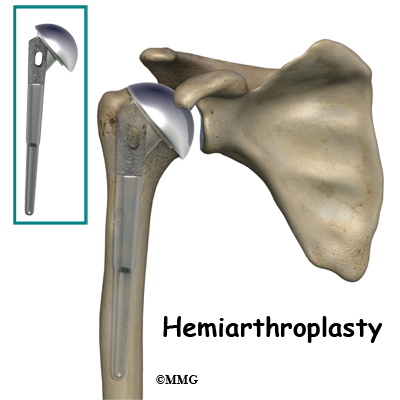
Joint replacement is used for more severe damage of the the joint. A hemiarthroplasty (partial replacement) may be all that’s needed when only one side of the joint has been affected. Full joint replacement is reserved for patients with significant involvement of both the humeral head and the glenoid fossa (socket).
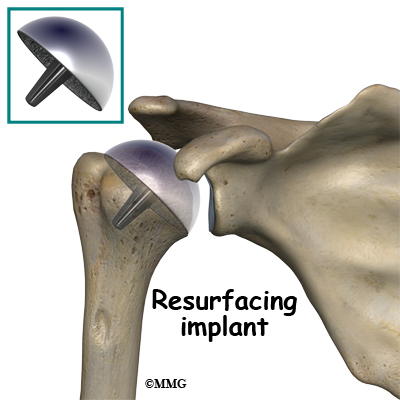
A newer procedure called humeral head resurfacing is gaining popularity and may help save the joint. Instead of removing the head of the humerus and replacing it, the bone is smoothed down and a metal cap placed over the smoothed head like a tooth capped by the dentist. The cap is held in place with a small peg that fits down into the bone. Joint resurfacing requires that the patient have enough healthy bone to support the cap.
Rehabilitation
What should I expect after treatment?
Nonsurgical Rehabilitation
Studies show that the results of nonsurgical treatment are satisfactory when the disease is caught during the early stages. Symptoms often remain mild, even when the disease is advanced. Since the shoulder does not involve weight-bearing like the hip, good results are obtained with conservative care. Physical therapy may be needed for extended periods of time. There are some patients who will continue to progress despite early conservative care. Predicting who might develop more advanced disease is difficult, so close monitoring is advised.
After Surgery
After core decompression, you may be wearing a sling for a few days. Many patients report immediate pain relief. Active-assisted motion is allowed in all directions. Active-assisted means you use your other hand (or hold a cane or some other type of stick with both hands) to help guide the involved side through the motion. Movements are not forced. You’ll go as far as you can comfortably.
You will gradually resume all normal activities over a period of four or five weeks — as long as you remain pain free. High-impact activities or activities that load the joint are not allowed for a full year following decompression.
With any of the more invasive procedures such as joint replacement, passive range-of-motion is carried out under the supervision of a physical therapist. Because major muscles are cut and reattached during the operation, regaining motion is progressed slowly to protect the healing soft tissues.
Active motion (moving under your own muscle power without help) is not allowed for the first three weeks. In fact, the therapist will move you from passive motion through active-assistive motion and then to active motion over a period of six weeks. Stretching and strengthening don’t begin until around week 12 post-op.
Results of treatment are often good but patients should be prepared for the possibility that the condition can progress over time. Further surgery may be needed. For those who have decompression or bone grafting, joint replacement may be needed eventually.
Quadrilateral Space Syndrome
A Patient’s Guide to Quadrilateral Space Syndrome
Introduction
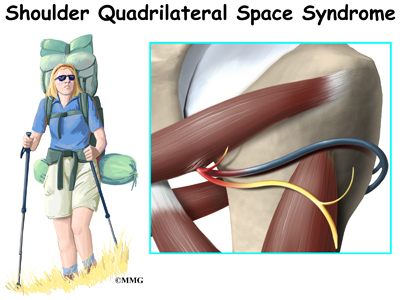
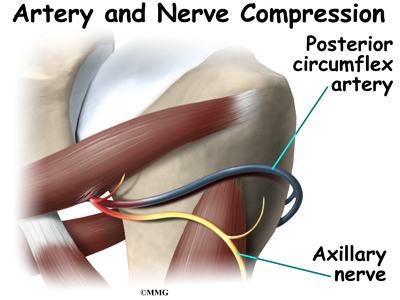
Quadrilateral space syndrome (QSS) happens when the axillary nerve is compressed, or injured in the back of the shoulder. Sometimes the symptoms are caused by the compression of an artery in the same area.
Quadrilateral space syndrome usually happens from overuse, especially with overhead sports like throwing and swimming. The syndrome can also be caused by an injury, like a shoulder dislocation.
This guide will help you understand
- what parts of the shoulder are involved
- what causes this condition
- how doctors diagnose the condition
- what treatment options are available
Anatomy
What parts of the shoulder are involved?
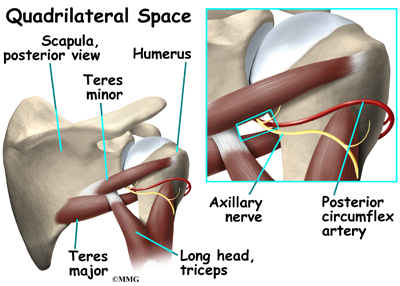
A quadrilateral is a four-sided shape. The quadrilateral space of the shoulder is in the upper back, where the shoulder meets the body. Three of the sides of the quadrilateral space are formed by muscles. The top of the quadrilateral is bordered by a muscle called the teres minor. The teres major muscle forms the bottom border. Part of the triceps muscle forms the inside border. The long bone of the upper arm, called the humerus, makes up the outer border.
In addition to these muscles, the axillary nerve and the posterior circumflex humeral artery are in the quadrilateral space. When either the nerve or the artery is compressed or injured in this area it can cause problems such as quadrilateral space syndrome.
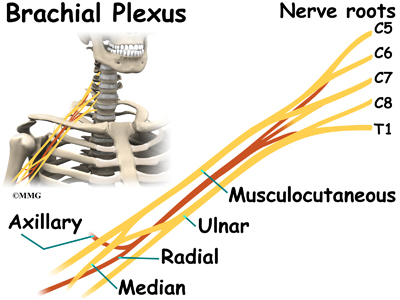
The axillary nerve is considered a peripheral nerve. There are several peripheral nerves in the shoulder that can be injured. The spinal cord in the neck, or cervical area, has branches that are called nerve roots. The nerve roots in the neck come together to form a large peripheral nerve called the brachial plexus. The axillary nerve is one of the branches off the brachial plexus. The axillary nerve is mainly formed from the fifth (C5) and sixth (C6) cervical nerve roots. The axillary nerve gives strength to the teres minor muscle and the deltoid muscle. It gives sensation to the shoulder joint.

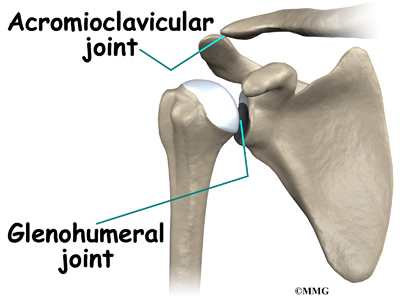
The shoulder joint is also known as the glenohumeral joint. It is a ball and socket joint. The glenoid is the cup portion of the shoulder joint. The upper end of the humerus forms the ball portion.
The shoulder joint is supported by many muscles. The most famous are the four rotator cuff muscles.They combine at the shoulder to form a thick cuff. They are also referred to as the SITS muscles. Each letter stands for one

of the rotator cuff muscles; supraspinatus, infraspinatus, teres minor, and subscapularis. Sometimes injury to the quadrilateral space is mistaken as rotator cuff injury.
Related Document: A Patient’s Guide to Shoulder Anatomy
Causes
What causes this condition?
Repetitive stress or overuse is a major cause of quadrilateral space syndrome. Some of the more common causes of overuse are seen in overhead sports like throwing and swimming. Children specializing in certain sports at early ages, have increased risk of getting quadrilateral space syndrome. Sometimes poor training techniques are to blame. Bands of extra fibers are usually what cause the compression of the axillary nerve, or the small artery in the quadrilateral space.
There are varying degrees of nerve injury. Most commonly, injury to the axillary nerve is a more mild form of injury called neuropraxia. This means that it typically recovers fully. The axillary nerve is very short, so even a severe injury can heal rather quickly.
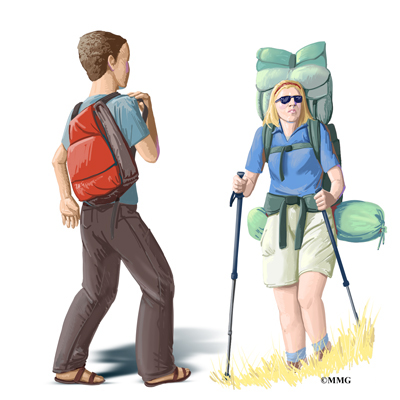
An acute axillary nerve injury can also happen from carrying a heavy backpack. The misuse of crutches can also cause compression of the nerve.
The most common traumatic injury that causes quadrilateral space syndrome (QSS) is a shoulder dislocation. Some reports show that quadrilateral space syndrome can happen 10 to 60 percent of the time after a shoulder dislocation. There is a greater risk depending on the type of dislocation.

A blunt force injury to the back of the shoulder can also cause quadrilateral space syndrome.
Symptoms
What does quadrilateral space syndrome feel like?

Symptoms of quadrilateral space syndrome usually include vague shoulder pain, numbness or tingling in the arm, and tenderness to pressure over the area of the quadrilateral space. A dull ache in the shoulder may worsen when the arm is moved overhead repeatedly.
Weakness and instability can sometimes be noted. The diagnosis of quadrilateral space syndrome is often missed since symptoms can be similar to other shoulder problems.
Diagnosis
How will my doctor diagnose this condition?
Your doctor will complete a history and physical examination.
Your doctor will ask questions about activity, possible traumatic injury, and the symptoms you are having. The physical examination usually includes evaluating range of motion, strength testing, checking reflexes and sensation. During this examination pressure will be applied over various areas of the shoulder to see where it may be painful.
Weakness and instability can sometimes be noted. The diagnosis of quadrilateral space syndrome is often missed since symptoms can be similar to other shoulder problems. Often there will be wasting of the teres minor muscle, and sometimes the deltoid muscle. Subluxation (instability) of the glenohumeral joint is sometimes noted as well.
Your doctor may want you to have some special tests done in order to better evaluate what is causing your problems.
Electromyelogram (EMG) is a valuable tool in the diagnosis of quadrilateral space syndrome (QSS) and other peripheral injuries around the shoulder. The doctor will place small needle electrodes into various muscles to see how well they are functioning. Since different nerves make different muscles work, it help to narrow down where the problem is coming from.
Magnetic resonance imaging (MRI) scans can sometimes identify the muscle wasting of the teres minor and deltoid muscles. MRI does not use x-rays. It uses magnetic waves. It allows the doctor to see your tissues and bones in thin slices.
Computed tomography angiography (CTA) is sometimes used to identify problems with the artery or vein within the quadrilateral space. Computed tomography uses special X-rays. The CTA requires that contrast dye be injected into a vein. Your arm will likely be in a throwing position while being scanned. Computed tomography also allows your doctor to see your bones and tissues in thin slices.
Some doctors do an axillary nerve block. The area of the axillary nerve is injected with a numbing medication like lidocaine. If the pain goes away when the nerve is numb, it is considered a postitive test. This helps the doctor determine whether or not it is the axillary nerve causing your symptoms.
Treatment
What treatment options are available?
Nonsurgical Treatment
Most of the time, quadrilateral space syndrome will improve with nonsurgical treatment.
There are varying degrees of nerve injury. Most commonly, injury to the axillary nerve is a more mild form of an injury called neuropraxia. This means that it typically recovers fully. The axillary nerve is very short, so even a severe injury can heal rather quickly.
It is important to rest your shoulder. Your doctor may suggest taking a break from the activity that may be causing your symptoms. Changing throwing or sport mechanics may be helpful.
Anti-inflammatories (NSAIDs) such as ibuprofen or naprosyn may be suggested. Heat or cold packs to your shoulder may be beneficial.
Your doctor will likely prescribe physical therapy.
Surgery
If there is no improvement after six weeks of conservative care, surgery is usually recommended.
Bands of extra fibers in the quadrilateral space are usually what cause the compression of the axillary nerve or the small artery or vein. These bands of fibers are clipped or removed during surgery. This type of surgery is called decompression. It is quite effective.

Occasionally, after high-energy trauma, or during surgery, the axillary nerve will be over-stretched, or even cut. This type of injury is called neurotomesis. The axillary nerve may need to be repaired. The injured portion is replaced with another nerve. This is called a nerve graft.
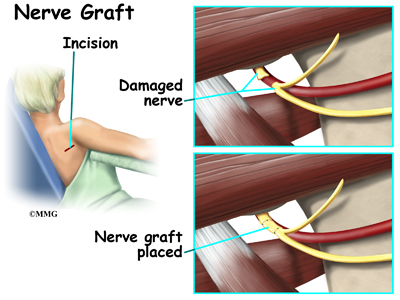
Your surgeon will operate from the back of the shoulder, making a small incision. In the case of nerve grafting, there will be a small incision where the other portion of nerve is removed. You will be allowed to go home the same day. Your arm will likely be in a sling.
Rehabilitation
What should I expect as I recover?
Nonsurgical Rehabilitation
Physical therapy is helpful for maintaining shoulder range of motion, or flexibility. Posture training may also be helpful. Your physical therapist or trainer may have you change the way you do your overhead sport when overuse is a problem. Electrical muscle stimulation (EMS) may be beneficial when there is muscle weakness or wasting. EMS is a battery operated device that sends electrical current to your muscles to make them contract. This will help maintain strength and decrease wasting of the muscle. There are units that can be used at home.
After about four weeks, you may be able to do more exercise on your own. Usually by six weeks, exercises specific to your sport are introduced. In most cases, you can expect to be pain free, have full range of motion, and be able to resume activity in 12 weeks.
Return to sports varies. Your doctor may want to have the EMG repeated monthly to see if the axillary nerve is improving. Improvement in the EMG should be seen. Near full recovery of deltoid muscle strength is recommended before return to your sport.
Most of the time, conservative care such as physical therapy is all that is needed. Return to activity is the goal of treatment. Rarely is surgery needed.
After Surgery
Most shoulder rehabilitation includes three phases.
Phase I is to limit pain, and allow range of motion at the shoulder. Gentle motion is started to keep scar tissue from forming again. This also keeps the nerve and blood vessels moving freely. During the first four weeks after surgery, it is important not to overuse your arm. Working on posture may also be a part of your therapy.
Phase II includes gentle strengthening of the shoulder and upper extremity. Total body conditioning is also important. This often means riding a bike, walking on a treadmill, and even strengthening of the core muscles in your trunk.
Phase III is usually started six weeks after surgery. This includes sport specific activities, functional activities, and continued conditioning. Your physical therapist or trainer may have you change the way you do your overhead sport when overuse has been the problem.
Your doctor may want to have the EMG repeated at monthly intervals to see if the axillary nerve is improving, especially after surgery to graft the nerve. By twelve weeks, you should be pain free. You should have full range of motion of the shoulder. Return to sports varies. However, in general, it is recommended there be improvement in the EMG, and that the muscle strength of the operated shoulder is at least 80 percent of the muscle strength of nonoperated shoulder.
Reverse Shoulder Arthroplasty
A Patient’s Guide to Reverse Shoulder Arthroplasty
Introduction

Shoulder joint replacement surgery (also called shoulder arthroplasty) can effectively ease pain from shoulder arthritis. Most people experience improved shoulder function after this surgery. But, certain patients are not candidates for joint replacement of the shoulder because they lack the muscle function necessary to stabilize the joint. A different type of shoulder replacement, called reverse shoulder replacement, may be available for many of these patients and provide pain relief as well as a stable functioning shoulder.
This guide will help you understand
- how the shoulder works
- what parts of the shoulder are replaced in reverse shoulder replacement
- how reverse shoulder replacement differs from shoulder replacement
- what to expect after reverse shoulder replacement surgery

Anatomy
What parts of the shoulder are involved?
The shoulder is made up of three bones: the scapula (shoulder blade), the humerus (upper arm bone), and the clavicle (collarbone).
The rotator cuff connects the humerus to the scapula.

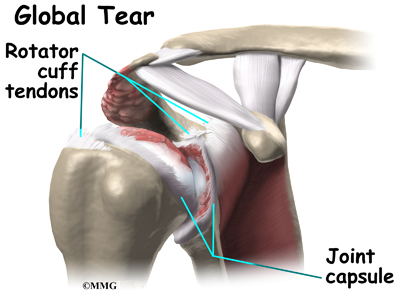
The rotator cuff is formed by the tendons of four muscles: the supraspinatus, infraspinatus, teres minor, and subscapularis.

Muscles move bones by pulling on the tendons. The rotator cuff helps raise and rotate the arm. As the arm is raised, the rotator cuff also keeps the humerus tightly in the socket. A part of the scapula, called the glenoid, makes up the socket of the shoulder. The glenoid is very shallow and flat.

The part of the scapula that connects to the shoulder is called the acromion. A bursa is located between the acromion and the rotator cuff tendons. A bursa is a lubricated sac of tissue that cuts down on the friction between two moving parts. Bursae are located all over the body where tissues must rub against each other. In this case, the bursa protects the acromion and the rotator cuff from grinding against each other.
The humeral head of the shoulder is the ball portion of the joint. The humeral head has several blood vessels, which enter at the base of the articular cartilage. Articular cartilage is the smooth, white material that covers the ends of bones in most joints. Articular cartilage provides a slick, rubbery surface that allows the bones to glide over each other as they move. Cartilage also functions as sort of a shock absorber.

The shoulder joint is surrounded by a watertight sac called the joint capsule. The joint capsule holds fluids that lubricate the joint. The walls of the joint capsule are made up of ligaments. Ligaments are connective tissues that attach bones to bones. The joint capsule has a considerable amount of slack, loose tissue, so that the shoulder is unrestricted as it moves through its large range of motion.
Related Document: A Patient’s Guide to Shoulder Anatomy
Rationale
What conditions lead to reverse shoulder joint replacement?

The most common reason for undergoing shoulder replacement surgery is osteoarthritis. Osteoarthritis is caused by the degeneration of the joint over time, through wear and tear. Osteoarthritis can occur without any injury to the shoulder, but that is uncommon. Because the shoulder is not a weight-bearing joint, it does not suffer as much wear and tear as other joints. Osteoarthritis is more common in the hip and knee.

Rotator cuff problems are a common condition in the shoulder, especially as we grow older. Degeneration or wear and tear of the rotator cuff tendons occurs as we age. Over time this can lead to weakening of the tendons and may result in a rotator cuff tear. Surgery to repair a rotator cuff tear is fairly common in people who are middle aged and older. Most rotator cuff repairs are successful, but in a portion of patients, the tendon has become so degenerated that the tendon can simply not be repaired. Small, medium and many large tears can be repaired either through arthroscopic or open surgical procedures. Unfortunately, many large tears that are untreated for a long time may retract and become unfixable.
A shoulder joint without an intact rotator cuff may still function relatively well. Some patients will have weakness, some pain and may not be able to completely raise the arm. But, they get by without their rotator cuff fairly well. There are many people who choose not to have surgery to repair a rotator cuff tear and will simply live with the limitations. Patients with massive rotator cuff tears may not be able to lift the arm without significant pain and weakness. When the arm cannot be lifted, this is called a pseudoparalytic shoulder.
The shoulder needs a functioning rotator cuff to remain stable as well as to create a joint capsule to hold the joint fluid that lubricates the joint. Over time, a shoulder without an intact rotator cuff becomes arthritic – the shoulder joint wears out due to the abnormal motion, the instability, and lack of lubrication from the joint fluid. This type of wear and tear arthritis in the shoulder is called (rotator) cuff tear arthropathy.
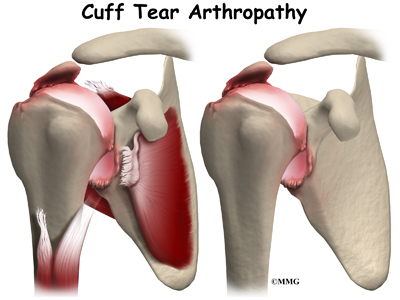
Cuff tear arthropathy is difficult to treat. The shoulder is weak and painful. Patients may not be able to raise the arm above shoulder level. Patients with this type of arthritis would seem to be good candidates for a shoulder replacement, but replacing the shoulder in the typical fashion has not been successful.
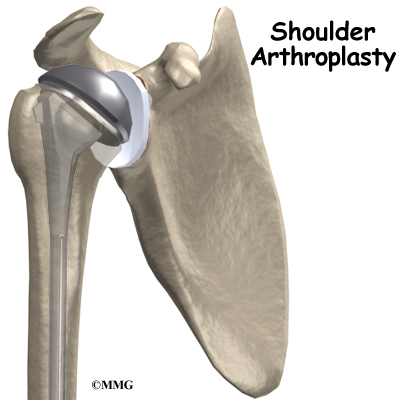
The “normal” artificial shoulder was designed to copy our real shoulder. The glenoid component (the socket) was designed to replace our normal shoulder socket with a thin, shallow plastic cup. The humeral head component was designed to replace the ball of the humerus with a metal ball that sits on top of the glenoid. This situation has been compared to placing a ball on a shallow saucer. Without something to hold it in place, the metal ball simply slides around on the saucer. In the shoulder that something is the rotator cuff and the muscles that attach to the tendons. Without a rotator cuff to hold the metal ball centered in the plastic socket, the metal quickly wore out the plastic socket and the joint became painful once again.
The answer to this dilemma was to rethink the mechanics of the shoulder joint and design an artificial shoulder that worked differently than the real shoulder joint. The solution was to reverse the socket and the ball, placing the ball portion of the shoulder where the socket use to be and the socket where the ball or humeral head use to be. This new design led to a much more stable shoulder joint that could function without a rotator cuff. The artificial joint itself provided more stability by creating a deeper socket that prevented the ball from sliding up and down as the shoulder was raised. The large deltoid muscle that covers the shoulder could be used to more effectively lift the arm, providing better function of the shoulder. The final result is a shoulder that functions better, is less painful and can last for years without loosening.
Other reasons to consider a reverse shoulder replacement include failed rotator cuff surgery leading to a pseudoparalytic shoulder even without arthritis. A pseudoparalytic shoulder refers to a situation where you can not raise the shoulder. Pseudo means false and paralysis usually means that the nerves that control the muscle no longer control the muscles. A pseudoparalytic shoulder appears paralyzed, but the reason that you cannot raise the shoulder is because the rotator cuff tendons that attach the muscles (that raise the shoulder) to the humerus bone are torn. The power of the muscles cannot be transmitted to the humerus to raise the shoulder.
Older patients with very severe fractures of the head of the humerus appear to do very well with reverse shoulder replacements as opposed to a standard shoulder replacement. Patients who have had previous shoulder replacements that have failed of become loose will also require a reverse shoulder replacement to fix the loose or painful prosthesis.
In most cases, doctors see a shoulder replacement as the last option. Sometimes there is a benefit to delaying shoulder replacement surgery as long as possible. Your doctor will probably want you to try nonsurgical measures to control your pain and improve your shoulder movement, including medications and physical or occupational therapy.
Like any arthritic condition, cuff tear arthropathy of the shoulder may respond to anti-inflammatory medications such as aspirin or ibuprofen. Acetaminophen (Tylenol ®) may also be prescribed to ease the pain. Some of the newer medications such as glucosamine and chondroitin sulfate are more commonly prescribed today. They seem to be effective in helping reduce the pain of arthritis in all joints. There are also new injectable medications that lubricate the arthritic joint. These medications have been studied mainly in the knee. It is unclear if they will help the arthritic shoulder. These lubrication injections are presently being studied in the shoulder. Although they are safe in the knee, they are not presently approved for use in the shoulder.
Physical or occupational therapy may be suggested to help you regain as much of the motion and strength in your shoulder as possible before you undergo surgery. In many cases, however, therapy may not be indicated for severe shoulder arthritis since it may aggravate the pain. This is a matter to be discussed with your orthopedic surgeon.
An injection of cortisone into the shoulder joint may give temporary relief. Cortisone is a powerful anti-inflammatory medication that can ease inflammation and reduce pain, possibly for several months. Most surgeons only allow two or three cortisone shots into any joint. If the shots don’t provide you with lasting relief, your doctor may suggest surgery.
Preparation
What do I need to do to get ready for surgery?
When cuff tear arthropathy of the shoulder requires replacement of the painful shoulder with an artificial shoulder joint, a reverse shoulder replacement may be recommended. You and your surgeon should make the decision to proceed with surgery together. You need to understand as much about the procedure as possible. If you have concerns or questions, you should talk to your surgeon.
Once you decide on surgery, you need to take several steps. Your surgeon may suggest a complete physical examination by your regular doctor. This exam helps ensure that you are in the best possible condition to undergo the operation.
Special x-rays will be needed. Plain x-rays of the shoulder will allow your surgeon to evaluate the severity of arthritis and the status of the rotator cuff. A CT scan is always required before any kind of shoulder replacement to determine the degree of damage to the bones (glenoid and humeral head) for surgical planning.
You may also need to spend time with the physical or occupational therapist who will be managing your rehabilitation after surgery. This allows you to get a head start on your recovery. One purpose of this pre-operative visit is to record a baseline of information. Your therapist will check your current pain levels, ability to do your activities, and the movement and strength of each shoulder.
A second purpose of the pre-operative visit is to prepare you for surgery. You’ll begin learning some of the exercises you will use during your recovery. Your therapist can help you anticipate any special needs or problems you might have at home, once you’re released from the hospital.
On the day of your surgery, you will probably be admitted to the hospital early in the morning. You shouldn’t eat or drink anything after midnight the night before. Come prepared to stay in the hospital for several nights. The length of time you will spend in the hospital depends a lot on you.
Surgical Procedure
What happens during shoulder replacement surgery?
Before we describe the procedure, let’s look first at the reverse artificial shoulder itself.
The Reverse Artificial Shoulder
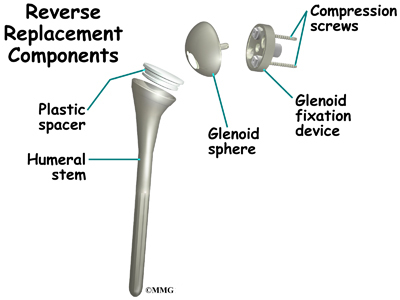
The reverse shoulder prosthesis (artificial joint) is made up of two parts. The humeral component replaces the humeral head, or the ball of the joint. The glenoid component replaces the socket of the shoulder, which is actually part of the scapula.
In the “normal” artificial shoulder prosthesis, the glenoid prosthesis is a shallow socket made of plastic and the humeral component is a metal stem attached to a metal ball that nearly matches the anatomy of the normal shoulder. In the reverse shoulder replacement, the ball and the socket are reversed.
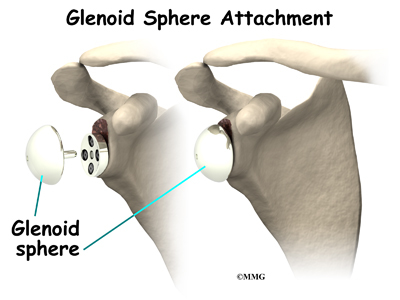
The humeral component is combination of a metal stem that fits into the marrow cavity of the upper humerus and, on top of the metal stem, a plastic socket. This plastic socket fits onto the humeral component to create a ball and socket type bearing. The glenoid component is usually made of two parts. A metal tray (base plate) attaches directly to the bone. The glenoid base plate is inserted into a small peg hole drilled into the bone and is secured with special screws through the base plate into the bone. Attached to that metal tray, a metal ball is attached that will fit into the plastic socket attached to the humeral component. The plastic is very tough and very slick, much like the articular cartilage it is replacing. In fact, you can ice skate on a sheet of this plastic without causing it much damage.
The Operation
The reverse shoulder replacement surgery is performed almost identically to the normal shoulder replacement – except different artificial parts are inserted.
You will most likely need general anesthesia for shoulder replacement surgery. General anesthesia puts you to sleep. It is difficult to numb only the shoulder and arm in a way that makes such a major surgery possible. While nerve blocks can be helpful with postoperative pain control, they are not usually effective enough to be used as the only anesthetic for this kind of operation.
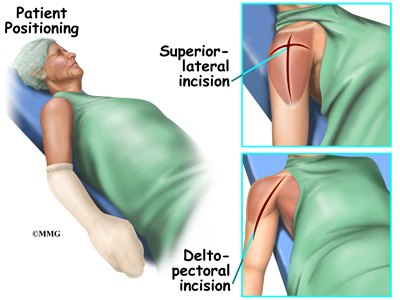
Shoulder replacement surgery is done through an incision on the front of your shoulder. This is called an anterior (deltopectoral) approach. For reverse shoulder replacements, especially for patients with multiple previous surgeries, a superior approach through the deltoid muscle may be used. The surgeon cuts through the skin and then isolates the nerves and blood vessels and moves them to the side. The muscles are also moved to the side.
The surgeon enters the shoulder joint itself by cutting into the joint capsule. This allows the surgeon to see the joint. In more advanced cases of cuff tear arthropathy, and in patients with previous surgery, there may be no capsule and rotator cuff remaining.
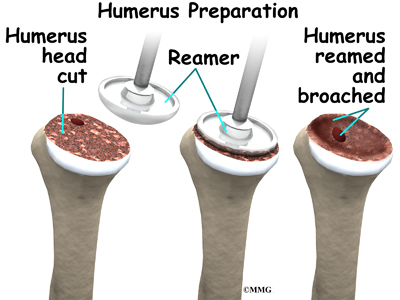
At this point, the surgeon can prepare the bone for attaching the replacement parts. The ball portion of the humeral head is removed with a bone saw. The hollow inside of the upper humerus is prepared using a rasp. This lets your surgeon mold the space to anchor the metal stem of the humeral component inside the bone.

View animation of drilling the humerus
View animation of removing the humeral head
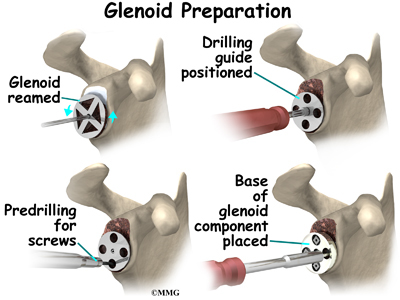
The glenoid will be replaced with a ball of metal. The arthritic glenoid surface is prepared by grinding away any remaining cartilage and flattening the surface. This is done with an instrument called a reamer. The surgeon usually uses the reamer to drill holes into the bone of the scapula and to flatten the deformed glenoid surface so the base plate rests on a smooth, flat surface. This is where the stem of the glenoid component is anchored.
View animation of reaming the glenoid
View animation of drilling the glenoid
View animation of
inserting the glenoid base plate

Finally, the humeral component and the glenoid component are inserted.
View animation of reaming the humerus
View animation of inserting the glenoid sphere
View animation of inserting the humerus implants
View animation of the completed implant
Once the joint is anchored, the surgeon tests for proper fit. When the surgeon is satisfied with the fit, the joint capsule is stitched together. The muscles are then returned to their correct positions, and the skin is also stitched up.
Your incision will be covered with a bandage, and your arm will be placed in a sling. You will then be woken up and taken to the recovery room.
Complications
What might go wrong?
As with all major surgical procedures, complications can occur. This document doesn’t provide a complete list of the possible complications, but it does highlight some of the most common problems. Some of the most common complications following reverse artificial shoulder replacement are
- anesthesia
- infection
- fracture
- dislocation
- loosening
- nerve or blood vessel injury
Anesthesia
Most surgical procedures require that some type of anesthesia be done before surgery. A very small number of patients have problems with anesthesia. These problems can be reactions to the drugs used, problems related to other medical complications, and problems due to the anesthesia. Be sure to discuss the risks and your concerns with your anesthesiologist.
Infection
Infection following reverse joint replacement surgery can be very serious. The chances of developing an infection following artificial joint replacement, however, are low (about one percent). Sometimes infections show up very early, before you leave the hospital. Other times infections may not show up for months, or even years, after the operation.
Infection can also spread into the artificial joint from other infected areas. Once an infection lodges in your joint, it is almost impossible for your immune system to clear it. You may need to take antibiotics when you have dental work or surgical procedures on your bladder and colon. The antibiotics reduce the risk of spreading germs to the artificial joint.
Fracture
During the surgery, the humerus is prepared by cutting off the deformed humeral head and reaming the canal to allow for insertion of the humeral stem. The glenoid is reamed to create a bone tunnel, and flattened to seat the glenoid base plate. In patients with weak bone, fractures can occur during this part of the procedure that may require restricted activity after the surgery while the fracture heals.
Dislocation
Just like your real shoulder, an artificial shoulder can dislocate. A shoulder dislocation occurs when the ball comes out of the socket. There is a greater risk of dislocation right after surgery, before the tissues have healed around the new joint. But there is always a slightly increased risk of dislocation with an artificial joint. Your therapist will teach you how to avoid activities and positions that tend to cause shoulder dislocation. A shoulder that dislocates more than once may need another operation to make it more stable.
Related Document: A Patient’s Guide to Shoulder Dislocations
Loosening
The major reason that artificial joints eventually fail is that they loosen where the metal or cement meets the bone. A loose joint prosthesis causes pain. Once the pain becomes unbearable, another operation will probably be needed to fix the artificial joint.
There have been great advances in extending the life of artificial joints. However, most will eventually loosen and require another surgery. In the case of artificial knees, you can expect about 12 to 15 years, but artificial shoulder joints tend to loosen sooner.
Nerve or Blood Vessel Injury
All of the large nerves and blood vessels to the arm and hand travel through the armpit. (This area is called the axilla.) Because shoulder replacement surgery takes place so close to the axilla, it is possible that the nerves or blood vessels may be injured during surgery. The resulting problems may be temporary if the injury was caused by stretching to hold the nerves out of the way. The nerves and blood vessels rarely suffer any kind of permanent injury after reverse shoulder replacement surgery, but this type of injury can happen.
After Surgery
What happens after surgery?
After surgery, you’ll be transported to the recovery room. You will have a dressing wrapped over your shoulder that will need to be changed frequently over the next few days. Your surgeon may have inserted a small drainage tube into the shoulder joint to help keep extra blood and fluid from building up inside the joint. An intravenous line (IV) will be placed in your arm to give you needed antibiotics and medication.
Rehabilitation
What will my recovery be like?
A physical or occupational therapist will see you the day after surgery to begin your rehabilitation program. Therapy treatments will gradually improve the movement in your shoulder. Your therapist will go over your exercises and make sure you are safe getting in and out of bed and moving about in your room.
When you go home, you may get home therapy visits. By visiting your home, your therapist can check to see that you are safe getting around in your home. Treatments will also be done to help improve your range of motion and strength. In some cases, you may require up to three visits at home before beginning outpatient therapy. Out patient therapy at a facility can often more effective and is often preferred over home physical therapy.
The first few outpatient treatments will focus on controlling pain and swelling. Ice and electrical stimulation treatments may help. Your therapist may also use massage and other types of hands-on treatments to ease muscle spasm and pain. Continue to use your shoulder sling as prescribed.
As the rehabilitation program evolves, more challenging exercises are chosen to safely advance the shoulder’s strength and function.
Finally, a select group of exercises can be used to simulate day-to-day activities, like grooming your hair or getting dressed. Specific exercises may also be chosen to simulate work or hobby demands.
When your shoulder range of motion and strength have improved enough, you’ll be able to gradually get back to normal activities. Ideally, you’ll be able to do almost everything you did before. However, you may need to avoid heavy or repeated shoulder actions.
You may be involved in a progressive rehabilitation program for two to four months after surgery to ensure the best results from your artificial joint. In the first six weeks after surgery, you should expect to see your therapist two to three times a week. At that time, if everything is still going as planned, you may be able to advance to a home program. Then you will only check in with your therapist every few weeks.
Many patients with a reverse shoulder replacement will be able to lift the arm overhead with little or no pain. Some patients, however, may take many months to recover their range of motion. While these patients will usually have excellent pain relief, motion recovery may be very slow due to years of disuse and deconditioning of the deltoid muscle.
Rotator Cuff Tear Arthropathy
A Patient’s Guide to Rotator Cuff Tear Arthropathy
Introduction
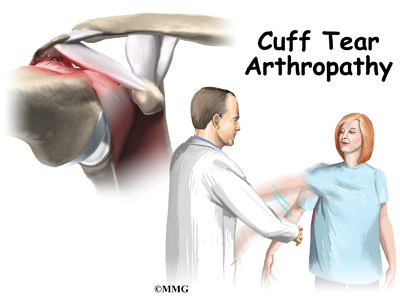
The rotator cuff is a unique structure in the shoulder that is formed by four tendons. These four tendons attach to four muscles that help keep the shoulder stabilized in the socket (or glenoid) and help rotate the upper arm inward and outward. If the rotator cuff is torn and is not repaired, a type of wear and tear arthritis of the shoulder can develop over time. This condition is sometimes called arthropathy and the term cuff tear arthropathy is used to describe this type of arthritis of the shoulder that develops when the rotator cuff is damaged. If you develop this condition, your shoulder will be painful. Movement and strength of the shoulder will be decreased. Moving the arm away from the body and raising it over your head can be especially difficult.
This guide will help you understand
- what parts of the shoulder are involved
- what causes this condition
- how doctors diagnose the condition
- what treatment options are available
Anatomy
What parts of the shoulder are involved?
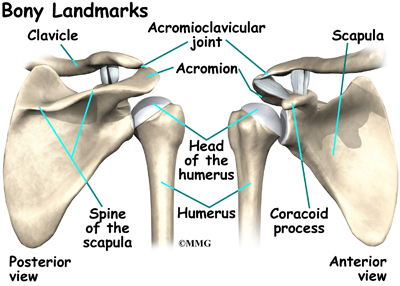
The bones of the shoulder are the humerus (the upper arm bone), the scapula (the shoulder blade), and the clavicle (the collar bone). The roof of the shoulder is formed by a part of the scapula called the acromion. The shoulder joint is also called the glenohumeral joint. One of the bones of the glenohumeral joint is the humerus (the long bone of the upper arm).

It has a ball, called the humeral head on the top end. The humeral head fits into a small, shallow cup called the glenoid fossa. It makes up the other part of the glenohumeral joint. The glenoid fossa is part of the shoulder blade. A large ligament runs from the front of the acromion to another part of the shoulder blade called the coracoid process. This ligament is called the coracoacromial ligament. It adds stability to the front of the shoulder.


The rotator cuff is made up of tough, fibrous tissue. It forms a cuff (or capsule) covering the shoulder joint. There are four tendons that help form the rotator cuff. The muscles that form the tendons are the supraspinatus, infraspinatus, teres minor, and subscapularis. These muscles rotate the shoulder outward and inward. Along with another muscle, the deltoid, they also help lift the arm away from the body.

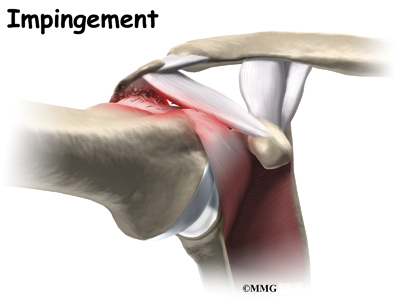
The rotator cuff slides between the humeral head and the acromion as we raise our arm. As this sliding occurs over and over, the rotator cuff tendons will often be pinched as you use the shoulder everyday. This pinching is called impingement. Over time this pinching can lead to damage and weakening of the rotator cuff tendons.
Related Document: A Patient’s Guide to Shoulder Anatomy
Related Document: A Patient’s Guide to Rotator Cuff Tears
Causes
What causes this condition?
Dr. Charles Neer actually described rotator cuff tear arthropathy (RCTA) in 1977. Today, doctors generally refer to this as simply cuff tear arthropathy. Cuff tear arthropathy is actually a type of wear and tear, or degenerative arthritis of the shoulder that develops over time after the rotator cuff is damaged.
Normally, when the rotator cuff muscles contract, they pull the head of the humerus tightly into the socket of the shoulder. This stabilizes the shoulder and allows the the large deltoid muscle to raise the arm over the head as it rotates the humeral head like a pulley. This motion needs the rotator cuff and deltoid muscles to work together – in balance. When the rotator cuff is torn, the shoulder becomes unbalanced. The deltoid muscle pulls the head of the humerus up into the acromion in a sliding motion.
When the top of the humerus hits the underside of the acromion, the deltoid may be able to pull the arm part way up as it levers against the underside of the acromion. But, over time this abnormal sliding motion causes wear and tear on the joint surfaces. Arthritis develops and any motion becomes painful. The shoulder becomes weaker and weaker until you can no longer raise the arm above the head.
Rotator cuff tears are very common. Trauma, such as falls, lifting, and pulling forcefully can also cause a rotator cuff tear. When this happens, it is called an acute tear. Although the rotator cuff can be damaged from a single traumatic injury, damage to the rotator cuff usually occurs gradually. Age can be a factor. As we age, the tendons of the rotator cuff become weaker and more likely to be injured. The blood supply to the tendons diminishes with age. Rotator cuff tears are much more likely to occur after the age of 40.
Certain activities can increase the wear and tear on the rotator cuff. Repetitive overhead activity such as painting, plastering, racquetball, weightlifting, and swimming can cause wear and tear of the rotator cuff.
Surgeons generally will recommend surgery to repair a rotator cuff tear when it occurs. A successful surgical repair of a torn rotator cuff tear can make the development of cuff tear arthropathy much less likely. But, sometimes a rotator cuff tear cannot be repaired. The tissue is simply too damaged and cannot fixed. This is not an uncommon situation in older patients with rotator cuff tears.
In other cases, the patient simply elects not to have surgery to repair a rotator cuff tear and chooses to simply live with the discomfort. Over several years, both of these situations can result in the later development of rotator cuff arthropathy.
Symptoms
What does this condition feel like?
The most common symptom of rotator cuff tear arthropathy is pain in and around the shoulder. The pain can also radiate into your neck, arm, even into your wrist or hand. The shoulder can be especially painful when trying to lift the arm, or rotate it outward. The pain is usually worse at night. It can interrupt your sleep, especially if you try to sleep on the affected shoulder. If untreated, the pain can be nearly continuous and can be severe.
Weakness of the shoulder makes it difficult, if not impossible to lift the arm overhead. Often, even starting this motion can be difficult. The tendency is to shrug the shoulder in order to lift the arm part of the way. With time, weakness of the rotator cuff muscles will worsen. Range of motion can be quite limited. You will often find it difficult to do routine things, like reaching behind your back, reaching into a cabinet, or combing your hair. You may notice a crackling or popping sensation. When there is arthritis of the glenohumeral joint, there is often a creaking or grating sound.
Diagnosis
How do doctors diagnose this condition?
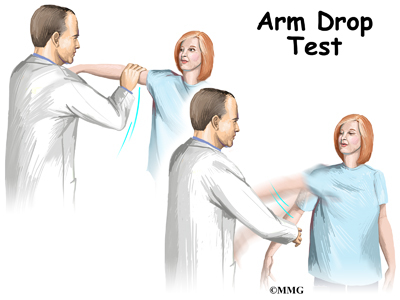
Your doctor will want to do a history and physical examination. He will ask you about activities or trauma that could have injured your shoulder. He will want to know the level of your pain, and what limitations you have. A physical examination is done. Range of motion and strength of the shoulder muscles will be evaluated. Your doctor will want to look at your shoulder to see if there is bony deformity, or atrophy (shrinkage) of the muscles. With a complete rotator cuff tear, moving the arm away from the body can be nearly impossible. If your doctor lifts your arm for you, and you cannot hold it up, this is called a positive Drop Arm Test. This usually means the rotator cuff is torn.
Other areas such as the neck may also need evaluation. A pinched nerve in the neck can mimic a rotator cuff tear. A neurological examination to include checking reflexes and sensation may be included. Your doctor may want you to have an electromyogram (EMG). This checks the function of the muscles of the shoulder. An EMG uses a small needle in the muscle being tested. It measures the electrical activity of the muscle at rest, and when tightened.
Your doctor will request X-rays of your shoulder. X-rays show the shape of the bones and joints. When the rotator cuff is torn, the shoulder will often ride high, meaning that it sits higher in the joint than it should. It can also show how much damage ahs occurred to the joint surfaces.
Magnetic resonance imaging (MRI) allows your doctor to look at slices of the area in question. The MRI machine uses magnetic waves, not X-rays to show the muscle, tendons, and ligaments of the shoulder. MRIs will show tears of the rotator cuff tendons. Atrophy of the muscles can also be evaluated with MRI. A computerized tomography (CT) scan shows slices of bone. Like X-rays, it uses radiation. A CT scan can help to more accurately determine the degree of damage of the glenohumeral joint. A CT scan is especially useful to plan surgery if an artificial shoulder replacement is considered for treatment.
Treatment
What treatment options are available?
Nonsurgical Treatment
Conservative care that includes physical therapy, ice, heat, and anti-inflammatories is tried first. The goal of treatment is to reduce pain, and increase range of motion and function. Corticosteroid injection into the shoulder joint is also sometimes helpful. Steroids are very powerful anti-inflammatory medications that can reduce pain temporarily. These injections will not heal the tear but may give pain relief for several weeks to months. If arthritis of the shoulder is advanced, and pain is continuous and severe, surgery may be the best option available.
Surgery
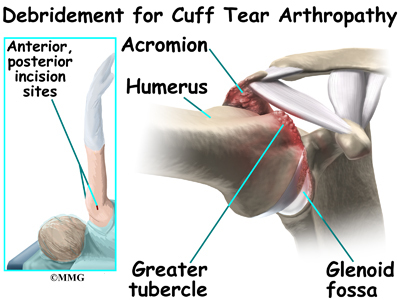
Cuff tear arthropathy is the result of long standing lack of rotator cuff function. In almost all cases, repair of the rotator cuff tear is no longer an option. Surgery for cuff tear arthropathy is done when pain and decreased motion continue after conservative care. The simplest surgical procedure to try and improve the situation is a debridement. During a debridement,
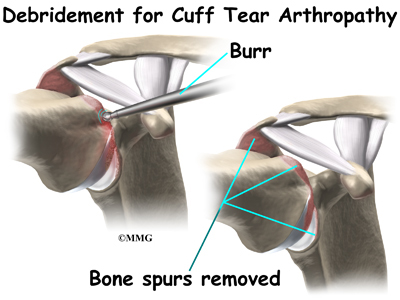
the surgeon will surgically remove (debride) any inflammed tissue, bones spurs and loose flaps of tendon tissue that may be catching in the joint and causing pain. This procedure may reduce pain, however, it does not always improve range of motion, strength, or function of the shoulder.

Patients with this type of arthritis would seem to be good candidates for a shoulder replacement, but replacing the shoulder in the typical fashion has not been successful. Replacing the shoulder with a special type of artficial shoulder joint is becoming more popular. This procedure is called a reverse shoulder replacement.
The “normal” artificial shoulder was designed to copy our real shoulder. The glenoid component (the socket) was designed to replace our normal shoulder socket with a thin, shallow plastic cup. The humeral head component was designed to replace the ball of the humerus with a metal ball that sits on top of the glenoid. This situation has been compared to placing a ball on a shallow saucer. Without something to hold it in place, the metal ball simply slides around on the saucer. In the shoulder that something is the rotator cuff and the muscles that attach to the tendons. Without a rotator cuff to hold the metal ball centered in the plastic socket, the metal quickly wore out the plastic socket and the joint became painful once again.
The answer to this dilemma was to rethink the mechanics of the shoulder joint and design an artificial shoulder that worked differently than the real shoulder joint. The solution was to reverse the socket and the ball, placing the ball portion of the shoulder where the socket use to be and the socket where the ball or humeral head use to be. This new design led to a much more stable shoulder joint that could function without a rotator cuff. The artificial joint itself provided more stability by creating a deeper socket that prevented the ball from sliding up and down as the shoulder was raised. The large deltoid muscle that covers the shoulder could be used to more effectively lift the arm, providing better function of the shoulder. The final result is a shoulder that functions better, is less painful and can last for years without loosening.
Related Document: A Patient’s Guide to Reverse Shoulder Arthroplasty
Rehabilitation
What should I expect after treatment?
Nonsurgical Rehabilitation
Your physical therapist will show you how to use ice or heat to help with pain. You will also be instructed in exercises to strengthen your shoulder girdle as much as possible. Showing you joint protection tips, or motion that you can expect to do safely without causing more harm to your shoulder is also important. The goal is to reduce pain, increase range of motion and function, and prevent further arthritis.
After Surgery
A physical or occupational therapist will see you the day after surgery to begin your rehabilitation program. Therapy treatments will gradually improve the movement in your shoulder. Your therapist will go over your exercises and make sure you are safe getting in and out of bed and moving about in your room.
When you go home, you may get home therapy visits. By visiting your home, your therapist can check to see that you are safe getting around in your home. Treatments will also be done to help improve your range of motion and strength. In some cases, you may require up to three visits at home before beginning outpatient therapy.
Out patient therapy at a facility can often more effective and is often preferred over home physical therapy. The first few outpatient treatments will focus on controlling pain and swelling. Ice and electrical stimulation treatments may help. Your therapist may also use massage and other types of hands-on treatments to ease muscle spasm and pain. Continue to use your shoulder sling as prescribed.
As the rehabilitation program evolves, more challenging exercises are chosen to safely advance the shoulder’s strength and function. Finally, a select group of exercises can be used to simulate day-to-day activities, like grooming your hair or getting dressed.
Weightlifter’s Shoulder
A Patient’s Guide to Weightlifter’s Shoulder (Distal Clavicular Osteolysis)
Introduction
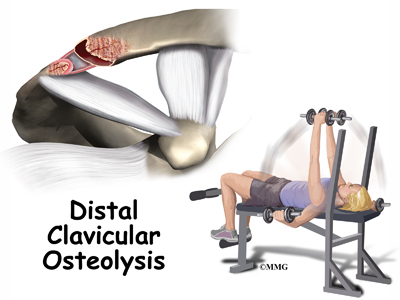
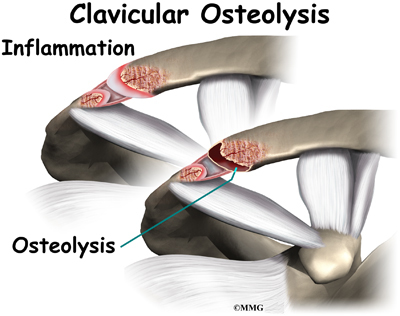
Weightlifter’s shoulder is a painful deterioration of the distal end of the clavicle (collar bone). It is an overuse phenomenon that causes tiny fractures along the end of the clavicle. A breakdown of the bone (osteolysis) occurs.
Weightlifters aren’t the only ones affected. Female bodybuilders, air-hammer operators, soldiers, handball players, and others can develop this problem. For that reason, it is also known as distal clavicular osteolysis (DCO). Osteolysis refers to the resorption of bone at the site of the injury.
This guide will help you understand
- how the problem develops
- how doctors diagnose the condition
- what treatment options are available
Anatomy
What parts of the shoulder are affected?
The shoulder is made up of three bones: the scapula (shoulder blade), the humerus (upper arm bone), and the clavicle (collarbone).
The acromioclavicular (AC) joint is affected most often. This is where the end of the collarbone (closest to the shoulder) attaches to the acromion. The acromion is a curved piece of bone that comes from the shoulder blade across the top of the shoulder. The clavicle and acromion meet to form the AC joint in front of the shoulder.
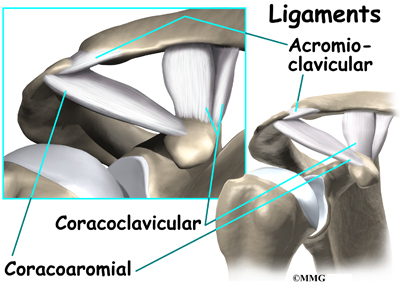
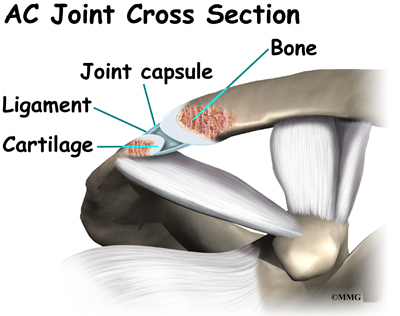
Ligaments and soft tissues hold the AC joint together and provide stability. These include the coracoclavicular ligament, superior and inferior AC ligaments, and the AC joint capsule. There is also a fibrocartilaginous disc between the clavicle and acromion to provide cushion and help transmit and offload forces on the joint.
Related Document: A Patient’s Guide to Shoulder Anatomy
Cause
What causes this condition?
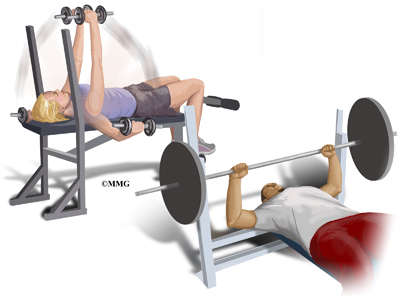
Repetitive trauma or stress from training and lifting causes tiny fractures of the distal end of the clavicular bone. Excessive traction on the AC joint from bench presses or chest fly exercises occurs when the elbows drop below or behind the body. This places the shoulders in a position of excess extension. Because the bone doesn’t have a chance to heal before the next training session begins, the bone actually starts to dissolve.
There may be a history of an acute injury of the AC joint. But the condition can occur without any known trauma. In most cases, there is repetitive stress to the affected upper extremity. Weight training, intensive lifting, and operating an air hammer are examples of the activities leading to acute distal clavicular osteolysis.
There is evidence that the body tries to heal itself but the bone dissolves or is resorbed by the body instead. A network of blood vessels forms in the area during the attempted healing process. Chronic inflammation with scar tissue called fibrosis is commonly found when tissue from the area is examined under a microscope.
The synovial lining of the joint starts to overproduce itself. Invasion of the underlying bone begins. Degenerative joint disease occurs as an end-result of the pathologic process.
Symptoms
What are the symptoms?
You feel an aching pain in the front of the shoulder at the AC joint. Pressing on the AC joint causes increased pain and tenderness. There is often weakness associated with the degenerative bone changes. For the weightlifter, symptoms are the most severe the night after a weightlifting competition or program.
Moving the arm across the body hurts. It gets worse with weight training involving the upper extremities (arms). Activities such as push-ups, bench presses, power clean exercises, dips on the parallel bars, and throwing motions make the symptoms worse. . Lying on the affected side can disrupt sleep.
Diagnosis
How will my doctor diagnose this condition?
The history and physical examination are probably the most important tools the physician uses to diagnose. Your doctor may move and feel your sore joint. This may hurt, but it is very important that your doctor understand exactly where your joint hurts and what movements cause you pain.
The diagnosis is made using X-rays, scintigraphy (bone scan), and steroid injection. CT-guided injection is actually a diagnostic tool and a treatment. Pain relief with steroid injection into the AC joint confirms that the pain is coming from the AC joint.
Treatment
What treatment options are available?
Nonsurgical Treatment
Treatment begins with conservative (nonoperative) care. This may include rest and/or changes in weight-training activities and techniques. Avoiding over-training and smoking are two very effective ways to prevent this condition. If it does develop, take quick steps to modify weightlifting techniques and avoid over-training.
A weight-trainer or physical therapist can help you with activity modification and specific strength training for this problem. For example, you can narrow your hand spacing on the barbells. This takes the stress off the distal clavicle. End your bench presses two inches above the chest. Some lifters place a two-inch folded towel on the chest as a reminder.
The power clean or power jerk can also be modified. Don’t rack the bar. Start with the elbows even with or above the shoulders and lift. This eliminates the power pull. Certain activities such as the bench press, dips, and push-ups should be avoided for a while. Apply an ice massage and take ibuprofen after each workout or exercise session.
Athletes must be careful to follow all recommendations for program modifications. There is a tendency to work through the pain and not really modify the program.
Surgery
Surgery may be needed for those athletes who do not improve with conservative care or who are unwilling to change the training or performance routine. The surgeon removes the end of the clavicle. This is called a distal clavicle resection. The procedure can be done with an open incision or through tiny puncture holes with an arthroscope.
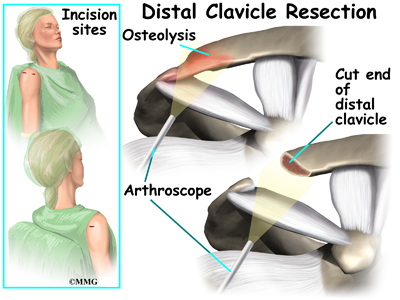
Repair of any torn soft tissue in the area is done at the same time. Some surgeons transfer the coracoacromial ligament over the end of the bone that has been cut. This helps stabilize the joint.
It’s possible to modify the procedure just a bit to stabilize the joint for a quick return-to-sport. The coracoacromial ligament can be transferred over the end of the bone that has been cut. This helps protect and stabilize the joint. It makes power lifting more comfortable for many athletes.
Rehabilitation
What should I expect after treatment?
Nonsurgical Rehabilitation
You may experience a gradual lessening of painful symptoms until you are pain free. The therapist will help you gradually resume all activities without bringing back the problem.
For athletes who progress through the pain without activity modification, they may perform surgery on themselves. In this form of self-surgery, the clavicle will resect on its own. However, there may be an inflammatory response with increased symptoms setting you back in your program.
After Surgery
Many experienced weightlifters are able to continue training carefully. They can resume their program as early as three days after surgery. Most are back in full swing by the end of a week.
Pain is relieved in a majority of patients. Weightlifters are pleased that without the pain, they can quickly get back to their pre-operative level of lifting within a week or two. In fact, some even report exceeding their training weight once the pain is gone. Likewise, there are reports of manual laborers returning to full work duties. The turn around time is very short.
Patients should be warned that there could be some problems. Abnormal motion of the AC joint can lead to a poor result. In such cases, pain is not relieved. There can be muscle injury, prolonged bleeding, infection, and fracture of the clavicle during the procedure. Smokers are at greater risk of poor wound healing and failed surgery.
Shoulder Arthroscopy
A Patient’s Guide to Shoulder Arthroscopy
Introduction
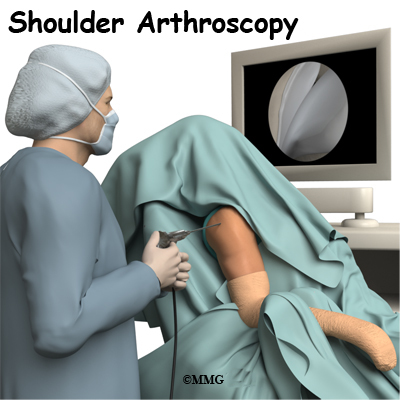
The use of arthroscopy (arthro means joint and scopy means look) has revolutionized many different types of orthopedic surgery. During a shoulder arthroscopy, a small video camera attached to a fiber-optic lens is inserted into the shoulder joint to allow a surgeon to see without making a large incision. Today the shoulder is one of the joints in which the arthroscope is commonly used to both diagnose problems and to perform surgical procedures inside the joint.
This guide will help you understand
- how the condition develops
- how doctors diagnose the condition
- what treatment options are available
Anatomy
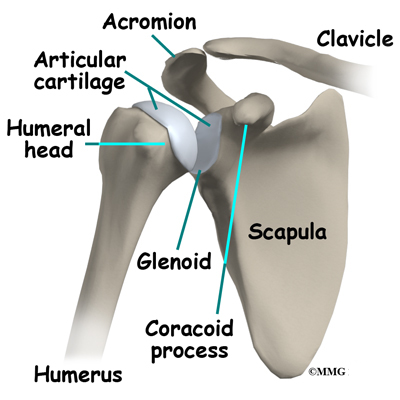
The shoulder is made up of three bones: the scapula (shoulder blade), the humerus (upper arm bone), and the clavicle (collarbone). A part of the scapula, called the glenoid, forms the socket of the shoulder. The glenoid is very shallow and flat, shaped somewhat like a dinner plate rather than a bowl. The humeral head forms the ball portion of the joint. Both the glenoid and the humeral head are covered with articular cartilage. Articular cartilage is the smooth, white material that covers the ends of bones in most joints. Articular cartilage provides a slick, rubbery surface that allows the bones to glide over each other as they move. Articular cartilage also functions as a shock absorber.
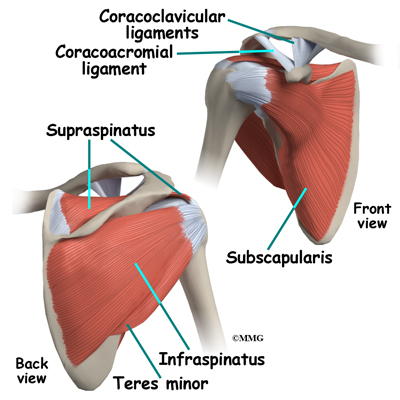
The rotator cuff connects the humerus to the scapula. The rotator cuff is formed by the tendons of four muscles: the supraspinatus, infraspinatus, teres minor, and subscapularis. Tendons attach muscles to bones. Muscles move the bones by pulling on the tendons. The rotator cuff helps raise and rotate the arm. As the arm is raised, the rotator cuff also keeps the humerus tightly in the shoulder socket, the glenoid. The upper part of the scapula that makes up the roof of the shoulder is called the acromion.

The shoulder joint is surrounded by a water tight pocket called the joint capsule. This capsule is formed by the rotator cuff tendons, ligaments, connective tissue and synovial tissue. When the joint capsule is filled with sterile saline and is distended, the surgeon can insert the arthroscope into the pocket that is formed, turn on the lights and the camera and see inside the shoulder joint as if looking into an aquarium. The surgeon can see nearly everything that is inside the shoulder joint including: (1) the joint surfaces of the glenoid socket and the humeral head (2) the rotator cuff tendons, (3) the glenoid labrum and (4) the synovial lining of the joint.
The arthroscope can also be placed in the space outside the shoulder joint known as the subacromial bursa. This bursa is a water tight pocket that sits above the shoulder joint. By placing the arthroscope into this space, the surgeon can see the underside of the distal end of the clavicle (collarbone) and the acromion as well as the joint that is formed where the clavicle and acromion meet, the acromioclavicular (AC) joint.
Related Document: A Patient’s Guide to Shoulder Anatomy
Rationale
What does my surgeon hope to accomplish??
When shoulder arthroscopy first became widely available, it was used primarily to look inside the shoulder joint and make a diagnosis. Today, shoulder arthroscopy is used in performing a wide range of different types of surgical procedures on the shoulder joint including confirming a diagnosis, removing loose bodies, removing or repairing a torn labrum, reconstructing torn ligaments to prevent recurrent dislocation, repairing torn rotator cuff tendons and washing out debris from a shoulder that has become infected. Surgery can also be performed outside the joint in the subacromial bursa including removing bone spurs from the acromion and reconstructing an arthritic acromioclavicular joint.
Your surgeon’s goal is to fix or improve your problem by performing a suitable surgical procedure; the arthroscope is a tool that improves the surgeons ability to perform that procedure. The arthroscope image is magnified and allows the surgeon to see better and clearer. The arthroscope allows the surgeon to see and perform surgery using much smaller incisions. This results in less tissue damage to normal tissue and can shorten the healing process. But remember, the arthroscope is only a tool. The results that you can expect from a shoulder arthroscopy depend on what is wrong with your shoulder, what can be done inside your shoulder to improve the problem and your effort at rehabilitation after the surgery.
Preparations
What do I need to know before surgery?
You and your surgeon should make the decision to proceed with surgery together. You need to understand as much about the procedure as possible. If you have concerns or questions, be sure and talk to your surgeon.
Once you decide on surgery, you need to take several steps. Your surgeon may suggest a complete physical examination by your regular doctor. This exam helps ensure that you are in the best possible condition to undergo the operation.
You may also need to spend time with the physical therapist who will be managing your rehabilitation after surgery. This allows you to get a head start on your recovery. One purpose of this preoperative visit is to record a baseline of information. The therapist will check your current pain levels, ability to do your activities, and the movement and strength of each shoulder.
A second purpose of the preoperative visit is to prepare you for surgery. The therapist will teach you the exercises you’ll use during your recovery.
On the day of your surgery, you will probably be admitted for surgery early in the morning. You shouldn’t eat or drink anything after midnight the night before.
Surgical Procedure
What happens during shoulder arthroscopy?
Before surgery you will be placed under either general anesthesia or a type of regional anesthesia. In simple cases, local anesthesia may be adequate. Sterile drapes are placed to create a sterile environment for the surgeon to work. There is a great deal of equipment that surrounds the operating table including the TV screens, cameras, light sources and surgical instruments.
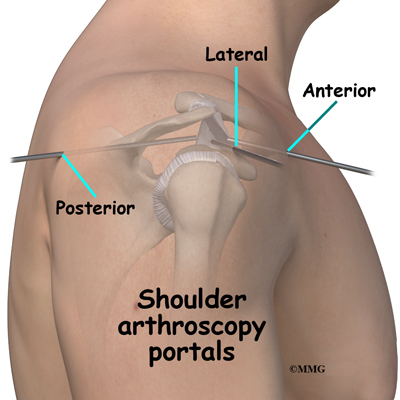
The surgeon begins the operation by making two or three small openings into the shoulder, called portals. These portals are where the arthroscope and surgical instruments are placed inside the shoulder joint. Care is taken to protect the nearby nerves and blood vessels. A small metal or plastic tube (or cannula) will be placed through one of the portals to inflate the shoulder joint with sterile saline.
The arthroscope is a small fiber-optic tube that is used to see and operate inside the joint. The arthroscope is a small metal tube about 1/4 inch in diameter (slightly smaller than a pencil) and about seven inches in length. The fiber-optics inside the metal tube of the arthroscope allows a bright light and TV camera to be connected to the outer end of the arthroscope. The light shines through the fiber-optic tube and into the shoulder joint. A TV camera is attached to the lens on the outer end of the arthroscope.
The TV camera projects the image from inside the shoulder joint on a TV screen next to the surgeon. The surgeon actually watches the TV screen (not the shoulder) while moving the arthroscope to different places inside the shoulder joint.
Over the years since the invention of the arthroscope, many very specialized instruments have been developed to perform different types of surgery using the arthroscope to see what is going on while the instruments are being used. Today, many surgical procedures that once required large incisions for the surgeon to see and fix the problem can be one with much smaller incisions. For example, simple removal of a torn labrum or loose body can be done using two or three small 1/4 inch incisions. More extensive surgical procedures such as ligament reconstruction or rotator cuff repair may require larger incisions.
Once the surgical procedure is complete, the arthroscopic portals and surgical incisions will be closed with sutures or surgical staples. A bandage will be applied to the shoulder. Once the bandage has been placed, you will be taken to the recovery room.
Complications
What might go wrong?
As with all major surgical procedures, complications can occur during shoulder arthroscopy. This document doesn’t provide a complete list of the possible complications, but it does highlight some of the most common problems. Some of the most common complications following shoulder arthroscopy are
- anesthesia complications
- thrombophlebitis
- infection
- equipment failure
- slow recovery
Anesthesia Complications
Most surgical procedures require that some type of anesthesia be done before surgery. A very small number of patients have problems with anesthesia. These problems can be reactions to the drugs used, problems related to other medical complications, and problems due to the anesthesia. Be sure to discuss the risks and your concerns with your anesthesiologist.
Thrombophlebitis (Blood Clots)
Thrombophlebitis, sometimes called deep venous thrombosis (DVT), can occur after any operation, but is more likely to occur following surgery on the hip, pelvis, or knee. DVT occurs when blood clots form in the large veins of the leg. This may cause the leg to swell and become warm to the touch and painful. If the blood clots in the veins break apart, they can travel to the lung, where they lodge in the capillaries and cut off the blood supply to a portion of the lung. This is called a pulmonary embolism. (Pulmonary means lung, and embolism refers to a fragment of something traveling through the vascular system.) Most surgeons take preventing DVT very seriously. There are many ways to reduce the risk of DVT, but probably the most effective is getting you moving as soon as possible after surgery. Two other commonly used preventative measures include
Animation of DVT…View animation
- pressure stockings to keep the blood in the legs moving
- medications that thin the blood and prevent blood clots from forming
Infection
Following shoulder arthroscopy, it is possible that a postoperative infection may occur. This is very uncommon and happens in less than 1% of cases. You may experience increased pain, swelling, fever and redness, or drainage from the incisions. You should alert your surgeon if you think you are developing an infection.
Infections are of two types: superficial or deep. A superficial infection may occur in the skin around the incisions or portals. A superficial infection does not extend into the joint and can usually be treated with antibiotics alone. If the shoulder joint itself becomes infected, this is a serious complication and will require antibiotics and possibly another surgical procedure to drain the infection.
Equipment Failure
Many of the instruments used by the surgeon to perform shoulder arthroscopy are small and fragile. These instruments can be broken resulting in a piece of the instrument floating inside of the shoulder joint. The broken piece is usually easily located and removed, but this may cause the operation to last longer than planned. There is usually no damage to the shoulder joint due to the breakage.
Different types of surgical devices (screws, pins, and suture anchors) are used to hold tissue in place during and after arthroscopy. These devices can cause problems. If one breaks, the free-floating piece may hurt other parts inside the shoulder joint, particularly the articular cartilage. The end of the tissue anchor may poke too far through tissue and the point may rub and irritate nearby tissues. A second surgery may be needed to remove the device or fix problems with these devices.
Slow Recovery
Not everyone gets quickly back to routine activities after shoulder arthroscopy. Because the arthroscope allows surgeons to use smaller incisions than in the past, many patients mistakenly believe that less surgery was necessary. This is not always true. The arthroscope allows surgeons to do a great deal of reconstructive surgery inside the shoulder without making large incisions. How fast you recover from shoulder arthroscopy depends on what type of surgery was done inside your shoulder.
Simple problems that require simple procedures using the arthroscope generally get better faster. Patients with extensive damage to the shoulder ligaments, rotator cuff tendons, or articular cartilage tend to require more complex and extensive surgical procedures. These more extensive reconstructions take longer to heal and have a slower recovery. You should discuss this with your surgeon and make sure that you have realistic expectations of what to expect following arthroscopic shoulder surgery.
After Surgery
What happens after surgery?
Shoulder arthroscopy is usually done on an outpatient basis meaning that patients go home the same day as the surgery. More complex reconstructions that require larger incisions and surgery that alters bone may require a short stay in the hospital to control pain more aggressively and monitor the situation more carefully. You may also begin physical therapy while in the hospital.
The portals are covered with surgical strips, the larger incisions may have been repaired with either surgical staples or sutures and may be covered with a bandage.
Patients who have had more complex reconstructive surgery may need to wear a sling or shoulder immobilizer for several weeks. The shoulder immobilizer helps to protect the healing tissue inside the shoulder joint. You may be allowed to remove the brace at times during the day to do gentle range-of-motion exercises and bathe.
Rehabilitation
What will my recovery be like?
Your rehabilitation will depend on the type of surgery required. You may not need formal physical therapy after simple procedures. Some patients may simply do exercises as part of a home program after some simple instructions. But, many surgeons have patients take part in formal physical therapy after any type of shoulder arthroscopy procedure. Generally speaking, the more complex the surgery the more involved and prolonged your rehabilitation program will be. The first few physical therapy treatments are designed to help control the pain and swelling from the surgery.
Today, the arthroscope is used to perform quite complicated major reconstructive surgery using very small incisions. Remember, just because you have small incisions on the outside, there may be a great deal of healing tissue on the inside of the shoulder joint. If you have had major reconstructive surgery, you should expect full recovery to take several months. Your physical therapist’s goal is to help you keep your pain under control and improve the range of motion and strength of your shoulder. When you are well under way, regular visits to your therapist’s office will end. Your therapist will continue to be a resource, but you will be in charge of doing your exercises as part of an ongoing home program.
Shoulder Dislocations
A Patient’s Guide to Shoulder Dislocations
Introduction

A shoulder dislocation is a painful and disabling injury of the glenohumeral joint. Most dislocations are anterior (forward) but the shoulder can dislocate posteriorly (backwards). Inferior and posterolateral dislocations are possible but occur much less often. The specific type of dislocation is based on the position of the humeral head in relation to the glenoid (shoulder socket) at the time of the diagnosis.
This guide will help you understand
- what parts of the shoulder are involved
- how the problem develops
- how doctors diagnose the condition
- what treatment options are available

Anatomy
What parts of the body are involved?
The shoulder has unique and complex anatomy that allows range of motion and coordination needed for reaching, lifting, throwing, and many other movements. The bones of the shoulder are the humerus (the upper arm bone), the scapula (the shoulder blade), and the clavicle
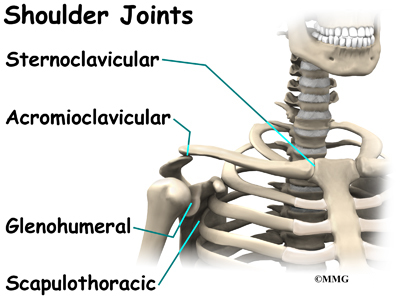
(the collar bone).The roof of the shoulder is formed by a part of the scapula called the acromion.
There are actually four joints that make up the shoulder. The main shoulder joint, called the glenohumeral joint, is formed where the ball of the humerus fits into a shallow socket on the scapula. This shallow socket is called the glenoid. Understanding the remaining anatomical structures

discussed will help you understand why your shoulder dislocated.
The acromioclavicular (AC) joint is where the clavicle meets the acromion. The sternoclavicular (SC) joint supports the connection of the arms and shoulders to the main skeleton on the front of the chest. The scapulothoracic joint is formed where the shoulder blade glides against the thorax (the rib cage). This joint is important because it requires that the muscles surrounding the shoulder blade work together to keep the socket lined up during shoulder movements.
Ligaments, Joint Capsule, and Labrum
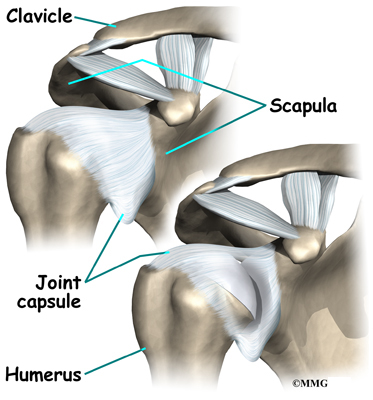
There are several important ligaments in the shoulder. Ligaments are soft tissue structures that connect bones to bones. A joint capsule is a watertight sac that surrounds a joint. In the shoulder, the joint capsule is formed by a group of ligaments that connect the humerus to the glenoid. These ligaments are the main source of stability for the shoulder. They help hold the shoulder in place and keep it from dislocating.
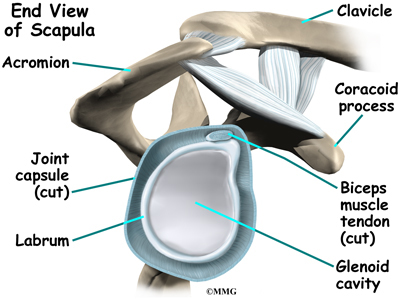
The labrum is a special cartilaginous structure inside the shoulder. It is attached almost completely around the edge of the glenoid. When viewed in cross section, the labrum is wedge-shaped. The shape and the way the labrum is attached create a deeper cup for the glenoid socket. This is important because the glenoid socket is so flat and shallow that the ball of the humerus does not fit tightly. The labrum creates a deeper cup for the ball of the humerus to fit into and helps prevent dislocation.
The labrum is also where the biceps tendon attaches to the glenoid. Tendons are much like ligaments, except that tendons attach muscles to bones. Muscles move the bones by pulling on the tendons. The biceps tendon runs from the biceps muscle, up the front of the upper arm, to the glenoid. At the very top of the glenoid, the biceps tendon attaches to the bone and actually becomes part of the labrum. This connection can be a source of problems when the biceps tendon is damaged and pulls away from its attachment to the glenoid.
The Rotator Cuff
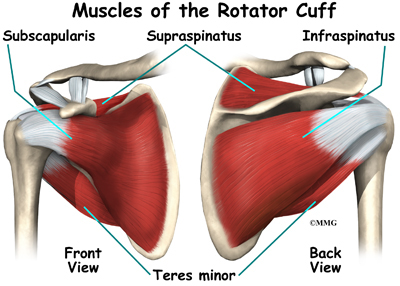
The tendons of the rotator cuff are the next layer in the shoulder joint. Four rotator cuff tendons connect the deepest layer of muscles to the humerus. This group of muscles lies just outside the shoulder joint. These muscles help raise the arm from the side and rotate the shoulder in the many directions. They are involved in many day-to-day activities. The rotator cuff muscles and tendons also help keep the shoulder joint stable by holding the humeral head in the glenoid socket.
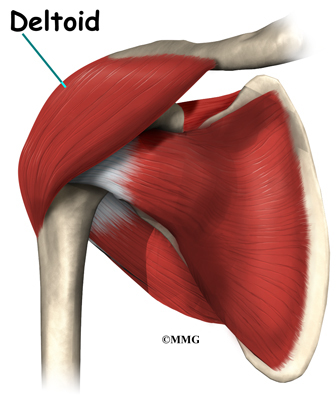
The large deltoid muscle is the outer layer of shoulder muscle. The deltoid is the largest, strongest muscle of the shoulder. The deltoid muscle takes over lifting the arm once the arm is away from the side.
Types of Shoulder Dislocations
Anterior Dislocation
With an anterior dislocation, the head of the humerus is driven forward from inside the glenoid cavity to a place under the coracoid process. This type of dislocation is sometimes referred to as a subcoracoid dislocation. The joint capsule is usually avulsed (torn away) from the margin of the glenoid cavity.
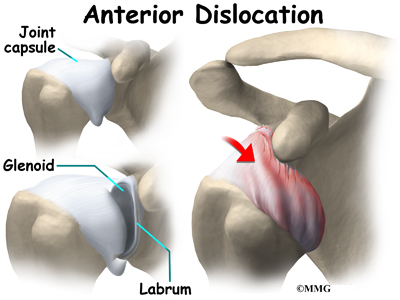
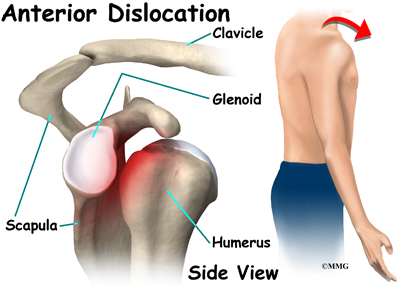
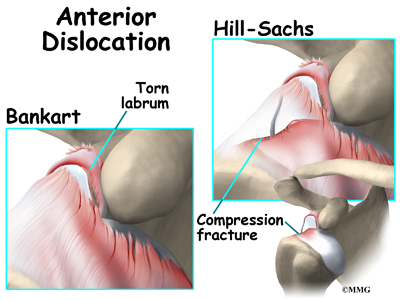
Anterior shoulder dislocation can also be the result of a detached labrum. When both the labrum and the capsule along the anterior margin of the glenoid cavity are avulsed, the injury is called a Bankart lesion. Compression fracture of the humeral head from the force of hitting the hard glenoid is called a Hill-Sach’s lesion. Three-fourths of the patients with a Bankart lesion will also have a Hill-Sach’s lesion.
Posterior and Inferior Dislocations
When the shoulder dislocates posteriorly, the head of the humerus moves backward behind the glenoid. An inferior dislocation describes the position of the humeral head down below the glenoid cavity. Posterior and inferior shoulder dislocations only account for about five to 10 per cent of all shoulder dislocations. Most shoulder dislocations are in the anterior direction.
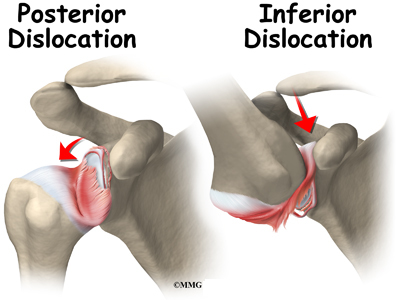

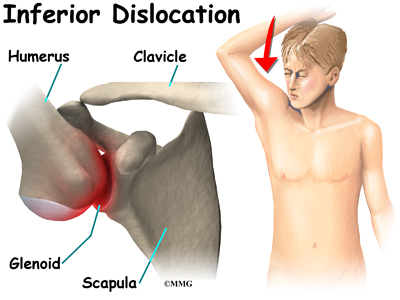
Related Document: A Patient’s Guide to Shoulder Anatomy
Causes
What causes this problem?
The shoulder is a very mobile joint and more vulnerable to dislocation than other joints. The glenoid cavity is small in relation to the head of the humerus. Muscles, ligaments, and the bony anatomy of the shoulder all work together to maintain shoulder stability and prevent dislocation. Dislocation can occur when any of these structures are injured or altered in any way.
Tears or ruptures of the rotator cuff are the most common injuries that lead to shoulder dislocation. Fractures of the humerus and damage to any of the nerves (e.g., axillary, brachial plexus) supplying the rotator cuff can also result in shoulder dislocation. A fall on an outstretched hand or directly on the posterolateral aspect (back and side) of the shoulder can cause an anterior dislocation. Violent uncoordinated muscle contractions during a grand mal seizure can also cause shoulder dislocations.
Forceful motions that cause soft tissue structures to tear or rupture lead to dislocation. Forceful abduction, external rotation, and extension are the most common load resulting in shoulder dislocation. The joint capsule may be lifted off the bone and the head of the humerus gets lodged between the capsule and the bone.
Once the shoulder has been dislocated the first time, there is a high probability (90 per cent chance) of a second shoulder dislocation (recurrence). The force of the first dislocation dislodging the head of the humerus forward leaves a pocket formed by sagging soft tissues that the humeral head can slip back into. Some people with very lax ligaments can dislocate the shoulder and reduce it over and over. This is referred to as habitual dislocation and should be discouraged.
The highest incidence of recurrence is in young people (under the age of 20 at the time of the injury). Sixty per cent of patients between 20 and 40 years will have a recurrence. Only 10 per cent of patients over 40 years will have another shoulder dislocation. Participation in contact sports activity increases the risk of reinjury. After a second dislocation, frequent recurrence of shoulder dislocation can occur with less and less force, load, or stress.
Symptoms
What does the condition feel like?
Most people with a shoulder dislocation experience sudden, severe pain in the shoulder after a fall, injury, or other traumatic event. It’s a natural response to hold and support the arm against the body with the other hand.
Pain and a feeling of extreme apprehension with any movement of the arm are common. This type of apprehension is present when instability remains after the shoulder has been reduced (manually put back in place). You may be constantly aware that if you move the arm in just the right way, it will pop out again.
With an inferior dislocation, it is difficult (and sometimes impossible) to bring the arm down to the side. This is because the head of the humerus is caught under the glenoid cavity.
Diagnosis
How do doctors diagnose the problem?
The history and physical examination are probably the most important tools the physician uses to diagnose a ruptured or deficient rotator cuff and/or bone fracture. Any of these injuries in the shoulder complex can lead to (and will be present along with) shoulder dislocation.
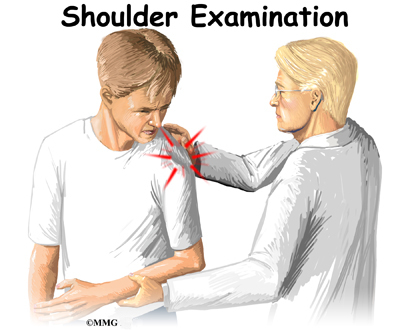
Your physician will visually inspect the shoulder. When there is a shoulder dislocation, the normal rounded contour of the shoulder and upper arm is lost. Instead, the outside edge of the shoulder looks flat or square. There are changes in the appearance of the surface anatomy. For example, instead of the greater tuberosity (bony bump along top of shoulder), there is a gap under the acromion. The head of the humerus may be observed and felt as a large bump in front or behind the shoulder. The area is usually extremely tender to palpation.
Range of motion, strength, and sensation will be tested if possible. Any changes or loss of sensation may point to nerve damage. The physician will also check the pulses in your arm in order to detect the possibility of vascular complications.
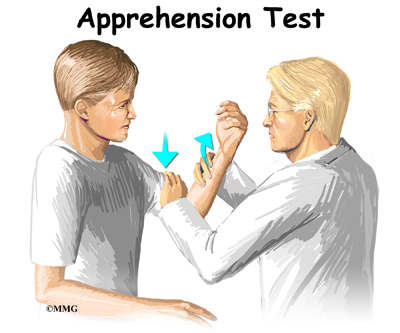
There are many clinical tests that can be performed to identify which soft tissue structures have been damaged or ruptured. A positive apprehension test is very diagnostic of an unstable shoulder that might dislocate again after a first dislocation injury. The arm is abducted (moved away from the body) and externally (outwardly) rotated. Just before the joint is about to dislocate, the patient becomes extremely anxious. At that point, the test is considered positive for shoulder instability and therefore discontinued.
X-rays are an important diagnostic tool to show the displaced head of the humerus and any bone fractures. Several views may be needed to reveal the exact direction of the dislocation and fracture lines when present. Magnetic resonance imaging (MRI) is used to diagnose and define the extent of the lesion. MRIs are very accurate in detecting Hill-Sach’s lesions.
If surgery is being considered, then the surgeon may perform a diagnostic arthroscopic exam. A log, thin scope with a tiny fiber-optic TV camera on the end is inserted into the shoulder joint, allowing the orthopedic surgeon to look at the structures inside the joint directly.
Treatment
What treatment options are available?
Nonsurgical Treatment
In many cases, the shoulder can be reduced without surgery. This is called a closed reduction. Many health care professionals (especially those trained in emergency procedures) know how to manipulate the shoulder back into the socket. However, without the aid of a general anesthetic, this maneuver can be very painful.
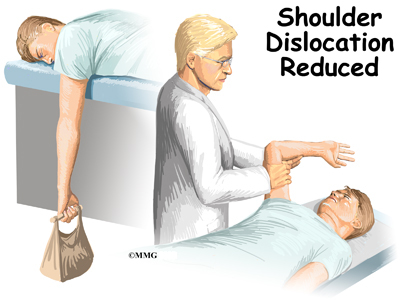
One simple technique to reduce an anterior shoulder dislocation is done in the prone (face down) position. The injured arm is supported at the edge of the table. The arm is allowed to dangle over the edge of the table with a weight attached. As the shoulder muscles relax, the humeral head slips back to its normal position. This may take several minutes.
If passive positioning doesn’t work for an anterior dislocation, then a general anesthetic is administered and traction is applied to the upper limb. The arm is held in a position of shoulder abduction (away from the body) while lateral (sideways) and backward pressure is applied to the head of the humerus. Posterior shoulder dislocation can be treated in a similar fashion. Under anesthesia, the shoulder is rotated outwardly and forward pressure is applied on the dislocated humeral head.
Some patients who have recurrent dislocations know how to pop the joint back in place without help. When performed by someone else, the procedure is done quickly in order to prevent further pain or soft tissue damage. Functional outcome is better if the dislocation is reduced early.
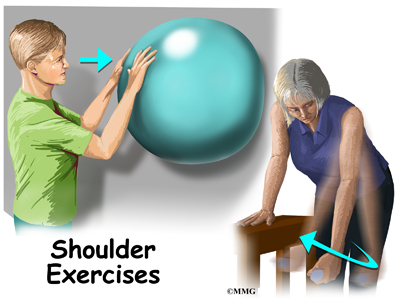
Following closed reduction, X-rays are used to confirm correct placement of the humeral head in the glenoid cavity. After reduction, immobilization of the arm in a sling against the chest is usually recommended. Immobilization of the reduced shoulder is applied for several weeks up to a month. This approach will give the soft tissues a chance to heal. For older adults, passive exercises called Codman’s or pendulum exercises may be prescribed to prevent stiffness. These are usually done once or twice a day with the sling removed.
Recurrent dislocation is the most common complication after dislocation, especially in young people. Older adults are more likely to experience chronic pain and stiffness. When conservative care is unable to restore shoulder stability and normal function, then surgical intervention may be needed.
Surgery
If the shoulder can’t be reduced manually or if a sling and rehabilitation program does not control symptoms of instability, then surgery may be suggested. The main goal of surgery is to reduce and/or stabilize the shoulder. Restoring normal motion and function and preventing recurrent dislocations are important outcomes of surgical intervention.
Even when surgery is needed, your surgeon may have you see a physical therapist for several visits before the surgery. This is done to reduce swelling, strengthen the muscles, and stabilize the shoulder as much as possible before surgery. This practice also reduces the chances of scarring inside the joint and can speed recovery after surgery.
There are many different ways to repair a chronically unstable shoulder following a first dislocation or after many recurrent shoulder dislocations. The direction of instability (anterior, posterior, inferior, or some combination) is taken into consideration when choosing the best reconstructive technique. The site, type, and extent of damage are major determining factors in how the surgeon approaches the repair.
One of the most common procedures is the Bankart operation. During the Bankart reconstruction procedure, the labrum and capsule are reattached to the anterior margin of the glenoid cavity.
Shoulder reconstruction surgery may be done with an open incision method or with the aid of an arthroscope. Incisions are usually still required with arthroscopic technique, but the surgery doesn’t require the surgeon to open the joint. The arthroscope is used to view the inside of the shoulder joint as the surgeon performs the work.


Older adults who have a fracture and shoulder dislocation may need a shoulder replacement instead of shoulder reconstructive surgery to reduce the dislocation and repair the fracture.
Rehabilitation
What should I expect as I recover?
Nonsurgical Rehabilitation
Patients may receive physical therapy after having a dislocation. Therapists treat swelling and pain and help minimize tension on inflamed structures with the use of ice, supportive taping, electrical stimulation, and rest periods. Symptoms are addressed in the acute phase but restoring normal function rather than eliminating symptoms is the focus for chronic shoulder instability.
Exercises are used to help you regain normal movement of joints and muscles. Range-of-motion exercises should be started right away with the goal of helping you swiftly regain full movement in your shoulder. This includes the use of gentle stretching and motion through the full range available.
As your symptoms ease and strength improves, you will be guided in specialized exercises to improve posture, shoulder stability, and normal motor control. The desired final outcome is a return to full function. For athletes, this means full participation in sports activities.
In the later phase of rehab, the therapist will use a combination of kinetic chain exercises to decrease shear forces on the joint while enhancing strength. Plyometrics, a specific type of exercise to produce fast, powerful movements needed for sports performance will also be included.
You can return to your sporting activities when your muscles are back to nearly their full strength and control, you are not having swelling that comes and goes, and you aren’t having problems with the shoulder popping out of the joint.
After Surgery
Many shoulder reconstructive surgeries are now done on an outpatient basis. Patients go home the same day as the surgery. Some patients stay one or two nights in the hospital if necessary.
After any surgery to stabilize the shoulder your shoulder will be immobilized. You will probably wear a sling or hard brace for three to six weeks. A large abduction wedge under the armpit holds the arm in just the right position. The soft tissues must be given enough time to heal and form scar tissue to support and stabilize the shoulder joint.
Some studies are being done to investigate the use of early motion (within two to three days) after the operation. This accelerated rehab protocol has not been adopted routinely by all surgeons. Athletes may be most likely to try early rehab in order to return to sports participation as soon as possible. Functional recovery without immobilization has been proven possible. There is less postoperative pain with early motion.
Most doctors have their patients take part in formal physical therapy after shoulder reconstruction. You will probably be involved in a progressive functional rehabilitation program. The phases of rehabilitation include acute, early recovery, late recovery, and functional phase.
You should expect functional rehab to last four to six months after surgery. This will ensure the best result from your reconstruction. During the acute phase (one to three weeks), you may expect to see the physical therapist two to three times a week. The goal is to control pain and inflammation. The therapist will address any postural abnormalities and begin muscle re-education.
When you have minimal pain and adequate soft tissue healing, you’ll be advanced to the early recovery phase. This phase usually lasts from three to six weeks after the surgery. During this time, the therapist will work with you to increase motion, strength, and control.
When you have full, pain free motion and improved strength, then you’ll enter the late recovery phase. This phase extends from six to 12 weeks post-operatively. Improving strength, power, endurance, and dynamic kinetics (movement) is the main thrust of the late recovery phase.
The functional phase begins about three months after surgery. This phase is directed at the sports athlete. The therapist will put you through a series of drills designed to improve coordination, speed, and agility. In order to participate in this level of rehab, you must have normal range of motion, flexibility needed for your sport or activity, and 90 per cent of normal strength. You must also be free of symptoms during activities or sport-specific drills.
Biceps Rupture
A Patient’s Guide to Biceps Rupture
Introduction
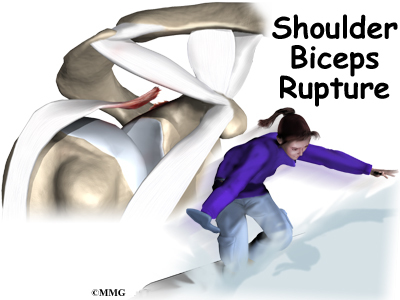
A biceps rupture involves a complete tear of the main tendon that attaches the top of the biceps muscle to the shoulder. It happens most often in middle-aged people and is usually due to years of wear and tear on the shoulder. A torn biceps in younger athletes sometimes occurs during weightlifting or from actions that cause a sudden load on the arm, such as hard fall with the arm outstretched.
This guide will help you understand
- what parts of the shoulder are affected
- the causes of a biceps rupture
- ways to treat this problem
Anatomy
What parts of the shoulder are affected?
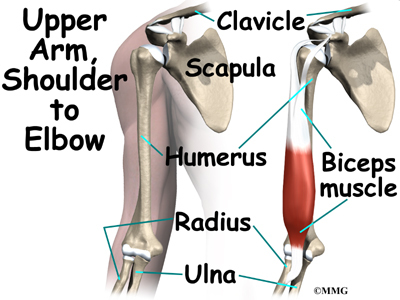
The biceps muscle goes from the shoulder to the elbow on the front of the upper arm. Two separate tendons (tendons attach muscles to bones) connect the upper part of the biceps muscle to the shoulder. The upper two tendons of the biceps are called the proximal biceps tendons, because they are closer to the top of the arm.
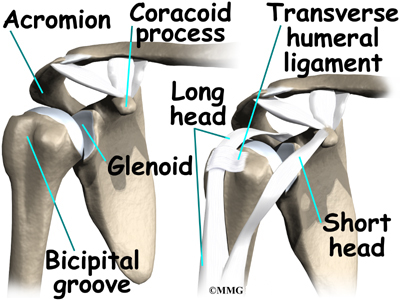
The main proximal tendon is the long head of the biceps. It connects the biceps muscle to the top of the shoulder socket, the glenoid. Beginning at the glenoid, the tendon of the long head of the biceps travels down the front of the upper arm. The tendon runs within the bicipital groove and is held in place by the transverse humeral ligament.
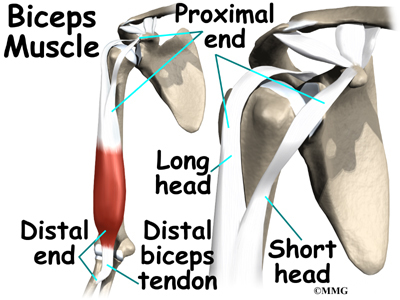
The short head of the biceps connects on the corocoid process of the scapula. The corocoid process is a small bony knob just in from the front of the shoulder.
The lower biceps tendon is called the distal biceps tendon. The word distal means the tendon is further down the arm. The lower part of the biceps muscle connects to the elbow by this tendon.
The muscles forming the short and long heads of the biceps stay separate until just above the elbow where they unite and connect to the distal biceps tendon.
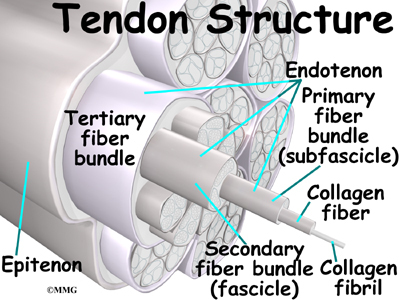
Tendons are made up of strands of a material called collagen. The collagen strands are lined up in bundles next to each other. Because the collagen strands in tendons are lined up, tendons have high tensile strength. This means they can withstand high forces that pull on both ends of the tendon. When muscles work, they pull on one end of the tendon. The other end of the tendon pulls on the bone, causing the bone to move.

Contracting the biceps muscle can bend the elbow upward. The biceps can also help flex the shoulder, lifting the arm up, a movement called flexion. And the muscle can rotate, or twist, the forearm in a way that points the palm of the hand up. This movement is called supination, which positions the hand as if you were holding a tray.
Related Document: A Patient’s Guide to Shoulder Anatomy
Causes
Why did my biceps rupture?
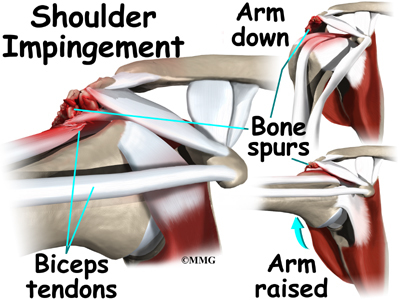
Biceps ruptures generally occur in people who are between 40 and 60 years old. People in this age group who’ve had shoulder problems for a long time are at most risk. Often the biceps ruptures after a long history of shoulder pain from tendonitis (inflammation of hte tendon) or problems with shoulder impingement. Shoulder impingement is a condition where the soft tissues between the ball of the upper arm and the top of the shoulder blade (acromion) get squeezed with arm motion.
Related Document: A Patient’s Guide to Shoulder Impingement
Years of shoulder wear and tear begin to fray the biceps tendon. Eventually, the long head of the biceps weakens and becomes prone to tears or ruptures. Examination of the tissues within most torn or ruptured biceps tendons commonly shows signs of degeneration. Degeneration in a tendon causes a loss of the normal arrangement of the collagen fibers that join together to form the tendon. Some of the individual strands of the tendon become jumbled due to the degeneration, other fibers break, and the tendon loses strength.
A rupture of the biceps tendon can happen from a seemingly minor injury. When it happens for no apparent reason, the rupture is called nontraumatic.
Aging adults with rotator cuff tears also commonly have a biceps tendon rupture. When the rotator cuff is torn, the ball of the humerus is free to move too far up and forward in the shoulder socket and can impact the biceps tendon. The damage may begin to weaken the biceps tendon and cause it to eventually rupture.
Related Document: A Patient’s Guide to Rotator Cuff Tears
Symptoms
What does a ruptured biceps feel like?

Patients often recall hearing and feeling a snap in the top of the shoulder. Immediate and sharp pain follow. The pain often subsides quickly with a complete rupture because tension is immediately taken off the pain sensors in the tendon. Soon afterward, bruising may develop in the middle of the upper arm and spread down to the elbow. The biceps may appear to have balled up, especially in younger patients who’ve had a traumatic biceps rupture. The arm may feel weak at first with attempts to bend the elbow or lift the shoulder.
The biceps tendon sometimes only tears part of the way. If so, a pop may not be felt or heard. Instead, the front of the shoulder may simply be painful, and the arm may feel weak with the same arm movements that are affected with a complete biceps rupture.
Diagnosis
How can my doctor be sure my biceps ruptured?
Your doctor will first take a detailed medical history. You will need to answer questions about your shoulder, if you feel pain or weakness, and how this is affecting your regular activities. You’ll also be asked about past shoulder pain or injuries.
The physical exam is often most helpful in diagnosing a rupture of the biceps tendon. Your doctor may position your arm to see which movements are painful or weak. By feeling the area of the muscle and tendon, the doctor can often tell if the tendon has ruptured. The muscle may look and feel balled up in the middle of the arm, and a dent can sometimes be felt near the top of the shoulder.
X-rays may be ordered. X-rays show the bones that form the shoulder joint and may show bony changes that have contributed to a ruptured biceps. For example, bone spurs (small projections of bone) may be seen on the X-ray. Spurs that form near the biceps tendon will often puncture the tendon as the arm is used with activity. X-rays can also show if there are other problems, such as a fracture. Plain X-rays do not show soft tissues like tendons and will not show a biceps rupture.
Your doctor may also order a magnetic resonance imaging (MRI) scan. This is the most reliable way to check whether the biceps tendon is only partially torn or if the tendon actually ruptured. An MRI is a special imaging test that uses magnetic waves to create pictures of the shoulder in slices. The MRI can also show if there are other problems in the shoulder.
Treatment
What treatment options are available?
Nonsurgical Treatment
Doctors usually treat a ruptured long head of biceps tendon without surgery. This is especially true for older individuals who can tolerate loss of arm strength or if the injury occurs in the nondominant arm.
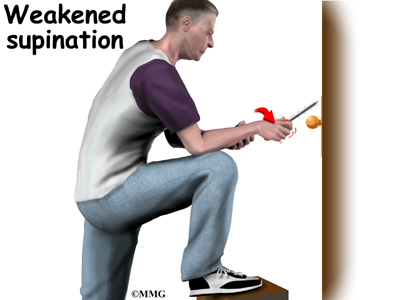
Not having surgery usually only results in a moderate loss of strength. The short head of the biceps is still attached and continues to supply strength to raise the arm up. Flexion of the elbow may be affected, but supination (the motion of twisting the forearm such as when you use a screwdriver) is usually affected more. Not repairing a ruptured biceps reduces supination strength by about 20 percent.
Nonsurgical measures could include a sling to rest the shoulder. Patients may be given anti-inflammatory medicine to help ease pain and swelling and to help return people to activity sooner after a biceps tendon rupture. These medications include common over-the-counter drugs such as ibuprofen.
Doctors may have their patients work with a physical or occupational therapist. At first, your therapist will give you tips how to rest your shoulder and how to do your activities without putting extra strain on the sore area.
Your therapist may apply ice and electrical stimulation to ease pain. Exercises are used to gradually strengthen other muscles that help do the work of a normal biceps muscle.
Surgery
Surgery is reserved for patients who need arm strength, are concerned with cosmetics of the balled up biceps, or who have pain that won’t go away.
Biceps Tenodesis
Biceps tenodesis is a surgery to anchor the ruptured end of the biceps tendon. A common method, called the keyhole technique, involves anchoring the ruptured end to the upper end of the humerus. The keyhole describes the shape of a small hole made by the surgeon in the humerus. The end of the tendon is slid into the top of the keyhole
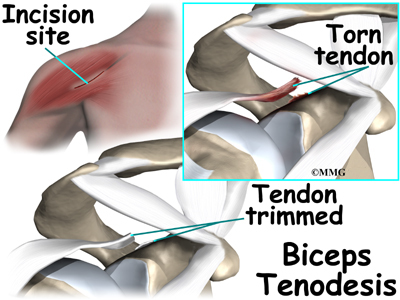
and pulled down to anchor it in place.
The surgeon begins by making an incision on the front of the shoulder, just above the axilla (armpit). The overlying muscles are separated so the surgeon can locate the damaged end of the biceps tendon. The end of the biceps tendon is prepared by cutting away frayed and degenerated tissue.

The transverse humeral ligament is split, exposing the bicipital groove. An incision is made along the floor of the bicipital groove. The bleeding from the incision gets scar tissue to form that will help anchor the repaired tendon in place.
A burr is used to form a keyhole-shaped cavity within the bicipital groove. The top of the cavity is round. The bottom is the slot of the keyhole.
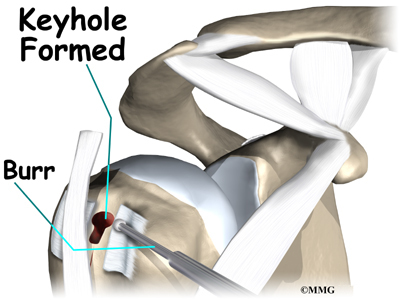
It is made the same width as the biceps tendon.
The surgeon rolls the top end of the biceps tendon into a ball. Sutures are used to form and hold the ball. The elbow is bent, taking tension off the biceps muscle and tendon. The surgeon pushes the tendon ball into the top part of the keyhole. As the elbow is gradually straightened, the ball is pulled firmly into the narrow slot in the lower end of the keyhole.

The surgeon tests the stability of the attachment by bending and straightening the elbow. When the surgeon is satisfied with the repair, the skin incisions are closed, and the shoulder is placed in a protective sling.
Acromioplasty and Direct Tenodesis
This procedure may be used for younger patients who’ve had a recent traumatic biceps rupture, have problems with impingement, and who have an injured rotator cuff.
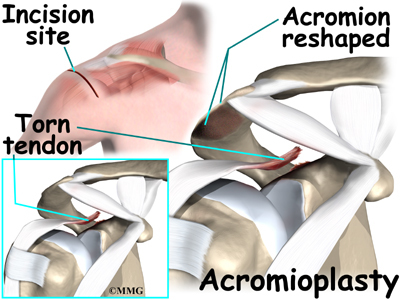
Acromioplasty involves cutting and reshaping the acromion, the bone that forms the top part of the shoulder. Some surgeons will also sever the corocohumeral ligament, which arches over the top of the shoulder joint. These steps relieve pressure on the tissues between the ball of the humerus and the acromion, including the biceps and rotator cuff tendons. For this reason, this procedure is sometimes called subacromial decompression. The ruptured end of the biceps is then anchored to the upper end of the humerus. This is called direct tenodesis.
The surgeon begins by making an incision across the top of the shoulder. The shoulder muscles are separated to expose the top of the humerus. Bone spurs are removed, along with part of the acromion. The surgeon then smooths the rough ends of the bone.
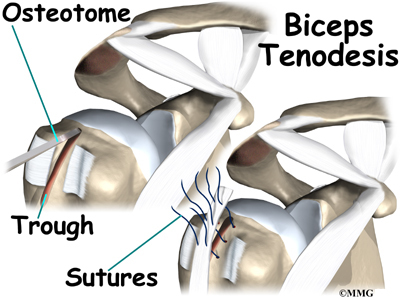
After the acromioplasty procedure, the surgeon focuses on the biceps tendon. When the bicipital groove is in view, the transverse humeral ligament is cut. Next, an osteotome is used to open the joint capsule and create a trough next to the bicipital groove. Three small holes are drilled along each side of the trough. The surgeon places the loose end of the biceps tendon in the new groove.

Sutures are woven into one drill hole, through the tendon, and out the opposite drill hole. This is repeated for the remaining two sets of drill holes. Next, the top end of the ruptured tendon is cut off. Finally, the three sutures are firmly secured.
When the surgeon is satisfied with the repair, the transverse humeral ligament and joint capsule are sutured, followed by the skin incision. The arm is bent at the elbow and placed in a light splint that is to be worn for four weeks after surgery.
Rehabilitation
What should I expect after treatment?
Nonsurgical Rehabilitation
In cases where the ruptured biceps tendon is treated nonsurgically, you will need to avoid heavy arm activity for three to four weeks. As the pain and swelling resolve, you should be safe to begin doing more normal activities.
If the tendon is only partially torn, however, recovery takes longer. Patients usually need to rest the shoulder using a protective sling. As symptoms ease, a carefully progressed rehabilitation program under the supervision of a physical or occupational therapist usually follows. This often involves four to six weeks of therapy.
After Surgery
Immediately after surgery, you’ll need to wear your shoulder sling for about four weeks. Some surgeons prefer to have their patients start a gentle range-of-motion program soon after surgery. When you start therapy, your first few therapy sessions may involve ice and electrical stimulation treatments to help control pain and swelling from the surgery. Your therapist may also use massage and other types of hands-on treatments to ease muscle spasm and pain.
You will gradually start exercises to improve movement in the forearm, elbow, and shoulder. You need to be careful to avoid doing too much, too quickly.
Heavier exercises for the biceps muscle are avoided until at least four to six weeks after surgery. Your therapist may begin with light isometric strengthening exercises. These exercises work the biceps muscle without straining the healing tendon.
At about six weeks, you start doing more active strengthening. As you progress, your therapist will teach you exercises to strengthen and stabilize the muscles and joints of the elbow and shoulder. Other exercises will work your arm in ways that are similar to your work tasks and sport activities. Your therapist will help you find ways to do your tasks that don’t put too much stress on your shoulder.
You may require therapy for six to eight weeks. It generally takes three to four months, however, to safely begin doing forceful biceps activity after surgery. Before your therapy sessions end, your therapist will teach you a number of ways to avoid future problems.
Biceps Tendonitis
A Patient’s Guide to Biceps Tendonitis
Introduction

Biceps tendonitis, also called bicipital tendonitis, is inflammation in the main tendon that attaches the top of the biceps muscle to the shoulder. The most common cause is overuse from certain types of work or sports activities. Biceps tendonitis may develop gradually from the effects of wear and tear, or it can happen suddenly from a direct injury. The tendon may also become inflamed in response to other problems in the shoulder, such as rotator cuff tears, impingement, or instability (described below).
This guide will help you understand
- what parts of the shoulder are affected
- the causes of biceps tendonitis
- ways to treat this problem
Anatomy

What parts of the shoulder are affected?
The biceps muscle goes from the shoulder to the elbow on the front of the upper arm. Two separate tendons (tendons attach muscles to bones) connect the upper part of the biceps muscle to the shoulder. The upper two tendons of the biceps are called the proximal biceps tendons, because they are closer to the top of the arm.

The main proximal tendon is the long head of the biceps. It connects the biceps muscle to the top of the shoulder socket, the glenoid. It also blends with the cartilage rim around the glenoid, the labrum. The labrum is a rim of soft tissue that turns the flat surface of the glenoid into a deeper socket. This arrangement improves the fit of the ball that fits in the socket, the humeral head.
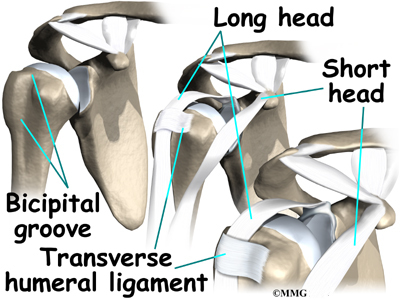
Beginning at the top of the glenoid, the tendon of the long head of the biceps runs in front of the humeral head. The tendon passes within the bicipital groove of the humerus and is held in place by the transverse humeral ligament. This arrangement keeps the humeral head from sliding too far up or forward within the glenoid.
The short head of the biceps connects on the coracoid process of the scapula (shoulder blade). The coracoid process is

a small bony knob just in from the front of the shoulder. The lower biceps tendon is called the distal biceps tendon. The word distal means the tendon is further down the arm. The lower part of the biceps muscle connects to the elbow by this tendon. The muscles forming the short and long heads of the biceps stay separate until just above the elbow, where they unite and connect to the distal biceps tendon.
Tendons are made up of strands of a material called collagen.

The collagen strands are lined up in bundles next to each other. Because the collagen strands in tendons are lined up, tendons have high tensile strength. This means they can withstand high forces that pull on both ends of the tendon. When muscles work, they pull on one end of the tendon. The other end of the tendon pulls on the bone, causing the bone to move.
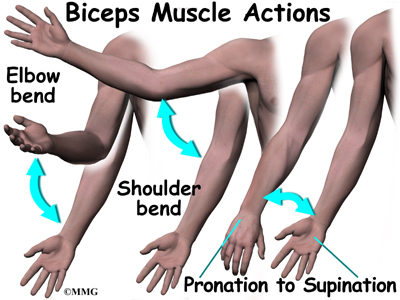
Contracting the biceps muscle can bend the elbow upward. The biceps can also help flex the shoulder, lifting the arm up, a movement called flexion. And the muscle can rotate, or twist, the forearm in a way that points the palm of the hand up. This movement is called supination, which positions the hand as if you were holding a tray.
Related Document: A Patient’s Guide to Shoulder Anatomy
Causes
Why is my biceps tendon inflamed?
Continuous or repetitive shoulder actions can cause overuse of the biceps tendon. Damaged cells within the tendon don’t have time to recuperate. The cells are unable to repair themselves, leading to tendonitis. This is common in sport or work activities that require frequent and repeated use of the arm, especially when the arm motions are performed overhead. Athletes who throw, swim, or swing a racquet or club are at greatest risk.
Years of shoulder wear and tear can cause the biceps tendon to become inflamed. Examination of the tissues in these cases commonly shows signs of degeneration. Degeneration in a tendon causes a loss of the normal arrangement of the collagen fibers that join together to form the tendon. Some of the individual strands of the tendon become jumbled due to the degeneration, other fibers break, and the tendon loses strength. When this happens in the biceps tendon, inflammation, or even a rupture of the biceps tendon, may occur.
Related Document: A Patient’s Guide to Rupture of the Biceps Tendon
Biceps tendonitis can happen from a direct injury, such as a fall onto the top of the shoulder. A torn transverse humeral ligament can also lead to biceps tendonitis. (As mentioned earlier, the transverse humeral ligament holds the biceps tendon within the bicipital groove near the top of the humerus.) If this ligament is torn, the biceps tendon is free to jump or slip out of the groove, irritating and eventually inflaming the biceps tendon.
Biceps tendonitis sometimes occurs in response to other shoulder problems, including
- rotator cuff tears
- shoulder impingement
- shoulder instability
Rotator Cuff Tears
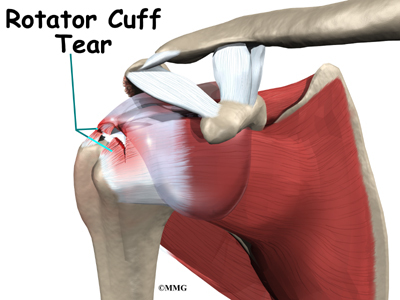
Aging adults with rotator cuff tears also commonly end up with biceps tendonitis. When the rotator cuff is torn, the humeral head is free to move too far up and forward in the shoulder socket and can impact the biceps tendon. The damage may begin to weaken the biceps tendon and cause it to become inflamed.
Related Document: A Patient’s Guide to Rotator Cuff Tears
Shoulder Impingement
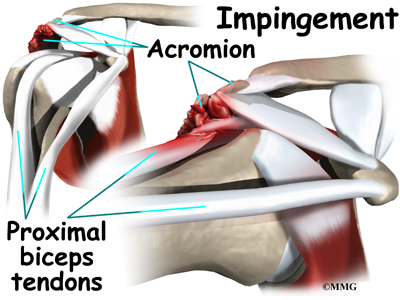
In shoulder impingement, the soft tissues between the humeral head and the top of the shoulder blade (acromion) get pinched or squeezed with certain arm movements.
Related Document: A Patient’s Guide to Shoulder Impingement
Shoulder Instability
Conditions that allow too much movement of the ball within the socket create shoulder instability. When extreme shoulder motions are frequently repeated, such as with throwing or swimming, the soft tissues supporting the ball and socket can eventually get stretched out.
Related Document: A Patient’s Guide to Shoulder Instability
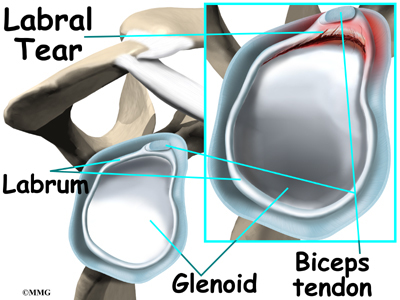
The labrum (the cartilage rim that deepens the glenoid, or shoulder socket) may begin to pull away from its attachment to the glenoid. A shoulder dislocation can also cause the labrum to tear. When the labrum is torn, the humeral head may begin to slip up and forward within the socket. The added movement of the ball within the socket (instability) can cause damage to the nearby biceps tendon, leading to secondary biceps tendonitis.
Related Document: A Patient’s Guide to Labral Tears
Symptoms
What does biceps tendonitis feel like?
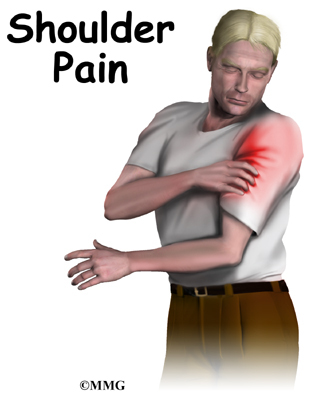
Patients generally report the feeling of a deep ache directly in the front and top of the shoulder. The ache may spread down into the main part of the biceps muscle. Pain is usually made worse with overhead activities. Resting the shoulder generally eases pain.
The arm may feel weak with attempts to bend the elbow or when twisting the forearm into supination (palm up). A catching or slipping sensation felt near the top of the biceps muscle may suggest a tear of the transverse humeral ligament.
Diagnosis
How can my doctor be sure I have biceps tendonitis?
Your doctor will first take a detailed medical history. You will need to answer questions about your shoulder, if you feel pain or weakness, and how this is affecting your regular activities. You’ll also be asked about past shoulder pain or injuries.
The physical exam is often most helpful in diagnosing biceps tendonitis. Your doctor may position your arm to see which movements are painful or weak. Available arm motion is checked. And by feeling the biceps tendon, the doctor can tell if the tendon is tender.
Special tests are done to see if nearby structures are causing problems, such as a tear in the labrum or in the transverse humeral ligament. The doctor checks the shoulder for impingement, instability, or rotator cuff problems.
X-rays are generally not needed right away. They may be ordered if the shoulder hasn’t gotten better with treatment. An X-ray can show if there are bone spurs or calcium deposits near the tendon. X-rays can also show if there are other problems, such as a fracture. Plain X-rays do not show soft tissues like tendons and will not show a biceps tendonitis.
When the shoulder isn’t responding to treatment, magnetic resonance imaging (MRI) scan may also be ordered. An MRI is a special imaging test that uses magnetic waves to create pictures of the shoulder in slices. This test can tell if there are problems in the rotator cuff or labrum.
Arthroscopy is an invasive way to evaluate shoulder pain that isn’t going away. It is not used to first evaluate biceps tendonitis. It may be used for ongoing shoulder problems that haven’t been found in an X-ray or MRI scan. The surgeon uses an arthroscope to see inside the joint. The arthroscope is a thin instrument that has a tiny camera on the end. It can show if there are problems with the rotator cuff, the labrum, or the portion of the biceps tendon that is inside the shoulder joint.
Treatment
What treatment options are available?
Nonsurgical Treatment
Whenever possible, doctors treat biceps tendonitis without surgery. Treatment usually begins by resting the sore shoulder. The sport or activity that led to the problem is avoided. Resting the shoulder relieves pain and calms inflammation.
Anti-inflammatory medicine may be prescribed to ease pain and to help patients return to normal activity. These medications include common over-the-counter drugs such as ibuprofen.
Doctors may have their patients work with a physical or occupational therapist. Therapists apply treatments to reduce pain and inflammation. When present, conditions causing the biceps tendonitis are also addressed. For example, shoulder impingement may require specialized hands-on joint mobilization, along with strengthening of the rotator cuff and shoulder blade muscles. Treating the main cause will normally get rid of the biceps tendonitis. When needed, therapists also evaluate the way you do your work or sport activities to reduce problems of overuse.
In rare instances, an injection of cortisone may be used to try to control pain. Cortisone is a very powerful steroid. However, cortisone is used very sparingly because it can weaken the biceps tendon, and possibly cause it to rupture.
Surgery
Patients who are improving with conservative treatments do not typically require surgery. Surgery may be recommended if the problem doesn’t go away or when there are other shoulder problems present.
Acromioplasty
The most common surgery for bicipital tendonitis is acromioplasty, especially when the underlying problem is shoulder impingement. This procedure involves removing the front portion of the acromion, the bony ledge formed where the scapula meets the top of the shoulder joint. By removing a small portion of the acromion, more space is created between the acromion and the humeral head. This takes pressure off the soft tissues in between, including the biceps tendon.
Acromioplasty is usually done through a two-inch incision in the skin over the shoulder joint. In some cases, the surgery can be done using an arthroscope.
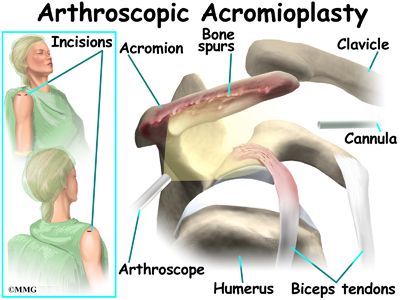
Today, acromioplasty is usually done using an arthroscope. An arthroscope is a slender tool with a tiny TV camera on the end. It lets the surgeon work in the joint through a very small incision. This may result in less damage to the normal tissues surrounding the joint, leading to faster healing and recovery.
To perform the acromioplasty using the arthroscope, several small incisions are made to insert the arthroscope and special instruments needed to complete the procedure. These incisions are small, usually about one-quarter inch long. It may be necessary to make three or four incisions around the shoulder to allow the arthroscope to be moved to different locations to see different areas of the shoulder.
A small plastic, or metal, tube is inserted into the shoulder and connected with sterile plastic tubing to a special pump. Another small tube allows the fluid to be removed from the joint. This pump continuously fills the shoulder joint with sterile saline (salt water) fluid. This constant flow of fluid through the joint inflates the joint and washes any blood and debris from the joint as the surgery is performed.
There are many small instruments that have been specially designed to

perform surgery in the joint. Some of these instruments are used to remove torn and degenerative tissue. Some of these instruments nibble away bits of tissue and then vacuum them up from out of the joint. Others are designed to burr away bone tissue and vacuum it out of the joint. These instruments are used to remove any bone spurs that are rubbing on the tendons of the shoulder and smooth the under surface of the acromion and AC joint.
If necessary, the acromioplasty can also be performed using the older, open method. The open method requires a small incision in the skin over the shoulder joint.
Working through the incision, the surgeon locates the deltoid muscle on
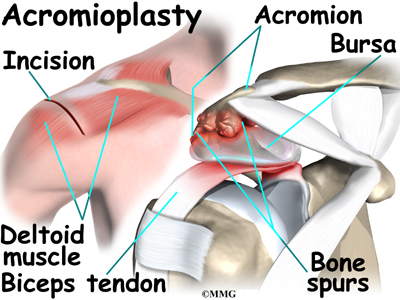
the outer part of the shoulder. Splitting the front section of this muscle gives the surgeon a better view of the acromion. Some surgeons also detach the deltoid muscle where it connects on the front of the acromion.
The bursa sac that lies just under the acromion is removed. Next, a surgical tool is used to cut a small portion off the front of the acromion. The ligament arcing from the acromion to the corocoid process (the coracoacromial ligament) may also be removed.
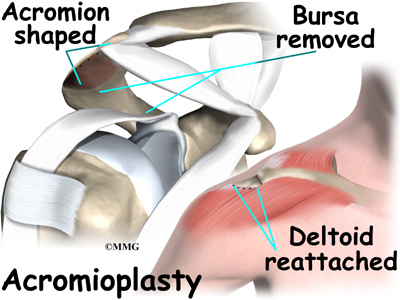
The surgeon shaves the undersurface of the acromion to remove any bone spurs. A file is used to smooth the edge of the acromion. Next, a series of small holes is drilled into the remaining acromion. These holes are used to reattach the deltoid muscle to the acromion.
The surgeon inspects the rotator cuff muscle to see if any tears are present. Then the entire area is irrigated to wash away small particles of bone. Finally, the free end of the deltoid muscle is sutured back to the ridge of the acromion using the drill holes made earlier.
If the biceps tendon is severely degenerated, the surgeon may perform biceps tenodesis (described next). The surgeon completes the procedure by closing the incision with sutures.
Biceps Tenodesis
Biceps tenodesis is a method of reattaching the top end of the biceps tendon to a new location. Studies show that the long-term results of this form of surgery are not satisfactory for patients with biceps tendonitis. However, tenodesis may be needed when the biceps tendon is severely degenerated or when shoulder reconstruction for other problems is needed.
A common way to do this surgery is called the keyhole technique. The keyhole describes the shape of a small hole made by the surgeon in the humerus. The end of the tendon is slid into the top of the keyhole and pulled down to anchor it in place.
This surgery can be done using the arthroscope. The tenodesis procedure is usually combined with other procedures such as those discussed above. If so, the surgeon will simply continue using the arthroscope to do the tenodesis procedure if possible. The advantage of using the arthroscope is that less normal tissue is damaged. This may result in faster healing and recovery.

If the procedure is performed using the open method, the surgeon begins by making an incision on the front of the shoulder, just above the axilla (armpit). The overlying muscles are separated so the surgeon can locate the top of the biceps tendon. The end of the biceps tendon is removed from its attachment at the top of the glenoid. The tendon is prepared by cutting away frayed and degenerated tissue.
The transverse humeral ligament is split, exposing the bicipital groove.
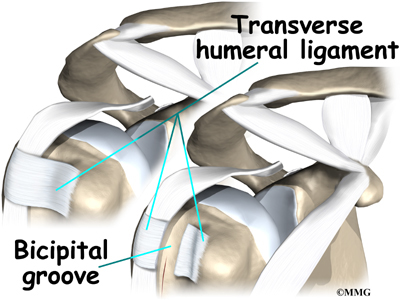
An incision is made along the floor of the bicipital groove. The bleeding from the incision gets scar tissue to form that will help anchor the repaired tendon in place.

A burr is used to form a keyhole-shaped cavity within the bicipital groove. The top of the cavity is round. The bottom is the slot of the keyhole. It is made the same width as the biceps tendon.
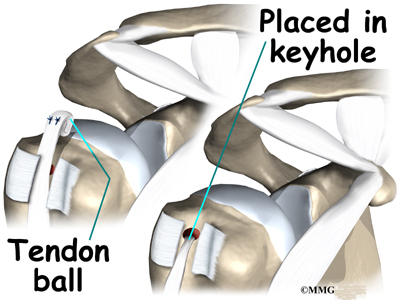
The surgeon rolls the top end of the biceps tendon into a ball. Sutures are used to form and hold the ball.The elbow is bent, taking tension off the biceps muscle and tendon. The surgeon pushes the tendon ball into the top part of the keyhole. As the elbow is gradually straightened, the ball is pulled firmly into the narrow slot in the lower end of the keyhole.
Rehabilitation
What should I expect after treatment?
Nonsurgical Rehabilitation
You will need to avoid heavy arm activity for three to four weeks. As the pain resolves, you should be safe to begin doing more normal activities.
Your doctor may prescribe a carefully progressed rehabilitation program under the supervision of a physical or occupational therapist. This could involve four to six weeks of therapy. At first, treatments are used to calm inflammation and to improve shoulder range of motion. As symptoms ease, specific exercises are used to strengthen the biceps muscle, as well as the rotator cuff and scapular muscles. Overhead athletes are shown ways to safely resume their sport.
After Surgery
Some surgeons prefer to have their patients start a gentle range-of-motion program soon after surgery. When you start therapy, your first few therapy sessions may involve ice and electrical stimulation treatments to help control pain and swelling from the surgery. Your therapist may also use massage and other types of hands-on treatments to ease muscle spasm and pain.
You will gradually start exercises to improve movement in the forearm, elbow, and shoulder. You need to be careful to avoid doing too much, too quickly.
Heavier exercises for the biceps muscle are avoided for two to four weeks after surgery. Your therapist may begin with light isometric strengthening exercises. These exercises work the biceps muscle without straining the healing tendon.
After two to four weeks, you start doing more active strengthening. As you progress, your therapist will teach you exercises to strengthen and stabilize the muscles and joints of the elbow and shoulder. Other exercises will work your arm in ways that are similar to your work tasks and sport activities. Your therapist will help you find ways to do your tasks that don’t put too much stress on your shoulder.
You may require therapy for six to eight weeks. It generally takes three to four months, however, to safely begin doing forceful biceps activity after surgery. Before your therapy sessions end, your therapist will teach you a number of ways to avoid future problems.
Shoulder Instability
A Patient’s Guide to Shoulder Instability
Introduction
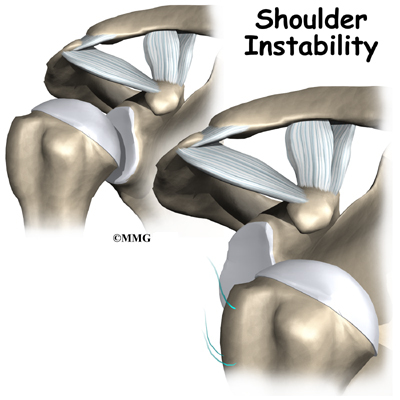
Shoulder instability means that the shoulder joint is too loose and is able to slide around too much in the socket. In some cases, the unstable shoulder actually slips out of the socket. If the shoulder slips completely out of the socket, it has become dislocated. If not treated, instability can lead to arthritis of the shoulder joint.
This guide will help you understand
- what parts of the shoulder are involved
- what causes shoulder instability
- what treatments are available

Anatomy
What parts of the shoulder are involved?
The shoulder is made up of three bones: the scapula (shoulder blade), the humerus (upper arm bone,) and the clavicle (collarbone).
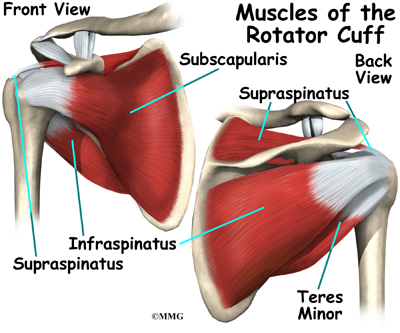
The rotator cuffconnects the humerus to the scapula. The rotator cuff is actually made up of the tendons of four muscles: the supraspinatus, infraspinatus, teres minor, and subscapularis.
Tendons attach muscles to bones. Muscles move bones by pulling on tendons. The muscles of the rotator cuff also keep the humerus tightly in the socket. A part of the scapula, called the glenoid, makes up the socket of the shoulder.
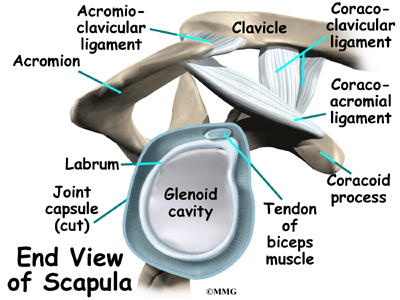
The glenoid is very shallow and flat. A rim of soft tissue, called the labrum, surrounds the edge of the glenoid, making the socket more like a cup. The labrum turns the flat surface of the glenoid into a deeper socket that molds to fit the head of the humerus.

Surrounding the shoulder joint is a watertight sac called the joint capsule. The joint capsule holds fluids that lubricate the joint. The walls of the joint capsule are made up of ligaments. Ligaments are soft connective tissues that attach bones to bones. The joint capsule has a considerable amount of slack, loose tissue, so that the shoulder is unrestricted as it moves through its large range of motion. If the shoulder moves too far, the ligaments become tight and stop any further motion, sort of like a dog coming to the end of its leash.
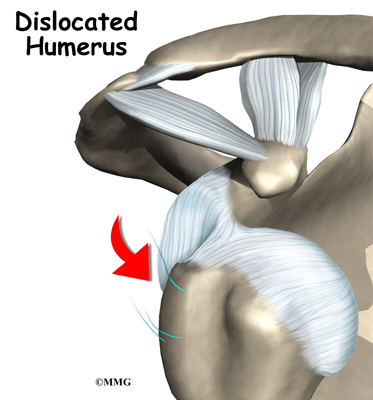
Dislocations happen when a force overcomes the strength of the rotator cuff muscles and the ligaments of the shoulder. Nearly all dislocations are anterior dislocations, meaning that the humerus slips out of the front of the glenoid. Only three percent of dislocations are posterior dislocations, or out the back.
Sometimes the shoulder does not come completely out of the socket. It slips only partially out and then returns to its normal position. This is called subluxation.
Related Document: A Patient’s Guide to Shoulder Anatomy
Causes
What makes a shoulder become unstable?
Shoulder instability often follows an injury that caused the shoulder to dislocate. This initial injury is usually fairly significant, and the shoulder must be reduced. To reduce a shoulder means it must be manually put back into the socket. The shoulder may seem to return to normal, but the joint often remains unstable. The ligaments that hold the shoulder in the socket, along with the labrum (the cartilage rim around the glenoid), may have become stretched or torn. This makes them too loose to keep the shoulder in the socket when it moves in certain positions. An unstable shoulder can result in repeated episodes of dislocation, even during normal activities. Instability can also follow less severe shoulder injuries.
Related Document: A Patient’s Guide to Shoulder Dislocations
Related Document: A Patient’s Guide to Labral Tears
In some cases, shoulder instability can happen without a previous dislocation. People who do repeated shoulder motions may gradually stretch out the joint capsule. This is especially common in athletes such as baseball pitchers, volleyball players, and swimmers. If the joint capsule gets stretched out and the shoulder muscles become weak, the ball of the humerus begins to slip around too much within the shoulder. Eventually this can cause irritation and pain in the shoulder.
A genetic problem with the connective tissues of the body can lead to ligaments that are too elastic. When ligaments stretch too easily, they may not be able to hold the joints in place. All the joints of the body may be too loose. Some joints, such as the shoulder, may be easily dislocated. People with this condition are sometimes referred to as double-jointed.
Symptoms
What problems does an unstable shoulder cause?
Chronic instability causes several symptoms. Frequent subluxation is one. In subluxation, the shoulder may slip (sublux) in certain positions, and the shoulder may actually feel loose. This commonly happens when the hand is raised above the head, for example while throwing. Subluxation of the shoulder usually causes a quick feeling of pain, like something is slipping or pinching in the shoulder. Over time, you may stop using the shoulder in ways that cause subluxation.
The shoulder may become so loose that it starts to dislocate frequently. This can be a real problem, especially if you can’t get it back in the socket and must go to the emergency room every time. A shoulder dislocation is usually very obvious. The injury is very painful, and the shoulder looks abnormal. Any attempted shoulder movements cause extreme pain. A dislocated shoulder can damage the nerves around the shoulder joint.
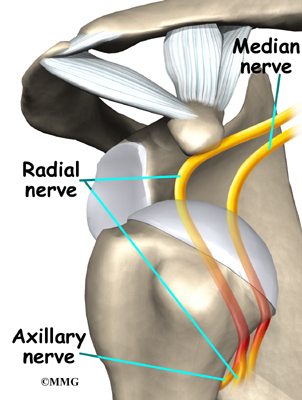
If the nerves have been stretched, a numb spot may develop on the outside of the arm, just below the top point of the shoulder. Several of the shoulder muscles may become slightly weak until the nerve recovers. But the weakness is usually temporary.
Diagnosis
What tests will my doctor run?
Your doctor will diagnose shoulder instability primarily through your medical history and physical exam. The medical history will include many questions about past shoulder injuries, your pain, and the ways your symptoms are affecting your activities.
In the physical exam, your doctor will feel and move your shoulder, checking it for strength and mobility. Your doctor will stress the shoulder to test the ligaments. When the shoulder is stretched in certain directions, you may get the feeling that the shoulder is going to dislocate. This is a very important sign of instability. It is called an apprehension sign. (Don’t worry. Unless your shoulder is extremely loose, it will not dislocate.)
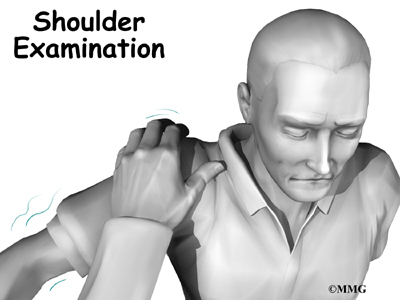

Your doctor may order an X-ray. X-rays can help confirm that your shoulder was dislocated or injured in the past.
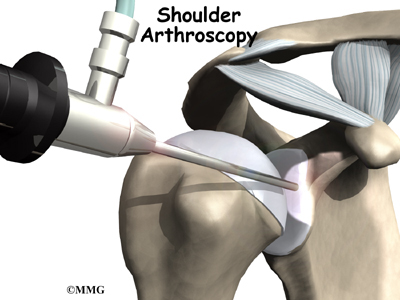
If your doctor is unsure about the diagnosis, you may need to undergo further tests. A surgeon may need to examine your shoulder using an arthroscope while you are under general anesthesia, which puts you to sleep. An arthroscope is a tiny TV camera inserted into the shoulder through a small incision. This allows a good look at the muscles and ligaments of the shoulder. When you are awake, it is hard to test the ligaments because you automatically tighten the muscles during the exam.
When you go to the doctor with a dislocated shoulder, X-rays are necessary to rule out a fracture. X-rays are usually done after the shoulder is put back into joint. This allows your doctor to make sure the joint is back in place.
Treatment
What treatment options are available?
Nonsurgical Treatment
Your doctor’s first goal will be to help you control your pain and inflammation. Initial treatment to control pain is usually rest and anti-inflammatory medication, such as aspirin or ibuprofen. Your doctor may suggest a cortisone injection if you have trouble getting your pain under control. Cortisone is a strong anti-inflammatory medication.
Related Document: A Patient’s Guide to Joint Injections for Arthritis
Your doctor will probably have a physical or occupational therapist direct your rehabilitation program. At first, patients are shown ways to avoid positions and activities that put the shoulder at further risk of injury or dislocation. Overhand athletes may be issued a special shoulder strap or sleeve to stop the shoulder from moving in ways that strain it.
Your therapist may use heat or ice treatments to ease pain and inflammation. Hands-on treatments and various types of exercises are used to improve the range of motion in your shoulder and nearby joints and muscles. Later, you will do strengthening exercises to improve the strength and control of the rotator cuff and shoulder blade muscles. Your therapist will help you retrain these muscles to keep the ball of the humerus in the socket. This will improve the stability of the shoulder and help your shoulder joint move smoothly.
You may need therapy treatments for six to eight weeks. Most patients are able to get back to their activities with full use of their arm within this amount of time.
Surgery
If your therapy program doesn’t stabilize your shoulder after a period of time, you may need surgery. There are many different types of shoulder operations that have been developed and used in the past to stabilize the shoulder. Almost all of these operations attempt to tighten the ligaments that are loose. The loose ligaments are usually along the front or bottom part of the shoulder capsule.
Surgery on the shoulder has improved dramatically over the past two decades. many of the procedures that have been developed in the past have been abandoned altogether. Today, surgery that is performed for stabilizing an unstable shoulder is most commonly done using the arthroscope.
Bankart Repair
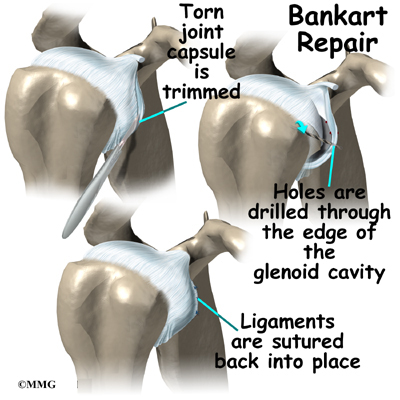
The most common method for surgically stabilizing a shoulder that is prone to anterior dislocations is the Bankart repair. In the past, the Bankart repair was done through a large incision made in the front (anterior) shoulder joint. This required damage to a great deal of normal tissue in order for the surgeon to be able to see the damaged portion of the joint capsule. The procedure was difficult and usually involved an attempt to sew or staple the ligaments on the front side of the joint back into their original position.
The arthroscope has changed all that.
An arthroscope is a special type instrument designed to look into a joint, or other space, inside the body. The arthroscope itself is a slender metal tube smaller than a pencil. Inside the metal tube are special strands of glass called fiberoptics. These small strands of glass form a lens that allows one to look into the tube on one end and see what is on the other side – inside the space. This is similar to a microscope or telescope. In the early days of arthroscopy, the surgeon actually looked into one end of the tube. Today, the arthroscope is attached to a small TV camera. The surgeon can watch the TV screen while the arthroscope is moved around in the joint. Using the ability to see inside the joint, the surgeon can then place other instruments into the joint and perform surgery while watching what is happening on the TV screen.
The arthroscope lets the surgeon work in the joint through a very small incision. This may result in less damage to the normal tissues surrounding the joint, leading to faster healing and recovery. If your surgery is done with the arthroscope, you may be able to go home the same day.
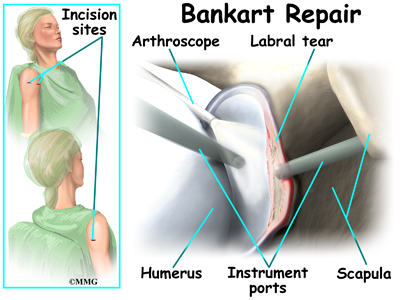
To perform the Bankart type repair using the arthroscope, several small incisions are made to insert the arthroscope and special instruments needed to complete the procedure. These incisions are small, usually about one-quarter inch long. It may be necessary to make three or four incisions around the shoulder to allow the arthroscope to be moved to different locations to see different areas of the shoulder.
A small plastic, or metal, tube is inserted into the shoulder and connected with sterile plastic tubing to a special pump. Another small tube allows the fluid to be removed from the joint. This pump continuously fills the shoulder joint with sterile saline (salt water) fluid. This constant flow of fluid through the joint inflates the joint and washes any blood and debris from the joint as the surgery is performed.
There are many small instruments that have been specially designed to perform surgery in the joint. Some of these instruments are used to remove torn and degenerative tissue. Some of these instruments nibble away bits of tissue and then vacuum them up from out of the joint. Others are designed to burr away bone tissue and vacuum it out of the joint. These instruments are used to remove any bone spurs that are rubbing on the tendons of the shoulder and smooth the under surface of the acromion and AC joint.
Once any degenerative tissue and bone spurs are removed, the torn ligaments that stabilize the shoulder are reattached to the bone around the socket of the shoulder, the glenoid. Special devices have been designed to reattach these ligaments. These devices are called suture anchors.

Suture anchors are special devices that have been designed to attach tissue to bone.In the past, many different ways were used to attach soft tissue (such as ligaments and tendons) to bone. The usual methods have included placing stitches through drill holes in the bone, special staples and screws with special washers – all designed to hold the tissue against the bone until healing occurred. Most of these techniques required larger incisions to be able to see what was going on and to get the hardware and soft tissue in the right location.
Today, suture anchors have simplified the process and created a much stronger way of attaching soft tissue to bone. These devices are small enough that the can be placed into the appropriate place in the bone through a small incision using the arthroscope. Most of these devices are made of either metal or a special plastic-like material that dissolves over time. This is the “anchor” portion of the device. The anchor is drilled into the bone where the surgeon wished to attach the soft tissue. Sutures are attached to the anchor and threaded through the soft tissue and tied down against the bone.
Capsular Shift
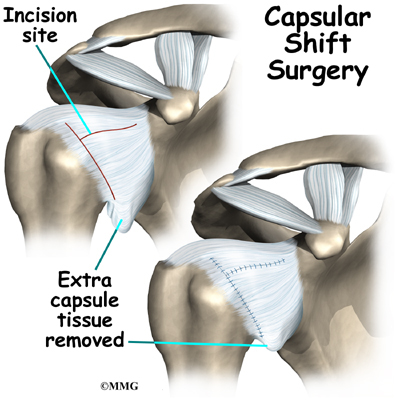
Another surgery to tighten a loose shoulder joint is a procedure called a capsular shift. The lining of any joint is called the joint capsule. The joint capsule forms a pocket, or bag that is made up of the ligaments and connective tissue around the joint. The shoulder joint has a fairly large joint capsule that is necessary to allow the joint to move in such a wide range.
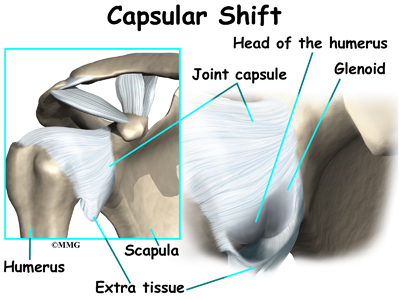
Sometimes the problem causing the shoulder instability is because the joint capsule is simply too large. This is sometimes referred to as a redundant, or patulous joint capsule. This may cause shoulder instability in multiple directions. This is sometimes referred to as multi-directional instability. In order to fix this type of instability, the joint capsule needs to be made smaller and tightened.
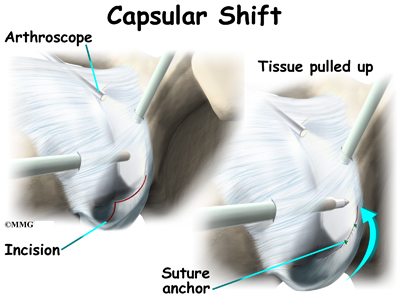
This procedure also can be performed using the arthroscope. The surgeon pulls the flap of tissue over the front of the capsule and connects it together. This is similar to when a tailor tucks loose fabric by overlapping and sewing the two parts together. Once the appropriate degree of tightness is achieved, the surgeon uses a combination of sutures and suture anchors to hold the joint capsule in this position until healing occurs.
Rehabilitation
What should I expect after treatment?
Nonsurgical Rehabilitation
Even nonsurgical treatment for shoulder instability usually requires a rehabilitation program. The goal of therapy will be to strengthen the rotator cuff and shoulder blade muscles to make the shoulder more stable. At first you will do exercises with a therapist. Eventually you will be put on a home program of exercise to keep the muscles strong and flexible. This should help you avoid future problems.
After Surgery
Rehabilitation after surgery is more complex. You will likely wear a sling to support and protect the shoulder for one to four weeks. A physical or occupational therapist may direct your recovery program. Depending on the surgical procedure, you will probably need to attend therapy sessions for two to four months. You should expect full recovery to take up to six months.
The first few therapy treatments will focus on controlling the pain and swelling from surgery. Ice and electrical stimulation treatments may help. Your therapist may also use massage and other types of hands-on treatments to ease muscle spasm and pain.
Therapy after Bankart surgery proceeds slowly. Range-of-motion exercises begin soon after surgery, but therapists are cautious about doing stretches on the front part of the capsule for the first six to eight weeks. The program gradually works into active stretching and strengthening.
Therapy goes even slower after surgeries where the front shoulder muscles have been cut. Exercises begin with passive movements. During passive exercises, your shoulder joint is moved, but your muscles stay relaxed. Your therapist gently moves your joint and gradually stretches your arm. You may be taught how to do passive exercises at home.
Active therapy starts three to four weeks after surgery. You use your own muscle power in active range-of-motion exercises. You may begin with light isometric strengthening exercises. These exercises work the muscles without straining the healing tissues.
At about six weeks you start doing more active strengthening. Exercises focus on improving the strength and control of the rotator cuff muscles and the muscles around the shoulder blade. Your therapist will help you retrain these muscles to keep the ball of the humerus in the socket. This helps your shoulder move smoothly during all your activities.
By about the tenth week, you will start more active strengthening. These exercises focus on improving strength and control of the rotator cuff muscles. Strong rotator cuff muscles help hold the ball of the humerus tightly in the glenoid to improve shoulder stability.
Overhand athletes (such as those who throw baseballs or footballs) start gradually in their sport activity about three months after surgery. They can usually return to competition within four to six months.
Some of the exercises you’ll do are designed to get your shoulder working in ways that are similar to your work tasks and sport activities. Your therapist will help you find ways to do your tasks that don’t put too much stress on your shoulder. Before your therapy sessions end, your therapist will teach you a number of ways to avoid future problems.
Thoracic Outlet Syndrome
A Patient’s Guide to Thoracic Outlet Syndrome
Introduction
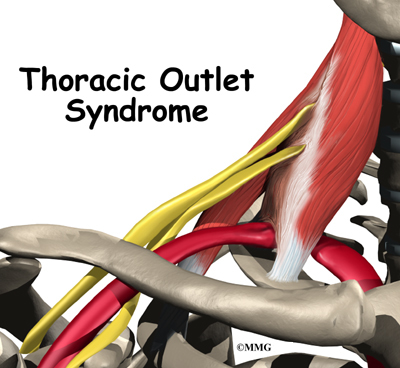
Thoracic outlet syndrome (TOS) can cause pain and numbness in the shoulder, arm, and hand. Testing for TOS is difficult. There is no one test to accurately diagnose TOS, and other conditions can have similar symptoms. You will need to go through several tests to find out if TOS is actually the cause of your pain. Making the right diagnosis often takes time and can be a cause of frustration, both for you and your doctor.
This guide will help you understand
- what happens to cause TOS
- what tests will be used to diagnose the condition
- what can be done to relieve your pain
Anatomy
What is the thoracic outlet?
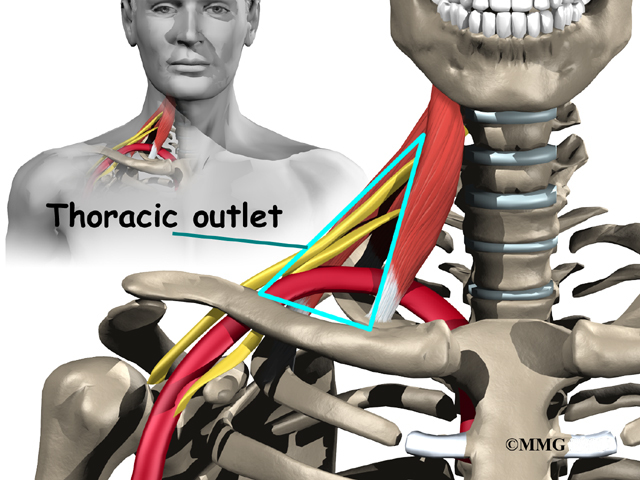
The nerves and blood vessels that go into the arm and hand start at the side of the neck. Nerves come out of the spine through small openings along the side of each vertebra. These openings are called neural foramina.

The nerves and vessels travel between muscles in the neck called the scalene muscles and over the top of the rib cage. The thoracic outlet is this opening between the scalene muscles and the rib cage. The nerves and blood vessels then go under the collarbone (also known as the clavicle), through the armpit (the axilla), and down the arm to the hand.
Related Document: A Patient’s Guide to Shoulder Anatomy
Causes
What causes TOS problems?
The main cause of TOS is that the nerves and blood vessels going to the arm and hand get squeezed near the thoracic outlet. This can occur for many reasons.
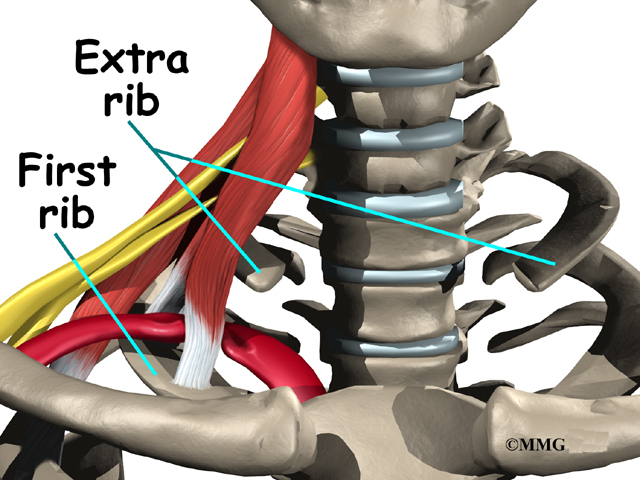
Pressure on nerves and vessels can happen in people who have fractured their clavicle. It can also happen in people who have an extra first rib, although this doesn’t always result in TOS.
Extra muscle or scar tissues in the scalene muscles can put extra pressure on the nerves and arteries. Heavy lifting and carrying can bulk up the scalenus muscles to the point where the nerve and arteries get squeezed.
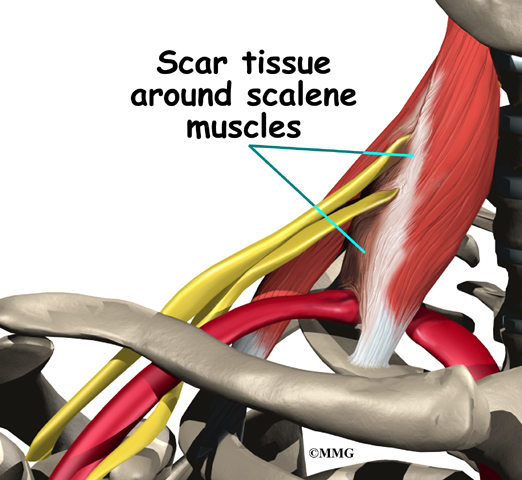
Traumatic injury from a car accident can also cause problems that lead to TOS. In an accident, the shoulder harness of the seat belt can strain or tear the muscles. As they heal, scar tissue can build up, putting pressure on the nerves and blood vessels at the thoracic outlet.
Neck and arm positions used at work and home may contribute to TOS. People who have to hold their neck and shoulders in awkward alignment sometimes develop TOS symptoms. TOS symptoms are also reported by people who have to hold their arms up or out for long periods of time.
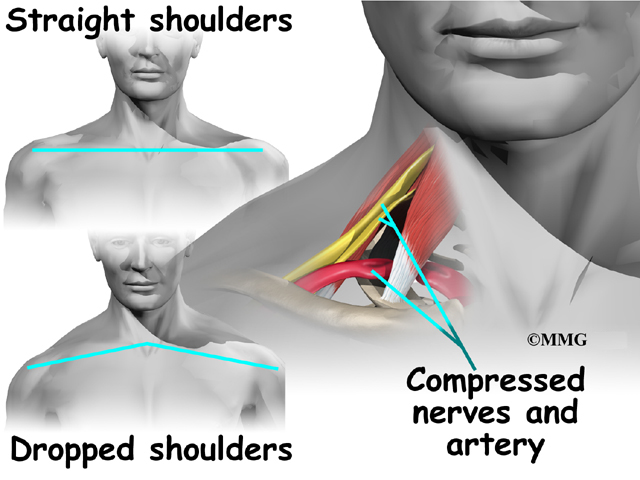
People with TOS often slouch their shoulders, giving them a drooped appearance. The poor body alignment of slouching can compress the nerves and arteries near the thoracic outlet. Being overweight can cause problems with posture, and women who have very large breasts may also have a droopy posture. For some reason, TOS affects three times as many women as men.
Symptoms
What symptoms does TOS cause?
TOS causes pain along the top of the clavicle and shoulder. The pain may spread along the inside edge of the arm. Occasionally pain spreads into the hand, mostly into the ring and pinky fingers. Numbness and tingling, called paresthesia, may accompany the pain, especially in the early hours of the morning before it’s time to wake up. Symptoms tend to get worse when driving, lifting, carrying, and writing. The arms may also feel tired when held overhead, as when using a blow dryer. It may be harder to hold and grip things, and the hand may feel clumsy.
Symptoms related to the blood vessels are less common. If the blood vessels are causing symptoms, the arm and shoulder may feel heavy and cold. The arm may become somewhat blue (cyanotic), and the constriction of vessels can cause the arm and hand to swell. Problems with the blood vessels that go to the arm are serious. If you experience these symptoms, you should call your doctor right away.
TOS symptoms are similar to the symptoms of many other conditions. A herniated disc in the neck, carpal tunnel syndrome in the hand, and bursitis of the shoulder can all cause symptoms very much like those of TOS.
Diagnosis
How will my doctor know that I have TOS?
Because TOS doesn’t have any unique symptoms, it can be difficult to diagnose. The diagnosis of TOS involves getting as much information as possible to eliminate other possible causes of your pain.
First, your doctor will take your medical history and do a thorough physical examination. Because TOS is so difficult to diagnose, your doctor will rely heavily on what you report about your symptoms and medical history.
You may need to get an X-ray. The X-ray could show an extra cervical rib or other problems with the bones and joints, such as arthritis. Your doctor may also ask you to get an magnetic resonance imaging (MRI) scan or other imaging tests. MRI scans use magnetic waves to show pictures of the bones and soft tissues of your body in slices. X-rays and other imaging tests are mostly used to rule out other problems.
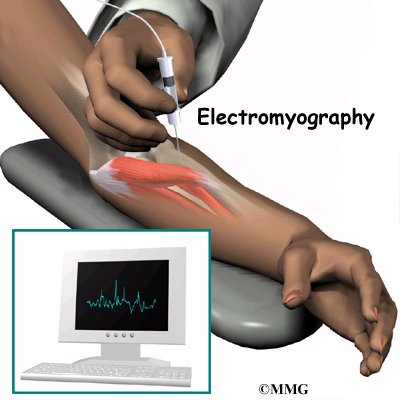
Your doctor may recommend electrical tests, called electromyography, of the nerves in the arm. These tests are used to find out if the nerves between the neck and hand are being pinched.
To confirm the diagnosis, doctors may do special tests of the blood vessels that run along the nerves. These tests are frequently negative, but it is important that your doctor rule out other causes of your pain.
Treatment
What treatment options are available?
Nonsurgical Treatment
Doctors begin treating your pain conservatively, without surgery or other invasive procedures. Your doctor can prescribe some types of medicine to ease your discomfort. Nonsteroidal anti-inflammatory drugs (NSAIDs), such as aspirin and ibuprofen, can relieve pain and inflammation, and muscle relaxants can relieve muscle spasm. Some patients who experience chronic pain, such as the pain of TOS, end up battling depression. In these cases, anti-depressants can be very helpful.
Your doctor may recommend some simple ways to help you combat TOS. For example, decrease the tension of the shoulder strap of your seat belt. Take rest periods to avoid fatigue. Overweight patients should seek help with weight loss, and women with especially large breasts may benefit from using a strapless long-line bra. Avoid heavy lifting, pulling, or pushing. Rapid breathing and stress can worsen symptoms. Avoid looking up, bending the neck back, or holding your arms up for long periods of time. And don’t carry a purse or bag on the affected shoulder.
Your doctor may start you on some basic exercises. If you have done them for some time and your symptoms aren’t getting much better, you may need to work with a physical or occupational therapist.
In most cases therapy can be very effective. However, therapy may not help much if your symptoms are so severe that the muscles of the hand or forearm have atrophied (shrunk).
Surgery
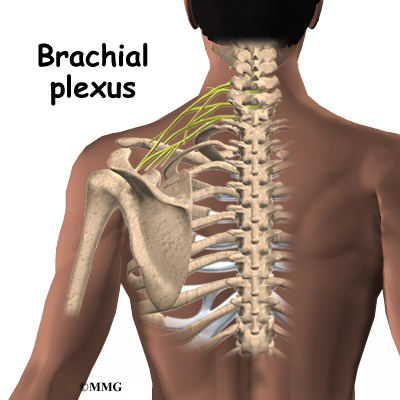
Surgery for TOS is usually a last resort. The surgery is directed at removing the source of compression on the nerves of the brachial plexus. The brachial plexus is the network of nerves that go to the hand and forearm. If there is an extra rib, it is usually removed. Otherwise, surgery consists of simply releasing the constricting elements and scar tissue around the nerves.
Surgery is usually done through an incision under the arm. The surgery will require a general anesthetic, which will put you to sleep. You will probably need to spend at least one night in the hospital.
Rehabilitation
What can I expect after treatment?
Nonsurgical Rehabilitation
If you are getting nonsurgical treatments, a home exercise program is essential to the treatment of TOS. This is true even if the cause of your TOS is an abnormality in the bones and muscles. You must consistently do your exercises to get the most benefit.
Usually a physical or occupational therapist will direct your exercise program. Rehabilitation may begin with a few exercises to loosen up tight muscles and joints around the compressed nerves and blood vessels. To help restore normal mobility, your therapist may prescribe stretching for the joints, muscles, and nerves. Your therapist can also help you find ways to manage your pain and avoid future problems.
You will be given exercises to strengthen the muscles of your shoulder and upper back and to stretch the muscles in the front of the chest and shoulders. Swimming can help some patients, but the backstroke and full breaststroke may worsen the condition. Your exercise program will focus on helping you sit and stand with good posture. Good posture is critical to managing TOS symptoms.
Your therapist can also give you tips to help avoid TOS pain. For example, you should limit the length of time the arms are used in outstretched or overhead positions, and don’t do heavy carrying and lifting. Simple things like taking frequent breaks, changing positions, stretching, or using a hand truck or cart can bring relief. Your doctor or therapist can help you with any specific tasks that cause you pain.
After Surgery
Your rehabilitation will likely be more complex after surgery. Patients wear a sling after surgery to support the shoulder and arm. Passive movements can begin soon after surgery. But there should be no active motion for about two weeks, to allow the soft tissues time to heal.
Patients usually start doing resistive exercise and activities after three to four weeks. Therapy treatments help improve motion in the shoulder blade and arm. Posture and strengthening exercises help prevent future TOS problems.
Your surgeon and therapist will give special attention to the type of work you do. They may have suggestions to help you avoid work postures and activities that could cause problems. You’ll be shown strategies to take care of any future symptoms and avoid further problems.
Osteoarthritis of the Acromioclavicular Joint
A Patient’s Guide to Osteoarthritis of the Acromioclavicular Joint
Introduction
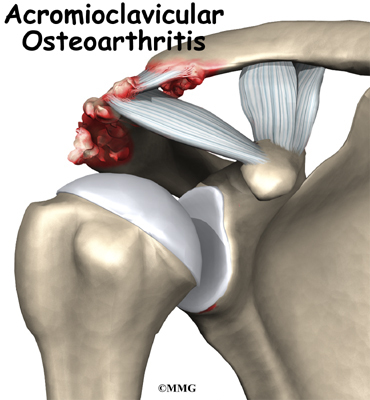
Some joints in the body are more likely to develop problems from normal wear and tear. Degeneration causes the cartilage that cushions the joint to wear out. This type of arthritis is called osteoarthritis. Doctors sometimes refer to this type of arthritis as arthrosis.
The acromioclavicular (AC) joint in the shoulder is a common spot for osteoarthritis to develop in middle age. Degeneration of the AC joint can be painful and can cause difficulty using the shoulder for everyday activities.
This guide will help you understand
- what the AC joint is and how it works
- the causes of pain and problems in the AC joint
- the treatments used for this condition
Anatomy
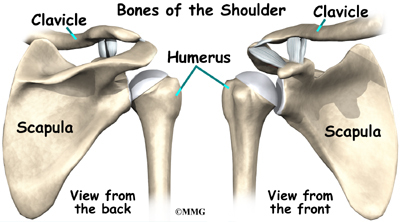
What exactly is the AC joint?
The shoulder is made up of three bones: the scapula (shoulder blade), the humerus (upper arm bone), and the clavicle (collarbone).
The part of the scapula that makes up the roof of the shoulder and connects with the clavicle is called the acromion.
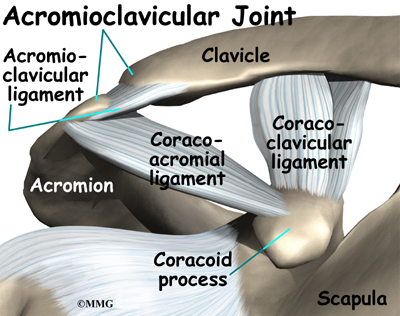
The joint where the acromion and the clavicle join is the AC joint.
In some ways, the AC joint is like any other joint. It has two bones that need to connect but be flexible as well. The ends of the bones are covered with articular cartilage. Articular cartilage provides a slick, rubbery surface that allows the bones to glide over each other as you move. Cartilage also functions as sort of a shock absorber.
However, the AC joint is different from joints like the knee or ankle, because it doesn’t need to move very much. The AC joint only needs to be flexible enough for the shoulder to move freely. The AC joint just shifts a bit as the shoulder moves.
View animation of shoulder movement
Related Document: A Patient’s Guide to Shoulder Anatomy
Causes
Why does degeneration of the AC joint occur?
We use our shoulder constantly. The resulting strain makes AC joint osteoarthritis a common disorder. The AC joint is under constant stress as the arm is used overhead. Weightlifters and others who repeatedly lift heavy amounts of weight overhead tend to have an increased incidence of the condition, and often at a younger age.
AC joint osteoarthritis may also develop following an injury to the joint, such as an AC joint separation. This injury is fairly common. A separation usually results from falling on the shoulder. The shoulder does heal, but many years later degeneration causes the AC joint to become painful.
Related Document: A Patient’s Guide to Acromioclavicular Joint Separation
Symptoms
What are the symptoms of this condition?
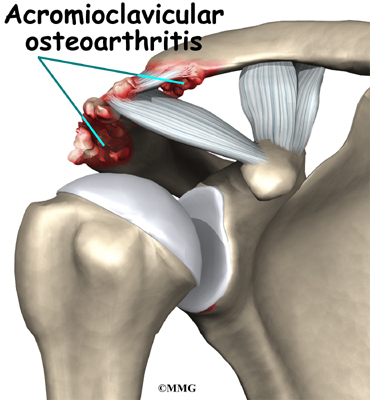
In its early stages, AC joint osteoarthritis usually causes pain and tenderness in the front of the shoulder around the joint. The pain is often worse when the arm is brought across the chest, since this motion compresses the joint. The pain is vague and may spread to include the shoulder, the front of the chest, and the neck. If the joint has been injured in the past, there may be a bigger bump over the joint on the affected shoulder than on the unaffected shoulder. The joint may also click or snap as it moves.
Diagnosis
What tests will my doctor do?
Your doctor will want to get a detailed medical history, including questions about your condition and how it is affecting you. You will need to answer questions about past injuries to your shoulder. You may be asked to rate your pain on a scale of one to ten. Your doctor will also want to know how much your pain affects your daily tasks.
Diagnosis of AC joint osteoarthritis is usually made by physical examination. The AC joint is usually tender. A key finding is pain as the joint is compressed. To test for this, your arm is pulled gently across your chest. Your doctor may inject a local anesthetic such as lidocaine into the joint. If the AC joint is the problem, the injection will temporarily reduce the pain.
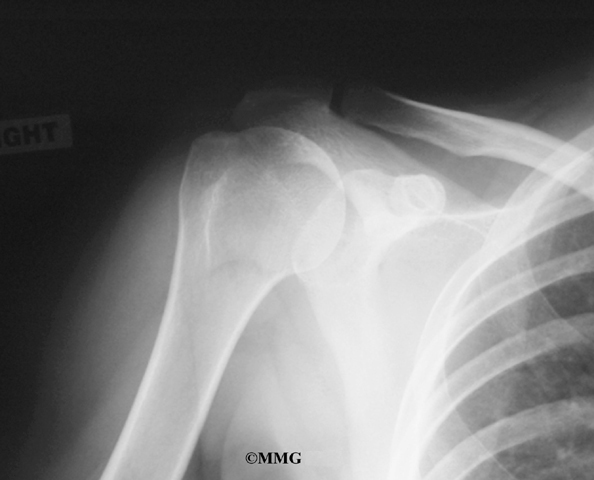
Your doctor may want to take X-rays of the AC joint. X-rays can show narrowing of the joint and bone spurs around the joint, which are signs of degeneration.
Treatment
What treatment options are available?
Nonsurgical Treatment
Initial treatment for AC joint osteoarthritis usually consists of rest and anti-inflammatory medications such as aspirin or ibuprofen. A rehabilitation program may be directed by a physical or occupational therapist. If the pain doesn’t go away, an injection of cortisone into the joint may help. Cortisone is a strong medication that decreases inflammation and reduces pain. Cortisone’s effects are often temporary, but it can give very effective relief in the short term.
Related Document: A Patient’s Guide to Joint Injections for Arthritis
Surgery
If nonsurgical measures fail to relieve your pain, your doctor may recommend surgery.
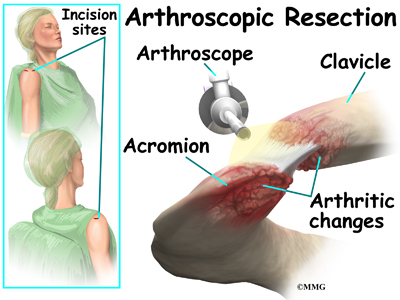
The most common procedure for AC joint osteoarthritis is resection arthroplasty. A resection arthroplasty involves removing a small portion of the end of the clavicle. This leaves a space between the acromion (the piece of the scapula that meets your shoulder) and the cut end of the clavicle, where the joint used to be. Your surgeon will take care not to remove too much of the end of the clavicle to prevent any damage to the ligaments holding the joint together.
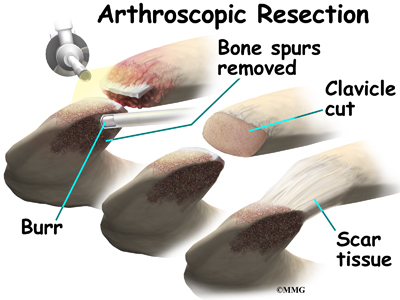
Usually only a small portion is removed, less than one cm (about three-eighths of an inch). As your body heals, the joint is replaced by scar tissue. Remember, the AC joint doesn’t move much, but it does need to be flexible. The scar tissue allows movement but stops the bone ends from rubbing together.
This procedure can be done in two ways. Today, it is more common to do this procedure using the arthroscope. An arthroscope is a slender tool with a tiny TV camera on the end. It lets the surgeon work in the joint through a very small incision. This may result in less damage to the normal tissues surrounding the joint, leading to faster healing and recovery.
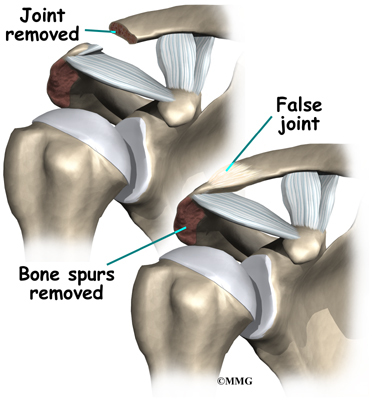
The older open method of performing this operation is done by making a small incision, less than two inches long, over the AC joint. The AC joint is very close to the surface of the skin and can be easily reached through a small incision. The surgeon can then use a special saw or other instrument to shave off a small portion of the end of the clavicle.
Rehabilitation
What should I expect after treatment?
Nonsurgical Rehabilitation
If you don’t need surgery, range-of-motion exercises should be started as pain eases, followed by a program of strengthening. At first, exercises are done with the arm kept below shoulder level. The program advances to include strength exercises for the rotator cuff and shoulder blade muscles. The goal is to get your shoulder moving smoothly and to learn how to control your symptoms. You will probably progress to a home program within four to six weeks.
After Surgery
Your surgeon may have you wear a sling to support and protect the shoulder for a few days. A physical or occupational therapist will probably direct your recovery program. The first few therapy treatments will focus on controlling the pain and swelling from surgery. Ice and electrical stimulation treatments may help. Your therapist may also use massage and other types of hands-on treatments to ease muscle spasm and pain.
Therapy can progress safely and quickly after a simple arthroscopic resection. Treatments start out with range-of-motion exercises and gradually work into active stretching and strengthening. You need to avoid doing too much, too quickly.
Therapy goes slower after surgeries where an incision is made through the shoulder muscles. Therapists usually wait up to two weeks before starting range-of-motion exercises. You will begin with passive exercises. In passive exercises, the shoulder joint is moved, but your muscles stay relaxed. Your therapist gently moves your joint and gradually stretches your arm. You may be taught how to do passive exercises at home.
Active therapy starts after four to six weeks. Active range-of-motion exercises help you regain shoulder movement using your own muscle power. You might begin with light isometric strengthening exercises. These exercises work the muscles without straining the healing joint.
At about six weeks, you will start more active strengthening. Exercises will focus on improving strength and control of the rotator cuff muscles and the muscles around the shoulder blade. Your therapist will help you retrain these muscles to keep the ball of the humerus centered in the socket. This helps your shoulder move smoothly during all your activities.
Some of the exercises you’ll do are designed to get your shoulder working in ways that are similar to your work tasks and sport activities. Your therapist will help you find ways to do your tasks that don’t put too much stress on your shoulder. Before your therapy sessions end, your therapist will teach you a number of ways to avoid future problems.
Acromioclavicular Joint Separation
A Patient’s Guide to Acromioclavicular Joint Separation
Introduction
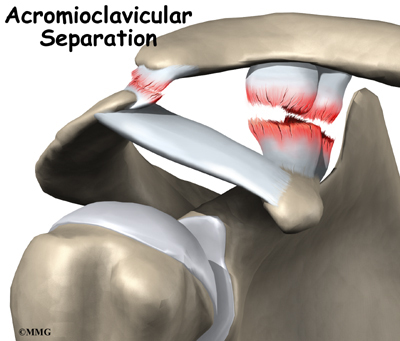
A shoulder separation is a fairly common injury, especially in certain sports. Most shoulder separations are actually injuries to the acromioclavicular (AC) joint. The AC joint is the connection between the scapula (shoulder blade) and the clavicle (collarbone). Shoulder dislocations and AC joint separations are often mistaken for each other. But they are very different injuries.
This guide will help you understand
- what the AC joint is
- what happens when the AC joint is separated
- how an AC joint separation is treated.

Anatomy
What is the AC joint, and how does it work?
The shoulder is made up of three bones: the scapula (shoulder blade), the humerus (upper arm bone), and the clavicle (collarbone).

The part of the scapula that makes up the top of the shoulder is called the acromion. The AC joint is where the acromion and the clavicle meet. Ligaments hold these two bones together.
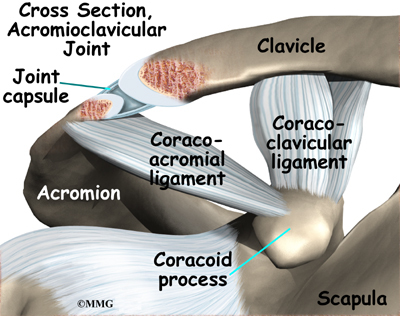
Ligaments are soft tissue structures that connect bone to bone. The AC ligaments surround and support the AC joint. Together, they form the joint capsule.
The joint capsule is a watertight sac that encloses the joint and the fluids that bathe the joint. Two other ligaments, the coracoclavicular ligaments, hold the clavicle down by attaching it to a bony knob on the scapula called the coracoid process.
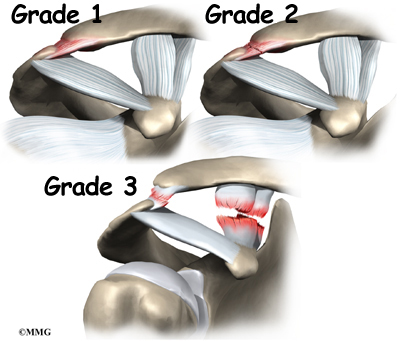
AC joint separations are graded from mild to severe, depending on which ligaments are sprained or torn. The mildest type of injury is a simple sprain of the AC ligaments. Doctors call this a grade one injury. A grade two AC separation involves a tear of the AC ligaments and a sprain of the coracoclavicular ligaments. A complete tear of the AC ligaments and the coracoclavicular ligaments is a grade three AC separation. This injury results in the obvious bump on the shoulder.
View animation of joint separation
Related Document: A Patient’s Guide to Shoulder Anatomy
Causes
How does AC joint separation happen?
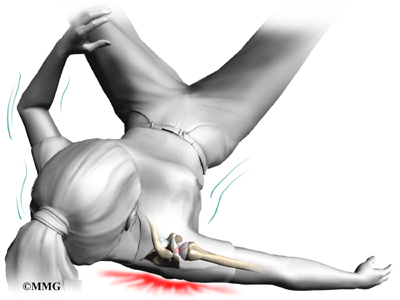
The most common cause of an AC joint separation is falling on the shoulder. As the shoulder strikes the ground, the force from the fall pushes the scapula down. The collarbone, because it is attached to the rib cage, cannot move enough to follow the motion of the scapula. Something has to give. The result is that the ligaments around the AC joint begin to tear, separating (dislocating) the joint.
Symptoms
What symptoms does this condition cause?
Symptoms range from mild tenderness felt over the joint after a ligament sprain to the intense pain of a complete separation. Grade two and three separations can cause a considerable amount of swelling. Bruising may make the skin bluish several days after the injury.
In grade three separations, you may feel a popping sensation due to shifting of the loose joint. Grade three separations usually cause a noticeable bump on the shoulder.
Diagnosis
What tests will my doctor run?
Your doctor will need to get information about your injury and a detailed medical history. You will need to answer questions about past injuries to your shoulder. You may be asked to rate your pain on a scale of one to 10.
Diagnosis is usually made by the physical examination. Your doctor may move and feel your sore joint. This may hurt, but it is very important that your doctor understand exactly where your joint hurts and what movements cause you pain.
Your doctor may order X-rays. X-rays can show an AC joint disruption, and they may be necessary to rule out a fracture of the clavicle. In some cases, X-rays are taken while holding a weight in each hand to stress the joint and show how unstable it is.
Treatment
What treatment options are available?
Nonsurgical Treatment
Treatment for a grade one or grade two separation usually consists of pain medications and a short period of rest using a shoulder sling. Your rehabilitation program may be directed by a physical or occupational therapist.
The treatment of grade three AC separations is somewhat controversial. Many studies show no difference whether a person is treated with surgery or conservative treatment. Even with surgery, a bump may still be present where the separation occurred. And a significant portion of people who undergo surgery will need another operation later.
Several studies have looked at what happens to the AC joint after this injury. It appears that many people, whether they had the joint repaired surgically or not, will need an operation at some time in the future. The injured joint degenerates faster than normal. Over time it becomes arthritic and painful. This process may take years to develop, but sometimes it happens within one or two years.
Related Document: A Patient’s Guide to Osteoarthritis of the Acromioclavicular Joint
Related Document: A Patient’s Guide to Impingement Syndrome
Surgery
Some surgeons prefer to repair severe grade three AC separations, especially in high-level throwing athletes.
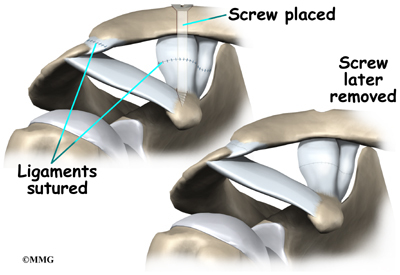
The surgery is usually done through a four-inch incision over the AC joint. The surgeon starts by putting the joint into its correct position. A screw or some other type of fixation may be used to hold the clavicle in place while the ligaments heal.
To fix the joint using a screw, the surgeon inserts the screw through the top of the clavicle and into the coracoid process.
Some surgeons use surgical tape to connect the clavicle and coracoid. A small drill hole is made in the clavicle and corocoid. The surgical tape is looped through each hole and pulled snugly.
In some cases, sutures are also used to repair and reinforce the torn coracoclavicular ligaments.
When a screw is used, it is usually removed six to eight weeks after the surgery. If it is not removed, the screw will probably break.
Rehabilitation
What should I expect after treatment?
Nonsurgical Rehabilitation
If you don’t need surgery, range-of-motion exercises should be started as pain eases, followed by a program of strengthening. At first, exercises are done with the arm kept below shoulder level. The program advances to include strength exercises for the rotator cuff and shoulder blade muscles. In most cases, the pain goes away almost completely within three weeks. Full recovery can take up to six weeks for grade two separations and up to 12 weeks for grade three separations. Since there is little danger of making the condition worse, you can usually do whatever activities you can tolerate.
After Surgery
Your surgeon may have you wear a sling to support and protect the shoulder for a few days. A physical or occupational therapist will probably direct your recovery program. The first few therapy treatments will focus on controlling the pain and swelling from surgery. Ice and electrical stimulation treatments may help. Your therapist may also use massage and other types of hands-on treatments to ease muscle spasm and pain.
Therapists usually wait four weeks before starting range-of-motion exercises. You will probably begin with passive exercises. In passive exercises, the shoulder joint is moved, but your muscles stay relaxed. Your therapist gently moves your joint and gradually stretches your arm. You may be taught how to do passive exercises at home.
Active therapy starts six to eight weeks after surgery, giving the ligaments time to heal. Active range-of-motion exercises help you regain shoulder movement using your own muscle power. You might begin with light isometric strengthening exercises. These exercises work the muscles without straining the healing joint.
After about three months, you will start more active strengthening. Exercises will focus on improving strength and control of the rotator cuff muscles and the muscles around the shoulder blade. Your therapist will help you retrain these muscles to keep the ball of the humerus centered in the socket. This helps your shoulder move smoothly during all your activities.
Recovery from shoulder surgery can take some time. You will need to be patient and stick to your therapy program. Some of the exercises you’ll do are designed get your shoulder working in ways that are similar to your work tasks and sport activities. Your therapist will help you find ways to do your tasks that don’t put too much stress on your shoulder. Before your therapy sessions end, your therapist will teach you a number of ways to avoid future problems.
Adhesive Capsulitis
A Patient’s Guide to Adhesive Capsulitis
Introduction
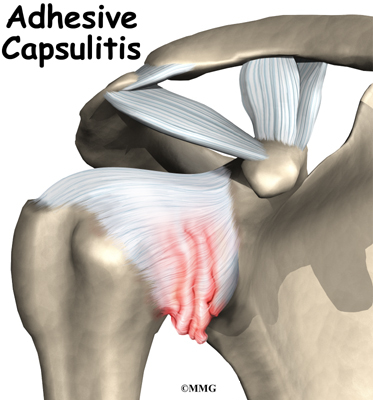
Many adults (mostly women) between the ages of 40 and 60 years of age develop shoulder pain and stiffness called adhesive capsulitis. You may be more familiar with the term frozen shoulder to describe this condition. But frozen shoulder and adhesive capsulitis are actually two separate conditions.
This guide will help you understand
- what causes adhesive capsulitis
- what tests your doctor will do to diagnose it
- how you can regain use of your shoulder.
Anatomy
What part of the shoulder is affected?
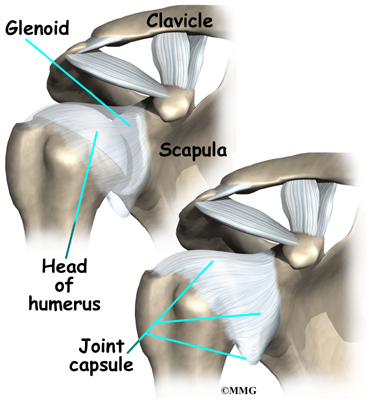
The shoulder is made up of three bones: the scapula (shoulder blade), the humerus (upper arm bone), and the clavicle (collarbone). The joint capsule is a watertight sac that encloses the joint and the fluids that bathe and lubricate it. The walls of the joint capsule are made up of ligaments. Ligaments are soft connective tissues that attach bones to bones. The joint capsule has a considerable amount of slack, loose tissue, so the shoulder is unrestricted as it moves through its large range of motion.

The terms frozen shoulder and adhesive capsulitis are often used interchangeably. In other words, the two terms describe the same painful, stiff condition of the shoulder no matter what causes it. A more accurate way to look at this is to refer to true adhesive capsulitis (affecting the joint capsule) as a primary adhesive capsulitis.
As the name suggests, adhesive capsulitis affects the fibrous ligaments that surround the shoulder forming the capsule. The condition referred to as a frozen shoulder usually doesn’t involve the capsule. Secondary adhesive capsulitis (or true frozen shoulder) might have some joint capsule changes but the shoulder stiffness is really coming from something outside the joint. Some of the conditions associated with secondary adhesive capsulitis include rotator cuff tears, biceps tendinitis, and arthritis. In either condition, the normally loose parts of the joint capsule stick together. This seriously limits the shoulder’s ability to move, and causes the shoulder to freeze.
Related Document: A Patient’s Guide to Shoulder Anatomy
Causes
Why did my shoulder freeze up?
The cause or causes of either primary adhesive capsulitis or secondary adhesive capsulitis (frozen shoulder) remain largely a mystery. Some of the risk factors for adhesive capsulitis include diabetes, thyroid dysfunction, and autoimmune diseases. Anyone who has had a heart attack, stroke, or been treated for breast cancer is also at increased risk for this condition. But a significant number of people develop adhesive capsulitis without any known trauma, medical history, or other risk factor.
In the case of secondary adhesive capsulitis (true frozen shoulder), the problem is really coming from something outside the joint. Some of the conditions associated with secondary adhesive capsulitis include rotator cuff tears, impingement, bursitis, biceps tendinitis, and arthritis.
For either type, an overactive immune response or an autoimmune reaction may be at fault. In an autoimmune reaction, the body’s defense system, which normally protects it from infection, mistakenly begins to attack the tissues of the body. This causes an intense inflammatory reaction in the tissue that is under attack.
No one knows why this occurs so suddenly. Pain and stiffness may begin after a shoulder injury, fracture, or surgery. It can also start if the shoulder is not being used normally. This can happen after a wrist fracture, when the arm is kept in a sling for several weeks. For some reason, immobilizing a joint after an injury seems to trigger the autoimmune response in some people.
Doctors theorize that the underlying condition may cause chronic inflammation and pain that make you use that shoulder less. This sets up a situation that can create adhesive capsulitis. With a primary adhesive capsulitis, treatment of any associated risk factors or underlying medical conditions may be needed before working to correct the tissues around the shoulder. In the case of secondary adhesive capsulitis, it may be necessary to treat the shoulder first in order to regain its ability to move before the underlying musculoskeletal problem can be addressed..
Related Document: A Patient’s Guide to Impingement Syndrome
Related Document: A Patient’s Guide to Rotator Cuff Tears
Symptoms
What are the symptoms of adhesive capsulitis?
The symptoms of adhesive capsulitis (and frozen shoulder) are primarily shoulder pain and stiffness, resulting in a very reduced range of shoulder motion. The tightness in the shoulder can make it difficult to do regular activities like getting dressed, combing your hair, or reaching across a table.
Diagnosis
What tests will my doctor run?
The diagnosis of adhesive capsulitis is usually made on the basis of your medical history and physical examination. One key finding that helps differentiate adhesive capsulitis from a frozen shoulder is how the shoulder moves. With adhesive capsulitis, the shoulder motion is the same whether the patient or the doctor tries to move the arm. With a frozen shoulder, say from a tendinitis or rotator cuff tear, the patient cannot move the arm normally or through the full range of motion. But when someone else lifts the arm it can be moved in a nearly normal range of motion.
Simple X-rays are usually not helpful. An arthrogram may show that the shoulder capsule is scarred and tightened. The arthrogram involves injecting dye into the shoulder joint and taking several X-rays. In adhesive capsulitis, very little dye can be injected into the shoulder joint because the joint capsule is stuck together, making it smaller than normal. The X-rays taken after injecting the dye will show very little dye in the joint.

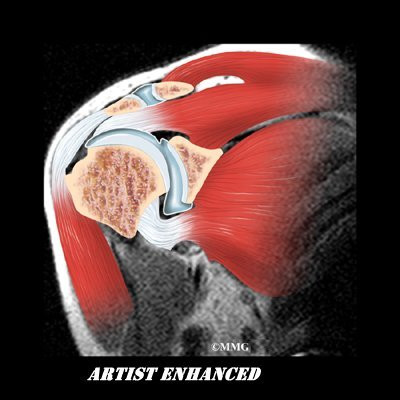
As your ability to move your shoulder increases, your doctor may suggest additional tests to differentiate between primary adhesive capsulitis and secondary adhesive capsulitis (from an underlying condition, such as impingement or a rotator cuff tear). Probably the most common test used is magnetic resonance imaging (MRI). An MRI scan is a special imaging test that uses magnetic waves to create pictures that show the tissues of the shoulder in slices. The MRI scan shows tendons and other soft tissues as well as the bones.
The final and most accurate diagnosis is made when an arthroscopic exam is done. The arthroscopic exam makes it possible to identify exactly which stage of disease you may be in. Tissue samples taken from inside and around the joint are examined under a microscope.
Four separate stages of primary adhesive capsulitis have been recognized from arthroscopic tissue sampling. Symptoms present at any given time usually correspond to the stage you are in. In the first stage, pain prevents full active shoulder motion (active motion means you move your own shoulder) but full passive motion (an examiner moves your shoulder without help from you) is still available. There are some inflammatory changes in the synovium but the capsular tissue is still normal.
In stage two (the freezing stage), pain is now accompanied by stiffness and you start to lose full passive shoulder motion. External rotation is affected first. The rotator cuff remains strong. These two symptoms differ from secondary adhesive capsulitis (what might otherwise be called a frozen shoulder). The condition referred to as a frozen shoulder is more often characterized by damage to the rotator cuff and loss of internal rotation first.
The pain during stage two of primary adhesive capsulitis is worse at night. Cellular changes continue to progress with increased blood flow to the synovium. There are early signs of scarring of the capsule from the inflammatory and repair processes.
By stage three of primary adhesive capsulitis (the frozen stage), there is less pain (mostly at the end range of motion) but more stiffness. There is a true loss of active and passive shoulder joint motion. Very little if any inflammation is seen in the tissue samples viewed under a microscope. Instead, the pathologist sees much more fibrotic (scar) tissue.
In the final (chronic) stage (stage four) you don’t have pain but instead there is profound stiffness and significant loss of motion. Both of these symptoms will gradually start to get better. The body is no longer attempting to repair or correct the problem. Enough scar tissue is present to make it difficult for the surgeon to see the joint during arthroscopic examination.
Treatment
What treatment options are available?
Treatment is based on any underlying causes (if known), any risk factors present, and the stage at the time of diagnosis. There isn’t a one-best-treatment known for adhesive capsulitis. Studies done so far just haven’t been able to come to a single evidence-based set of treatment guidelines for this problem.
Nonsurgical Treatment
Treatment of adhesive capsulitis can be frustrating and slow. Most cases eventually improve, but the process may take months. The goal of your initial treatment is to decrease inflammation and increase the range of motion of the shoulder. Your doctor will probably recommend anti-inflammatory medications, such as aspirin and ibuprofen.
During the early stage, your doctor may also recommend an injection of cortisone and a long-acting anesthetic, similar to lidocaine, to get the inflammation under control. Cortisone is a steroid that is very effective at reducing inflammation. Controlling the inflammation relieves some pain and allows the stretching program to be more effective.
Physical or occupational therapy treatments are a critical part of recovery and rehab. The first two goals are to reduce pain and interrupt the inflammatory cycle. Treatments are directed at getting the muscles to relax in order to help you regain the motion and function of your shoulder. This can be done with modalities such as electrical stimulation, joint mobilization, the use of cold, and iontophoresis. Iontophoresis is a way to push medications through the skin directly into the inflamed tissue.
Therapists use heat and hands-on treatments to stretch the joint capsule and muscle tissues of the shoulder. In some cases, it helps to inject a long-acting anesthetic with the cortisone right before a stretching session. This allows your therapist to manually break up the adhesions while the shoulder is numb from the anesthetic. You will also be given exercises and stretches to do as part of a home program. You may need therapy treatments for three to four months before you get full shoulder motion and function back.
During stage two, the therapist will address the capsular tightness and adhesions. Joint mobilization techniques are used to keep the joint sliding and gliding smoothly and to prevent scar tissue from forming. Keeping full shoulder and scapular (shoulder blade) motion is a priority. Special stretching techniques are used to prevent pain that could cause muscles around the shoulder to tighten even more.
Physical therapy throughout stages three and four continues in a similar fashion with added strengthening exercises.
Physical or occupational therapy treatments are a critical part of helping you regain the motion and function of your shoulder. Treatments are directed at getting the muscles to relax. Therapists use heat and hands-on treatments to stretch the joint capsule and muscle tissues of the shoulder. You will also be given exercises and stretches to do as part of a home program. You may need therapy treatments for three to four months before you get full shoulder motion and function back.
Related Document: A Patient’s Guide to Joint Injections for Arthritis
Surgery
Manipulation Under Anesthesia
If progress in rehabilitation is slow, your doctor may recommend manipulation under anesthesia. This means you are put to sleep with general anesthesia. Then the surgeon aggressively stretches your shoulder joint. The heavy action of the manipulation stretches the shoulder joint capsule and breaks up the scar tissue. In most cases, the manipulation improves motion in the joint faster than allowing nature to take its course. You may need this procedure more than once.

This procedure has risks. There is a very slight chance the stretching can injure the nerves of the brachial plexus, the network of nerves running to your arm. And there is a risk of fracturing the humerus (the bone of the upper arm), especially in people who have osteoporosis (fragile bones).
Arthroscopic Release
When it becomes clear that physical therapy and manipulation under anesthesia have not improved shoulder motion, arthroscopic release may be needed. This procedure is usually done using an anesthesia block to deaden the arm. The surgeon uses an arthroscope to see inside the shoulder. An arthroscope is a slender tube with a camera attached. It allows the surgeon to see inside the joint.
During the arthroscopic procedure, the surgeon cuts (releases) scar tissue, the ligament on top of the shoulder (coracohumeral ligament), and a small portion of the joint capsule. During the arthroscopic procedure a biopsy of the scar tissue is sent to the lab for evaluation to determine the stage of adhesive capsulitis. If shoulder movement is not regained or if the surgeon is unable to complete the surgery using the arthroscope, an open procedure may be needed. An open procedure requires a larger incision so the surgeon can work in the joint more easily.
At the end of the release procedure, the surgeon gently manipulates the shoulder to gain additional motion. A steroid medicine may be injected into the shoulder joint at the completion of the procedure.
Nerve Block
Numbing the suprascapular nerve to the shoulder is a newer technique used in some pain clinics. The procedure can be done on an outpatient basis, which means you’ll be in and out the same day. A single injection of a numbing agent combined with a steroid medication temporarily eliminates the pain signals. It’s like hitting a “reset” button. The nerve pathway sending continuous pain signals from the shoulder to the spinal cord and up to the brain is turned off. For a short time, the patient can move the arm fully without pain. Often, that’s enough to get the shoulder back on track for improved movement and function.
Hydrodilation
Another new technique called hyrdodilation or brisement is being used as an alternative to surgery. A fluid is injected into the joint causing the capsule to expand until it bursts. The result can be relief of pain and improved function. There haven’t been enough studies done yet to see how well this approach works. And there have been no studies comparing hydrodilation with manipulation or nerve block.
Rehabilitation
What can I expect after treatment?
Nonsurgical Rehabilitation
The primary goal of physical therapy is to help you regain full range of motion in the shoulder. If your pain is too strong at first to begin working on shoulder movement, your therapist may need to start with treatments to help control pain. Treatments to ease pain include ice, heat, ultrasound, and electrical stimulation. Therapists also use massage or other types of hands-on treatment to ease muscle spasm and pain.
When your shoulder is ready, therapy will focus on regaining your shoulder’s movement. Sessions may begin with treatments like moist hot packs or ultrasound. These treatments relax the muscles and get the shoulder tissues ready to be stretched. Therapists then begin working to loosen up the shoulder joint, especially the joint capsule. You can also get a good stretch using an overhead shoulder pulley in the clinic or as part of a home program.
If your doctor recommends an injection for your shoulder, you should plan on seeing your therapist right after the injection. The extra fluid from the injection stretches out the tissues of the joint capsule. An aggressive session of stretching right afterward can help maximize the stretch to the joint capsule.
After Surgery
After arthroscopic release, you’ll likely begin using a shoulder pulley on a daily basis. You’ll probably be encouraged to use the treated arm in everyday activities. Strengthening exercises are not begun for four to six weeks after the procedure. You might participate in physical or occupational therapy for up to two months after arthroscopic release.
After manipulation under anesthesia, your surgeon may place your shoulder in a continuous passive motion (CPM) machine. CPM is used after many different types of joint surgeries. You begin using CPM immediately after surgery. It keeps the shoulder moving and alleviates joint stiffness. The machine simply straps to the arm and continuously moves the joint. This continuous motion is thought to reduce stiffness, ease pain, and keep extra scar tissue from forming inside the joint.
Some surgeons apply a dynamic splint to the shoulder after manipulation surgery. A dynamic splint puts the shoulder into a full stretch and holds it there. Keeping the shoulder stretched gradually loosens up the joint capsule.
You’ll resume therapy within one to two days of the shoulder manipulation. Some surgeons have their patients in therapy every day for one to two weeks. Your therapist will treat you with aggressive stretching to help maximize the benefits of the shoulder manipulation. The stretching also keeps scar tissue from forming and binding the capsule again. Your shoulder movement should improve continually after the manipulation and therapy. If not, you may require more than one manipulation.
Once your shoulder is moving better, treatment is directed toward shoulder strengthening and function. These exercises focus on the rotator cuff and shoulder blade muscles. Your therapist will help you retrain these muscles to help keep the ball of the humerus centered in the socket. This lets your shoulder move smoothly during all your activities.
The therapist’s goal is to help you regain shoulder motion, strength, and function. When you are well under way, regular visits to the therapist’s office will end. Your therapist will continue to be a resource, but you will be in charge of doing your exercises as part of an ongoing home program.
Shoulder Anatomy
A Patient’s Guide to Shoulder Anatomy
Introduction
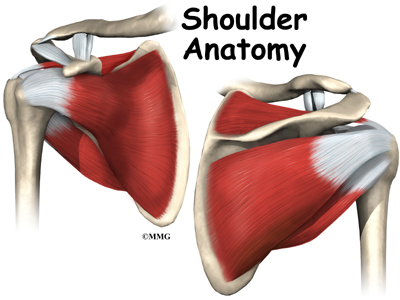
The shoulder is an elegant piece of machinery. It has the greatest range of motion of any joint in the body. However, this large range of motion can lead to joint problems.
Understanding how the different layers of the shoulder are built and connected can help you understand how the shoulder works, how it can be injured, and how challenging recovery can be when the shoulder is injured. The deepest layer of the shoulder includes the bones and the joints. The next layer is made up of the ligaments of the joint capsule. The tendons and the muscles come next.
In addition to reading this article, be sure to watch our Shoulder Anatomy Animated Tutorial Video.
This guide will help you understand
- what parts make up the shoulder
- how these parts work together
Important Structures
The important structures of the shoulder can be divided into several categories. These include
- bones and joints
- ligaments and tendons
- muscles
- nerves
- blood vessels
- bursae
Bones and Joints

The bones of the shoulder are the humerus (the upper arm bone), the scapula (the shoulder blade), and the clavicle (the collar bone). The roof of the shoulder is formedby a part of the scapula called the acromion.
There are actually four joints that make up the shoulder. The main shoulder joint, called the glenohumeral joint, is formed

where the ball of the humerus fits into a shallow socket on the scapula. This shallow socket is called the glenoid.
The acromioclavicular (AC) joint is where the clavicle meets the acromion. The sternoclavicular (SC) joint supports the connection of the arms and shoulders to the main skeleton on the front of the chest.

A false joint is formed where the shoulder blade glides against the thorax (the rib cage). This joint, called the scapulothoracic joint, is important because it requires that the muscles surrounding the shoulder blade work together to keep the socket lined up during shoulder movements.
Articular cartilage is the material that covers the ends of the bones of any joint. Articular cartilage is about one-quarter of an inch thick in most large, weight-bearing joints. It is a bit thinner in joints such as the shoulder, which don’t normally support weight. Articular cartilage is white and shiny and has a rubbery consistency. It is slippery, which allows the joint surfaces to slide against one another without causing any damage. The function of articular cartilage is to absorb shock and provide an extremely smooth surface to make motion easier. We have articular cartilage essentially everywhere that two bony surfaces move against one another, or articulate. In the shoulder, articular cartilage covers the end of the humerus and socket area of the glenoid on the scapula.
Ligaments and Tendons
There are several important ligaments in the shoulder. Ligaments are soft tissue structures that connect bones to bones. A joint capsule is a watertight sac that surrounds a joint. In the shoulder, the joint capsule is formed by a group of ligaments that connect the humerus to the glenoid. These ligaments are the main source of stability for the shoulder. They help hold the shoulder in place and keep it from dislocating.

Ligaments attach the clavicle to the acromion in the AC joint. Two ligaments connect the clavicle to the scapula by attaching to the coracoid process, a bony knob that sticks out of the scapula in the front of the shoulder.
A special type of ligament forms a unique structure inside the shoulder called the labrum. The labrum is attached almost completely around the edge of the glenoid. When viewed in cross section, the labrum is wedge-shaped. The shape and the way the labrum is attached create a deeper cup for the glenoid socket. This is important because the glenoid socket is so flat and shallow that the ball of the humerus does not fit tightly. The labrum creates a deeper cup for the ball of the humerus to fit into.

The labrum is also where the biceps tendon attaches to the glenoid. Tendons are much like ligaments, except that tendons attach muscles to bones. Muscles move the bones by pulling on the tendons. The biceps tendon runs from the biceps muscle, across the front of the shoulder, to the glenoid. At the very top of the glenoid, the biceps tendon attaches to the bone and actually becomes part of the labrum. This connection can be a source of problems when the biceps tendon is damaged and pulls away from its attachment to the glenoid.
The tendons of the rotator cuff are the next layer in the shoulder joint. Four rotator cuff tendons connect the deepest layer of muscles to the humerus.
Muscles

The rotator cuff tendons attach to the deep rotator cuff muscles. This group of muscles lies just outside the shoulder joint. These muscles help raise the arm from the side and rotate the shoulder in the many directions. They are involved in many day-to-day activities. The rotator cuff muscles and tendons also help keep the shoulder joint stable by holding
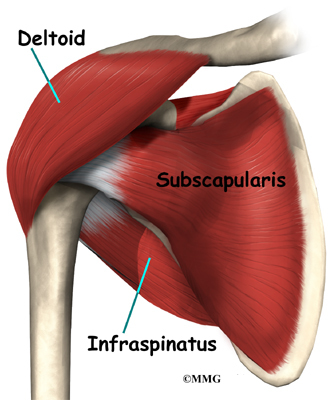
the humeral head in the glenoid socket.
The large deltoid muscle is the outer layer of shoulder muscle. The deltoid is the largest, strongest muscle of the shoulder. The deltoid muscle takes over lifting the arm once the arm is away from the side.
Nerves

The main nerves that travel into the arm run through the axilla under the shoulder. Three main nerves begin together at the shoulder: the radial nerve, the ulnar nerve, and the median nerve. These nerves carry the signals from the brain to the muscles that move the arm. The nerves also carry signals back to the brain about sensations such as touch, pain, and temperature. There is also an important nerve that travels around the back of the shoulder joint to supply sensation to a small area of skin on the outside of the shoulder and motor signals to the deltoid muscle. This nerve is called the axillary nerve.
Blood Vessels
Traveling along with the nerves are the large vessels that supply the arm with blood. The large axillary artery travels through the axilla.
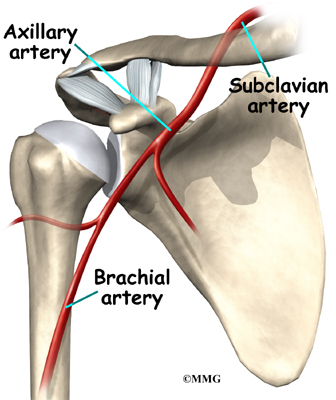
If you place your hand in your armpit, you may be able to feel the pulsing of this large artery. The axillary artery has many smaller branches that supply blood to different parts of the shoulder. The shoulder has a very rich blood supply.
Bursae
Sandwiched between the rotator cuff muscles and the outer layer of large bulky shoulder muscles are structures known as bursae. Bursae are everywhere in the body. They are found wherever two body parts move against one another and there is no joint to reduce the friction.
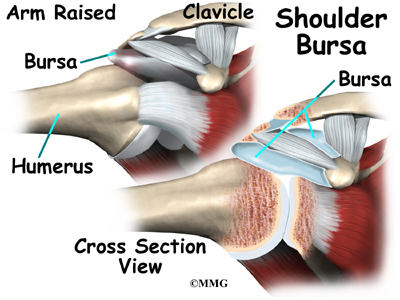
A single bursa is simply a sac between two moving surfaces that contains a small amount of lubricating fluid.
Think of a bursa like this: If you press your hands together and slide them against one another, you produce some friction. In fact, when your hands are cold you may rub them together briskly to create heat from the friction. Now imagine that you hold in your hands a small plastic sack that contains a few drops of salad oil. This sack would let your hands glide freely against each other without a lot of friction.
Summary
As you can see, the shoulder is extremely complex, with a design that provides maximum mobility and range of motion. Besides big lifting jobs, the shoulder joint is also responsible for getting the hand in the right position for any function. When you realize all the different ways and positions we use our hands every day, it is easy to understand how hard daily life can be when the shoulder isn’t working well.
Artificial Joint Replacement of the Shoulder
A Patient’s Guide to Artificial Joint Replacement of the Shoulder
Introduction

Shoulder joint replacement surgery (also called shoulder arthroplasty) is not as common as replacement surgeries for the knee or hip joints. Still, when necessary, this operation can effectively ease pain from shoulder arthritis. Most people experience improved shoulder function after this surgery.
This guide will help you understand
- how the shoulder works
- what parts of the shoulder are replaced in surgery
- what to expect after shoulder replacement surgery
Anatomy

What parts make up the shoulder?
The shoulder is made up of three bones: the scapula (shoulder blade), the humerus (upper arm bone), and the clavicle (collarbone).

The rotator cuff connects the humerus to the scapula. The rotator cuff is formed by the tendons of four muscles: the supraspinatus, infraspinatus, teres minor, and subscapularis.
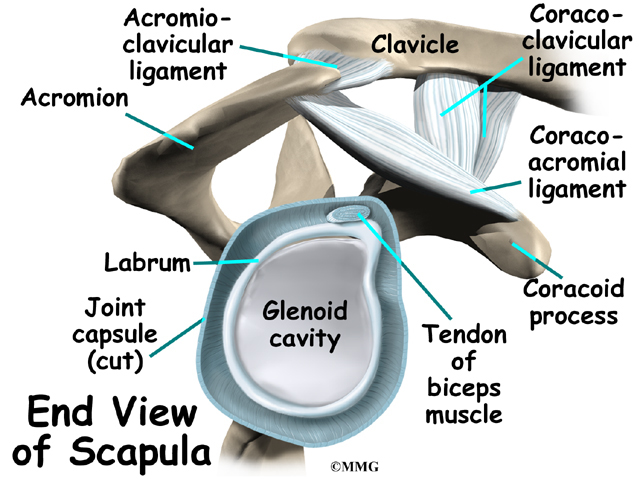
Tendons attach muscles to bones. Muscles move bones by pulling on the tendons. The rotator cuff helps raise and rotate the arm. As the arm is raised, the rotator cuff also keeps the humerus tightly in the socket. A part of the scapula, called the glenoid, makes up the socket of the shoulder. The glenoid is very shallow and flat.

The part of the scapula that connects to the shoulder is called the acromion. A bursa is located between the acromion and the rotator cuff tendons. A bursa is a lubricated sac of tissue that cuts down on the friction between two moving parts. Bursae are located all over the body where tissues must rub against each other. In this case, the bursa protects the acromion and the rotator cuff from grinding against each other.
The humeral head of the shoulder is the ball portion of the joint. The humeral head has several blood vessels, which enter at the base of the articular cartilage. Articular cartilage is the smooth, white material that covers the ends of bones in most joints. Articular cartilage provides a slick, rubbery surface that allows the bones to glide over each other as they move. Cartilage also functions as sort of a shock absorber.
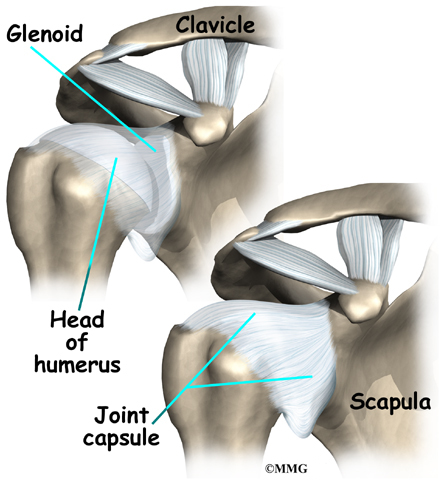
The shoulder joint is surrounded by a watertight sac called the joint capsule. The joint capsule holds fluids that lubricate the joint. The walls of the joint capsule are made up of ligaments. Ligaments are connective tissues that attach bones to bones. The joint capsule has a considerable amount of slack, loose tissue, so that the shoulder is unrestricted as it moves through its large range of motion.
Related Document: A Patient’s Guide to Shoulder Anatomy
Rationale
What conditions lead to shoulder joint replacement?
The most common reason for undergoing shoulder replacement surgery is osteoarthritis. Osteoarthritis is caused by the degeneration of the joint over time, through wear and tear. Osteoarthritis can occur without any injury to the shoulder, but that is uncommon. Because the shoulder is not a weight-bearing joint, it does not suffer as much wear and tear as other joints. Osteoarthritis is more common in the hip and knee.
Most of the time osteoarthritis occurs many years after an injury to the shoulder. For example, a shoulder dislocation can result in an unstable shoulder. The extra movement or repeated dislocation of the unstable joint causes damage to the articular cartilage and other joint tissues. Over time, this damage leads to osteoarthritis.
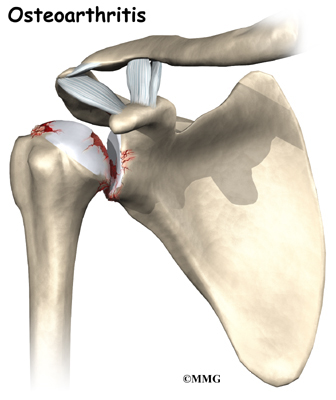
Osteoarthritis is not the only type of arthritis that affects the shoulder joint. Systemic diseases, such as rheumatoid arthritis, may affect any joint in the body. Whatever the type or cause of the arthritis, the shoulder may become painful and difficult to use. If you and your doctor can’t find ways to control your pain, or if it becomes impossible to use your shoulder for daily tasks, your doctor may recommend shoulder replacement surgery.
Certain types of shoulder fractures can injure the blood vessels of the humeral head. The fracture may heal, but the blood vessels don’t. When the blood vessels are damaged, the humeral head no longer has any blood supply. This condition leads to a condition called aseptic necrosis.

In necrosis, parts of the joint surface actually die. Over time, necrosis of the shoulder joint can lead to arthritis. When fractures affect the humeral head, doctors may recommend a shoulder joint replacement. In some cases, the risk of developing necrosis is so high that it makes sense to replace the humeral head immediately.
In most cases, doctors see shoulder replacement surgery as the last option. Sometimes there is a benefit to delaying shoulder replacement surgery as long as possible. Your doctor will probably want you to try nonsurgical measures to control your pain and improve your shoulder movement, including medications and physical or occupational therapy.
Like any arthritic condition, osteoarthritis of the shoulder may respond to anti-inflammatory medications such as aspirin or ibuprofen. Acetaminophen (Tylenol®) may also be prescribed to ease the pain. Some of the newer medications such as glucosamine and chondroitin sulfate are more commonly prescribed today. They seem to be effective in helping reduce the pain of osteoarthritis in all joints. There are also new injectable medications that lubricate the arthritic joint. These medications have been studied mainly in the knee. It is unclear if they will help the arthritic shoulder.
Physical or occupational therapy may be suggested to help you regain as much of the motion and strength in your shoulder as possible before you undergo surgery.
An injection of cortisone into the shoulder joint may give temporary relief. Cortisone is a powerful anti-inflammatory medication that can ease inflammation and reduce pain, possibly for several months. Most surgeons only allow two or three cortisone shots into any joint. If the shots don’t provide you with lasting relief, your doctor may suggest surgery.
Related Document: A Patient’s Guide to Joint Injections for Arthritis
Preparation
What do I need to do to get ready for surgery?
Some severe degenerative problems of the shoulder may require replacement of the painful shoulder with an artificial shoulder joint. You and your surgeon should make the decision to proceed with surgery together. You need to understand as much about the procedure as possible. If you have concerns or questions, you should talk to your surgeon.
Once you decide on surgery, you need to take several steps. Your surgeon may suggest a complete physical examination by your regular doctor. This exam helps ensure that you are in the best possible condition to undergo the operation.
You may also need to spend time with the physical or occupational therapist who will be managing your rehabilitation after surgery. This allows you to get a head start on your recovery. One purpose of this pre-operative visit is to record a baseline of information. Your therapist will check your current pain levels, ability to do your activities, and the movement and strength of each shoulder.
A second purpose of the pre-operative visit is to prepare you for surgery. You’ll begin learning some of the exercises you’ll use during your recovery. And your therapist can help you anticipate any special needs or problems you might have at home, once you’re released from the hospital.
On the day of your surgery, you will probably be admitted to the hospital early in the morning. You shouldn’t eat or drink anything after midnight the night before. Come prepared to stay in the hospital for several nights. The length of time you will spend in the hospital depends a lot on you.
Surgical Procedure
What happens during shoulder replacement surgery?
Before we describe the procedure, let’s look first at the artificial shoulder itself.
The Artificial Shoulder
There are two major types of artificial shoulder replacements: a cemented prosthesis and an uncemented prosthesis. A cemented prosthesis is held in place by a type of epoxy cement that attaches the metal to the bone. An uncemented prosthesis has a fine mesh of holes on the surface. Bone grows into the mesh. Over time, this anchors the prosthesis to the bone.
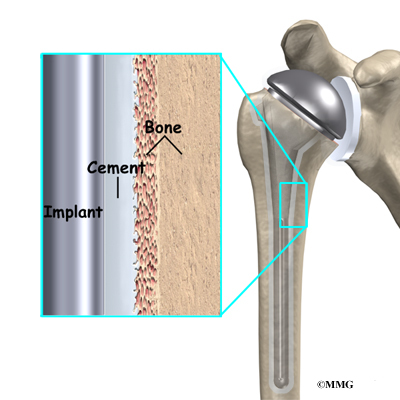
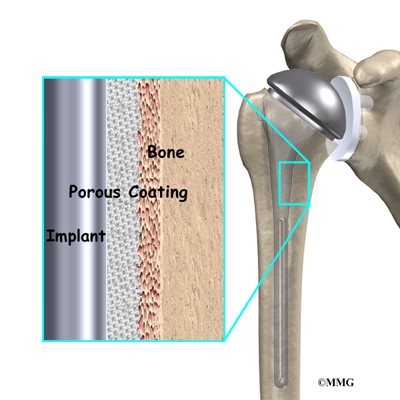
Both types of artificial joints are widely used. Your surgeon may also use a combination of the two types. The surgeon determines the type of replacement joint based on your age, your lifestyle, and the surgeon’s experience.
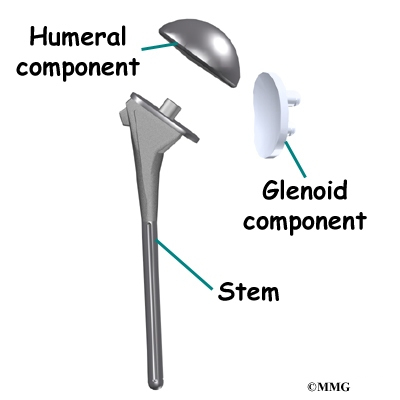
Each prosthesis (artificial joint) is made up of two parts. The humeral component replaces the humeral head, or the ball of the joint. The glenoid component replaces the socket of the shoulder, which is actually part of the scapula.
The humeral component is made of metal. The glenoid component is usually made of two parts. A metal tray attaches directly to the bone, and a plastic cup forms the socket. The plastic is very tough and very slick, much like the articular cartilage it is replacing. In fact, you can ice skate on a sheet of this plastic without causing it much damage.
The Operation
Shoulder replacement surgery can be done in one of two ways. When the cartilage of both the humeral head (the ball) and the glenoid (the socket) is worn away, both parts of the joint must be replaced. This surgery is called arthroplasty, which is the term used for joint reconstruction.
If the glenoid still has some articular cartilage, your surgeon may replace only the humeral head. This procedure is known as a hemiarthroplasty. (Hemi means half.) The hemi-arthroplasty is most commonly used after a fracture of the shoulder where the blood supply to the ball portion (the humeral head) of the humerus is damaged. Research has shown that when the shoulder is being replaced for arthritis, the complete shoulder arthroplasty performs better. Patients have less pain immediately after surgery and in the long run have a better functioning shoulder with less complications and are less likely to need a second operation.
You will most likely need general anesthesia for shoulder replacement surgery. General anesthesia puts you to sleep. It is difficult to numb only the shoulder and arm in a way that makes such a major surgery possible.
Shoulder replacement surgery is done through an incision on the front of your shoulder. This is called an anterior approach. The surgeon cuts through the skin and then isolates the nerves and blood vessels and moves them to the side. The muscles are also moved to the side.
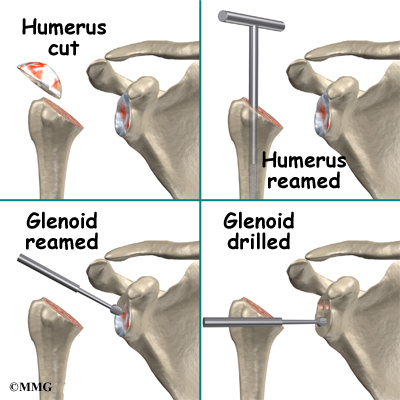
The surgeon enters the shoulder joint itself by cutting into the joint capsule. This allows the surgeon to see the joint.
At this point, the surgeon can prepare the bone for attaching the replacement parts. The ball portion of the humeral head is removed with a bone saw. The hollow inside of the upper humerus is prepared using a rasp. This lets your surgeon mold the space to anchor the metal stem of the humeral component inside the bone.
View animation of removing humeral head
View animation of reaming the humerus
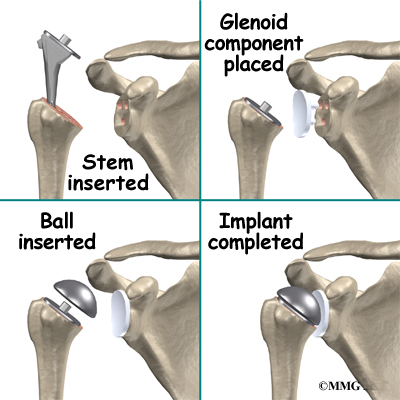
If the glenoid will be replaced, it is prepared by grinding away any remaining cartilage on the surface. This is done with an instrument called a burr. The surgeon usually uses the burr to drill holes into the bone of the scapula. This is where the stem of the glenoid component is anchored.
View animation of preparing the glenoid
View animation of drilling the glenoid
Finally, the humeral component and the glenoid component are inserted and the humeral ball is attached.
View animation of inserting the humeral component
View animation of inserting the glenoid component
View animation of attaching the humeral ball
Once the joint is anchored, the surgeon tests for proper fit. When the surgeon is satisfied with the fit, the joint capsule is stitched together. The muscles are then returned to their correct positions, and the skin is also stitched up.
Your incision will be covered with a bandage, and your arm will be placed in a sling. You will then be woken up and taken to the recovery room.
Complications
What might go wrong?
As with all major surgical procedures, complications can occur. This document doesn’t provide a complete list of the possible complications, but it does highlight some of the most common problems. Some of the most common complications following artificial shoulder replacement are
- anesthesia
- infection
- loosening
- dislocation
- nerve or blood vessel injury
Anesthesia
Most surgical procedures require that some type of anesthesia be done before surgery. A very small number of patients have problems with anesthesia. These problems can be reactions to the drugs used, problems related to other medical complications, and problems due to the anesthesia. Be sure to discuss the risks and your concerns with your anesthesiologist.
Infection
Infection following joint replacement surgery can be very serious. The chances of developing an infection following artificial joint replacement, however, are low (about one percent). Sometimes infections show up very early, before you leave the hospital. Other times infections may not show up for months, or even years, after the operation.
Infection can also spread into the artificial joint from other infected areas. Once an infection lodges in your joint, it is almost impossible for your immune system to clear it. You may need to take antibiotics when you have dental work or surgical procedures on your bladder and colon. The antibiotics reduce the risk of spreading germs to the artificial joint.
Loosening
The major reason that artificial joints eventually fail is that they loosen where the metal or cement meets the bone. A loose joint prosthesis causes pain. Once the pain becomes unbearable, another operation will probably be needed to fix the artificial joint.
There have been great advances in extending the life of artificial joints. However, most will eventually loosen and require another surgery. In the case of artificial knees, you can expect about 12 to 15 years, but artificial shoulder joints tend to loosen sooner.
Dislocation
Just like your real shoulder, an artificial shoulder can dislocate. A shoulder dislocation occurs when the ball comes out of the socket. There is a greater risk of dislocation right after surgery, before the tissues have healed around the new joint. But there is always a slightly increased risk of dislocation with an artificial joint. Your therapist will teach you how to avoid activities and positions that tend to cause shoulder dislocation. A shoulder that dislocates more than once may need another operation to make it more stable.
Related Document: A Patient’s Guide to Shoulder Dislocations
Nerve or Blood Vessel Injury
All of the large nerves and blood vessels to the arm and hand travel through the armpit. (This area is called the axilla.) Because shoulder replacement surgery takes place so close to the axilla, it is possible that the nerves or blood vessels may be injured during surgery. The resulting problems may be temporary if the injury was caused by stretching to hold the nerves out of the way. The nerves and blood vessels rarely suffer any kind of permanent injury after shoulder replacement surgery, but this type of injury can happen.
After Surgery
What happens after surgery?
After surgery, you’ll be transported to the recovery room. You will have a dressing wrapped over your shoulder that will need to be changed frequently over the next few days. Your surgeon may have inserted a small drainage tube into the shoulder joint to help keep extra blood and fluid from building up inside the joint. An intravenous line (IV) will be placed in your arm to give you needed antibiotics and medication.
Your shoulder may be placed in a continuous passive motion (CPM) machine immediately after surgery. CPM helps the shoulder begin moving and alleviates joint stiffness. The machine straps to the shoulder and continuously bends and straightens the joint. This motion is thought to reduce stiffness, ease pain, and keep extra scar tissue from forming inside the joint. You’ll use a shoulder sling to support your arm when you’re not using the CPM machine.
Rehabilitation
What will my recovery be like?
A physical or occupational therapist will see you the day after surgery to begin your rehabilitation program. Therapy treatments will gradually improve the movement in your shoulder. If you are using CPM, your therapist will check the alignment and settings. Your therapist will go over your exercises and make sure you are safe getting in and out of bed and moving about in your room.
When you go home, you may get home therapy visits. By visiting your home, your therapist can check to see that you are safe getting around in your home. Treatments will also be done to help improve your range of motion and strength. In some cases, you may require up to three visits at home before beginning outpatient therapy.
The first few outpatient treatments will focus on controlling pain and swelling. Ice and electrical stimulation treatments may help. Your therapist may also use massage and other types of hands-on treatments to ease muscle spasm and pain. Continue to use your shoulder sling as prescribed.
As the rehabilitation program evolves, more challenging exercises are chosen to safely advance the shoulder’s strength and function.
Finally, a select group of exercises can be used to simulate day-to-day activities, like grooming your hair or getting dressed. Specific exercises may also be chosen to simulate work or hobby demands.
When your shoulder range of motion and strength have improved enough, you’ll be able to gradually get back to normal activities. Ideally, you’ll be able to do almost everything you did before. However, you may need to avoid heavy or repeated shoulder actions.
You may be involved in a progressive rehabilitation program for two to four months after surgery to ensure the best results from your artificial joint. In the first six weeks after surgery, you should expect to see your therapist two to three times a week. At that time, if everything is still going as planned, you may be able to advance to a home program. Then you will only check in with your therapist every few weeks.
Calcific Tendonitis of the Shoulder
A Patient’s Guide to Calcific Tendonitis of the Shoulder
Introduction
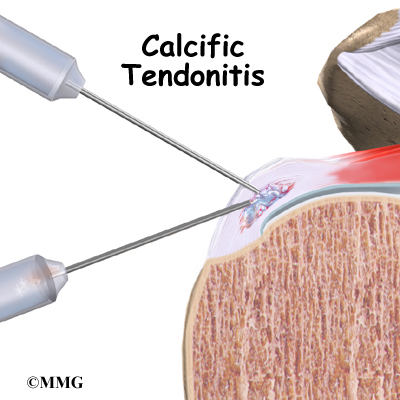
Calcific tendonitis of the shoulder happens when calcium deposits form on the tendons of your shoulder. The tissues around the deposit can become inflamed, causing a great deal of shoulder pain. This condition is fairly common. It most often affects people over the age of 40.
This guide will help you understand
- what happens in the shoulder with calcific tendonitis
- what tests your doctor will run to diagnose this condition
- what you can do to help relieve the pain.
Anatomy
Which part of the shoulder is affected?
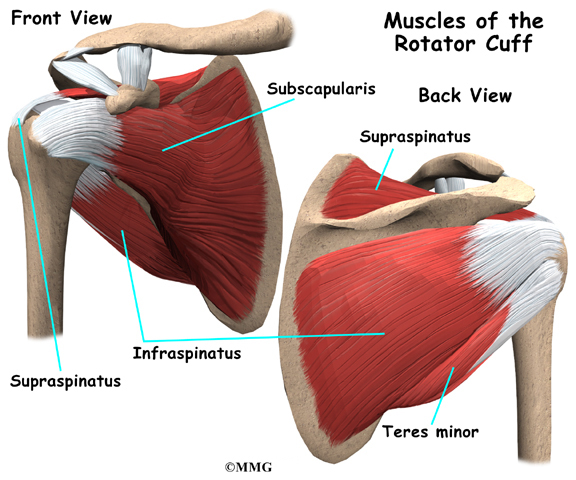
Calcific tendonitis occurs in the tendons (tendons attach muscles to bones) of the rotator cuff. The rotator cuff is actually made up of several tendons that connect the muscles around your shoulder to the humerus (the larger bone of the upper arm).
Calcium deposits usually form on the tendon in the rotator cuff called the supraspinatus tendon.
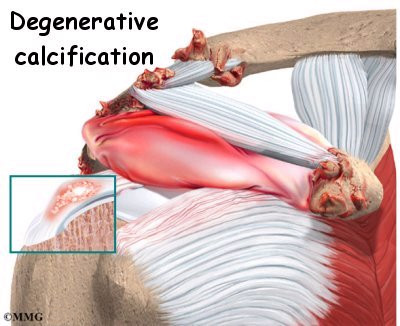
There are two different types of calcific tendonitis of the shoulder: degenerative calcification and reactive calcification. The wear and tear of aging is the primary cause of degenerative calcification. As we age, blood flow to the tendons of the rotator cuff decreases. This makes the tendon weaker. Due to the wear and tear as we use our shoulder, the fibers of the tendons begin to fray and tear, just like a worn-out rope. Calcium deposits form in the damaged tendons as a part of the healing process.
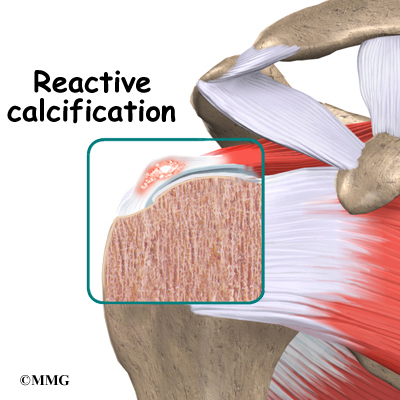
Reactive calcification is different. Why it occurs is not clear. It doesn’t seem to be related to degeneration, though it is more likely to cause shoulder pain than degenerative calcification. Doctors think of reactive calcification in three stages. In the pre-calcific stage, the tendon changes in ways that make calcium deposits more likely to form. In the calcific stage, calcium crystals are deposited in the tendons. Then they begin to disappear. The body simply reabsorbs the calcium deposits. Ironically, it is during this stage that pain is most likely to occur. In the post-calcific stage, the body heals the tendon, and the tendon is remodeled with new tissue.
No one knows what triggers the body to reabsorb the deposits. But once this occurs and the tissue begins to be remodeled, the pain usually decreases or goes away altogether.
Related Document: A Patient’s Guide to Shoulder Anatomy
Causes
Why did I develop calcific tendonitis?
No one really knows what causes calcific tendonitis. Severe wear and tear, aging, or a combination of the two are involved in degenerative calcification. Some researchers think that calcium deposits form because there is not enough oxygen to the tendon tissues. Others feel that pressure on the tendons can damage them, causing the calcium deposits to form.
Reactive calcification is even more of a mystery. This type of problem occurs in younger patients and seems to go away by itself in many cases.
Symptoms
What are the symptoms of this condition?
While the calcium is being deposited, you may feel only mild to moderate pain, or even no pain at all. For some unknown reason, calcific tendonitis becomes very painful when the deposits are being reabsorbed. The pain and stiffness of calcific tendonitis can cause you to lose motion in your shoulder. Lifting your arm may become painful. At its most severe, the pain may interfere with your sleep.
Diagnosis
What tests will my doctor run?
Your doctor will take a detailed medical history and do a thorough physical exam of your shoulder. The pain of calcific tendonitis can be confused with other conditions that cause shoulder pain. An X-ray is usually necessary to confirm the presence of calcium deposits. The X-ray will also help pinpoint the exact location of the deposits.
You will probably need to get several X-rays over time. This will help your doctor keep track of the changes in the amount of calcification. By following the changes in the calcium deposits, your doctor can determine whether the condition will heal by itself or perhaps require surgery.
Treatment
How can I get my pain under control?
Nonsurgical Treatment
Your doctor’s first goal will be to help control your pain and inflammation. Initial treatment is likely to be rest and anti-inflammatory medication, such as ibuprofen. The anti-inflammatory medicine is used mainly to control pain. Your doctor may suggest a cortisone injection if your pain stays severe even after trying other nonsurgical treatments. Cortisone is a very powerful steroid. Cortisone can be very effective at temporarily easing inflammation and swelling.
Related Document: A Patient’s Guide to Joint Injections for Arthritis
During the time when the calcium deposits are being reabsorbed, the pain can be especially bad. Your doctor may suggest trying to remove the calcium deposit by inserting two large needles into the area and rinsing with sterile saline. (Saline is simply a saltwater solution.) This procedure is called lavage. Sometimes lavage breaks the calcium particles loose. Then they can be removed with the needles. Getting rid of the calcium deposits can help speed up the healing. Even when lavage fails to remove calcium deposits, it may reduce pressure in the tendon, leading to less pain.
Your doctor will probably have a physical or occupational therapist direct your rehabilitation program. At first, therapy focuses on easing your pain and inflammation. Treatments may include heat or ice. Therapists may apply ultrasound treatments. Ultrasound has shown some benefit in reducing the size of the deposit and in helping people have less pain and better arm function. However, to get the full benefit, ultrasound treatments must be repeated often (up to 24 times) in a six-week period.
Shock wave therapy is a newer form of nonsurgical treatment. It uses a machine to generate shock wave pulses to the sore area. Patients generally receive the treatment once each week for up to three weeks. The impulses are thought to help break up the deposit so the body can more easily absorb it. Recent studies indicate that this form of treatment can help ease pain and reduce the size of the deposit.
Surgery
If the pain and loss of movement continue to get worse or interfere with your daily life, you may need surgery. Surgery for calcific tendonitis does not usually require patients to stay in the hospital overnight. It does require anesthesia.
Arthroscopic Resection
Most surgeries to correct calcific tendonitis of the shoulder are arthroscopic

surgeries. The arthroscope is a special TV camera that can be inserted into the shoulder joint through a small incision in the skin. Other small incisions allow the surgeon to insert small surgical instruments into the joint as well. The surgeon uses the arthroscope to locate the calcium deposit in the rotator cuff tendon. Once the deposit is found, the surgeon uses the small instruments to resect (remove) the calcium deposits and rinse the area. Loose calcium crystals must be removed. They can be very irritating to the surrounding tissues.
Open Resection
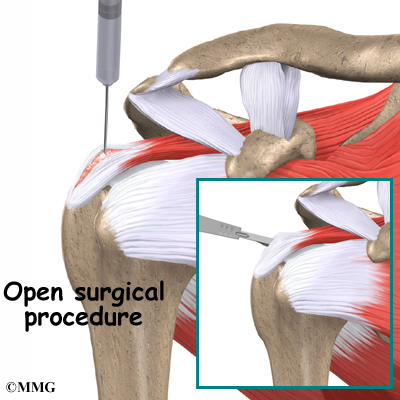
In rare instances, open surgery is necessary. In open surgery, the surgeon gets to the calcium deposit by cutting through muscles and other surrounding tissues. The tendon itself is cut to allow removal of the calcium deposits. The surgeon rinses the area to get rid of calcium crystals and then stitches the muscles and skin together.
Rehabilitation
What should I expect after treatment?
Nonsurgical Rehabilitation
Even if you don’t need surgery, you may need to follow a program of rehabilitation exercises. Your doctor may recommend that you work with a physical or occupational therapist for four to six weeks. Your therapist can create an individualized program of strengthening and stretching for your shoulder.
It is very important to strengthen the muscles of the rotator cuff, as these muscles help control the stability of the shoulder joint. Strengthening these muscles can actually decrease the pressure on the calcium deposits in the tendon. Your therapist can also evaluate your workstation or the way you use your body when you do your activities and suggest changes. Simple changes in the way you sit or stand can ease pain and help you avoid further problems.
After Surgery
Rehabilitation after shoulder surgery can be a slow process. You will probably need to attend therapy sessions for six to eight weeks, and you should expect full recovery to take three to four months. Getting the shoulder moving as soon as possible is important. However, this must be balanced with the need to protect the healing tissues.
Your surgeon may have you wear a sling to support and protect the shoulder for a few days after surgery. Ice and electrical stimulation treatments may be used during your first few therapy sessions to help control pain and swelling from the surgery. Your therapist may also use massage and other types of hands-on treatments to ease muscle spasm and pain.
Therapy can progress quickly after a simple arthroscopic resection. Treatments start out with range-of-motion exercises and gradually work into active stretching and strengthening. You just need to be careful to avoid doing too much, too quickly.
Therapy goes slower after open surgery, where the shoulder muscles have been cut. Therapists will usually wait up to two to three weeks before starting range-of-motion exercises. Exercises begin with passive movements. In passive exercises, your shoulder joint is moved, but your muscles stay relaxed. Your therapist gently moves your joint and gradually stretches your arm. You may be taught how to do passive exercises at home.
Active therapy starts four to six weeks after surgery. You use your own muscle power in active range-of-motion exercises. You may begin with light isometric strengthening exercises. These exercises work the muscles without straining the healing tissues.
At about six weeks you start doing heavier strengthening. Exercises focus on improving the strength and control of the rotator cuff muscles and the muscles around the shoulder blade. Your therapist will help you retrain these muscles to keep the ball of the humerus in the socket. This helps your shoulder move smoothly during all your activities.
Some of the exercises you’ll do are designed get your shoulder working in ways that are similar to your work tasks and sport activities. Your therapist will help you find ways to do your tasks that don’t put too much stress on your shoulder. Before your therapy sessions end, your therapist will teach you a number of ways to avoid future problems.
Impingement Syndrome
A Patient’s Guide to Impingement Syndrome
Introduction
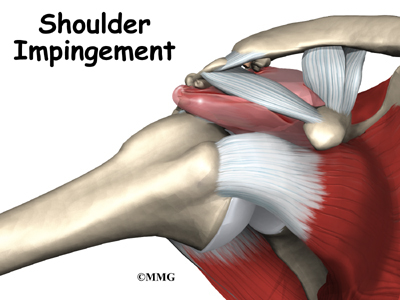
The shoulder is a very complex piece of machinery. Its elegant design gives the shoulder joint great range of motion, but not much stability. As long as all the parts are in good working order, the shoulder can move freely and painlessly.
Many people refer to any pain in the shoulder as bursitis. The term bursitis really only means that the part of the shoulder called the bursa is inflamed. Tendonitis is when a tendon gets inflamed. This can be another source of pain in the shoulder. Many different problems can cause inflammation of the bursa or tendons. Impingement syndrome is one of those problems. Impingement syndrome occurs when the rotator cuff tendons rub against the roof of the shoulder, the acromion.
This guide will help you understand
- what happens in your shoulder when you have impingement syndrome
- what tests your doctor will run to diagnose this condition
- how you can relieve your symptoms.
Anatomy
What part of the shoulder is affected?

The shoulder is made up of three bones: the scapula (shoulder blade), the humerus (upper arm bone), and the clavicle (collarbone).

The rotator cuff connects the humerus to the scapula. The rotator cuff is formed by the tendons of four muscles: the supraspinatus, infraspinatus, teres minor, and subscapularis.
Tendons attach muscles to bones. Muscles move the bones by pulling on the tendons. The rotator cuff helps raise and rotate the arm.

As the arm is raised, the rotator cuff also keeps the humerus tightly in the socket of the scapula, the glenoid. The upper part of the scapula that makes up the roof of the shoulder is called the acromion.
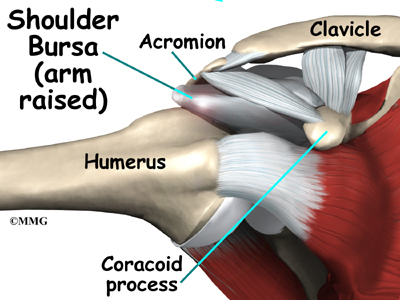
A bursa is located between the acromion and the rotator cuff tendons. A bursa is a lubricated sac of tissue that cuts down on the friction between two moving parts. Bursae are located all over the body where tissues must rub against each other. In this case, the bursa protects the acromion and the rotator cuff from grinding against each other.
Related Document: A Patient’s Guide to Shoulder Anatomy
Causes
Why do I have problems with shoulder impingement?
Usually, there is enough room between the acromion and the rotator cuff so that the tendons slide easily underneath the acromion as the arm is raised. But each time you raise your arm, there is a bit of rubbing or pinching on the tendons and the bursa. This rubbing or pinching action is called impingement.
Impingement occurs to some degree in everyone’s shoulder. Day-to-day activities that involve using the arm above shoulder level cause some impingement. Usually it doesn’t lead to any prolonged pain. But continuously working with the arms raised overhead, repeated throwing activities, or other repetitive actions of the shoulder can cause impingement to become a problem. Impingement becomes a problem when it causes irritation or damage to the rotator cuff tendons.
Raising the arm tends to force the humerus against the edge of the acromion. With overuse, this can cause irritation and swelling of the bursa. If any other condition decreases the amount of space between the acromion and the rotator cuff tendons, the impingement may get worse.
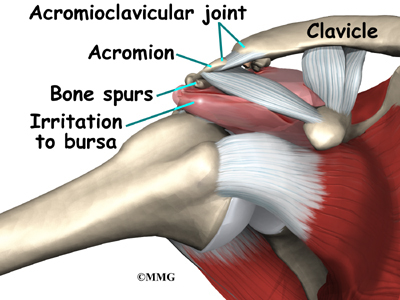
Bone spurs can reduce the space available for the bursa and tendons to move under the acromion. Bone spurs are bony points. They are commonly caused by wear and tear of the joint between the collarbone and the scapula, called the acromioclavicular (AC) joint. The AC joint is directly above the bursa and rotator cuff tendons.
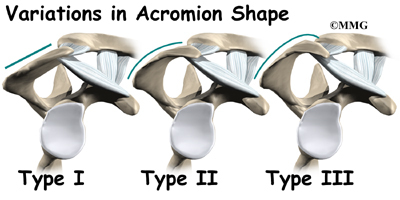
In some people, the space is too small because the acromion is oddly sized. In these people, the acromion tilts too far down, reducing the space between it and the rotator cuff.
Symptoms
What does impingement syndrome feel like?
Impingement syndrome causes generalized shoulder aches in the condition’s early stages. It also causes pain when raising the arm out to the side or in front of the body. Most patients complain that the pain makes it difficult for them to sleep, especially when they roll onto the affected shoulder.
A reliable sign of impingement syndrome is a sharp pain when you try to reach into your back pocket. As the condition worsens, the discomfort increases. The joint may become stiffer. Sometimes a catching sensation is felt when you lower your arm. Weakness and inability to raise the arm may indicate that the rotator cuff tendons are actually torn.
Related Document: A Patient’s Guide to Rotator Cuff Tears
Diagnosis
What tests will my doctor run?
The diagnosis of bursitis or tendonitis caused by impingement is usually made on the basis of your medical history and physical examination. Your doctor will ask you detailed questions about your activities and your job, because impingement is frequently related to repeated overhead activities.
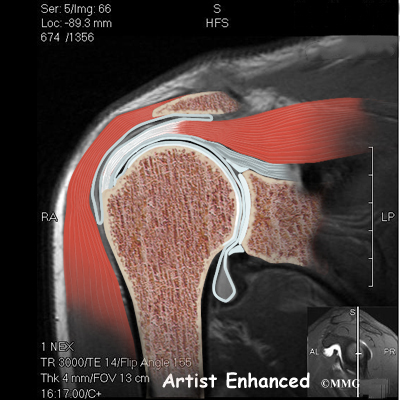
Your doctor may order X-rays to look for an abnormal acromion or bone spurs around the AC joint. A magnetic resonance imaging (MRI) scan may be performed if your doctor suspects a tear of the rotator cuff tendons. An MRI is a special imaging test that uses magnetic waves to create pictures that show the tissues of the shoulder in slices. The MRI scan shows tendons as well as bones. The MRI scan is painless and requires no needles.
An arthrogram may also be used to detect rotator cuff tears. The arthrogram is an older test than the MRI, but it is still widely used. It involves injecting dye into the shoulder joint and then taking several X-rays. If the dye leaks out of the shoulder joint, it suggests that there is a tear in the rotator cuff tendons.
In some cases, it is unclear whether the pain is coming from the shoulder or a pinched nerve in the neck. An injection of a local anesthetic (such as lidocaine) into the bursa can confirm that the pain is in fact coming from the shoulder. If the pain goes away immediately after the injection, then the bursa is the most likely source of the pain. Pain from a pinched nerve in the neck would almost certainly not go away after an injection into the shoulder.
Treatment
What treatment options are available?
Nonsurgical Treatment
Doctors usually start by prescribing nonsurgical treatment. You may be prescribed anti-inflammatory medications such as aspirin or ibuprofen. Resting the sore joint and putting ice on it can also ease pain and inflammation. If the pain doesn’t go away, an injection of cortisone into the joint may help. Cortisone is a strong medication that decreases inflammation and reduces pain. Cortisone’s effects are temporary, but it can give very effective relief for up to several months.
Related Document: A Patient’s Guide to Joint Injections for Arthritis
Your doctor may also prescribe sessions with a physical or occupational therapist. Your therapist will use various treatments to calm inflammation, including heat and ice. Therapists use hands-on treatments and stretching to help restore full shoulder range of motion. Improving strength and coordination in the rotator cuff and shoulder blade muscles lets the humerus move in the socket without pinching the tendons or bursa under the acromion. You may need therapy treatments for four to six weeks before you get full shoulder motion and function back.
Surgery
If you are still having problems after trying nonsurgical treatments, your doctor may recommend surgery.
Subacromial Decompression
The goal of surgery is to increase the space between the acromion and the rotator cuff tendons. Taking pressure off the tissues under the acromion is called subacromial decompression. The surgeon must first remove any bone spurs under the acromion that are rubbing on the rotator cuff tendons and the bursa. Usually the surgeon also removes a small part of the acromion to give the tendons even more space. In patients who have a downward tilt of the acromion, more of the bone may need to be removed. Surgically cutting and shaping the acromion is called acromioplasty. It gives the surgeon another step to get pressure off (decompress) the tissues between the humerus and the acromion.
Resection Arthroplasty
Impingement may not be the only problem in an aging or overused shoulder. It is very common to also see degeneration from arthritis in the AC joint. If there is reason to believe that the AC joint is arthritic, the end of the clavicle may be removed during impingement surgery. This procedure is called a resection arthroplasty.
The most common procedure for AC joint osteoarthritis is resection arthroplasty. A resection arthroplasty involves removing a small portion of the end of the clavicle. This leaves a space between the acromion (the piece of the scapula that meets your shoulder) and the cut end of the clavicle, where the joint used to be. Your surgeon will take care not to remove too much of the end of the clavicle to prevent any damage to the ligaments holding the joint together. Usually only a small portion is removed, less than one cm (about three-eighths of an inch). As your body heals, the joint is replaced by scar tissue. Remember, the AC joint doesn’t move much, but it does need to be flexible. The scar tissue allows movement but stops the bone ends from rubbing together.
This procedure can be done in two ways. Today, it is more common to do this procedure using the arthroscope. An arthroscope is a slender tool with a tiny TV camera on the end. It lets the surgeon work in the joint through a very small incision. This may result in less damage to the normal tissues surrounding the joint, leading to faster healing and recovery.
Related Document: A Patient’s Guide to Osteoarthritis of the Acromioclavicular Joint
Arthroscopic Procedure
Today, acromioplasty is usually done using an arthroscope.

An arthroscope is a special type instrument designed to look into a joint, or other space, inside the body. The arthroscope itself is a slender metal tube smaller than a pencil. Inside the metal tube are special strands of glass called fiberoptics. These small strands of glass form a lens that allows one to look into the tube on one end and see what is on the other side – inside the space. This is similar to a microscope or telescope. In the early days of arthroscopy, the surgeon actually looked into one end of the tube. Today, the arthroscope is attached to a small TV camera. The surgeon can watch the TV screen while the arthroscope is moved around in the joint. Using the ability to see inside the joint, the surgeon can then place other instruments into the joint and perform surgery while watching what is happening on the TV screen.
The arthroscope lets the surgeon work in the joint through a very small incision. This may result in less damage to the normal tissues surrounding the joint, leading to faster healing and recovery. If your surgery is done with the arthroscope, you may be able to go home the same day.
To perform the acromioplasty using the arthroscope, several small incisions are made to insert the arthroscope and special instruments needed to complete the procedure. These incisions are small, usually about one-quarter inch long. It may be necessary to make three or four incisions around the shoulder to allow the arthroscope to be moved to different locations to see different areas of the shoulder.

A small plastic, or metal, tube is inserted into the shoulder and connected with sterile plastic tubing to a special pump. Another small tube allows the fluid to be removed from the joint. This pump continuously fills the shoulder joint with sterile saline (salt water) fluid. This constant flow of fluid through the joint inflates the joint and washes any blood and debris from the joint as the surgery is performed.
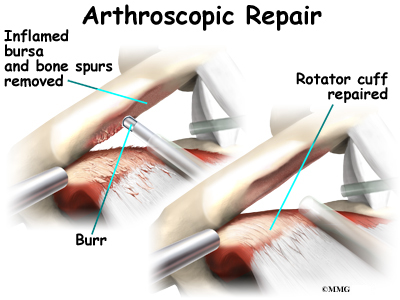
There are many small instruments that have been specially designed to perform surgery in the joint. Some of these instruments are used to remove torn and degenerative tissue. Some of these instruments nibble away bits of tissue and then vacuum them up from out of the joint. Others are designed to burr away bone tissue and vacuum it out of the joint. These instruments are used to remove any bone spurs that are rubbing on the tendons of the shoulder and smooth the under surface of the acromion and AC joint.
Open Procedure
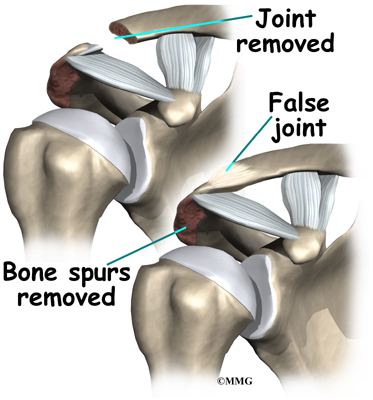
In other cases, an open incision is made to allow removal of the bone. Usually an incision about three or four inches long is made over the top of the shoulder. The surgeon removes any bone spurs and a part of the acromion. The surgeon then smooths the rough ends of the bone. If necessary, the surgeon will do a resection arthroplasty on the AC joint. If you have open surgery, you may need to spend a night or two in the hospital.
View animation of bone spur removal
Rehabilitation
What should I expect after treatment?
Nonsurgical Rehabilitation
Even if you don’t need surgery, you may need to follow a program of rehabilitation exercises. Your doctor may recommend that you work with a physical or occupational therapist. Your therapist can create an individualized program of strengthening and stretching for your shoulder and rotator cuff.
It is important to maintain the strength in the muscles of the rotator cuff. These muscles help control the stability of the shoulder joint. Strengthening these muscles can actually decrease the impingement of the acromion on the rotator cuff tendons and bursa. Your therapist can also evaluate your workstation or the way you use your body when you do your activities and suggest changes to avoid further problems.
After Surgery
Rehabilitation after shoulder surgery can be a slow process. You will probably need to attend therapy sessions for several weeks, and you should expect full recovery to take several months. Getting the shoulder moving as soon as possible is important. However, this must be balanced with the need to protect the healing muscles and tissues.
Your surgeon may have you wear a sling to support and protect the shoulder for a few days after surgery. Ice and electrical stimulation treatments may be used during your first few therapy sessions to help control pain and swelling from the surgery. Your therapist may also use massage and other types of hands-on treatments to ease muscle spasm and pain.
Therapy can progress quickly after a simple arthroscopic procedure. Treatments start out with range-of-motion exercises and gradually work into active stretching and strengthening. You just need to be careful to avoid doing too much, too quickly.
Therapy goes slower after open surgery in which the shoulder muscles have been cut. Therapists will usually wait up to two weeks before starting range-of-motion exercises. Exercises begin with passive movements. During passive exercises, your shoulder joint is moved, but your muscles stay relaxed. Your therapist gently moves your joint and gradually stretches your arm. You may be taught how to do passive exercises at home.
Active therapy starts four to six weeks after surgery. You use your own muscle power in active range-of-motion exercises. You may begin with light isometric strengthening exercises. These exercises work the muscles without straining the healing tissues.
At about six weeks you start doing more active strengthening. Exercises focus on improving the strength and control of the rotator cuff muscles and the muscles around the shoulder blade. Your therapist will help you retrain these muscles to keep the ball of the humerus in the socket. This helps your shoulder move smoothly during all your activities.
Some of the exercises you’ll do are designed get your shoulder working in ways that are similar to your work tasks and sport activities. Your therapist will help you find ways to do your tasks that don’t put too much stress on your shoulder. Before your therapy sessions end, your therapist will teach you a number of ways to avoid future problems.
Labral Tears
A Patient’s Guide to Labral Tears
Introduction
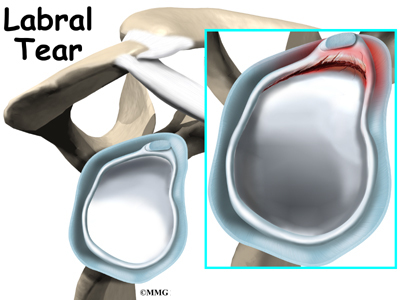
Since orthopedic surgeons began using a tiny TV camera called an arthroscope to diagnose and treat shoulder problems, they have discovered several conditions that no one knew existed. One of these conditions is an injury to a small structure in the shoulder called the labrum. A labral tear can cause pain and a catching sensation in the shoulder. Labral tears can be very difficult to diagnose.
This document will help you understand:
- where and what the labrum is
- what tests your doctor will run to diagnose the problem
- what you can do to relieve your pain

Anatomy
What is the labrum?
The shoulder is made up of three bones: the scapula (shoulder blade), the humerus (upper arm bone), and the clavicle (collarbone).
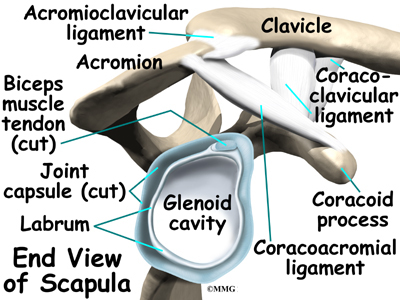
A part of the scapula, called the glenoid, makes up the socket of the shoulder. The glenoid is very shallow and flat. The labrum is a rim of soft tissue that makes the socket more like a cup. The labrum turns the flat surface of the glenoid into a deeper socket that molds to fit the head of the humerus.
The rotator cuff connects the humerus to the scapula. The rotator cuff is formed by the tendons of four muscles: the supraspinatus, infraspinatus, teres minor, and subscapularis.

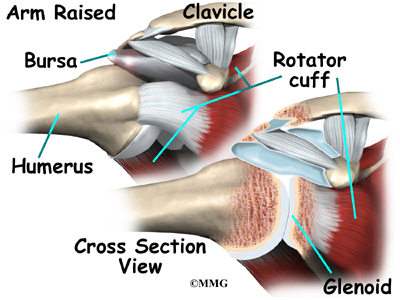
Tendons attach muscles to bones. Muscles move the bones by pulling on the tendons. The rotator cuff helps raise and rotate the arm. As the arm is raised, the rotator cuff also keeps the humerus tightly in the glenoid of the scapula.
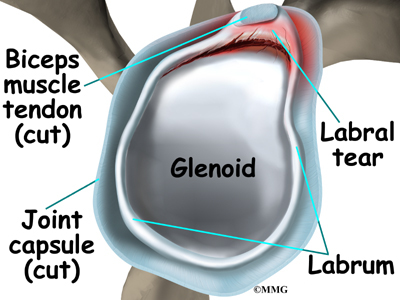
The soft labral tissue can be caught between the glenoid and the humerus. When this happens, the labrum may start to tear. If the tear gets worse, it may become a flap of tissue that can move in and out of the joint, getting caught between the head of the humerus and the glenoid. The flap can cause pain and catching when you move your shoulder. Several tendons and ligaments attach to the labrum that help maintain the stability of the shoulder. So when the labrum tears, the shoulder often becomes much less stable.
Related Document: A Patient’s Guide to Shoulder Anatomy
Causes
What causes labral tears?
Labral tears are often caused by a direct injury to the shoulder, such as falling on an outstretched hand. The labrum can also become torn from the wear and tear of activity, a condition called overuse. An injured labrum can lead to shoulder instability. The extra motion of the humerus within the socket causes additional damage to the labrum. An extremely unstable shoulder may slip or dislocate. This can also cause the labrum to tear.
Related Document: A Patient’s Guide to Shoulder Instability
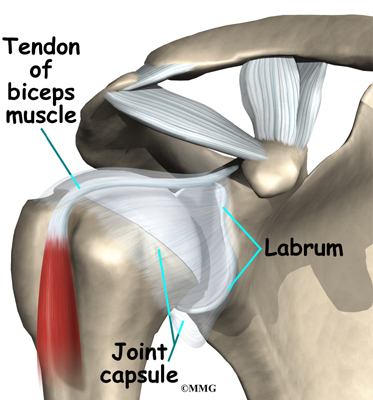
The biceps tendon attaches to the front part of the labrum. The biceps is the large muscle on the front of your upper arm. Sports can cause injuries to the labrum when the biceps tendon pulls sharply against the front of the labrum. Baseball pitchers are prone to labral tears because the action of throwing causes the biceps tendon to pull strongly against the top part of the labrum. Weightlifters can have similar problems when pressing weights overhead. Golfers may tear their labrum if their club strikes the ground during the golf swing.
Related Document: A Patient’s Guide to Biceps Tendonitis
Symptoms
What does a labral tear feel like?
The main symptom caused by a labral tear is a sharp pop or catching sensation in the shoulder during certain shoulder movements. This may be followed by a vague aching for several hours. At other times, the tear may not cause any pain. Shoulder instability from a damaged labrum may cause the shoulder to feel loose, as though it slips with certain movements.
Diagnosis
What tests will my doctor run?
Your doctor may suspect a labral tear based on your medical history. You will be asked questions about your pain and past injuries to your shoulder that may suggest labral damage.
In the physical examination, there are several shoulder movements that can bring on the symptoms. You may feel a catching sensation as your arm is raised, and there may be pain when the arm is held overhead. If your arm is held in front of your body, with the palm of the hand facing downward, you may feel pain when your doctor tries to push down on your arm.
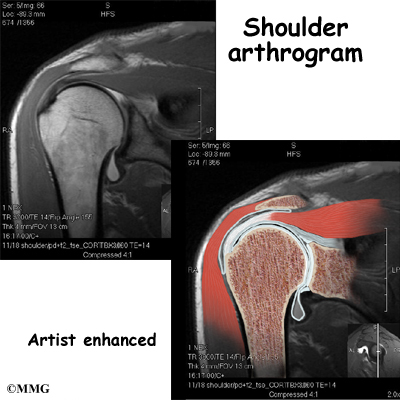
Labral tears are difficult to see, even in a magnetic resonance imaging (MRI) scan. An MRI scan is a special imaging test that uses magnetic waves to show the tissues of the shoulder in slices. The MRI scan shows soft tissues such as tendons and ligaments as well as bones.
Labral tears may be seen using computed tomography (CT) scan and a special dye. A CT scan is an older test that uses computer-enhanced X-rays to show slices of the shoulder. The soft tissues do not show up in a CT scan, but the special dye does. The dye shows the outline of the labrum. If there is a tear, the dye may leak into it and show up on the CT scan.
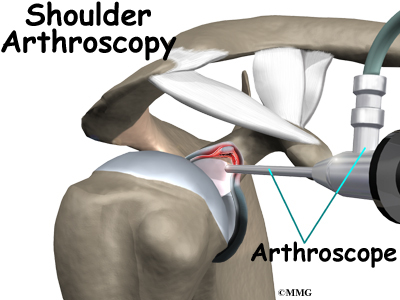
However, MRI and CT scans are not very accurate in detecting labral tears. Confirming the diagnosis of a labral tear can be extremely difficult. A surgeon may need to look into your shoulder using an arthroscope. The arthroscope is a small TV camera that is inserted into the shoulder joint through a very small incision. The surgeon can then see pictures of the joint on a TV screen. This allows the surgeon to look directly at the labrum to see if it is torn.
Treatment
What treatment options are available?
Nonsurgical Treatment
Your doctor’s first goal will be to control your pain and inflammation. Initial treatment for pain control is usually rest and anti-inflammatory medication, such as aspirin or ibuprofen. Your doctor may suggest a cortisone injection if you have trouble getting your pain under control. Cortisone is a strong anti-inflammatory medication. It can provide good relief, although its effects are temporary.
Related Document: A Patient’s Guide to Joint Injections for Arthritis
Your doctor will probably have a physical or occupational therapist direct your rehabilitation program. Your first therapy treatments will try to ease pain and inflammation by using such treatments as heat or ice. Hands-on treatment and various types of exercises are used to improve the range of motion in your shoulder and the nearby joints and muscles.
Later, you will do strengthening exercises to improve the strength and control of the rotator cuff and shoulder blade muscles. Your therapist will help you retrain these muscles to keep the ball of the humerus in the glenoid. This will improve the stability of your shoulder and help it move smoothly during all your activities.
You may need therapy treatments for four to six weeks. Most patients are able to get back to their activities with full use of their arm within this amount of time.
Surgery
If your symptoms don’t go away, you may need surgery. Surgical treatment for this condition is still evolving. Surgeons have not known about the problem long enough to adequately evaluate the results of different treatments.
Labral Debridement
The arthroscope is commonly used to treat many labral tears. If the tear is small and is mostly getting caught as you move the shoulder, simply removing the frayed edges and any loose parts of the labrum may get rid of your symptoms. This is called labral debridement.
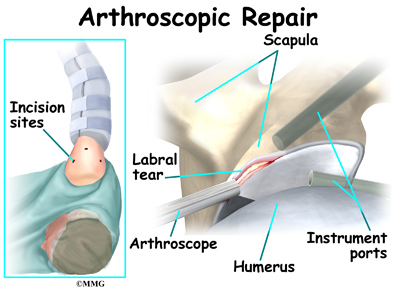
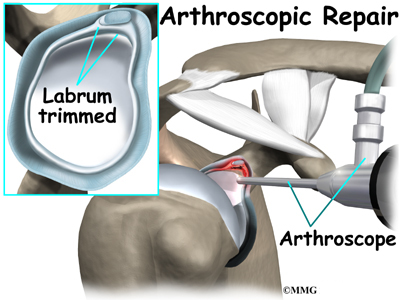
Labral Repair
If the tear is larger, the shoulder may also be unstable. If this is the case, the labral tear may need to be repaired, rather than simply removed. Several new techniques allow surgeons to place “anchors” into the bone around the shoulder joint and reattach the labrum using the arthroscope. There are many variations of these anchors, but most are drilled into the bone and have sutures (stitches) attached that are then used to tie the labrum down to the bone and enable the labrum to heal back in the appropriate position.
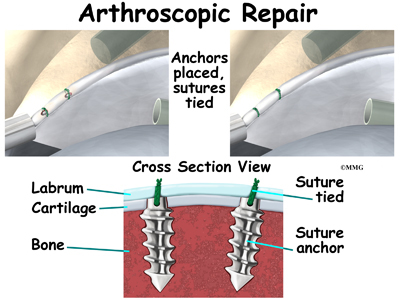
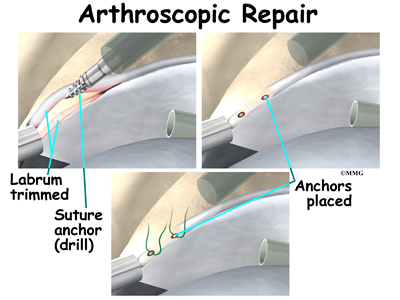
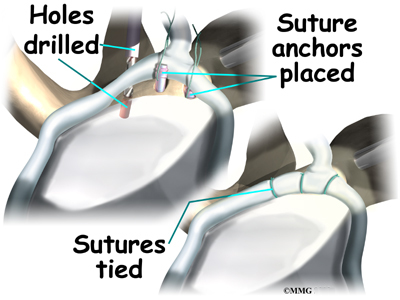
Open Procedure
Open procedures are rarely used today for repair of labral tears. The arthroscopic techniques have become increasingly refined and are today the preferred method of treatment.
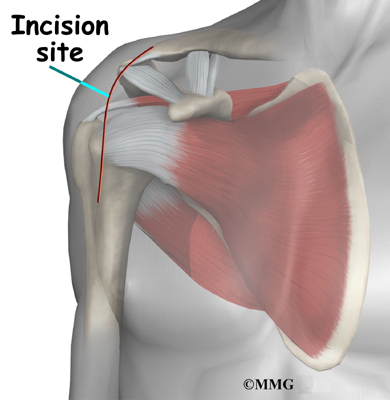
If for some reason the tear is repaired open, the surgeon will need to make an incision in the front of the shoulder. The main drawback of making the larger incision is that it will probably take you longer to recover from surgery.
Rehabilitation
What should I expect after treatment?
Nonsurgical Rehabilitation
Even nonsurgical treatment requires a rehabilitation program. Some evidence suggests that shoulder instability may eventually make labral tears worse. The goal of therapy will be to strengthen the rotator cuff muscles to make the shoulder more stable. At first you will do exercises with the therapist. Eventually you will be put on a home program of exercise to keep the muscles strong and flexible. This should help you avoid future problems.
After Surgery
Rehabilitation after surgery is more complex. You will probably need to wear a sling to support and protect the shoulder for several weeks after surgery. A physical or occupational therapist will probably direct your recovery program. Depending on the surgical procedure, you will probably need to attend therapy sessions for one to two months, and you should expect full recovery to take up to four to six months if you are expecting to participate in athletics.
Getting the shoulder moving as soon as possible is important. However, this must be balanced with the need to protect the healing tissues. The first few therapy treatments will focus on controlling the pain and swelling from surgery. Ice and electrical stimulation treatments may help. Your therapist may also use massage and other types of hands-on treatments to ease muscle spasm and pain.
Therapy proceeds quickly after a simple arthroscopic surgery to clean up the frayed edges or loose parts of the labrum. Sessions start with range-of-motion exercises and gradually work into active stretching and strengthening. Overhand athletes start their sports gradually within four to six weeks. They can usually return to competition within three months.
After surgery to repair the labrum, therapists usually begin with passive exercises. In passive exercises, the shoulder joint is moved, but your muscles stay relaxed. Your therapist gently moves your joint and gradually stretches your arm. You may also be taught how to do passive exercises at home.
Active therapy starts about six weeks after repair surgery. Active range-of-motion exercises help you regain shoulder movement using your own muscle power. Light isometric strengthening exercises are started about this time. These exercises work the muscles without straining the healing joint.
By about the tenth week, you will start more active strengthening. Exercises will focus on improving strength and control of the rotator cuff muscles. They help tighten the ball of the humerus in the glenoid socket and can improve the stability of the shoulder. A stronger and more stable shoulder helps keep the ball of the humerus centered in the socket during all your activities.
Some of the exercises you will do are designed get your shoulder working in ways that are similar to your work tasks and sport activities. Your therapist will help you find ways to do your tasks that don’t put too much stress on your shoulder. Before your therapy sessions end, your therapist will teach you a number of ways to avoid future problems.