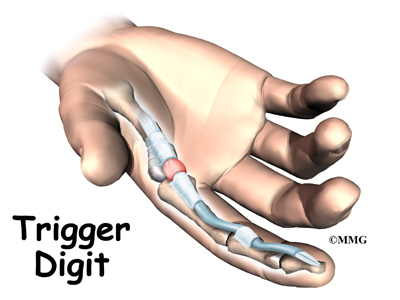
A Patient’s Guide to Boutonniere Deformity of the Finger
Introduction
The tendons that allow each finger to straighten, the extensor tendons, at first appear to be relatively simple. But as the extensor tendon runs into the finger, it becomes a complex and elegantly balanced mechanism that allows very fine control of the motion of each joint of the finger. When this mechanism is damaged in certain areas, this balance can be destroyed. The result is a finger that doesn’t work properly. Over time, the imbalance can lead to contractures (tightening of the tendons) and other changes that result in a permanently crooked finger. The boutonniere deformity is one such problem that affects the extensor tendons of the finger.
This guide will help you understand
- what parts of the finger are involved
- what causes the boutonniere deformity
- how the problem is treated
- what to expect from treatment
Anatomy
What parts of the finger are involved?

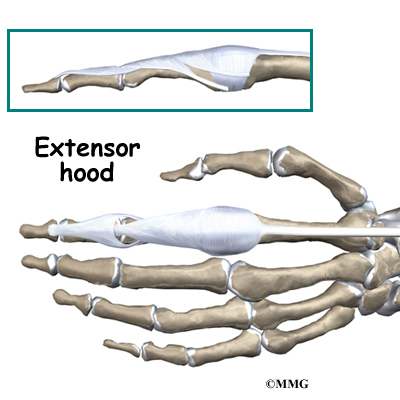
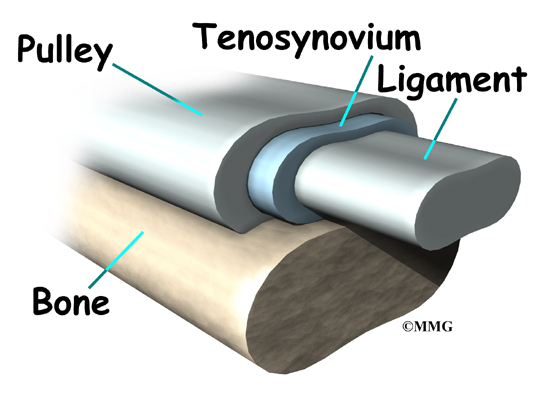
The extensor tendons begin as muscles that arise from the backside of the forearm bones. These muscles travel towards the hand, where they eventually connect to the extensor tendons before crossing over the back of the wrist joint. As they travel into the fingers, the extensor tendons become the extensor hood. The extensor hood flattens out to cover the top of the finger and sends out branches on each side that connect to the bones in the middle and end of the finger. When the extensor muscle contracts, it shortens and pulls on these attachments to straighten the finger.
Small ligaments also connect the extensor hood with other tendons that travel into the finger to bend the finger. These connections help balance the motion of the finger so that all the joints of the finger work together, giving a smooth bending and straightening action. Problems arise when these ligaments become too tight or too loose.
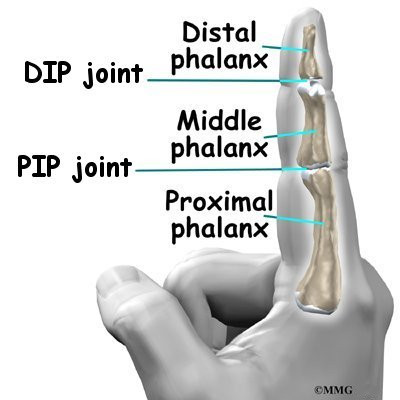
The fingers are actually made up of three bones, called phalanges. The three phalanges in each finger are separated by two joints, called interphalangeal joints (IP joints). The joint near the end of the finger is called the distal IP joint (DIP joint). (Distal means further away.) The proximal IP joint (PIP joint), is the middle joint between the main knuckle and the DIP joint. (Proximal means closer in.) The IP joints of the fingers work like hinge joints when you bend and straighten your hand.
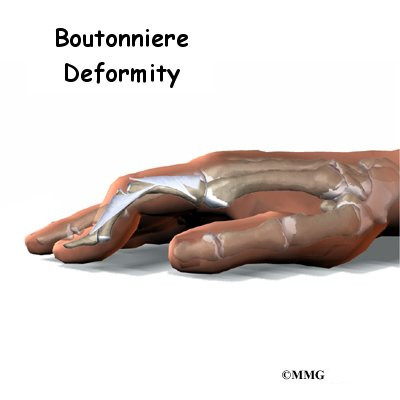
A boutonniere deformity occurs when disease or injury causes the PIP joint to become flexed (bent) and the DIP joint is pulled up into too much extension (hyperextension).
Related Document: A Patient’s Guide to Hand Anatomy
Causes

How does this condition occur?
The boutonniere deformity happens when the extensor tendon attachment to the middle phalanx is injured. This area is called the central slip. This tendon attachment may be injured in many ways. The central slip may simply be damaged when a cut occurs over the back of the middle finger joint (PIP joint). More commonly the central slip tears or pops off its attachment on the bone when the finger is jammed from the end, forcing the PIP joint to bend. When a small amount of bone is pulled off with the tendon, doctors call it an avulsion fracture. The central slip can also be torn when the PIP joint is dislocated and the middle phalanx

dislocates towards the palm.
Other conditions that affect the central slip can cause the boutonniere deformity. For example, prolonged inflammation in the PIP joint from rheumatoid arthritis stretches and eventually ruptures the central slip. A severe burn on the hand can damage the central slip. Another problem affecting the hand, called Dupuytren’s contracture, can weaken the central slip and produce the boutonniere deformity.
Related Document: A Patient’s Guide to Dupuytren’s Contracture
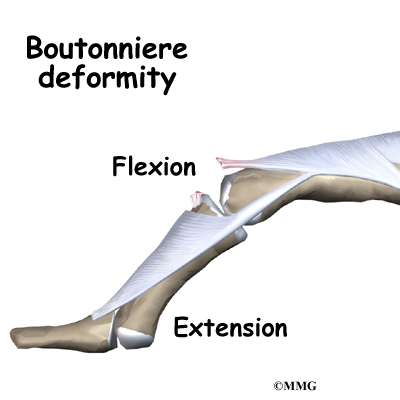
The boutonniere deformity may not occur right away. It is the imbalance in the extensor hood that results from the torn tendon that eventually causes the deformity. Because the middle phalanx no longer is pulled by the central slip, the flexor tendon on the other side begins to bend the PIP joint without resistance. The lateral bands begin to slide down along the side of the finger where they continue to straighten the DIP joint. Eventually the finger becomes stiff in this position.
Symptoms
What do boutonniere deformities look and feel like?
Initially, the finger is painful and swollen around the PIP joint. The PIP joint may not straighten out completely under its own power. The finger can usually be straightened easily with help from the other hand. Eventually, the imbalance leads to the typical shape of the finger with a boutonniere deformity.
Diagnosis

What tests will my doctor do?
Usually the diagnosis is evident just from the physical examination. X-rays are required to see if there is an associated avulsion fracture, since this may change the recommended treatment. No other tests are required normally.
Treatment
What can be done for a boutonniere deformity of the finger?
Treatment for boutonniere deformity depends on whether the injury to the central slip is recognized immediately or if the deformity has been present for a long time. When the injury is the result of a laceration of the finger, the surgeon will usually repair the tendon as well as suture the skin.
Nonsurgical Treatment
If the injury to the central slip results from a simple avulsion (tearing) of the tendon from the bone, splinting of the PIP joint for six weeks should allow the bone to heal and prevent the boutonniere deformity from occurring. The DIP joint is free to move throughout this period and can be exercised to prevent stiffness in the DIP joint.
While a simple homemade splint will work, there are many splints that have been designed to make it easier to wear at all times. There are also special splints that have been designed that are similar to springs. These splints can be used to gently stretch out a contracture of the PIP joint over several weeks. The spring applies gentle pressure all the time, and the PIP joint slowly straightens.
A splint may also be needed to keep the DIP joint from hyperextending. Newer styles are shaped like jewelry rings and are available in stainless steel, sterling silver, or gold.
Splinting and a rigorous exercise program may even work when the condition has been present for some time. Many hand surgeons will try six weeks of splinting with the spring-type splint and exercise to see if the deformity lessens to a tolerable limit before considering surgery. This is desirable before surgery to stretch out a PIP contracture before repairing or reconstructing the extensor hood.
Surgery
Surgery is required in some cases of boutonniere deformity. Best results occur when the PIP joint is limber, rather than stuck in a bent position. If the PIP joint is stuck in a bent position, surgeons usually wait before doing surgery to see if splinting will help stretch and straighten the PIP joint.
Joint Fixation
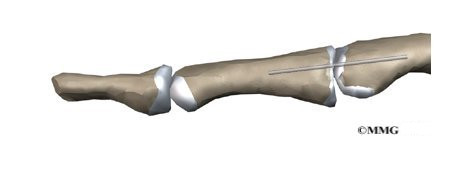
When the deformity is the result of a dislocation of the PIP joint, surgery may be required to repair the damaged structures and prevent the later development of a boutonniere deformity. A pin is usually placed through the PIP joint to fix the joint in place for up to three weeks. Patients wear a splint to protect the joint for another three weeks after surgery.
Soft Tissue Repair
In cases where the balance cannot be restored to a tolerable limit with splinting or by simply pinning the PIP joint, surgery may be required to reconstruct and rebalance the extensor hood. There are numerous types of operations that have been designed to try and rebalance the extensor hood. None is completely successful.
Surgery to repair the soft tissues that are contributing to a boutonniere deformity carries a relatively high risk of failure to achieve completely normal functioning of the extensor mechanism of the finger. All of the repair and reconstruction procedures are dependant on a well designed and rigorous exercise program following the surgery. A physical therapist or occupational therapist will work closely with you during your recovery.
Fusion
If past treatments, including surgery, do not stop inflammation or deformity in the joint, finger joint fusion may be recommended. Joint fusion is a procedure that binds the two joint surfaces of the finger together, keeping them from moving. Fusing the two joint surfaces together eases pain, makes the joint stable, and prevents additional joint deformity.
Related Document: A Patient’s Guide to Finger Fusion Surgery
Rehabilitation
What will my recovery be like?
Nonsurgical Rehabilitation
If nonsurgical treatment is successful, you may see improvement in eight to 12 weeks. After wearing a finger splint for up to eight weeks, doctors usually have you continue wearing the splint at night for at least another month. It is important during this time that the joints on either side of the splint be moved. This may require the help of a physical or occupational therapist.
After Surgery
You’ll wear a splint or brace after surgery. A protective finger splint holds the PIP joint straight and is used for at least three weeks after surgery. Surgeons may apply a dynamic splint to help gradually straighten the PIP joint. Physical or occupational therapy treatments usually start three to six weeks after surgery.
You will likely need to attend therapy sessions for three to four months, and you should expect full recovery to take up to six months. The first few therapy treatments will focus on controlling the pain and swelling from surgery. Then you’ll begin gentle range-of-motion exercise. Strengthening exercises are started eight to 10 weeks after surgery. You’ll learn ways to grip and support items in order to do your tasks safely and with the least amount of stress on your finger joint. As with any surgery, you need to avoid doing too much, too quickly.
Eventually, you’ll begin doing exercises designed to get your hand and fingers working in ways that are similar to your work tasks and daily activities. Your therapist will help you find ways to do your tasks that don’t put too much stress on your finger joint. Before your therapy sessions end, your therapist will teach you a number of ways to avoid future problems.
Your therapist’s goal is to help you keep your pain under control, improve your strength and range of motion, and regain your fine motor abilities with your hand and finger. When you are well under way, regular visits to your therapist’s office will end. Your therapist will continue to be a resource, but you will be in charge of doing your exercises as part of an ongoing home program.