Hand
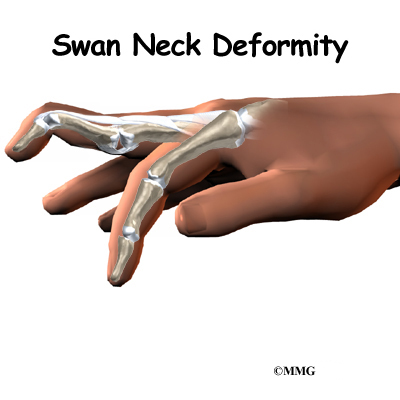
Swan Neck Deformity of the Finger
A Patient’s Guide to Swan Neck Deformity of the Finger
Introduction
Normal finger position and movement occur from the balanced actions of many important structures. Ligaments support the finger joints. Muscles hold and move the fingers. Tendons help control the fine motion of each finger joint. Disease or injury can disturb the balance in these structures, altering normal finger alignment and function. The result may be a crooked finger, such as a swan neck deformity of the finger.
This guide will help you understand
- what parts of the finger are affected
- what causes swan neck deformity
- how the problem is treated
- what to expect from treatment
Anatomy
What parts of the finger are involved?

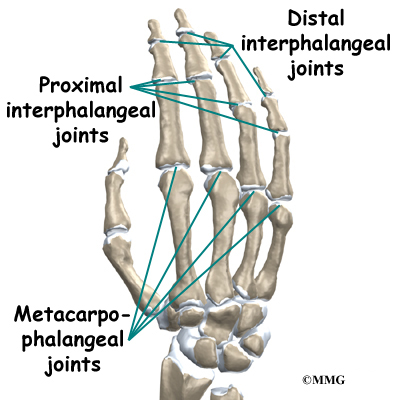
The fingers are actually made up of three bones, called phalanges. The three phalanges in each finger are separated by two joints, called interphalangeal joints (IP joints). The joint near the end of the finger is called the distal IP joint (DIP joint). (Distal means further away.) The proximal IP joint (PIP joint) is the middle joint between the main knuckle and the DIP joint. (Proximal means closer in.) The IP joints of the fingers work like hinge joints when you bend and straighten your hand.

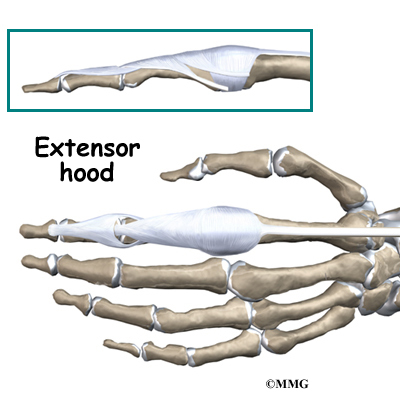
The tendons that allow each finger joint to straighten are called the extensor tendons. The extensor tendons of the fingers begin as muscles that arise from the backside of the forearm bones. These muscles travel toward the hand, where they eventually connect to the extensor tendons before crossing over the back of the wrist joint. As they travel into the fingers, the extensor tendons become the extensor hood. The extensor hood flattens out to cover the top of the finger and sends out branches on each side that connect to the bones in the middle and end of the finger. When the extensor muscles contract, they tug on the extensor tendon and straighten the finger.
Ligaments are tough bands of tissue that connect bones together. Several small ligaments connect the extensor hood with other tendons that travel into the finger to bend the finger. These connections help balance the motion of the finger so that all the joints of the finger work together, giving a smooth bending and straightening action.
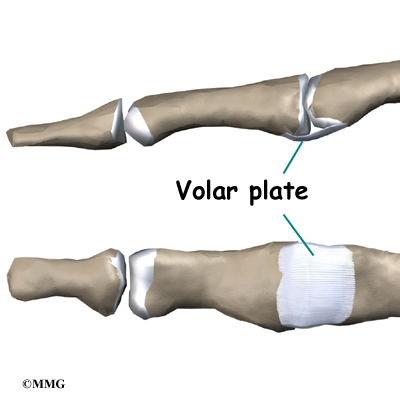
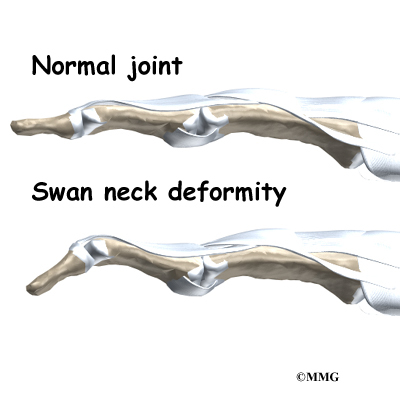
In the PIP joint (the middle joint between the main knuckle and the DIP joint), the strongest ligament is the volar plate. This ligament connects the proximal phalanx to the middle phalanx on the palm side of the joint. The ligament tightens as the joint is straightened and keeps the PIP joint from bending back too far (hyperextending). Swan neck deformity can occur when the volar plate loosens from disease or injury.
Related Document: A Patient’s Guide to Hand Anatomy
Causes
How does this condition occur?
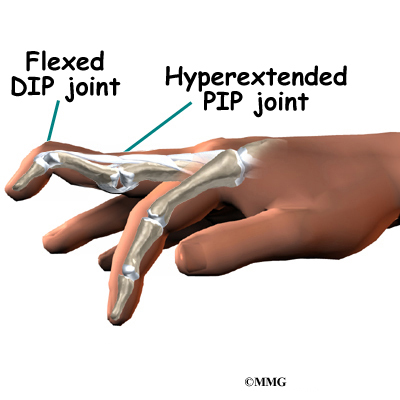
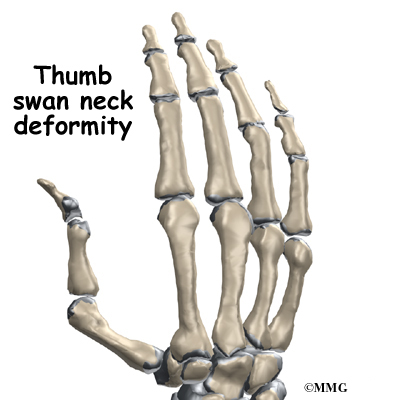
A swan neck deformity describes a finger with a hyperextended PIP joint and a flexed DIP joint.
Conditions that loosen the PIP joint and allow it to hyperextend can produce a swan neck deformity of the finger. Rheumatoid arthritis (RA) is the most common disease affecting the PIP joint. Chronic inflammation of the PIP joint puts a stretch on the volar plate. (As mentioned earlier, the volar plate is a supportive ligament in front of the PIP joint that normally keeps the PIP joint from hyperextending.) As the volar plate becomes weakened and stretched, the PIP joint becomes loose and begins to easily bend back into hyperextension. The extensor tendon gets out of balance, which allows the DIP joint to get pulled downward into flexion. As the DIP joint flexes and the PIP joint hyperextends, the swan neck deformity occurs.
View animation of of PIP joint hyperextension
Related Document: A Patient’s Guide to Rheumatoid Arthritis
Other conditions that weaken the volar plate can produce a swan neck deformity. The small (intrinsic) muscles of the hand and fingers can tighten up from hand trauma, RA, and various nerve disorders, such as cerebral palsy, Parkinson’s disease, or stroke. The muscle imbalance tends to weaken the volar plate and pull the PIP joint into extension. Weakness in the volar plate can also occur from a finger injury that forces the PIP joint into hyperextension, stretching or rupturing the volar plate. As mentioned, looseness (laxity) in the volar plate can lead to a swan neck deformity.
Related Document: A Patient’s Guide to PIP Joint Injuries of the Finger
Clearly, PIP joint problems can produce a swan neck deformity. But so can problems that start in the DIP joint at the end of the finger. Injury or disease that disrupts the end of the extensor tendon can cause the DIP joint to droop (flex).

An example from sports is a jammed finger that tears or ruptures the extensor tendon at the end of the finger (distal phalanx). Without treatment, the DIP joint droops and won’t straighten out. This condition is called a mallet finger. The extensor tendon may become imbalanced and begin to pull the PIP joint into hyperextension, forming a swan neck deformity.
Related Document: A Patient’s Guide to Mallet Finger Injuries
Chronic inflammation from RA can also disrupt the very end of the extensor tendon. Inflammation and swelling in the DIP joint stretches and weakens the extensor tendon where it passes over the top of the DIP joint. A mallet deformity occurs in the DIP, followed by hyperextension of the PIP joint. Again, the result is a swan neck deformity.
Symptoms
What do swan neck deformities look and feel like?
Inflammation from injury or disease (such as RA) may cause pain and swelling of the PIP joint. The PIP joint eventually is free to bend back too far into hyperextension. The DIP joint is bent downward into flexion. Eventually, the imbalance leads to the typical shape of the finger with a swan neck deformity.
Diagnosis
What tests will my doctor do?
Usually the diagnosis is evident just from the physical examination. An X-ray may be ordered so the doctor can check the condition of the joint surfaces, examine joint alignment, and see if a fracture is present (as in a traumatic finger injury). No other tests are required normally.
Treatment
What can be done for a swan neck deformity of the finger?
Treatment for swan neck deformity can be nonsurgical or surgical. The approach your doctor uses depends on whether the PIP joint is flexible or stiff.
Nonsurgical Treatment
Successful nonsurgical treatment is based on restoring balance in the structures of the hand and fingers. The PIP joint must be supple (not stiff). Aligning the PIP joint and preventing hyperextension should help restore DIP extension. If it doesn’t, surgery may be needed.
You may require professional rehabilitation. A physical or occupational therapist addresses the imbalances that have formed the swan neck deformity. Stretching, massage, and joint mobilization are used to try and restore finger alignment and function.

A special splint may be used to keep the PIP joint lined up, protect the joint from hyperextending, and still allow the PIP joint to bend. Newer styles are shaped like jewelry rings and are available in stainless steel, sterling silver, or gold. This approach works best for mild cases of swan neck deformity in which the PIP joint is supple.
Splinting and a rigorous therapy program are usually not successful in altering the imbalance responsible for the deformity. However, many hand surgeons will try six weeks with the splint and exercise to improve PIP joint mobility before performing surgery.
Surgery
Soft Tissue Repair
In cases where the balance cannot be restored to a tolerable limit with splinting, surgery may be required to reconstruct and rebalance the structures around the PIP joint. The surgeon releases, aligns, and balances the soft tissues around the PIP joint. The surgery may involve the skin (dermadesis), the tendons (tenodesis), or the ligaments (mobilization or reconstruction).
Surgery to repair the soft tissues that are contributing to a swan neck deformity carries a relatively high risk of failure to achieve completely normal functioning of the finger. All of the repair and reconstruction procedures are dependant on a well designed and rigorous exercise program following the surgery. A physical or occupational therapist will work closely with you during your recovery.
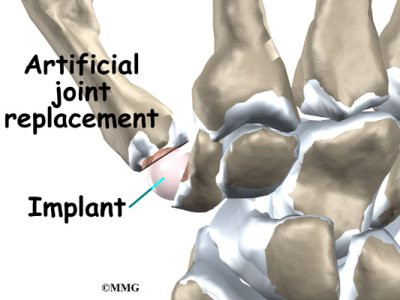
PIP Joint Arthroplasty
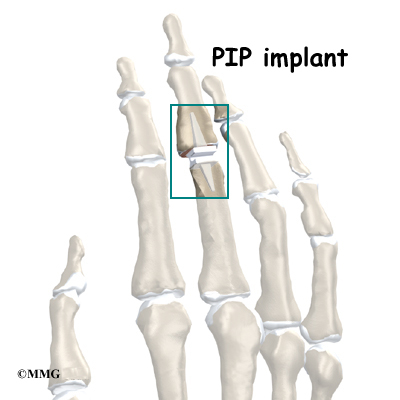
Swan neck deformity with a stiff PIP joint sometimes requires replacement of the PIP joint, called arthroplasty. The surgeon works from the back surface (dorsum) of the finger joint. Both surfaces of the PIP joint are removed to make room for the new implant. With the new joint in place, the surgeon balances the soft tissues around the joint to ensure that the new joint can easily bend and straighten.
Related Document: A Patient’s Guide to Artificial Joint Replacement of the Finger
Finger Joint Fusion
When RA produces a mallet deformity of the DIP joint and the PIP joint is supple, surgeons may consider fusing the DIP joint. Joint fusion is a procedure that binds the two joint surfaces of the finger together, keeping them from moving. Fusing the two joint surfaces together eases pain, makes the joint stable, and helps prevent additional joint deformity.
If past treatments, including surgery, do not stop inflammation or deformity in the PIP joint, fusion of the PIP joint may be recommended. The PIP joint is usually fused in a bent position, between 25 and 45 degrees.
Related Document: A Patient’s Guide to Finger Fusion Surgery
Rehabilitation
What will my recovery be like?
Nonsurgical Rehabilitation
The goal of nonsurgical treatment is to get the finger joints, tendons, and muscles in balance. If nonsurgical treatment is successful, you may see improvement in eight to 12 weeks. Your doctor may have you work with a physical or occupational therapist during this time.
Your therapist will work with you to obtain and use your finger splint. Special forms of stretching may help reduce tightness in the intrinsic muscles of the hand and fingers. Strengthening exercises can help with alignment and function of the hand and fingers.
After Surgery
You’ll wear a splint or brace after surgery. A protective finger splint holds and protects the joint and is used for at least three weeks after surgery. Physical or occupational therapy treatments usually start three to six weeks after surgery.
You will likely need to attend therapy sessions for three to four months, and you should expect full recovery to take up to six months. The first few therapy treatments will focus on controlling the pain and swelling from surgery. Then you’ll begin gentle range-of-motion exercise. Strengthening exercises are started eight to 10 weeks after surgery. You’ll learn ways to grip and support items in order to do your tasks safely and with the least amount of stress on your finger joint. As with any surgery, you need to avoid doing too much, too quickly.
Eventually, you’ll begin doing exercises designed to get your hand and fingers working in ways that are similar to your work tasks and daily activities. Your therapist will help you find ways to do your tasks that don’t put too much stress on your finger joint. Before your therapy sessions end, your therapist will teach you a number of ways to avoid future problems.
Your therapist’s goal is to help you keep your pain under control, improve your strength and range of motion, and regain fine motor abilities with your hand and finger. When you are well under way, regular visits to your therapist’s office will end. Your therapist will continue to be a resource, but you will be in charge of doing your exercises as part of an ongoing home program.
Hand Anatomy
A Patient’s Guide to Hand Anatomy
Introduction
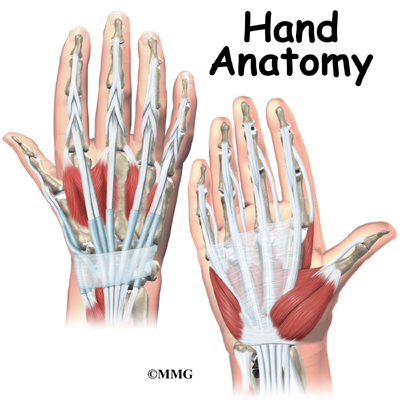
Few structures of the human anatomy are as unique as the hand. The hand needs to be mobile in order to position the fingers and thumb. Adequate strength forms the basis for normal hand function. The hand also must be coordinated to perform fine motor tasks with precision. The structures that form and move the hand require proper alignment and control in order for normal hand function to occur.
In addition to reading this article, be sure to watch our Hand Anatomy Animated Tutorial Video.
This guide will help you understand
- what parts make up the hand
- how those parts work together
Important Structures
The important structures of the hand can be divided into several categories. These include
- bones and joints
- ligaments and tendons
- muscles
- nerves
- blood vessels
The front, or palm-side, of the hand is referred to as the palmar side. The back of the hand is called the dorsal side.
Bones and Joints
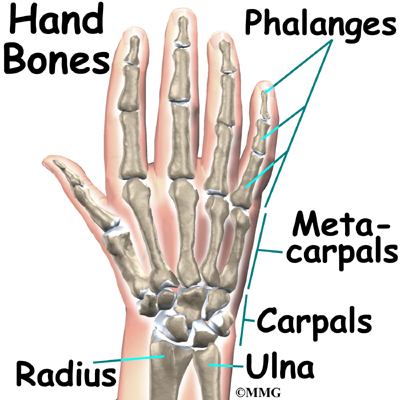
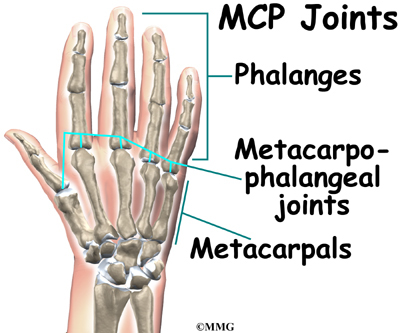

There are 27 bones within the wrist and hand. The wrist itself contains eight small bones, called carpals. The carpals join with the two forearm bones, the radius and ulna, forming the wrist joint. Further into the palm, the carpals connect to the metacarpals. There are five metacarpals forming the palm of the hand. One metacarpal connects to each finger and thumb. Small bone shafts called phalanges line up to form each finger and thumb.
The main knuckle joints are formed by the connections of the phalanges to the metacarpals. These joints are called the metacarpophalangeal joints (MCP joints). The MCP joints work like a hinge when you bend and straighten your fingers and thumb.
The three phalanges in each finger are separated by two joints, called interphalangeal joints (IP joints). The one closest to the MCP joint (knuckle) is called the proximal IP joint (PIP joint). The joint near the end of the finger is called the distal IP joint (DIP joint). The thumb only has one IP joint between the two thumb phalanges. The IP joints of the digits also work like hinges when you bend and straighten your fingers and thumb.
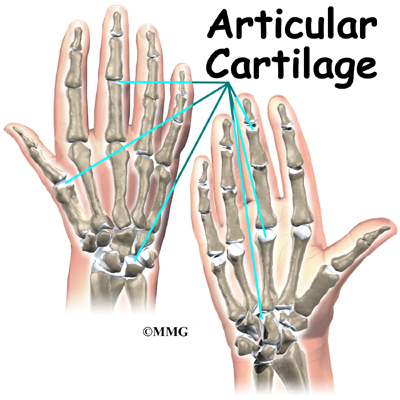
The joints of the hand, fingers, and thumb are covered on the ends with articular cartilage. This white, shiny material has a rubbery consistency. The function of articular cartilage is to absorb shock and provide an extremely smooth surface to
facilitate motion. There is articular cartilage essentially everywhere that two bony surfaces move against one another, or articulate.
Ligaments and Tendons


Ligaments are tough bands of tissue that connect bones together. Two important structures, called collateral ligaments, are found on either side of each finger and thumb joint. The function of the collateral ligaments is to prevent abnormal sideways bending of each joint.
In the PIP joint (the middle joint between the main knuckle and the DIP joint), the strongest ligament is the volar plate. This ligament connects the proximal phalanx to the middle phalanx on the palm side of the joint. The ligament tightens as the joint is straightened and keeps the PIP joint from bending back too far (hyperextending). Finger deformities can occur when the volar plate loosens from disease or injury.
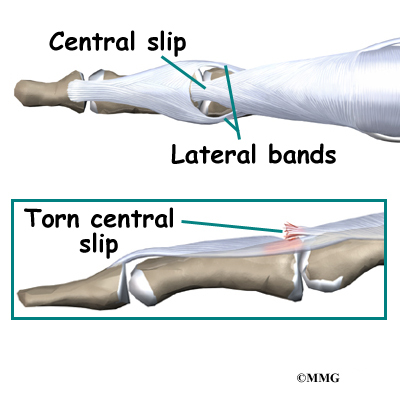
The tendons that allow each finger joint to straighten are called the extensor tendons. The extensor tendons of the fingers begin as muscles that arise from the backside of the forearm bones. These muscles travel towards the hand, where they eventually connect to the extensor tendons before crossing over the back of the wrist joint. As they travel into the fingers, the extensor tendons become the extensor hood. The extensor hood flattens out to cover the top of the finger and sends out branches on each side that connect to the bones in the middle and end of the finger.
The place where the extensor tendon attaches to the middle phalanx is called the central slip. When the extensor muscles contract, they tug on the extensor tendon and straighten the finger. Problems occur when the central slip is damaged, as can happen with a tear.
Muscles
Many of the muscles that control the hand start at the elbow or forearm. They run down the forearm and cross the wrist and hand. Some control only the bending or straightening of the wrist. Others influence motion of the fingers or thumb. Many of these muscles help position and hold the wrist and hand while the thumb and fingers grip or perform fine motor actions.
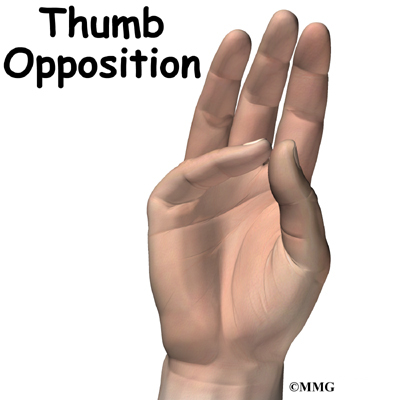
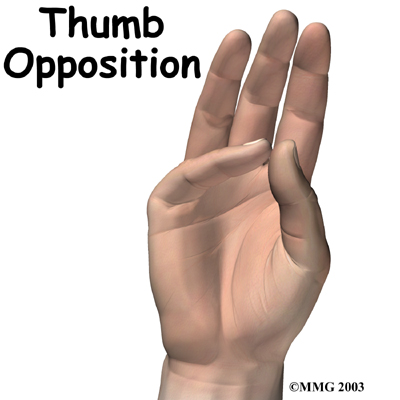
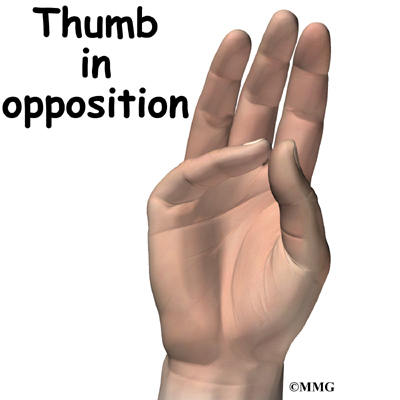
Most of the small muscles that work the thumb and pinky finger start on the carpal bones. These muscles connect in ways that allow the hand to grip and hold. Two muscles allow the thumb to move across the palm of the hand, an important function called thumb opposition.
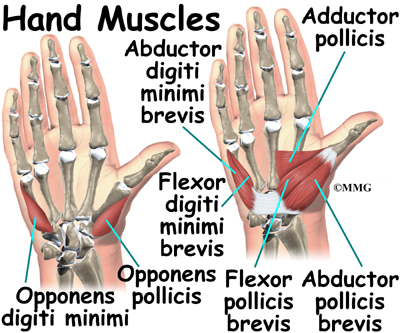
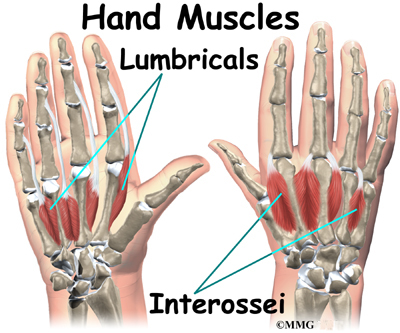
The smallest muscles that originate in the wrist and hand are called the intrinsic muscles. The intrinsic muscles guide the fine motions of the fingers by getting the fingers positioned and holding them steady during hand activities.
Nerves
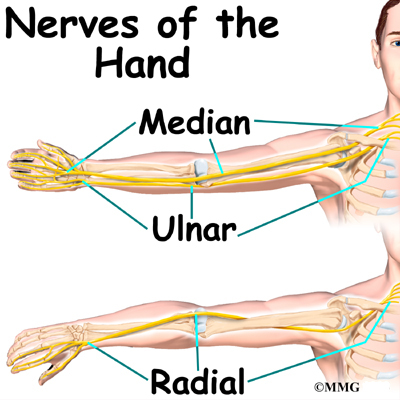

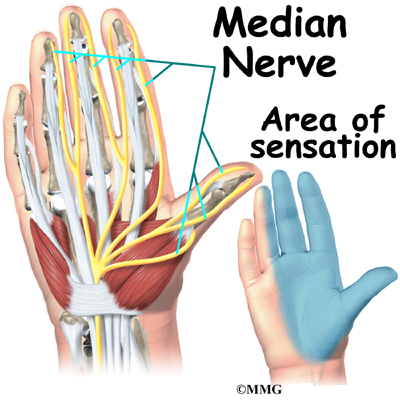
All of the nerves that travel to the hand and fingers begin together at the shoulder: the radial nerve, the median nerve, and the ulnar nerve. These nerves carry signals from the brain to the muscles that move the arm, hand, fingers, and thumb. The nerves also carry signals back to the brain about sensations such as touch, pain, and temperature.
The radial nerve runs along the thumb-side edge of the forearm. It wraps around the end of the radius bone toward the back of the hand. It gives sensation to the back of the hand from the thumb to the third finger. It also supplies the back of the thumb and just beyond the main knuckle of the back surface of the ring and middle fingers.
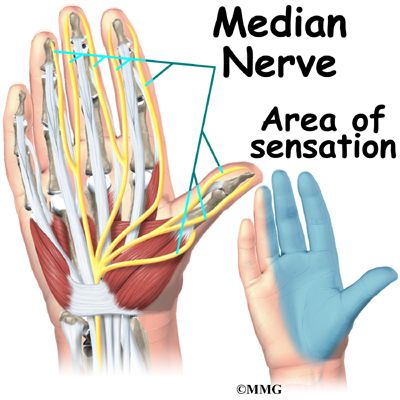
The median nerve travels through a tunnel within the wrist called the carpal tunnel. This nerve gives sensation to the thumb, index finger, long finger, and half of the ring finger. It also sends a nerve branch to control the thenar muscles of the thumb. The thenar muscles help move the thumb and let you touch the pad of the thumb to the tips each of each finger on the same hand, a motion called opposition.
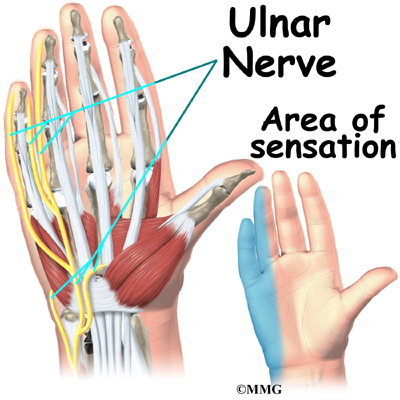
The ulnar nerve travels through a separate tunnel, called Guyon’s canal. This tunnel is formed by two carpal bones, the pisiform and hamate, and the ligament that connects them. After passing through the canal, the ulnar nerve branches out to supply feeling to the little finger and half the ring finger. Branches of this nerve also supply the small muscles in the palm and the muscle that pulls the thumb toward the palm.
The nerves that travel to the hand are subject to problems. Constant bending and straightening of the wrist and fingers can lead to irritation or pressure on the nerves within their tunnels and cause problems such as pain, numbness, and weakness in the hand, fingers, and thumb.
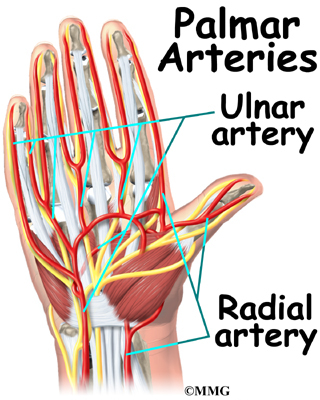
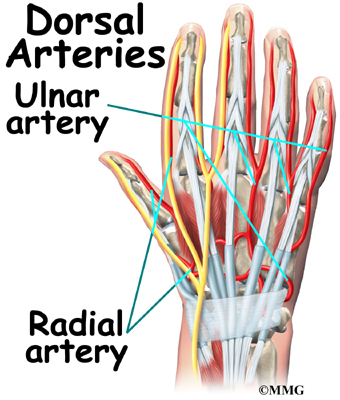
Blood Vessels
Traveling along with the nerves are the large vessels that supply the hand with blood. The largest artery is the radial artery that travels across the front of the wrist, closest to the thumb. The radial artery is where the pulse is taken in the wrist. The ulnar artery runs next to the ulnar nerve through Guyon’s canal (mentioned earlier). The ulnar and radial arteries arch together within the palm of the hand, supplying the front of the hand, fingers, and thumb. Other arteries travel across the back of the wrist to supply the back of the hand, fingers, and thumb.
Summary
The hand is formed of numerous structures that have an important role in normal hand function. Conditions that change the way these structures work can greatly impact whether the hand functions normally. When our hands are free of problems, it’s easy to take the complex anatomy of the hand for granted.
Open Carpal Tunnel Release
A Patient’s Guide to Open Carpal Tunnel Release
Introduction
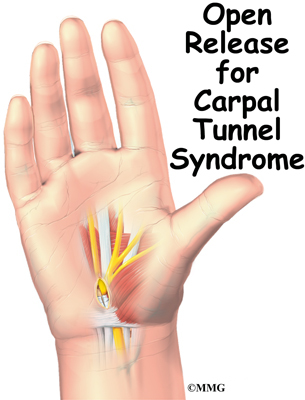
Carpal tunnel syndrome (CTS) occurs when the median nerve is squeezed as it courses through the wrist. The passageway through the wrist, called the carpal tunnel, is formed by the small wrist bones (carpals) on one side and a ligament on the other. In an open release for CTS, the surgeon makes an incision on the front of the wrist and hand in order to cut the ligament. The goal is to relieve pressure on the median nerve.
This guide will help you understand
- what part of the wrist and hand are treated during surgery
- how surgeons perform the operation
- what to expect before and after the procedure
Related Document: A Patient’s Guide to Carpal Tunnel Syndrome
Anatomy


What part of the wrist is treated during surgery?
The carpal tunnel is an opening through the wrist into the hand that is formed by the carpal bones of the wrist on the bottom and the transverse carpal ligament on the top. The transverse carpal ligament is at the base of the wrist and crosses from one side of the wrist to the other. (Transverse means across.) It is sometimes referred to as the carpal ligament.
The opening formed by the carpal bones and the carpal ligament is the carpal tunnel. The median nerve passes through the carpal tunnel into the hand. It gives sensation to the thumb, index finger, long finger, and half of the ring finger. It also sends a nerve branch to control the thenar muscles of the thumb.
The median nerve rests on top of the flexor tendons, just below the carpal ligament. Between the skin and the carpal ligament is a thin sheet of connective tissue called the palmar fascia.
Related Document: A Patient’s Guide to Hand Anatomy
Rationale
What does the surgeon hope to achieve?
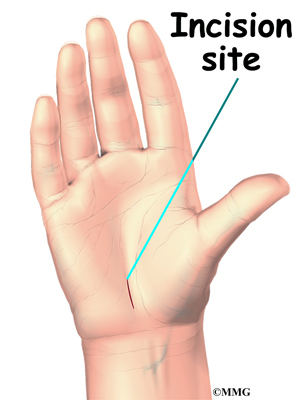
The surgery releases the carpal ligament, taking pressure off the median nerve. The open procedure for releasing the carpal ligament involves a sizeable wrist incision, usually about two inches long. By creating a large incision, the surgeon is able to clearly see the wrist structures and to carefully do the operation.
Preparation
What should I do to prepare for surgery?
The decision to proceed with surgery must be made jointly by you and your surgeon. You need to understand as much about the procedure as possible. If you have concerns or questions, you should talk to your surgeon.
Once you decide on surgery, your surgeon may suggest a complete physical examination by your regular doctor. This exam helps ensure that you are in the best possible condition to undergo the operation.
On the day of your surgery, you will probably be admitted to the hospital early in the morning. You shouldn’t eat or drink anything after midnight the night before. This surgery can usually be done as an outpatient procedure, meaning you can leave the hospital the same day.
Procedure
Open release for CTS is occasionally done using a general anesthetic (one that puts you to sleep). More often, it is done using a regional anesthetic. A regional anesthetic blocks the nerves going to only a portion of the body. Injections of medications similar to lidocaine are used to block the nerves for several hours. This type of anesthesia could be an axillary block (only the arm is asleep) or a wrist block (only the hand is asleep). The surgery can also be performed by simply injecting lidocaine around the area of the incision.
Once you have anesthesia, your surgeon will make sure the skin of your palm is free of infection by cleaning the skin with a germ-killing solution.
A small incision is made in the palm of the hand, usually about one inch long. In some severe cases, a slightly longer incision is extended into the forearm. The incision makes the palmar fascia visible. This is a sheet of connective tissue in the palm and forearm right under the skin. The surgeon makes an incision through this material and exposes the carpal ligament.
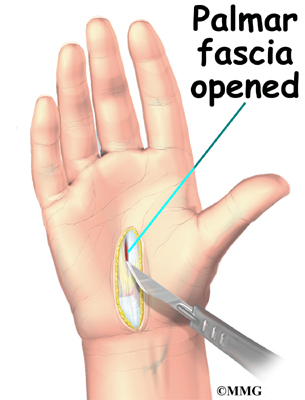
View animation of palmar fascia exposed
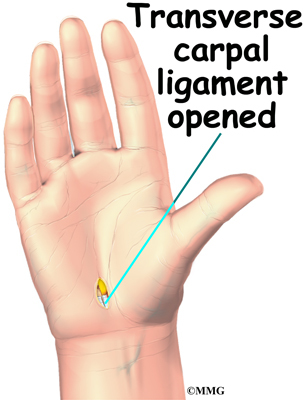
View animation of ligament exposed
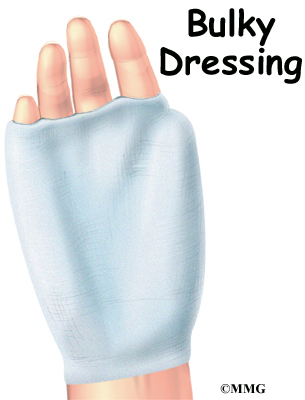
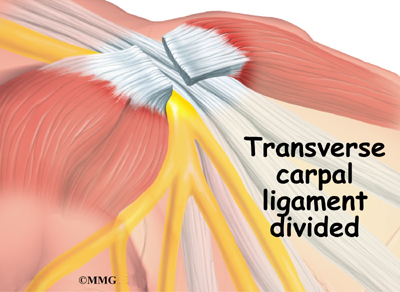
Once in view, the carpal ligament is released using a scalpel or scissors. Care is taken to make sure that the median nerve and flexor tendons are out of the way and protected. By cutting the carpal ligament, pressure is taken off the median nerve. Upon dividing the carpal ligament, the surgeon stitches just the skin together and leaves the loose ends of the carpal ligament separated. The loose ends are left apart to keep pressure off the median nerve. Eventually, the gap between the two ends of the ligament fills in with scar tissue. After the skin is stitched together, your hand will be wrapped in a bulky dressing. This surgery can usually be done as an outpatient procedure, meaning you can leave the hospital the same day.


Complications
What might go wrong?
As with all major surgical procedures, complications can occur. This document doesn’t provide a complete list of the possible complications, but it does highlight some of the most common problems. Some of the most common complications following open carpal tunnel release are
- anesthesia
- infection
- incision pain
- scar tissue formation
- nerve damage
- hand weakness
Anesthesia
Problems can arise when the anesthesia given during surgery causes a reaction with other drugs the patient is taking. In rare cases, a patient may have problems with the anesthesia itself. In addition, anesthesia can affect lung function because the lungs don’t expand as well while a person is under anesthesia. Be sure to discuss the risks and your concerns with your anesthesiologist.
Infection
Infection is a possible complication after surgery, especially infection of the incision. Therefore, check your incision every day as instructed by your surgeon. If you think you have a fever take your temperature. If you have signs of infection or other complications, call your surgeon right away.
These are warning signs of infection or other complications:
- pain in your hand that is not relieved by your medicine
- discharge with an unpleasant odor coming from your incision
- swelling, heat, and redness along your incision
- chills or fever over 100.4 degrees Fahrenheit
- bright red blood coming from your incision
Incision Pain
Some patients continue to have pain along their incision. The area often stays sensitive long after the surgery. However, symptoms of incision sensitivity tend to get better within four to six months after surgery.
Scar Tissue Formation
A common problem after carpal tunnel release is excessive scar tissue buildup. The body attempts to heal the area but goes too far in the process of supplying new cells. Too much scar tissue forms. When this happens the nearby soft tissues can become bound together. The incision may appear raised. The nearby skin may feel tight. You may even feel a bump beneath the incision. Wrist and hand movement may feel restricted. Scar tissue can also bind the flexor tendons and median nerve, preventing them from gliding smoothly within the carpal tunnel. Pain and a loss of range of motion may occur. In severe cases, a second surgery may be needed to remove the extra scar tissue.
Nerve Symptoms
Sometimes people still feel some numbness and tingling after surgery, especially if they had severe pressure on the median nerve prior to surgery. When the thenar muscles (mentioned earlier) are notably shrunken (atrophied) from prolonged pressure on the median nerve, full strength and normal sensation may not fully return even after having the surgery.
Hand Weakness
Muscles that are used to squeeze and grip may seem weak after surgery. During normal gripping, the tendons of the wrist press outward against the carpal ligament. This allows the carpal ligament to work like a pulley to improve grip strength. People used to think that the tendons lose this mechanical advantage after the carpal ligament has been released. However, recent studies indicate that hand weakness is more likely from pain or swelling that occurs in the early weeks after the procedure. With the exception of patients who have severe thenar atrophy at the time of surgery, most people achieve normal hand strength within two to four months of surgery. Those with severe atrophy commonly see improvements in hand strength, but they rarely regain normal size of the thenar muscles.
After Surgery
What happens immediately after surgery?
At first, take time during the day to support your healing arm with your hand elevated above the level of your heart. You may be instructed to put an ice pack on your wrist several times a day to keep swelling down. At various times during the day, move your thumb and fingers five to 10 times. Also, bend and straighten your elbow and lift and lower your shoulder occasionally to keep these joints limber. Keep the dressing on your hand until you return to the surgeon. Avoid getting the stitches wet. Your stitches will be removed 10 to 14 days after surgery.
Heavy gripping and pinching should be avoided for up to six weeks. These actions need to be avoided to keep the tendons from pushing out against the healing carpal ligament After six weeks, you should be safe to resume gripping and pinching without irritating the wrist.
It generally takes longer to recover after open carpal tunnel release. Pain and symptoms usually begin to improve, but you may have tenderness in the area of the incision for several months after surgery.
Patients who wait too long to seek medical advice sometimes have difficulty adjusting after surgery. Poor coping skills in the presence of persistent pain and numbness may result in disappointment or dissatisfaction with the results of surgery. Recovery may take longer than expected when nerve damage is severe. In some cases, symptoms are not entirely alleviated.
Rehabilitation
What should I expect after surgery?
Many surgeons prefer to have their patients attend occupational or physical therapy sessions after the stitches are removed. Patients are treated two to three times each week for four to six weeks. As mentioned, however, it may take several months for the incision pain to go away and for maximum hand strength to return.
At first, therapists attempt to reduce pain and swelling. Common treatments include hot or cold packs, electrical stimulation, and ultrasound. Massage strokes directed from the fingers toward the elbow help move swelling away from the hand and wrist.
Therapists use hands-on stretching and active hand and wrist exercises to encourage range of motion. You’ll be shown how to carefully strengthen your hand by squeezing and stretching special putty. You’ll likely be given home exercises to improve hand and finger movement and strength.
Treatments are used to reduce sensitivity in the incision. The methods are applied gently at first. One method is for the therapist to massage the incision for several minutes. Patients learn the massage technique so they can do it on their own five to six times each day. Another way to desensitize the incision is to grip materials of various textures or to rub them over the incision. These treatments are gradually done with more vigor as the sensitivity of the incision eases.
Another therapy goal is to prevent scar tissue formation. Therapists use scar massage to reduce scar tissue formation in the incision and in the nearby skin and soft tissues. To prevent scar tissue from forming between the flexor tendons and median nerve, therapists instruct their patients in a series of fist positions. These specialized exercises encourage the normal gliding action of the structures within the carpal tunnel.
As you progress, your therapist will also give you exercises to help strengthen and stabilize the muscles and joints in the hand. Other exercises are used to improve fine motor control and dexterity. Some of the exercises you’ll do are designed to get your hand working in ways that are similar to your work tasks and sport activities.
Your therapist will help you find ways to do your tasks that don’t put too much stress on your hand and wrist. Before your therapy sessions end, your therapist will teach you a number of ways to avoid future problems.
Mucous Cysts of the Fingers
A Patient’s Guide to Mucous Cysts of the Fingers
Introduction
Mucous cysts are small, fluid-filled sacs that form on the fingers. They are associated with osteoarthritis (OA) and usually develop in patients 50 to 70 years old. These cysts appear between the last joint of the finger and the bottom of the fingernail. Unless a mucous cyst is painful or in danger of rupturing, it can be left alone without causing harm to the patient. But even surgically removing a mucous cyst may not alleviate pain if the underlying cause of the pain is OA.
This guide will help you understand
- what part of the finger is involved
- how doctors diagnose the condition
- what can be done to treat a mucous cyst
Anatomy

What part of the finger is involved?
The bones of the fingers are called the phalanges. Each finger has three phalanges, separated by two interphalangeal joints (IP joints). The one closest to the knuckle is called the proximal IP joint (PIP joint). The joint near the end of the finger is called the distal IP joint (DIP joint).
Ligaments are tough bands of tissue that connect bones. Several ligaments hold each finger joint together. These ligaments join to form the joint capsule of the finger joint. The joint capsule is a watertight sac around the joint. The joint surfaces are covered with a material called articular cartilage. This material is slick and spongy, and it allows one side of a joint to slide against the other joint surface easily. When this material wears out, the joint develops osteoarthritis (OA).
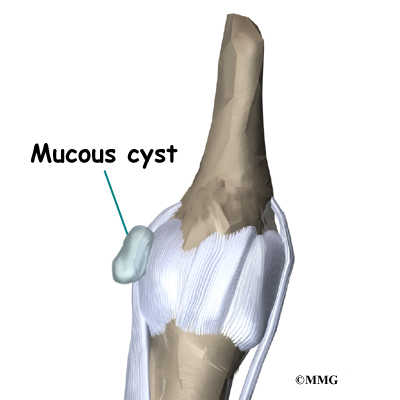
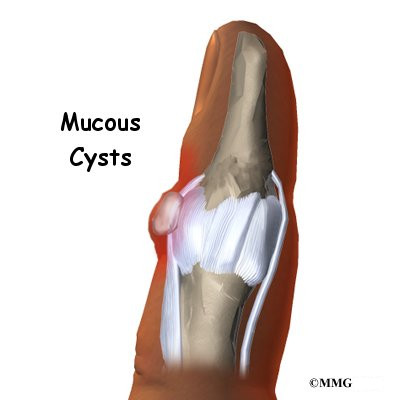
A mucous cyst is a type of ganglion, a small, harmless sac filled with a clear, sticky fluid. The fluid is a mix of chemicals normally found in the body. A mucous cyst is a ganglion of the DIP joint. The cyst is attached to the joint by a stalk of tissue. Typically only one cyst appears, though an occult (concealed) cyst may also be found closer to the joint.
Related Document: A Patient’s Guide to Hand Anatomy
Causes
Why do I have this problem?
Mucous cysts are typically found in patients with OA. Doctors do not know why mucous cysts develop.
Doctors also don’t understand exactly how these cysts form. One theory suggests that mucous cysts are formed when connective tissue degenerates (wears away). Collagen is a protein found in connective tissue. The leftover collagen is thought to collect in pools, and the pools form cysts. Fluid seems to move from the joint into the cyst, but not the other way.
Symptoms
What does a mucous cyst feel like?
A mucous cyst is typically visible just under the skin on the finger. It may be painful. You may notice a groove in the fingernail just above the cyst. The groove is a result of pressure from the cyst on the nailbed. The skin over the cyst may have thinned.
Diagnosis
How do doctors diagnose the condition?
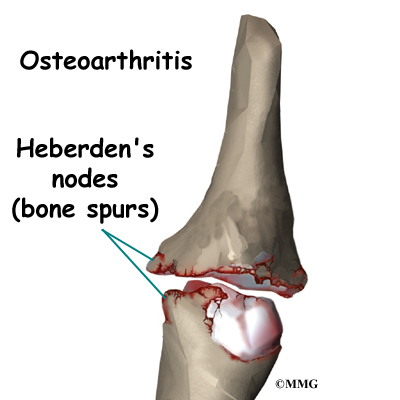
Your doctor will ask for a history of the problem and examine your fingers. Your doctor may also order an X-ray. An X-ray of the DIP joint may show degeneration related to OA, including bone spurs, joint space narrowing, and hardening of the subchondral bone, the layer of bone just below the articular cartilage in the joint. A patient may also have Heberden’s nodes. These are simply the bumps formed by bones spurs arising from the finger joint due to the OA.
Treatment
What can be done for the condition?
Treatment for mucous cysts may be either nonsurgical or surgical. The relative risks and benefits of any mucous cyst treatment should be considered carefully.
Nonsurgical Treatment
Observation is often sufficient treatment for mucous cysts. Mucous cysts are not typically harmful and usually do not grow worse without treatment.
However, sometimes a mucous cyst will rupture. When this occurs, it creates a path directly into the joint where bacteria could enter and cause a serious infection inside the joint. When this happens, antibiotics are applied directly to the site and the finger is wrapped in a dressing. Oral antibiotics are also prescribed. If the joint develops an infection despite these steps, surgery is required. During surgery, the area, including the DIP joint, is carefully cleaned, and a dressing is applied.
Surgery
Surgery is recommended if you feel significant pain or if the cyst and skin appear ready to rupture.
Needle puncture is one option. In this procedure, the cyst is punctured and aspirated. (Aspiration means drawing the fluid out with suction.) However, this procedure has less than a 50 percent success rate.
Another option involves excision (removal) of the cyst and its connection to the DIP joint. Patients should be aware that removing a mucous cyst may not eliminate pain if the pain is from the underlying OA.

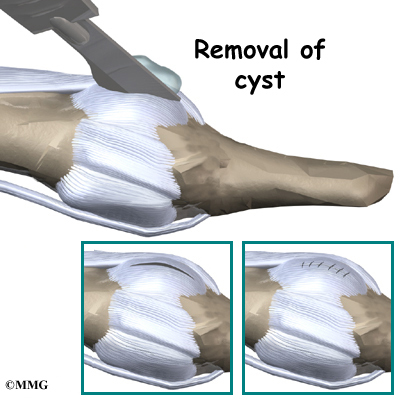
In this procedure, the cyst, stalk, and any bone spurs on the DIP joint are removed. If the skin on the finger is too closely attached to the cyst, a bit of the skin may need to be removed from the finger. If that’s the case, a small skin graft is added to the spot. Surgery can usually be performed using regional anesthesia, meaning only the arm or finger is numbed with lidocaine.
Complications may occur with both procedures. A slight risk of infection exists with both. Even after an excision surgery, a mucous cyst may reappear, though this is rare.
Rehabilitation
What should I expect with treatment?
Nonsurgical Rehabilitation
Your doctor may simply have you observe for any changes in the cyst. During this period of observation, let your doctor know of any significant increases or decreases in the size of the cyst.
After Surgery
If you have surgery to remove a mucous cyst and a skin graft is used, you will wear a cast or splint for two weeks. Otherwise, the fingers can be moved sooner. You will be shown specific exercises to help you regain full motion in the finger. Exercises should be continued until you can move the finger normally without pain.
Thumb Arthritis
A Patient’s Guide to Arthritis of the Thumb
Introduction
When you stop to think about how much you use your thumbs, it’s easy to see why the joint where the thumb attaches to the hand can suffer from wear and tear. This joint is designed to give the thumb its rather large range of motion, but the tradeoff is that the joint suffers a lot of stress over the years. This can lead to painful osteoarthritis of this joint, thumb arthritis, that may require surgical treatment as the arthritis progresses.
This guide will help you understand
- how arthritis of the thumb develops
- how it is diagnosed
- what can be done for the condition

Anatomy
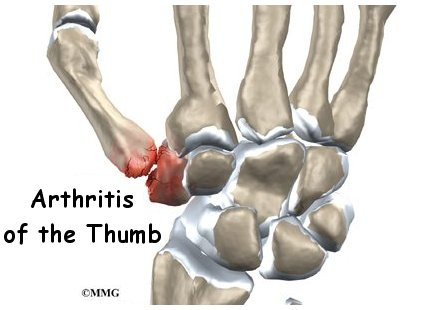
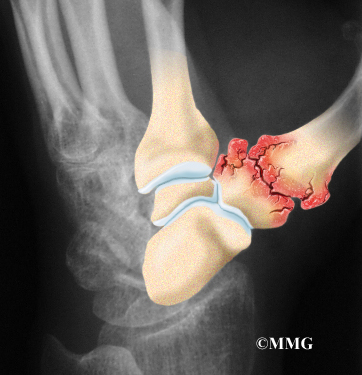
Where is the CMC joint, and what does it do?
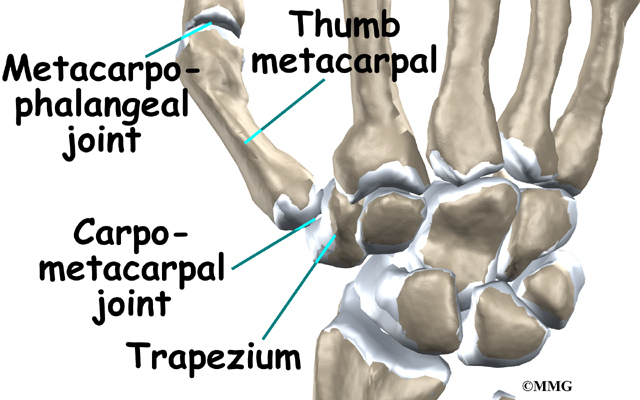
The CMC joint (an abbreviation for carpometacarpal joint) of the thumb is where the metacarpal bone of the thumb attaches to the trapezium bone of the wrist. This joint is sometimes referred to as the basal joint of the thumb. The CMC is the joint that allows you to move your thumb into your palm, a motion called opposition. The CMC joint is sometimes referred to as a universal joint because of the wide range of movements possible.
Several strong, thick ligaments hold the CMC joint together. The ligaments allow for motion but keep the joint from sliding too far and prevent thumb dislocation. This function is called ligamentous restraint. These ligaments can be injured, such as when you sprain your thumb. There are also nine muscles that provide dynamic stabilization of the CMC joint. These muscles coordinate together to create a balance of stability. They put the thumb in positions that allow optimal function for thumb-pinch activities.
Related Document: A Patient’s Guide to Hand Anatomy
Causes
What causes arthritis of the thumb?
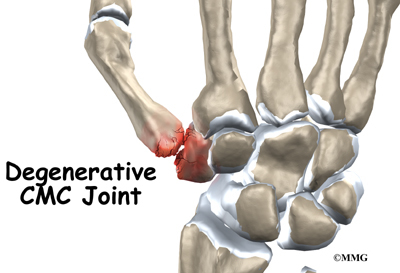
Arthritis is a condition in which a joint becomes inflamed (red, swollen, hot, and painful). Degenerative arthritis is a condition in which a joint wears out, usually slowly over a period of many years. Doctors sometimes also describe this same condition as degenerative arthrosis. It is also called osteoarthritis.
Injury to a joint, such as a bad sprain or fracture, can cause damage to the articular cartilage. An injury to the CMC joint of the thumb, even if it does not injure the articular cartilage directly, can alter how the joint works. After a fracture of the thumb metacarpal, the bone fragments may heal in slightly different positions. The joints may then line up differently. This is also true when the ligaments around the CMC joint are damaged by a sprain. When an injury results in a change in the way the joint moves, the injury may increase the forces on the articular cartilage surfaces. This is similar to any mechanical device or machinery. If the mechanism is out of balance, it tends to wear out faster.

Over many years this imbalance in the joint mechanics can lead to damage on the articular surface. Since articular cartilage cannot heal itself very well, the damage adds up. Eventually, the joint is no longer able to compensate for the increasing damage, and it begins to hurt. Damage has occurred well before the pain begins.
Women are three time more likely than men to develop arthritis of the CMC joint. There are several reasons for this. Women have higher amounts of certain hormones that are linked with joint laxity (looseness). There are also some anatomic differences in the joint surfaces between men and women. Increased joint motion from laxity combined with differences in the shape and surface of the bones add to the risk of CMC arthritis in women.
Adults with increased body mass index (BMI) are also at risk for CMC arthritis. There are two possible reasons for this relationship. First, increased mechanical loading seems to occur at the CMC joint in obese adults. This is true even though the thumb is not a weight-bearing joint. Over time, increased load translates into wear and tear on the joint.
Second, patients with a higher body mass index also have elevated levels of lipids (fats), hormones, and insulin-like growth factor around the joint. Local biochemical changes from these hormones may speed up joint degeneration.
Symptoms
What does arthritis of the thumb feel like?

Pain is the main problem with degenerative arthritis of any joint. This pain occurs at first only related to activity. Usually, once the activity gets underway there is not much pain, but after resting for several minutes the pain and stiffness increase. Later, when the condition worsens, pain and aching may be present even at rest. The most noticeable problem with CMC joint arthritis is that it becomes difficult to grip anything. It causes a sharp pain at the base of the thumb in the thick part of the heel of the hand.
When the articular cartilage starts to wear off the joint surface, the joint may make a squeaking sound when moved. Doctors refer to this sound as crepitus. The joint often becomes stiff and begins to lose motion. Moving the thumb away from the palm may become difficult. This is referred to as a contracture.
Osteoarthritis may cause the CMC joint of the thumb to loosen and to bend back too far (hyperextension). If the middle thumb joint (MCP joint) becomes flexed and the furthest thumb joint also becomes hyperextended, the deformity is named a thumb swan neck deformity. A similar finger deformity sometimes occurs in people with finger arthritis.
Related Document: A Patient’s Guide to Swan Neck Deformity of the Finger
Diagnosis
How do doctors identify this problem?
The diagnosis of CMC joint arthritis of the thumb begins with your doctor taking a detailed history of the problem. Specifics about any injuries that may have occurred to the hand are important because they may suggest other reasons why the condition exists.
Following the history, the doctor will examine your hand and possibly other joints in your body. The doctor will need to see how the motion of the CMC joint has been affected.
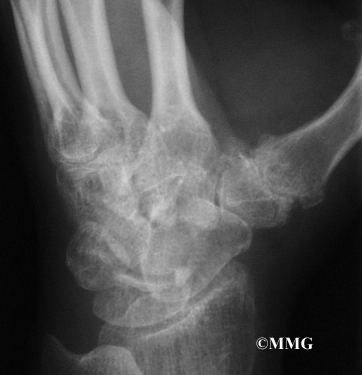
X-rays will be taken to see how much the joint is damaged. This test usually determines how bad the degenerative arthritis has become. How much articular cartilage remains in the joint can be estimated with the X-rays.
Using X-ray findings, the condition is classified as stage I, II, III, or IV, depending on the condition of the joint cartilage and the joint space. In Stage I, there are no obvious changes on X-ray. By stage IV, bone spurs, narrowed joint space, and even joint dislocation may be seen. Although X-rays are important, radiographic staging of the disease does not predict the severity of symptoms or guide treatment.
Treatment
What can be done for CMC joint arthritis?
The treatment of degenerative arthritis of the CMC joint of the thumb is based on the severity of symptoms. The goals of treatment are to relieve pain, decrease disability, and prevent deformity. Treatment can be divided into the nonsurgical means to control the symptoms and the surgical procedures that are available to treat the condition. Surgery is usually not considered until the symptoms have become impossible to control without it.
Nonsurgical Treatment
Treatment usually begins when the CMC joint first becomes painful. This may only occur with heavy use and may simply require mild anti-inflammatory medications, such as aspirin or ibuprofen. Reducing the activity, or changing from occupations that require heavy repetitive gripping with the hand, may be necessary to help control the symptoms.
Rehabilitation services, such as physical and occupational therapy, have a critical role in the nonoperative treatment plan for CMC joint arthritis. A primary goal is to help you learn how to control symptoms and maximize the health of your thumb. You’ll learn ways to calm pain and symptoms, which might include the use of rest, heat, or topical rubs. Adaptive devices to assist with household chores, self-care, or even on-the-job tasks may be recommended.
A brace or splint may also be prescribed to support the thumb. These devices are designed to help reduce pain, prevent deformity, or keep a thumb deformity from getting worse. A thumb stabilizer is a type of thumb splint that is often custom-made of heat-moldable plastic. It is designed to fit the forearm, wrist, and thumb. Patients with CMC joint arthritis usually only wear the splint at night and when the joint is flared up. It should also be worn to protect the thumb during heavy or repeated hand and thumb activities.
Range-of-motion and stretching exercises are prescribed to improve your thumb motion. Strengthening exercises for the arm and hand help steady the hand and protect the thumb joint from shock and stress. Strengthening improves joint stability and prevents deformity and/or dislocation. Your therapist will go over tips on how you can get your tasks done with less strain on the joint.
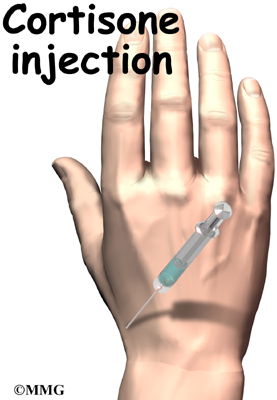
An injection of cortisone into the joint can give temporary relief. Cortisone is a very powerful anti-inflammatory medication. When injected into the joint itself, it can help relieve the pain. Pain relief is temporary and usually only lasts several weeks to months. There is a small risk of infection with any injection into the joint, and cortisone injections are no exception.
Studies do not support the use of cortisone injections alone. Although temporary pain relief is possible, there is no long-term improvement in hand function, joint stiffness, or tenderness. Steroid injection(s) combined with splinting has been shown more successful in patients during the early stages of CMC arthritis.
Surgery
The surgical treatment for arthritis of the CMC joint includes several options. At one time, joint replacement with an artificial joint made with silicone was very popular. Problems with silicone implants in other parts of the body have led many surgeons to return to more traditional operations such as fusion and excision arthroplasty instead.
Newer artificial joints are being developed, and in the future we may see more surgeons using them. The best method to reduce pain and provide optimal function still remains uncertain. Research is underway to provide surgeons with evidence-based practice guidelines.
CMC Joint Fusion
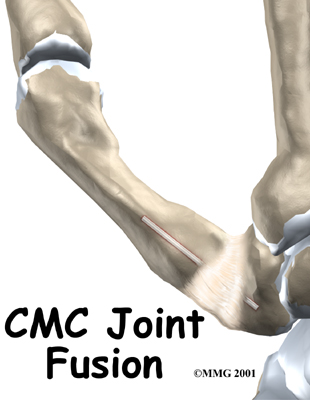
A fusion, or arthrodesis, of any joint is designed to eliminate pain by allowing the bones that make up the joint to grow together, or fuse, into one solid bone. Fusions are used in many joints and were very common before the invention of artificial joints for the replacement of arthritic joints. Even today, joint fusions are still commonly used in many different joints for treating the pain of arthritis.
A fusion of the CMC joint of the thumb is done quite often in younger people who need a strong grip or pinch more than they need the fine motion of the thumb. People who use their hands for heavy work will probably prefer a fusion to an arthroplasty (described below).
Related Document: A Patient’s Guide to Thumb Fusion Surgery
Artificial Joint Replacement (Arthroplasty)
Artificial joints are available for the CMC joint. These plastic or metal prostheses are used by some hand surgeons to replace the joint. The prosthesis acts as a spacer to fill the gap created when the arthritic surfaces of the two bones that make up the CMC joint are removed.
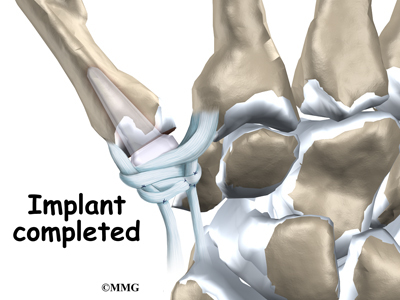
Long-term results using silicone and Zirconia implants have not been widely successful. Early wear (after two years) has been reported as a result of the shear and compressive forces across the implant. In some cases, the implant sinks down into the bone causing increased pain and weakness. Titanium implants have reportedly excellent results but not all studies have had equally good outcomes. More research is needed to reduce complications and extend the life of the implant.
Related Document: A Patient’s Guide to Artificial Joint Replacement of the Thumb
Resection (also called Excision) Arthroplasty
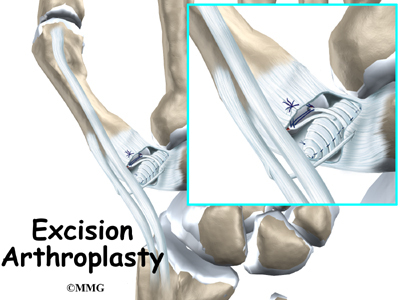
The traditional operation for treating CMC joint arthritis is resection (excision) arthroplasty. This method has been used for many years and has withstood the test of time. Patients with severe symptoms in stage III or IV CMC arthritis who have failed nonsurgical treatment are good candidates for resection arthroplasty.
The purpose of resection arthroplasty is to remove the arthritic joint surfaces of the CMC joint and replace them with a cushion of material that will keep the bones separated. The trapezium bone is removed in a procedure called a trapeziectomy.
A rolled up piece of tendon is placed into the space created by removing the bone. This procedure is called a resection arthroplasty with ligament reconstruction and tendon interposition (LRTI). During the healing phase after surgery, this tendon turns into tough scar tissue that forms a flexible connection between the bones, similar to a joint. Sometimes the surgeon uses a silicone-based or metal implant or disc made of costochondral tissue instead of a rolled up tendon for the interpositional material. Costochondral allografts are plugs of tissue taken from the material between the breastbone and the ribs.
Resection arthroplasty with or without LRTI can be combined with a ligament reconstruction of the joint. Tendons in the area are used to create a ligament sling between the metacarpal bone of the thumb and the carpal bone of the index finger. This helps hold the thumb in place and keeps the space between the bones from collapsing.
Your surgeon decides whether to perform resection arthroplasty with or without tendon interposition and/or ligament reconstruction. Studies so far have not shown a biomechanical or clinical advantage to interposition. If there’s no evidence that this procedure improves pain, reduces stiffness, or increases pinch or grip strength, then it may fall out of favor. Surgeons will look for something more effective to achieve the intended treatment goals.
Related Document: A Patient’s Guide to Resection (Excision) Arthroplasty of the Thumb
There can be complications with any surgical procedure. Infection, nerve injury, or continued pain can occur after surgery for CMC arthritis. When tendons are used as graft material for ligament reconstruction, problems can occur such as tendon rupture or tethering. Tethering means the tendon develops scarring or adhesions that bind it and keep it from gliding smoothly inside its sheath or outer covering.
With joint implants, there can be an inflammatory reaction, subsidence (the implant sinks down into the bone), dislocation, or other cystic changes.
Rehabilitation
What should I expect following treatment?
Nonsurgical Rehabilitation
If you don’t need surgery, range-of-motion exercises for the thumb should be started as pain eases. Your therapist will work with you to obtain or create a special thumb splint (mentioned earlier) when needed. The program advances to include strength exercises for the thumb and fingers. Dexterity and fine motor exercises are used to get your hand and thumb moving smoothly. You’ll be given tips on keeping your symptoms controlled. You will probably progress to a home program within four to six weeks.
After Surgery
Your postoperative recovery and rehab program may depend on the type of surgery you had. For example, arthroscopy is much less invasive than open surgery and requires less time to recover. Your hand will be bandaged with a well-padded dressing and a thumb splint for support after arthroscopic, joint replacement, or ligament reconstructive surgery.
With fusion, there’s a high risk of nonunion so a cast is used to immobilize the joint for as much as three months. Often the thumb is fused in a functional position. The preferred position is a thumb key pinch. This means you can use the thumb to pinch and hold objects, but you won’t be able to open your hand flat. Getting your hand into a pocket will be more difficult, especially a pocket in tight pants.
Physical or occupational therapy sessions may be needed after surgery for up to eight weeks. The first few treatments are used to help control the pain and swelling after surgery. Some of the exercises you’ll begin to do are to help strengthen and stabilize the muscles around the thumb joint.
Other exercises are used to improve fine motor control and dexterity of your hand. You’ll be given tips on ways to do your activities while avoiding extra strain on the thumb joint.
Carpal Tunnel Syndrome
A Patient’s Guide to Carpal Tunnel Syndrome
Introduction
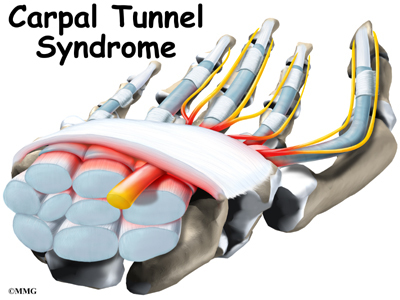
Carpal tunnel syndrome (CTS) is a common problem affecting the hand and wrist. Symptoms begin when the median nerve gets squeezed inside the carpal tunnel of the wrist, a medical condition known as nerve entrapment or compressive neuropathy. Any condition that decreases the size of the carpal tunnel or enlarges the tissues inside the tunnel can produce the symptoms of CTS.
This syndrome has received a lot of attention in recent years because of suggestions that it may be linked with occupations that require repeated use of the hands, such as typing on a computer keyboard or doing assembly work. Actually, many people develop this condition regardless of the type of work they do.
This guide will help you understand
- where the carpal tunnel is located
- how CTS develops
- what can be done for the condition
Anatomy

Where is the carpal tunnel, and what does it do?
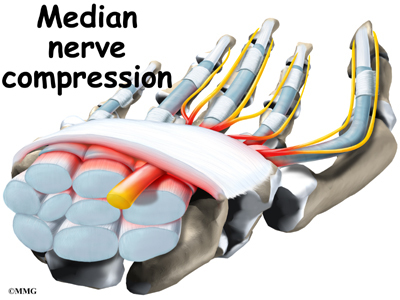
The carpal tunnel is an opening through the wrist to the hand that is formed by the bones of the wrist on one side and the transverse carpal ligament on the other. (Ligaments connect bones together.) This opening forms the carpal tunnel.
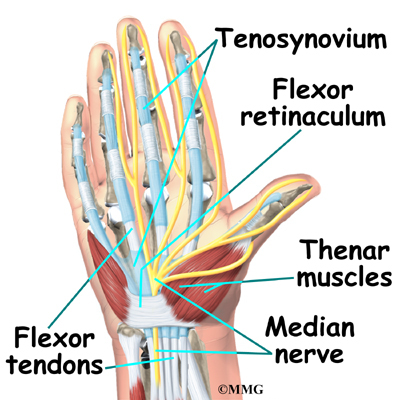
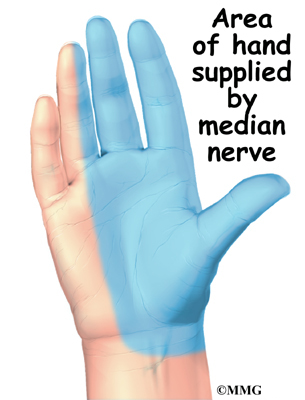
The median nerve passes through the carpal tunnel into the hand. It gives sensation to the thumb, index finger, long finger, and half of the ring finger. It also sends a nerve branch to control the thenar muscles of the thumb. The thenar muscles help move the thumb and let you touch the pad of the thumb to the tips of each finger on the same hand, a motion called opposition.
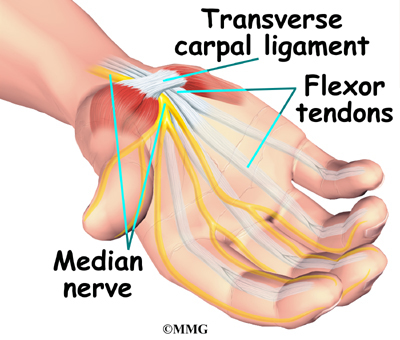
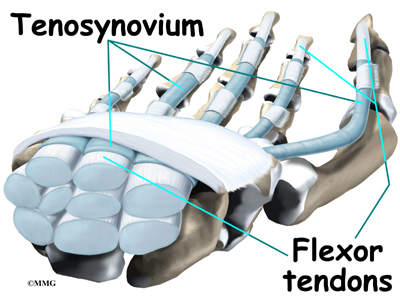
The median nerve and flexor tendons pass through the carpal tunnel. The median nerve rests on top of the tendons, just below the transverse carpal ligament. The flexor tendons are important because they allow movement of the fingers, thumb, and hand, such as when grasping. The tendons are covered by a material called tenosynovium. The tenosynovium is a slippery covering that allows the tendons to glide next to each other as they contract and relax to move the hand and fingers.
Related Document: A Patient’s Guide to Hand Anatomy
Causes
What causes CTS?
Any condition that makes the area inside the carpal tunnel smaller or increases the size of the tissues within the tunnel can lead to symptoms of CTS. The carpal tunnel cannot expand so any condition that causes abnormal pressure in the tunnel can produce symptoms of CTS. And any increase in pressure within the carpal tunnel can reduce blood flow to the nerve, leading to loss of nerve function.
Various types of arthritis can cause swelling and pressure in the carpal tunnel. The way people do their tasks can put them at risk for problems of CTS. Some of these risks include
- force
- posture
- wrist alignment
- repetition
- temperature
- vibration
One of these risks alone may not cause a problem. But doing a task that involves several factors may pose a greater risk. And the longer a person is exposed to one or more risks, the greater the possibility of having a problem with CTS. However, scientists believe that other factors such as smoking, obesity, and caffeine intake may actually be more important in determining whether a person is more likely to develop CTS.
In other instances, CTS can start when the tenosynovium thickens from irritation or inflammation. This thickening causes pressure to build inside the carpal tunnel. But the tunnel can’t stretch any larger in response to the added swelling, so the median nerve starts to squeeze against the transverse carpal ligament. If the pressure continues to build up, the nerve is eventually unable to function normally.
When pressure builds on the median nerve, the blood supply to the outer covering of the nerve slows down and may even be cut off. The medical term for this is ischemia. At first, only the outside covering of the nerve is affected. But if the pressure keeps building up, the inside of the nerve will start to become thickened. New cells (called fibroblasts) form within the nerve and create scar tissue. This is thought to produce the feelings of pain and numbness in the hand. If pressure is taken off right away, the symptoms will go away quickly. Pressure that isn’t eased right away can slow or even stop the chances for recovery.
Trauma such as a wrist fracture, fracture/dislocation, infection, burns or other thermal injuries, bleeding disorders, and high-pressure injection injuries can result in a condition called i>acute carpal tunnel syndrome. This is much less common than the chronic compressive neuropathy caused by any of the risk factors described in this document.
A traumatic wrist injury may cause swelling and extra pressure within the carpal tunnel. The area inside the tunnel can also be reduced after a wrist fracture or dislocation if the bone pushes into the tunnel. Fractured wrist bones may later cause CTS if the healed fragments result in abnormal irritation on the flexor tendons.
Other conditions in the body can produce symptoms of CTS. Pregnancy can cause fluid to be retained, leading to extra pressure in the carpal tunnel. Diabetics may report symptoms of CTS, which may be from a problem in the nerve (called neuropathy) or from actual pressure on the median nerve. People with low thyroid function (called hypothyroidism) are more prone to problems of CTS. Tumors or cysts in the wrist, on the tendons, or in the carpal tunnel can also cause CTS.
Symptoms
What does CTS feel like?
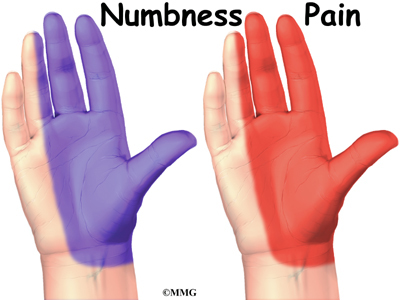
One of the first symptoms of CTS is gradual tingling and numbness in the areas supplied by the median nerve. This is typically followed by dull, vague pain where the nerve gives sensation in the hand. The hand may begin to feel like it’s asleep, especially in the early morning hours after a night’s rest.
In the case of acute CTS, symptoms are sudden and severe, occurring over a matter of hours rather than weeks or months with the more chronic form of this condition.
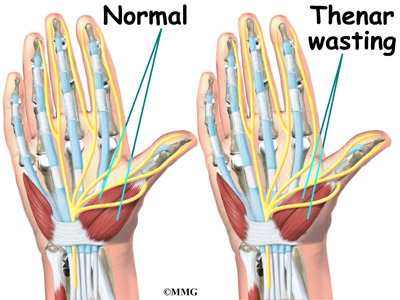
Whether acute or chronic, pain associated with carpal tunnel syndrome may even spread up the arm to the shoulder. If the condition progresses, the thenar muscles of the thumb can weaken, causing the hand to be clumsy when picking up a glass or cup. If the pressure keeps building in the carpal tunnel, the thenar muscles may begin to atrophy (shrink).
Touching the pad of the thumb to the tips of the other fingers becomes difficult, making it hard to grasp items such as a steering wheel, newspaper, or telephone.
Diagnosis
How do doctors identify the condition?
Your doctor begins the evaluation by obtaining a history of the problem, followed by a thorough physical examination. Your description of the symptoms and the physical examination are the most important parts in the diagnosis of CTS. Commonly, patients will complain first of waking in the middle of the night with pain and a feeling that the whole hand is asleep.

Careful investigation usually shows that the little finger is unaffected. This can be a key piece of information to make the diagnosis. If you awaken with your hand asleep, pinch your little finger to see if it is numb also, and be sure to tell your doctor if it is or isn’t. Other complaints include numbness while using the hand for gripping activities, such as sweeping, hammering, or driving.
If your symptoms started after a traumatic wrist injury, X-rays may be needed to check for a fractured bone or a fracture with dislocation.
If more information is needed to make the diagnosis, electrical studies of the nerves in the wrist may be requested by your doctor. Several tests are available to see how well the median nerve is functioning, including the nerve conduction velocity (NCV) test. This test measures how fast nerve impulses move through the nerve.
Treatment
What can be done for CTS?
The American Academy of Orthopaedic Surgeons has published guidelines on the treatment of carpal tunnel syndrome. These guidelines reflect current research evidence and are included in this document. For the complete online version of the guidelines, see www.aaos.org/guidelines.
Nonsurgical Treatment
Activities that are causing your symptoms need to be changed or stopped if at all possible. Avoid repetitive hand motions, heavy grasping, holding onto vibrating tools, and positioning or working with your wrist bent down and out. If you smoke, talk to your doctor about ways to help you quit. Lose weight if you are overweight. Reduce your caffeine intake.

A wrist brace will sometimes decrease the symptoms in the early stages of CTS. A brace keeps the wrist in a resting position, not bent back or bent down too far. When the wrist is in this position, the carpal tunnel is as big as it can be, so the nerve has as much room as possible inside the carpal tunnel. A brace can be especially helpful for easing the numbness and pain felt at night because it can keep your hand from curling under as you sleep. The wrist brace can also be worn during the day to calm symptoms and rest the tissues in the carpal tunnel.
Anti-inflammatory medications may also help control the swelling and reduce symptoms of CTS. These include common over-the-counter medications such as ibuprofen and aspirin. Oral steroid medication may also offer some relief. In some studies, high doses of vitamin B-6 have been shown to help in decreasing CTS symptoms. Some types of exercises have also shown to help prevent or at least control the symptoms of CTS.
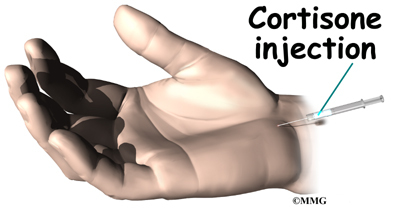
If these simple measures fail to control your symptoms, an injection of cortisone into the carpal tunnel may be suggested. This medication is used to reduce the swelling in the tunnel and may give temporary relief of symptoms.
A cortisone injection may help ease symptoms and can aid your doctor in making a diagnosis. If you don’t get even temporary relief from the injection, it could indicate that some other problem is causing your symptoms. When your symptoms do go away after the injection, it’s likely they are coming from a problem within the carpal tunnel. Some doctors feel this is a signal that a surgical release of the transverse carpal ligament would have a positive result.
Your doctor may suggest that you work with a physical or occupational therapist. The main focus of treatment is to reduce or eliminate the cause of pressure in the carpal tunnel. Your therapist may check your workstation and the way you do your work tasks. Suggestions may be given about the use of healthy body alignment and wrist positions, helpful exercises, and tips on how to prevent future problems. You might also receive treatments to reduce inflammation and to encourage normal gliding of the tendons and median nerve within the carpal tunnel.
Surgery
If all attempts to control your symptoms fail, surgery may be suggested to reduce the pressure on the median nerve. Surgery may not be advised if there is advanced nerve damage. Persistent pain and numbness may not go away with surgery. If you have muscle atrophy and weakness and/or loss of sensation, you may not be a good candidate for surgery.
And surgery may not be advised if electrodiagnostic studies show normal results. In such cases, patients seeking pain relief will be advised to continue with conservative (nonoperative) care.
In the case of acute CTS, surgery is required right away to decompress the nerve and save it from permanent damage. This is called nerve-sparing decompression. If a patient experiences a traumatic wrist or hand injury with worsening symptoms and increasing loss of hand function, carpal tunnel release is required.
When surgery is needed, several different surgical procedures have been designed to relieve pressure on the median nerve. By releasing the pressure on the nerve, the blood supply to the nerve improves, and most people get relief of their symptoms. However, if the nerve pressure has been going on a long time, the median nerve may have thickened and scarred to the point that recovery after surgery is much slower.
Open Release
The standard surgery for CTS is called open release. Open surgical procedures use a small skin incision. In open release for CTS, an incision as small as one inch can be made down the front of the wrist and palm. By creating an open incision, the surgeon is able to see the wrist structures and to carefully do the operation. The surgeon cuts the transverse carpal ligament in order to take pressure off the median nerve.


After dividing the transverse carpal ligament, the surgeon stitches just the skin together and leaves the loose ends of the transverse carpal ligament separated. The loose ends are left apart to keep pressure off the median nerve. Eventually, the gap between the two ends of the ligament fills in with scar tissue.
Related Document: A Patient’s Guide to Open Carpal Tunnel Release
Endoscopic Release
Some surgeons are using a newer procedure called endoscopic carpal tunnel release. The surgeon merely nicks the skin in order to make one or two small openings for inserting the endoscope. An endoscope is a thin, fiber-optic TV camera that allows the surgeon to see inside the carpal tunnel as the transverse carpal ligament is carefully released.

Upon inserting the endoscope, the surgeon can see the wrist structures on a TV screen. A special knife is used to cut only the transverse carpal ligament. The palmar fascia and the skin over the wrist are not disturbed.
As in open release, the loose ends of the transverse carpal ligament are left apart after endoscopic release to keep pressure off the median nerve. The gap eventually fills in with scar tissue.
Related Document: A Patient’s Guide to Endoscopic Carpal Tunnel Release
Rehabilitation
What should I expect after treatment?
Nonsurgical Rehabilitation
If nonsurgical treatment is successful, you may see improvement in four to six weeks. You may need to continue wearing your wrist splint at night to control symptoms and keep your wrist from curling under as you sleep. Try to do your activities using healthy body and wrist alignment. Limit activities that require repeated motions, heavy grasping, and vibration in the hand.
After Surgery
It generally takes longer to recover after open carpal tunnel release. Pain and symptoms usually begin to improve, but you may have tenderness in the area of the incision for several months after surgery.
Patients who wait too long to seek medical advice sometimes have difficulty adjusting after surgery. Poor coping skills in the presence of persistent pain and numbness may result in disappointment or dissatisfaction with the results of surgery. Recovery may take longer than expected when nerve damage is severe. In some cases, symptoms are not entirely alleviated.
When the stitches are removed, your surgeon may have you work with a physical or occupational therapist for six to eight weeks. Treatments are used at first to ease pain and inflammation. Gentle massage to the incision can help reduce sensitivity in and around the incision and limit scar tissue from building up. Special exercises are used to encourage normal gliding of the tendons and median nerve within the carpal tunnel.
As you progress, your therapist will give you exercises to help strengthen and stabilize the muscles and joints in the hand, wrist, and arm. Other exercises are used to improve fine motor control and dexterity of the hand. Your therapist will work with you to help you do your daily and work activities safely and with the least amount of strain on your wrist and hand.
Mallet Finger Injuries
A Patient’s Guide to Mallet Finger Injuries
Introduction
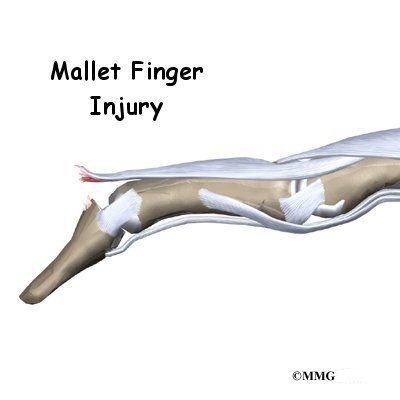
When you think about how much we use our hands, it’s not hard to understand why injuries to the fingers are common. Most of these injuries heal without significant problems, however some do not. One such injury is an injury to the distal interphalangeal, or DIP, joint of the finger. This joint is commonly injured during sporting activities such as baseball. If the tip of the finger is struck with the ball, the tendon that attaches to the small bone underneath can be injured. Untreated, this can cause the end of the finger to fail to straighten completely, a condition called mallet finger.
This guide will help you understand
- what parts make up the DIP finger joint
- what types of injuries affect this joint
- how the injury is treated
- what to expect from treatment
Anatomy

What parts of the finger are involved?
The finger joints work like hinges when the fingers bend and straighten. The main knuckle joint is the metacarpophalangeal joint (MCP joint). It is formed by the connection of the metacarpal bone in the palm of the hand with the first finger bone, or proximal phalanx. Each finger has three phalanges, or small bones, separated by two interphalangeal joints (IP joints). The one closest to the MCP joint (knuckle) is called the proximal IP joint (PIP joint). The joint near the end of the finger is called the distal IP joint (DIP joint).
The extensor tendon is attached to the base of the distal phalanx. When it tightens, the DIP joint straightens. Another tendon, the flexor tendon, is attached to the palm of the finger. When it pulls, the DIP joint bends.
Related Document: A Patient’s Guide to Hand Anatomy
Causes
How do these injuries of the DIP joint occur?
A mallet finger results when the extensor tendon is cut or torn from the attachment on the bone. Sometimes, a small fragment of bone may be pulled, or avulsed, from the distal phalanx. The result is the same in both cases: the end of the finger droops down and cannot be straightened.
Symptoms

What do mallet finger injuries look and feel like?
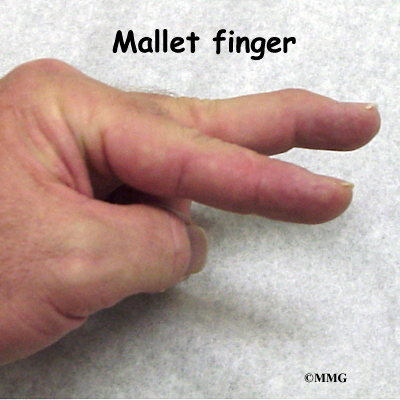
Initially, the finger is painful and swollen around the DIP joint. The end of the finger is bent and cannot be straightened voluntarily. The DIP joint can be straightened easily with help from the other hand. If the DIP joint gets stuck in a bent position and the PIP joint (middle knuckle) extends, the finger may develop a deformity that is shaped like a swan’s neck. This is called a swan neck deformity.
Related Document: A Patient’s Guide to Swan Neck Deformity of the Finger
Diagnosis
What tests will my doctor do?
Usually the diagnosis is evident from the physical examination. X-rays are required to see if there is an associated avulsion fracture since this may change the recommended treatment. No other tests are normally required.
Treatment
What can be done for the problem?
Nonsurgical Treatment

Treatment for mallet finger is usually nonsurgical. If there is no fracture, then the assumption is that the end of the tendon has been ruptured, allowing the end of the finger to droop. Usually continuous splinting for six weeks followed by six weeks of nighttime splinting will result in satisfactory healing and allow the finger to extend.
The key is continuous splinting for the first six weeks. The splint holds the DIP joint in full extension and allows the ends of the tendon to move as close together as possible. As healing occurs, scar formation repairs the tendon. If the splint is removed and the finger is allowed to bend, the process is disrupted and must start all over again. The splint must remain on at all times, even in the shower.

While a simple homemade splint will work, there are many splints that have been designed to make it easier to wear at all times. In some extreme cases where the patient has to use the hands to continue working (such as a surgeon), a metal pin can be placed inside the bone across the DIP joint to act as an internal splint and allow the patient to continue to use the hand. The pin is removed at six weeks.
Splinting may even work when the injury is quite old. Most doctors will splint the finger for eight to 12 weeks to see if the drooping lessens to a tolerable amount before considering surgery.
Surgery
DIP Fixation
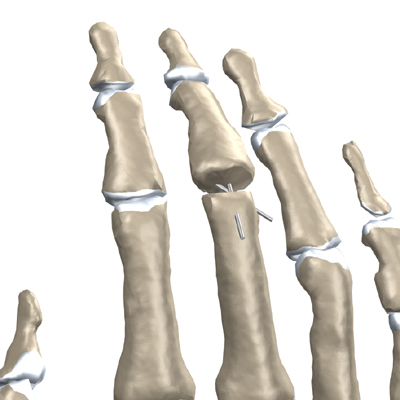
Surgical treatment is reserved for unique cases. The first is when the result of nonsurgical treatment is intolerable. If the finger droops too much, the tip of the finger gets caught as you try to put your hand in a pocket. This can be quite a nuisance. If this occurs, the tendon can be repaired surgically, or the joint can be fixed in place. A surgical pin acts like an internal cast to keep the DIP joint from moving so the tendon can heal. The pin is removed after six to eight weeks.
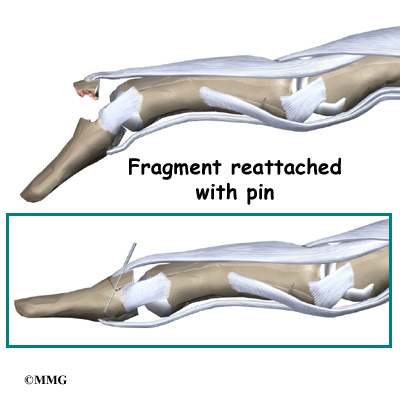
Fracture Pinning
The other case is when there is a fracture associated with the mallet finger. If the fracture involves enough of the joint, it may need to be repaired. This may require pinning the fracture. If the damage is too severe, it may require fusing the joint in a fixed position.
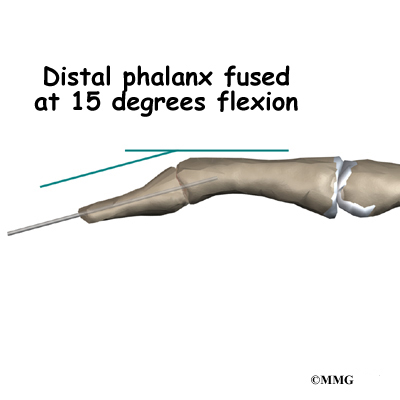
Finger Joint Fusion

If the damage cannot be repaired using pin fixation, finger joint fusion may be needed. Joint fusion is a procedure that binds the two joint surfaces of the finger together, keeping them from rubbing on one another. Fusing the two joint surfaces together eases pain, makes the joint stable, and prevents additional joint deformity.
Related Document: A Patient’s Guide to Finger Fusion Surgery
Rehabilitation
What will my recovery be like?
Nonsurgical Rehabilitation
When the injury is new, the DIP joint is splinted nonstop in full extension for six to eight weeks. A mallet finger that is up to three months old may require splinting in full extension for eight to 12 weeks. The splint is then worn for shorter periods that include nighttime splinting for six more weeks. Skin problems are common with prolonged splinting. Patients should monitor the skin under their splint to avoid skin breakdown. If problems arise, a new or different splint may be needed. Nearby joints may be stiff after keeping the finger splinted for this length of time. Therapy and exercise may be needed to assist in finger range of motion and to reduce joint stiffness.
After Surgery
Rehabilitation after surgery for mallet finger focuses mainly on keeping the other joints mobile and preventing stiffness from disuse. A physical or occupational therapist may be consulted to teach you home exercises and to make sure the other joints do not become stiff. After the surgical pin has been removed, exercises may be instituted gradually to strengthen the finger and increase flexibility.
PIP Joint Injuries of the Finger
A Patient’s Guide to PIP Joint Injuries of the Finger
Introduction

We use our hands constantly, placing them in harm’s way continuously. Injuries to the finger joints are common and usually heal without significant problems. Some injuries are more serious and may develop problems if not treated carefully. One such injury is a sprain of the proximal interphalangeal joint, or PIP joint, of the finger. This joint is one of the most unforgiving joints in the body to injury. What appears at first to be a simple sprain of the PIP joint may result in a painful and stiff finger, making it difficult to use the hand for gripping activities.
This guide will help you understand
- what parts make up the PIP finger joint
- what types of injuries affect this joint
- how the injury is treated
- what to expect from treatment
Anatomy

What parts of the finger are involved?
The finger joints work like hinges when the fingers bend and straighten. The main knuckle joint is the metacarpophalangeal joint (MCP joint). It is formed by the connection of the metacarpal bone in the palm of the hand with the finger bone, or phalange. Each finger has three phalanges, separated by two interphalangeal joints (IP joints). The one closest to the MCP joint (knuckle) is called the proximal IP joint (PIP joint). The joint near the end of the finger is called the distal IP joint (DIP joint).
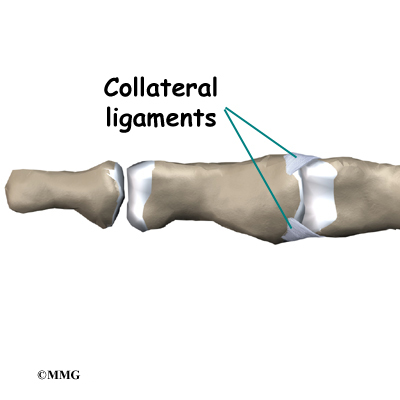
Ligaments are tough bands of tissue that connect bones together. Several ligaments hold the joints together. In the PIP joint, the strongest ligament is the volar plate. This ligament connects the proximal phalanx to the middle phalanx on the palm side of the joint. The ligament tightens as the joint is straightened and keeps the joint from hyperextending. There is also a collateral ligament on each side of the PIP joint. The collateral ligaments tighten when the joint is bent sideways and keep the joint stable from side to side.

Related Document: A Patient’s Guide to Hand Anatomy
Causes
How do these injuries of the PIP joint occur?
A sprain is a general term that means a ligament is injured. Doctors usually use this term to mean that the ligament has been stretched and partially torn. If the ligament is stretched too far, it ruptures or tears completely.
Injury to the volar plate can occur when the joint is hyperextended. If a complete tear occurs, the ligament usually ruptures or tears from its attachment on the middle phalanx. There may be a small piece of bone avulsed (pulled away) from the middle phalanx when this occurs. If it is small it is usually of no consequence, but if it is large and involves a significant amount of the joint surface it may require surgery to fix the fragment and restore the joint surface.
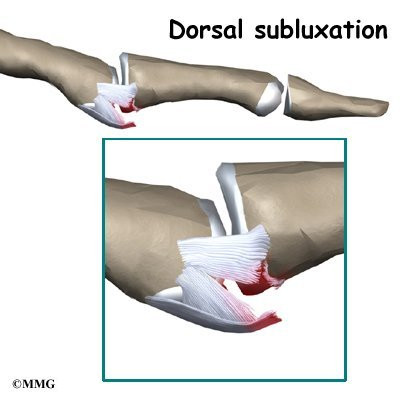
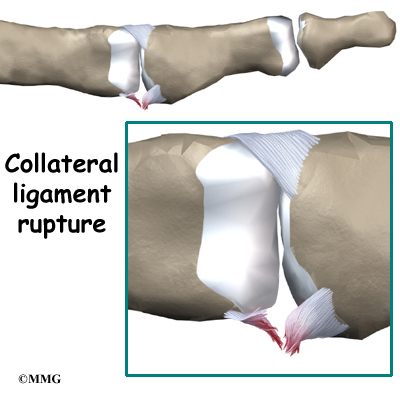
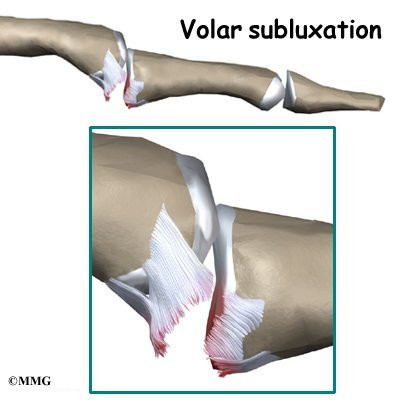
Injury to the collateral ligaments can occur when the joint is forced to bend too far sideways until one of the collateral ligaments ruptures. These ligaments can also be injured if the PIP joint is actually dislocated, with the middle phalanx dislocating behind the proximal phalanx.
Symptoms
What do PIP joint injuries look and feel like?
Initially, the finger is painful and swollen around the PIP joint. If the joint has completely dislocated it will appear deformed.
Diagnosis
What tests will my doctor do?
Usually the diagnosis is evident just from the physical examination. X-rays are required to see if there is an associated avulsion fracture since this may change the recommended treatment. X-rays are also useful to see if the joint is aligned properly after an injury or after the reduction of a dislocation. No other tests are required normally.
Treatment
How will my PIP joint injury be treated?
Nonsurgical Treatment
When the ligaments have been sprained or partially torn, treatment may simply consist of a short period of splinting and early exercise. The PIP joint is very sensitive to injury and becomes stiff very rapidly when immobilized for even short periods of time. The faster the joint begins to move the less likely there will be a problem with stiffness later on. Many sprains can be treated with simple buddy taping to the adjacent finger. This allows the good finger to brace to the injured finger while at the same time using the good finger to bend the injured finger as the hand is used.
When the volar plate has been completely ruptured or when the joint has been dislocated, nonsurgical treatment is still usually suggested. The goal is to keep the joint in a stable position while beginning motion as soon as possible. Since the injury results from hyperextension, a brace to prevent the joint from straightening completely while still allowing the joint to bend accomplishes both of these goals. This brace is called a dorsal blocking splint. The brace is usually worn for three to four weeks until the ligament heals enough to stabilize the joint.
In some cases when the volar plate ruptures, it may get caught in the joint and prevent the doctor from reducing (realigning) the joint without surgery.
Surgery
In severe cases, surgery is necessary to repair extensive damage to the collateral ligaments or volar plate. Surgery is also necessary to remove the volar plate if it becomes trapped in the joint and prevents the surgeon from realigning the joint without surgery.
Rehabilitation
What will my recovery be like?
Nonsurgical Rehabilitation
If nonsurgical treatment is successful, you may see improvement in three to six weeks. By wearing a dorsal blocking splint, the joint continues to bend freely but is kept from straightening completely.
After three to four weeks, the joint should heal enough to remove the splint and begin strengthening exercises. These exercises may be directed by a physical or occupational therapist.
Injuries to the PIP joint remain swollen for long periods of time. Commonly, the joint will be permanently enlarged due to the scarring of the healing process. This may cause problems with getting rings on and off. It is a good idea to wait for about one year before the ring is resized since the scarring will continue to remodel. The joint will gradually get smaller and in some cases may return to its original size.
After Surgery
You’ll wear a splint or brace for three weeks after surgery to give the repair time to heal. Patients may be seen for physical or occupational therapy afterward. You will likely need to attend therapy sessions for two to three months, and you should expect full recovery to take up to four months.
The first few therapy treatments will focus on controlling the pain and swelling from surgery. Then you’ll begin gentle range-of-motion exercise. Strengthening exercises are used to give added stability around the finger joint. You’ll learn ways to grip and support items in order to do your tasks safely and with the least amount of stress on your finger joint. As with any surgery, you need to avoid doing too much, too quickly.
Eventually, you’ll begin doing exercises designed to get your hand and fingers working in ways that are similar to your work tasks and daily activities. Your therapist will help you find ways to do your tasks that don’t put too much stress on your finger joint. Before your therapy sessions end, your therapist will teach you a number of ways to avoid future problems.
Your therapist’s goal is to help you keep your pain under control, improve your strength and range of motion, and regain fine motor abilities with your hand and finger. When your are well under way, regular visits to your therapist’s office will end. Your therapist will continue to be a resource, but you will be in charge of doing your exercises as part of an ongoing home program.
Finger Fusion Surgery
A Patient’s Guide to Finger Fusion Surgery
Introduction
Arthritis of the finger joints may be surgically treated with a fusion procedure. Fusion keeps the problem joints from moving so that pain is eliminated.
This guide will help you understand
- what parts make up the finger joint
- why this type of surgery is used
- how the operation is performed
- what to expect before and after surgery
Anatomy

What parts of the finger are involved?
The finger joints work like hinges when the fingers bend and straighten. The main knuckle joint is the metacarpophalangeal joint (MCP joint). It is formed by the connection of the metacarpal bone in the palm of the hand with the finger bone, or phalange. Each finger has three phalanges, separated by two interphalangeal joints (IP joints).
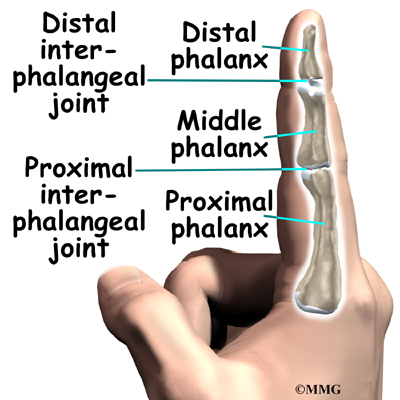
The one closest to the MCP joint (knuckle) is called the proximal IP joint (PIP joint). The joint near the end of the finger is called the distal IP joint (DIP joint).
Ligaments are tough bands of tissue that connect bones together. Several ligaments hold the joints together in the finger. These ligaments join to form the joint capsule of the finger joint, a watertight sac around the joint.

The joint surfaces are covered with a material called articular cartilage. This material is the slick, spongy covering that allows one side of a joint to slide against the other joint surface easily. When this material wears out, the joint develops a type of arthritis called osteoarthritis and becomes painful.
Related Document: A Patient’s Guide to Hand Anatomy
Rationale
What does the surgeon hope to achieve?
Arthritic finger joints cause pain and make it difficult to perform normal movements, such as grasping and pinching. Advanced arthritis can also loosen the joint and may begin to cause finger joint deformity. Joint fusion is a procedure that binds the two joint surfaces of the finger together, keeping them from rubbing on one another. Fusing the two joint surfaces together eases pain, makes the joint stable, and prevents additional joint deformity.
Preparation
What should I do to prepare for surgery?
The decision to proceed with surgery must be made jointly by you and your surgeon. You need to understand as much about the procedure as possible. If you have concerns or questions, you should talk to your surgeon.
Once you decide on surgery, you need to take several steps. Your surgeon may suggest a complete physical examination by your regular doctor. This exam helps ensure that you are in the best possible condition to undergo the operation.
On the day of your surgery, you will probably be admitted to the hospital early in the morning. You shouldn’t eat or drink anything after midnight the night before. The length of time you spend in the hospital depends a lot on you.
Surgical Procedure
What happens during the operation?
Surgery can last up to 90 minutes. Surgery may be done using a general anesthetic, which puts you completely to sleep, or a local anesthetic, which numbs only the hand. With a local anesthetic you may be awake during the surgery, but you won’t be able to see the surgery.
Once you have anesthesia, your surgeon will make sure the skin of your hand is free of infection by cleaning the skin with a germ-killing solution.
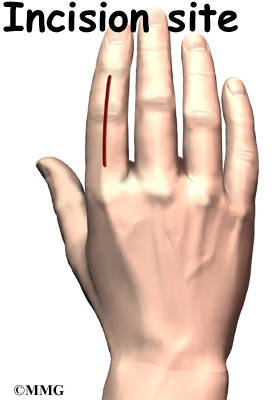
An incision is made on the back part of the finger over the surface of the joint that is to be fused. Special care is taken not to damage the nearby nerves going to the finger.
The joint capsule surrounding the finger joint is then opened so that the surgeon can see the joint surfaces. The articular cartilage is removed from both joint surfaces to leave two surfaces of raw bone. The bottom of the phalange is hollowed with a special tool to form a socket. The other surface is shaped into a rounded cone that fits inside the socket.
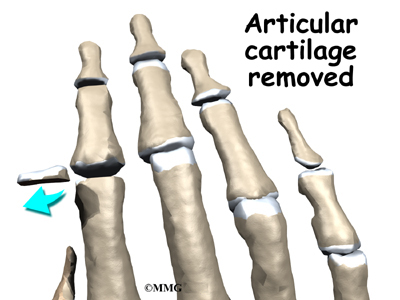
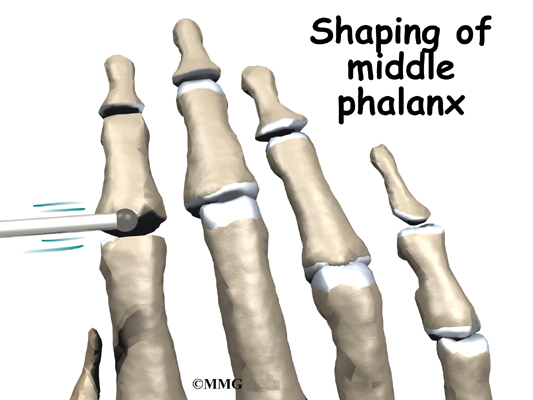
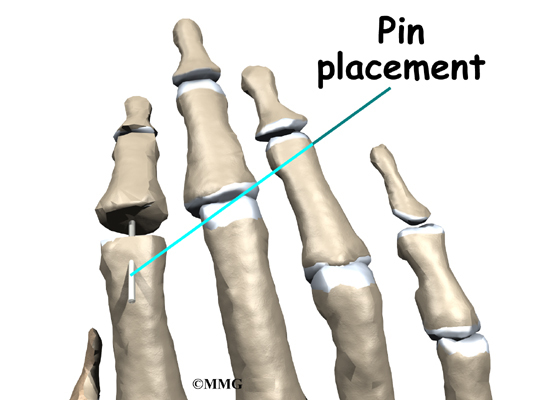

The surgeon places a metal pin through the center of both bones and then connects the cone and socket snugly together. The metal pin allows the surgeon to hold the two bones in the correct alignment and prevents the bones from moving too much as they grow together, or fuse.
The soft tissues over the joint are sewn back together. The forearm and hand are then placed in a cast until the bones completely fuse together. This takes about six weeks.
Complications
What might go wrong?
As with all major surgical procedures, complications can occur. This document doesn’t provide a complete list of the possible complications, but it does highlight some of the most common problems. Some of the most common complications following finger fusion surgery are
- anesthesia
- infection
- nerve damage
- nonunion
Anesthesia
Problems can arise when the anesthesia given during surgery causes a reaction with other drugs the patient is taking. In rare cases, a patient may have problems with the anesthesia itself. In addition, anesthesia can affect lung function because the lungs don’t expand as well while a person is under anesthesia. Be sure to discuss the risks and your concerns with your anesthesiologist.
Infection
Any operation carries a small risk of infection. Finger fusion surgery is no different. You will probably be given antibiotics before the operation to reduce the risk of infection.
If an infection occurs you will most likely need antibiotics to cure it. You may need additional operations to drain the infection if it involves the area around the fusion.
Nerve Damage
There are nerves and blood vessels near the finger joint. Since the operation is performed so close to these important structures, it is possible to injure either the nerves or the blood vessels during fusion surgery. The result may be temporary if the nerves have been stretched by retractors holding them out of the way. It is uncommon to have permanent injury to either the nerves or the blood vessels, but it is possible.
Nonunion
Sometimes the finger bones do not fuse as planned. This is called a nonunion, or pseudarthrosis. (Pseud means false, and arthro means joint; a pseudarthrosis refers to the motion at a false joint.) If the motion from a nonunion continues to cause pain, you may need a second operation to try to get the bones to completely fuse. This may mean adding a bone graft and making sure that any metal pins that have been used are holding the bones still to allow the fusion to occur.
After Surgery
What happens immediately after surgery?
After surgery, you will wear an elbow-length cast for about six weeks. This gives the ends of the bones time to fuse together. Your surgeon will want to check your hand in five to seven days. Stitches will be removed after 10 to 14 days, though most of your stitches will be absorbed into your body. You may have some discomfort after surgery. You will be given pain medicine to control the discomfort.
You should keep your hand elevated above the level of your heart for several days to avoid swelling and throbbing. Keep it propped up on a stack of pillows when sleeping or sitting up.
Rehabilitation
What should I expect during my rehabilitation period?
As mentioned, you’ll wear a cast on your arm and hand for about six weeks to give the fusion time to heal. When the cast is removed, you may have stiffness in the joints closest to the fused joint. If you have pain or stiffness that doesn’t improve, you may need a physical or occupational therapist to direct your recovery program.
The first few therapy treatments will focus on controlling the pain and swelling from surgery. Your therapist may use gentle massage and other hands-on treatments to ease muscle spasm and pain.
Then you’ll begin gentle range-of-motion exercise for the joints nearest the fusion. Strengthening exercises are used to give added stability around the finger joint. You’ll learn ways to grip and support items in order to do your tasks safely and with the least amount of stress on your finger joint. As with any surgery, you need to avoid doing too much, too quickly.
Some of the exercises you’ll do are designed to get your hand and fingers working in ways that are similar to your work tasks and daily activities. Your therapist will help you find ways to do your tasks that don’t put too much stress on your finger joint. Before your therapy sessions end, your therapist will teach you a number of ways to avoid future problems.
Your therapist’s goal is to help you keep your pain under control, improve your strength and range of motion, and regain your fine motor abilities with your hand and fingers. When your treatment is well under way, regular visits to your therapist’s office will end. Your therapist will continue to be a resource, but you will be in charge of doing your exercises as part of an ongoing home program.
Finger Joint Arthritis
A Patient’s Guide to Arthritis of the Finger Joints
Introduction
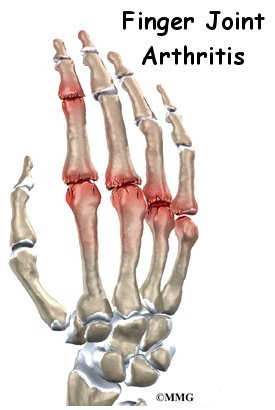
When you stop to think about how much you use your hands, it’s easy to see why the joints of the fingers are so important. Arthritis of the finger joints has many causes, and arthritic finger joints can make it hard to do daily activities due to pain and deformity. Unbearable pain or progressive deformity from arthritis may signal the need for surgical treatment.
This guide will help you understand
- how arthritis of the finger joints develops
- how doctors diagnose the condition
- what treatment options are available
Anatomy
How do the finger joints normally work?
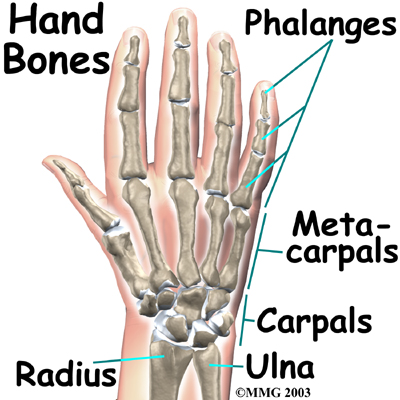
The bones in the palm of the hand are called metacarpals. One metacarpal connects to each finger and thumb. Small bone shafts called phalanges line up to form each finger and thumb.

The main knuckle joint is formed by the connection of the phalanges to the metacarpals. This joint is called the metacarpophalangeal joint (MCP joint). The MCP joint acts like a hinge when you bend and straighten your fingers and thumb.
The three phalanges in each finger are separated by two joints, called interphalangeal joints (IP joints). The one closest to the MCP joint (knuckle) is called the proximal IP joint (PIP joint). The joint near the end of the finger is called the distal IP joint (DIP joint). The thumb only has one IP joint between the two thumb bones. The IP joints of the digits also work like hinge joints when you bend and straighten your hand.
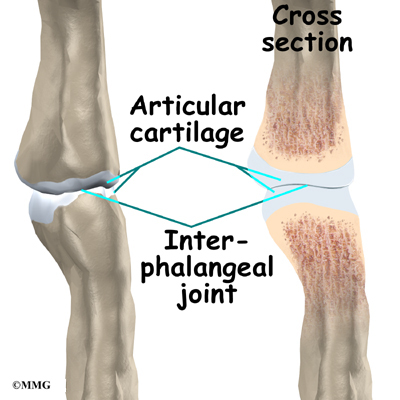
The finger and thumb joints are covered on the ends with articular cartilage. This white, shiny material has a rubbery consistency. The function of articular cartilage is to absorb shock and provide an extremely smooth surface to facilitate motion. There is articular cartilage essentially everywhere that two bony surfaces move against one another, or articulate.
Related Document: A Patient’s Guide to Hand Anatomy
Causes
What causes arthritis?

Degenerative arthritis is a condition in which a joint wears out, or degenerates, usually slowly over a period of many years. Degenerative arthritis is usually called osteoarthritis. The term arthritis means joint inflammation (pain, redness, heat, and swelling). The term degenerative arthritis means inflammation of a joint due to wear and tear. You may also hear the term degenerative arthrosis used. Degenerative arthritis is usually called osteoarthritis.
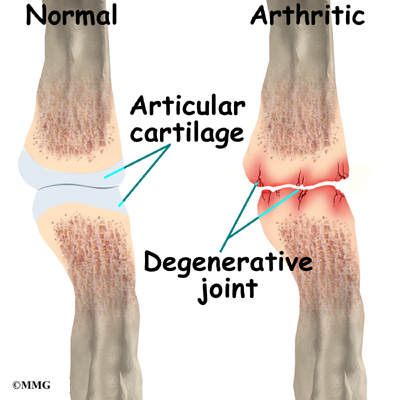
Injury to a joint, such as a bad sprain or fracture, can cause damage to the articular cartilage. An injury to any of the joints of the fingers, even if it does not injure the articular cartilage directly, can alter how the joint works. After a fracture, the bone fragments may heal in slightly different positions. This may make the joints line up differently. When an injury changes the way the joint lines up and moves, force can start to press against the surface of the articular cartilage. This is similar to how a machine that is out of balance wears out faster.
Over time, this imbalance in the joint can lead to damage to the articular surface. Since articular cartilage cannot heal itself very well, the damage adds up. Eventually, the joint can no longer compensate for the increasing damage, and symptoms begin. The damage in the joint starts well before the symptoms of arthritis appear.
Symptoms
What does arthritis feel like?
Pain is the main problem with arthritis. At first, the pain usually only causes problems when you begin an activity. Once the activity gets underway, the pain eases. But after resting for several minutes the pain and stiffness increase. When the arthritis condition worsens, pain may be felt even at rest. The sensitive joint may feel enlarged and warm to the touch from inflammation.
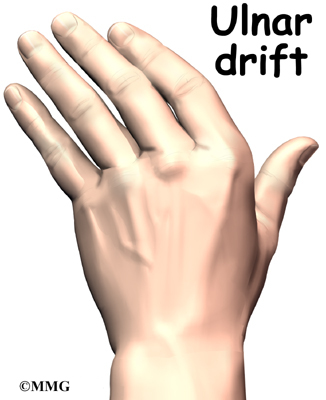
In rheumatoid arthritis, the fingers often become deformed as the disease progresses. The MCP joints of the fingers may actually begin to point sideways (towards the little finger). This is called ulnar drift. Ulnar drift can cause weakness and pain, making it difficult to use your hand for daily activities.

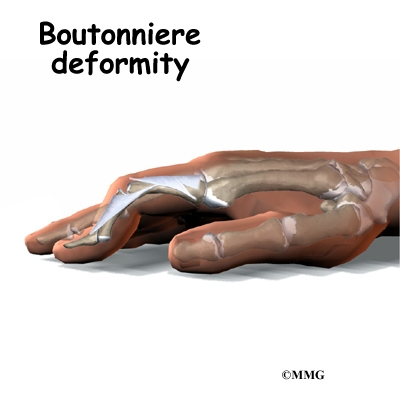
Both rheumatoid arthritis and osteoarthritis can affect the IP joints of the fingers. The IP joints may begin to flex (bend) or hyperextend (over straighten), causing characteristic finger deformities. Swan neck deformity occurs when the middle finger joint (the PIP joint) becomes loose and hyperextended, while the DIP joint becomes flexed. When the PIP joint flexes and the DIP joint extends, a boutonniere deformity forms.
Related Document: A Patient’s Guide to Swan Neck Deformity of the Finger
Related Document: A Patient’s Guide to Boutonniere Deformity of the Finger
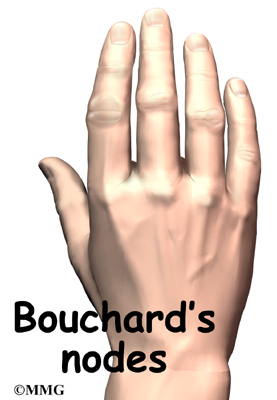
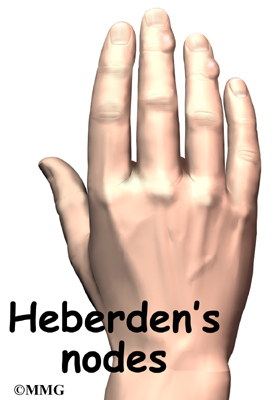
Both forms of arthritis can cause enlarged areas over the back of the PIP joints. These areas tend to be sore and swollen. They are known as Bouchard’s nodes . Osteoarthritis causes similar enlargements over the DIP joints, called Heberden’s nodes.
Diagnosis
How do doctors identify arthritis?
The diagnosis of arthritis of the finger joints begins with a history of the problem. Details about any injuries that may have occurred to the hand are important and may suggest other reasons why the condition exists.
Following the history, a physical examination of the hand and possibly other joints in the body will be done. Your doctor will need to see how the motion of each joint has been affected.
X-rays will be taken to see how much the joint has changed. These tests can help determine how bad the degenerative damage from the arthritis has become. The X-rays also help the doctor estimate how much articular cartilage is still on the surface of the joints.
Treatment
What can be done for the condition?
Nonsurgical Treatment
Treatment usually begins when the joint first becomes painful. This may only occur with heavy use and may simply require mild anti-inflammatory medications, such as aspirin or ibuprofen. Reducing the activity, or changing from occupations that require heavy repetitive hand and finger motions, may be necessary to help control the symptoms.
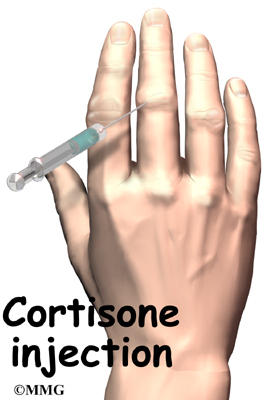
An injection of cortisone into the finger joint can give temporary relief. Cortisone is a very powerful anti-inflammatory medication. When injected into the joint itself, it can help relieve the pain. Pain relief is temporary and usually only lasts several weeks to months. There is a small risk of infection with any injection into the joint, and cortisone injections are no exception.
Rehabilitation services, such as physical and occupational therapy, play a critical role in nonoperative treatment of finger joint arthritis. A primary goal is to help you learn how to control symptoms and maximize the health of your hand and fingers. You’ll learn ways to calm pain and symptoms, which might include the use of rest, heat, or topical rubs.
A custom finger brace or splint may be prescribed to support the finger joints. These devices are designed to help reduce pain, prevent deformity, or keep a finger deformity from getting worse.
Range-of-motion and stretching exercises are prescribed to improve your finger movement. Strengthening exercises for the arm and hand help steady the hand and protect the finger joints from shock and stress. Your therapist will also go over tips on how you can get your tasks done with less strain on the joint.
Surgery
Fusion
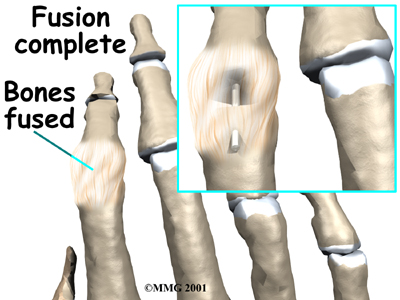
A fusion (or arthrodesis) of any joint is designed to eliminate pain by allowing the bones that make up the joint to grow together, or fuse, into one solid bone. Fusions are used in many joints and were very common before the invention of artificial joints for the replacement of arthritic joints. Even today, joint fusions are still very commonly used in many different joints for treating the pain and potential deformity of arthritis. Fusions are more commonly used in the PIP or the DIP joints in the fingers. A fusion of these joints is far easier and more reliable than trying to save the motion by replacing the joint.
Related Document: A Patient’s Guide to Finger Fusion Surgery
Artificial Joint Replacement
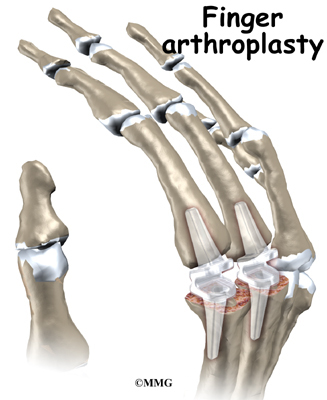
Artificial joints are available for the finger joints. These plastic or metal prostheses are used by some hand surgeons to replace the arthritic joint. The prosthesis forms a new hinge, giving the joint freedom of motion and pain relief. The procedure for putting in a new joint is called arthroplasty.
Related Document: A Patient’s Guide to Artificial Joint Replacement of the Finger
Rehabilitation
What should I expect following treatment?
Nonsurgical Rehabilitation
If you don’t need surgery, range-of-motion exercises for the finger should be started as pain eases, followed by a program of strengthening. Your therapist will work with you to obtain or create special finger splints or braces (mentioned earlier) when needed. The rehabilitation program advances to include strength exercises for the fingers and hand. Dexterity and fine motor exercises are used to get your hand and fingers moving smoothly. You’ll be given tips on keeping your symptoms controlled. You will probably progress to a home program within four to six weeks.
After Surgery
Your hand will be bandaged with a well-padded dressing and a finger splint for support after surgery. Physical or occupational therapy sessions may be needed after surgery for up to eight weeks. The first few treatments are used to help control the pain and swelling after surgery. Some of the exercises you’ll begin to do help strengthen and stabilize the muscles around the finger joint. Other exercises are used to improve fine motor control and dexterity of your hand. You’ll be given tips on ways to do your activities while avoiding extra strain on the finger joint.
Dupuytren’s Contracture
A Patient’s Guide to Dupuytren’s Contracture
Introduction

Dupuytren’s contracture is a fairly common disorder of the fingers. It most often affects the ring or little finger, sometimes both, and often in both hands. It occurs most often in middle-aged, white men. This condition is seven times more common in men than women. Although more common in men of Scottish, Scandinavian, Irish, or Eastern European ancestry researchers agree that genes are not a direct cause of this disease, but predisposes them to this condition.
The condition is noted to be secondary to an increase in fibroblast density – a complex biochemical and cellular interaction. The disorder may occur suddenly but more commonly progresses slowly over a period of years. The disease usually doesn’t cause symptoms until after the age of 40.
This guide will help you understand
- how Dupuytren’s contracture develops
- how the disorder progresses
- what treatment options are available
Anatomy
What part of the hand is affected?
The palm side of the hand contains many nerves, tendons, muscles, ligaments, and bones. This combination allows us to move the hand in many ways. The bones give our hand structure and form joints. Bones are attached to bones by ligaments. Muscles allow us to bend and straighten our joints. Muscles are attached to bones by tendons. Nerves stimulate the muscles to bend and straighten. Blood vessels carry needed oxygen, nutrients, and fuel to the muscles to allow them to work normally and heal when injured. Tendons and ligaments are connective tissue. Another type of connective tissue, called fascia, surrounds and separates the tendons and muscles of the hand.

Lying just under the palm is the palmar fascia, a thin sheet of connective tissue shaped somewhat like a triangle. This fascia covers the tendons of the palm of the hand and holds them in place. It also prevents the fingers from bending too far backward when pressure is placed against them. The fascia separates into thin bands of tissue at the fingers. These bands continue into the fingers where they wrap around the joints and bones. Dupuytren’s contracture transforms the fascia into shortened cords.
The condition commonly first shows up as a thick nodule (knob) or a short cord in the palm of the hand, just below the ring finger. More nodules form, and the tissues thicken and shorten until the finger cannot be fully straightened. Dupuytren’s contracture usually affects only the ring and little finger. The contracture spreads to the joints of the finger, which can become permanently immobilized.
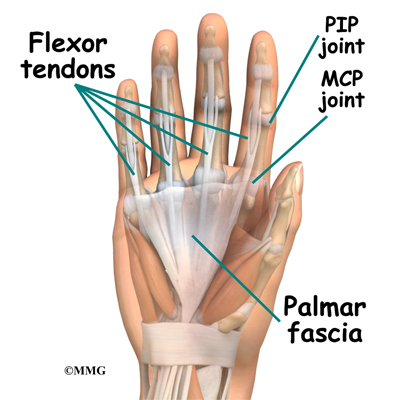
The areas affected most often are the metacarpophalangeal (MCP) and proximal interphalangeal (PIP) joints. The MCP joints are what we usually refer to as the “knuckles.” The PIP joints are the middle joints between the knuckles and the joints at the tips of the fingers.
Flexion contractures usually develop at the metacarpophalangeal (MCP) joints first. As the disease spreads from the palm down to the fingers, the proximal interphalangeal (PIP) joints start to be affected as well.
Related Document: A Patient’s Guide to Hand Anatomy
Causes
Why do I have this problem?
Researchers have studied Dupuytren’s contracture and have found this to be a complex interaction of biochemical and cellular processes. The treatment options in the future will rely on pharmacologic interventions rather than surgery alone. This condition is rare in young people but becomes more common with age. When it appears at an early age, it usually progresses rapidly and is often very severe. The condition tends to progress more quickly in men than in women.
People who smoke have a greater risk of having Dupuytren’s contracture. Heavy smokers who abuse alcohol are even more at risk. Recently, scientists have found a connection with the disease among people who have diabetes. It has not been determined whether or not work tasks can put a person at risk or speed the progression of the disease.
Symptoms
What does Dupuytren’s contracture feel like?
Normally, we are able to control when we bend our fingers and how much. How much we flex our fingers determines how small an object we can hold and how tightly we can hold it. People lose this control as the disorder develops and the palmar fascia contracts, or tightens. This contracture is like extra scar tissue just under the skin. As the disorder progresses, the bending of the finger becomes more and more severe, which limits the motion of the finger.

Without treatment, the contracture can become so severe that you cannot straighten your finger, and eventually you may not be able to use your hand effectively. Because our fingers are slightly bent when our hand is relaxed, many people put up with the contracture for a long time. Patients with this condition usually seek medical advice for cosmetic reasons or the loss of use of their hand. The condition usually isn’t painful, but the nodules can be sensitive to touch. For this reason many patients are worried that something serious is wrong with their hand.
Diagnosis
How do doctors identify the problem?
Your doctor will ask you the history of your problem, such as how long you have had it, whether you’ve noticed it getting worse, and whether it has kept you from doing your daily activities. The doctor will then examine your hands and fingers.
Your doctor can tell if you have a Dupuytren’s contracture by looking at and feeling the palm of your hand and your fingers. Usually, special tests are unnecessary. Abnormal fascia will feel thick. Cords and small nodules in the fascia may be felt as small knots or thick bands under the skin. These nodules usually form first in the palm of the hand. As the disorder progresses, nodules form along the finger. These nodules can be felt through the skin, and you may have felt them yourself. Depending on the stage of the disorder, your finger may have started to contract, or bend.
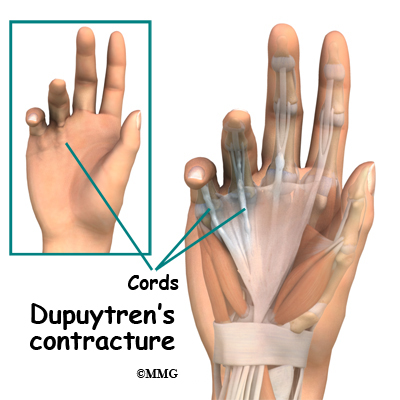
The amount you are able to bend your finger is called flexion. The amount you are able to straighten the finger is called extension. Both are measured in degrees. Normally, the fingers will straighten out completely. This is considered zero degrees of flexion (no contracture). As the contracture causes your finger to bend more and more, you will lose the ability to completely straighten out the affected finger. How much of the ability to straighten out your finger you have lost is also measured in degrees.
Measurements taken at later follow-up visits will tell how well treatments are working or how fast the disorder is progressing. The progression of the disorder is unpredictable. Some patients have no problems for years, and then suddenly nodules will begin to grow and their finger will begin to contract.
The tabletop test may also done. The tabletop test will show if you can flatten your palm and fingers on a flat surface. You can follow the progression of the disorder by doing the tabletop test yourself at relatively regular intervals. Put your hand flat on a table and if you can see sunlight between your hand and the table, it’s time to start to consider treatment for the condition. Your doctor will tell you what to look for and when you should return for a follow-up visit.
Treatment
What can be done for the condition?
There are two types of treatment for Dupuytren’s contracture: nonsurgical and surgical. The best course of treatment is determined by how far the contractures have advanced. Palmar Fascia Removal (palmar fasciectomy) or release of the diseased cords still remains the “gold standard” of care for advanced Dupuytren’s contracture.
Bracing and stretching of the fingers alone has not been proven to help in the long term progression of this condition.
Nonsurgical and surgical treatments are to treat the contracture itself. This does not cure the disease. Dupuytren’s disease continues to slowly form the bands although it may be years before the contracture presents itself again.
Nonsurgical Treatment
The nodules of Dupuytren’s contracture are almost always limited to the hand. If you receive regular examinations, you will know when to proceed with the next treatment step. Dupuytren’s contracture is a progressive disease, early treatment, determined by the stage of the disease, is important to release the contracture and to prevent disability in your hand. Treatment is determined based on the severity of the contracture.
Enzymatic Fasciotomy
Ongoing research of this condition has resulted a less invasive method of treatment called an enzymatic fasciotomy, if only the MCP joint is contracted, and there are only one or two cords involved, this procedure may be possible. It may eventually replace surgery. Until then, surgical release of the cords will likely remain the gold standard.
The U.S. Food and Drug Administration (FDA) recently approved a new injectable drug (Xiaflex) for nonsurgical treatment of this problem. By injecting an enzyme directly into the cords formed by the disease, the tissue dissolves and starts to weaken, most often he/she is able to break apart the cord himself/herself.
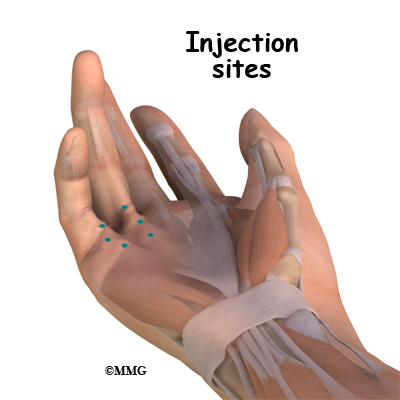
Generally patients return within 24 hours for recheck. If the cord hasn’t broken apart, your physician may have to numb the finger and then stretch the finger to break apart the cord to regain full motion of the finger. That sounds dramatic — it’s not! The treatment is safe and effective. But further study is needed to assess the long-term effects, especially recurrence rates.
There are a few possible (minor) side effects but very few major or long-term complications with this new treatment. During the control trials conducted with patients, most people had a local skin reaction (swelling, redness, skin tears, itching or stinging) where the injection went into the skin. A small number of more serious problems developed in a few patients including skin infection, tendon rupture, finger deformity, complex regional pain syndrome (pain and stiffness), and hives that had to be treated with medication.
Early studies show a good success rate (77 per cent) in reducing MCP contractures using this injection treatment. Almost all of the patients (92 per cent) were able to straighten the MCP joints with less than a 30-degree flexion contracture. Results were not quite as good for the PIP joints. Less than half (44 per cent) of the patients with PIP contractures had regained full motion of the affected joint. The long-term results and recurrence rates with enzyme fasciotomy are unknown at this time.
Surgery
No hard and fast rule exists as to when surgery is needed. But the sooner a contracture is treated, the better the results of a return to full function. Many patients are instructed to keep an eye on the disease and return for follow-up once their “tabletop test” shows light between their hand and the table.
Surgery is usually recommended when the MCP joint (at the knuckle) of the finger reaches 30 degrees of flexion. When patients have severe problems and require surgery at a younger age, the problem often comes back later in life. When the problem comes back or causes severe contractures, surgeons may decide to fuse the individual finger joints together. In the worst case, amputation of the finger may be needed if the contracture restricts the nerves or blood supply to the finger.
Surgery for the main knuckle of the finger (at the base of the finger) has better long-term results than when the middle finger joint is tight. Tightness is more likely to return after surgery for the middle joint.
The goal of tissue release surgery is to release the fibrous attachments between the palmar fascia and the tissues around it, thereby releasing the contracture. Once released, finger movement should be restored to normal. If the problem is not severe, it may be possible to free the contracture simply by cutting the cord under the skin.
Needle Aponeurotomy
A less invasive procedure called a needle aponeurotomy (also referred to as a percutaneous fasciotomy) is available when the disease is at an early stage. Under local anesthesia, the surgeon inserts a very thin needle under the skin. The sharp needle cuts a path through the cord, weakening it enough to stretch and extend or rupture it.
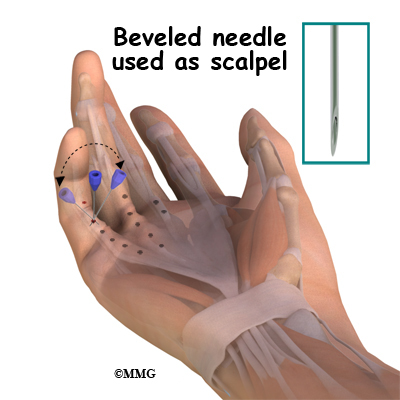
The advantage of this procedure is that it can be done on older adults who have other health issues that might make surgery under general anesthesia too risky. The disadvantage is a high recurrence rate and the potential for nerve injury, infection, and hematoma (pocket of blood) formation.
This procedure has replaced the “open fasciotomy” in many practices.
Palmar Fascia Removal (partial or limited palmar fasciectomy)

This remains the gold standard of treatment for Dupuytren’s contracture. Removal of the diseased palmar fascia causing the contracture but not then entire fascia will usually give a very good result. Final outcomes depend a great deal on the success of doing the postoperative physical or occupational therapy as prescribed. If you decide to have this surgery, you must commit to doing the therapy needed to make your surgery as successful as possible.
Removal of the entire palmar fascia (radical fasciectomy) requires extensive removal of involved and non-involved palmar and digital (finger) fascia. This procedure may be required in cases of severe or recurrent Dupuytren’s contacture. This approach has higher complication rates without providing better success rates so it is not done as often anymore.
Complications of a palmar fasciectomy can include permanent nerve damage, joint pain and stiffness, hematoma (pocket of blood), infections, and poor wound healing.
Surgery does not always fully restore range-of-motion and function but it usually increases the ability to extend (straighten) the affected fingers. You should also be aware that the problem can come back and/or spread. In other words, surgery is not always “curative.”
Skin Graft
A skin graft may be needed if more extensive removal of the palmar fascia is required. This may be the case when the skin surface has contracted so much that the finger cannot relax as it should and the palm cannot be stretched out flat. Surgeons graft skin from the wrist, elbow, or groin. The skin is grafted into the area near the incision to give the finger extra mobility for movement.
Related Document: A Patient’s Guide to Dupuytren’s Contracture Surgery
Rehabilitation
What should I expect after treatment?
Nonsurgical Rehabilitation
No formal physical therapy is generally needed for enzyme fasciotomy.
After Surgery
After a needle aponeurotomy usually physical therapy is not required. Patients are advised to keep their hand iced and elevated for two days following the procedure. NO strenuous gripping for one week. After one week, return to activities as tolerated. Occasionally a splint is prescribed for night use.
After a partial palmar fasciectomy, your hand will be bandaged with a well-padded dressing and a splint for support after surgery. Physical or occupational therapy sessions will be needed after surgery for up to six weeks. Visits will include heat treatments, soft tissue massage, and vigorous stretching. Therapy treatments after surgery can make the difference in a successful result after surgery. Palmar wounds from the incisions take about three to five weeks to heal.
Studies show that patients with more severe disease (especially affecting the proximal interphalangeal (PIP) joints) have a higher risk of disease recurrence. In fact, for all treatment approaches (surgical and nonsurgical), the metacarpophalangeal (MCP) joints are easier to treat with better outcomes and fewer cases of recurrence.
As many as half of all patients who have surgery report return of flexion contractures within five years of surgery. Patients with PIP contractures seem to have the highest recurrence rates.
Thumb Fusion Surgery
A Patient’s Guide to Thumb Fusion Surgery
Introduction
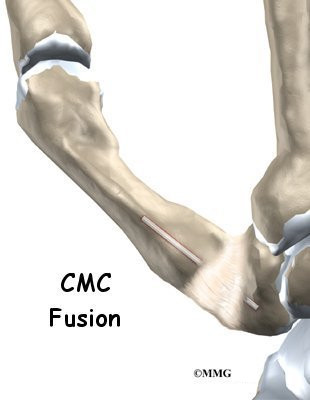
Thumb arthritis may be surgically treated with a fusion procedure. The bones that form the thumb joint are set so they can grow together, or fuse. After fusing, the joint won’t move, and your pain should go away.
This guide will help you understand
- which parts of the thumb are involved
- why this type of surgery is used
- what happens during surgery
- what to expect before and after surgery
Anatomy
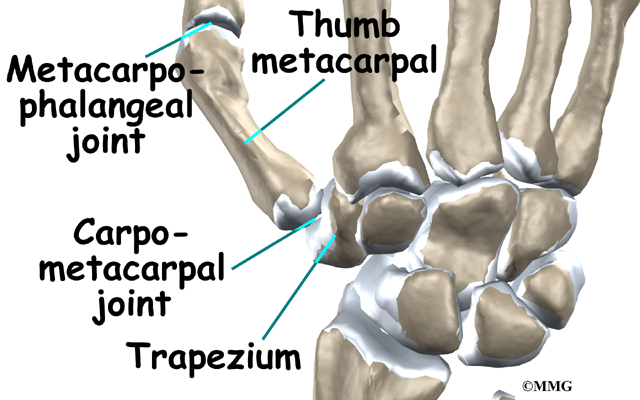
Which parts of the thumb are involved?
The CMC joint (an abbreviation for carpometacarpal joint) of the thumb is where the metacarpal bone of the thumb attaches to the trapezium bone of the wrist. This joint is sometimes referred to as the basal joint of the thumb. The CMC is the joint that allows you to move your thumb into your palm, a motion called opposition.

Several ligaments (bands of strong tissue) hold the joint together. These ligaments join to form the joint capsule of the CMC joint. The joint capsule is a watertight sac around the joint.
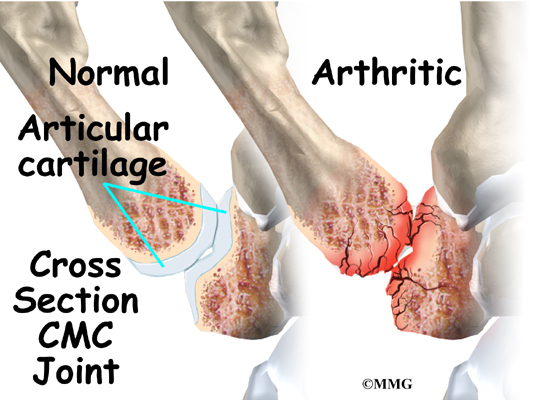
The joint surfaces are covered with a material called articular cartilage. This material is the slick, spongy covering that allows one side of a joint to slide against the other joint surface easily. When this material wears out, the joint develops a type of arthritis called osteoarthritis and becomes painful.
Related Document: A Patient’s Guide to Hand Anatomy
Rationale
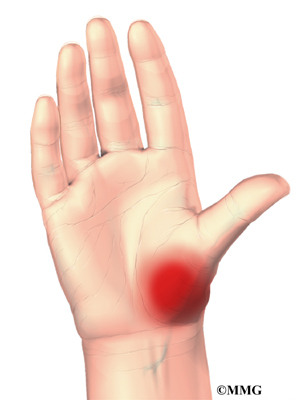
What does the surgeon hope to achieve?
When the articular cartilage wears out, the CMC joint becomes arthritic. The joint becomes painful when the thumb is used for gripping and pinching.
Related Document: A Patient’s Guide to Arthritis of the Thumb
Joint fusion is a procedure that joins the surfaces of the thumb metacarpal and the trapezium so they don’t move or cause pain. This surgery is usually done on younger patients who have to have a lot of thumb strength on the job, such as carpenters who need to use a hammer all day. Once the CMC joint is fused, their pain goes away. They lose joint movement, but they still have a good ability to grip and pinch.
Preparations
What should I do to prepare for surgery?
The decision to proceed with surgery must be made jointly by you and your surgeon. You need to understand as much about the procedure as possible. If you have concerns or questions, you should talk to your surgeon.
Once you decide on surgery, you need to take several steps. Your surgeon may suggest a complete physical examination by your regular doctor. This exam helps ensure that you are in the best possible condition to undergo the operation.
On the day of your surgery, you will probably be admitted to the hospital early in the morning. You shouldn’t eat or drink anything after midnight the night before.
Surgical Procedure
What happens during the operation?
Surgery can last up to 90 minutes. Surgery may be done using a general anesthetic, which puts you completely to sleep, or a local anesthetic, which numbs only the hand. With a local anesthetic you may be awake during the surgery, but you won’t be able to see the surgery.

Once you have anesthesia, your surgeon will make sure the skin of your hand is free of infection by cleaning the skin with a germ-killing solution. An incision is made on the side of the thumb just over the CMC joint. Special care is taken not to damage the nearby nerves going to the thumb.
The joint capsule surrounding the CMC joint is then opened so that the surgeon can see the joint surfaces. The articular cartilage is removed from both joint surfaces to leave two surfaces of raw bone. A special tool is used to hollow the end of the thumb metacarpal to form a socket. The surface of the trapezium is shaped into a rounded cone that fits into the socket inside the thumb metacarpal.

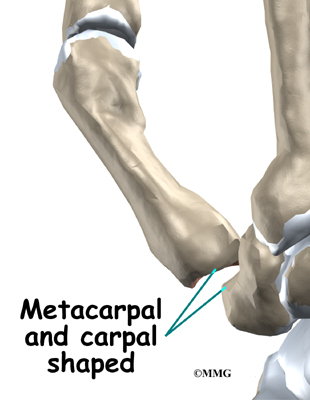
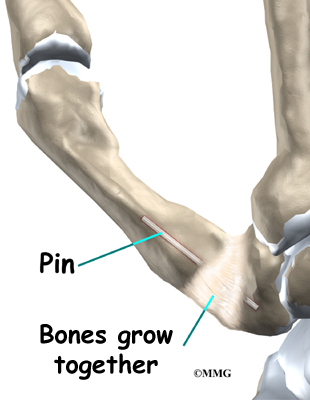
The surgeon places a metal pin through the center of both bones and then connects the cone and socket snugly together. A metal pin allows the surgeon to hold the two bones in the correct alignment and prevents the bones from moving too much as they grow together, or fuse.
The soft tissues over the joint are then sewn back together. The forearm and hand are placed in a cast until the bones completely fuse together. This takes about six weeks.
Complications
What might go wrong?
As with all major surgical procedures, complications can occur. This document doesn’t provide a complete list of the possible complications, but it does highlight some of the most common problems. Some of the most common complications following thumb fusion are
- anesthesia
- infection
- nerve damage
- nonunion
Anesthesia
Problems can arise when the anesthesia given during surgery causes a reaction with other drugs the patient is taking. In rare cases, a patient may have problems with the anesthesia itself. In addition, anesthesia can affect lung function because the lungs don’t expand as well while a person is under anesthesia. Be sure to discuss the risks and your concerns with your anesthesiologist.
Infection
Any operation carries a small risk of infection. Thumb fusion surgery is no different. You will probably be given antibiotics before the operation to reduce the risk of infection. If an infection occurs you will most likely need antibiotics to cure it. You may need additional operations to drain the infection if it involves the area around the fusion.
Nerve Damage
All of the nerves and blood vessels that go to the thumb travel across, or near, the CMC joint. Since the operation is performed so close to these important structures, it is possible to injure either the nerves or the blood vessels during fusion surgery. The result may be temporary if the nerves have been stretched by retractors holding them out of the way. It is uncommon to have permanent injury to either the nerves or the blood vessels, but it is possible.
Nonunion
Sometimes the thumb bones do not fuse as planned. This is called a nonunion, or pseudarthrosis. (Pseud means false, and arthro means joint; a pseudarthrosis refers to the motion at a false joint.) If the motion from a nonunion continues to cause pain, you may need a second operation to try to get the bones to completely fuse. This usually means adding more bone graft and making sure that any metal pins that have been used are holding the bones still to allow the fusion to occur.
After Surgery
What happens after surgery?
After surgery, you will be fitted in an elbow-length cast. This gives the ends of the bones the opportunity to fuse together. Your surgeon will want to check your hand within five to seven days. Stitches will be removed in 10 to 14 days, though most of your stitches will be absorbed into your body. You may have some discomfort after surgery. You will be given pain medicine to control the discomfort.
You should keep your hand elevated above the level of your heart for several days to avoid swelling and throbbing. Keep it propped up on a stack of pillows when sleeping or sitting up.
Rehabilitation
What should I expect during my recovery period?
As mentioned, you’ll wear the cast for about six weeks to give the fusion time to heal. When the cast is removed, you may have stiffness in the joints on both sides of the fusion.
If you have pain or stiffness that doesn’t improve, you may need a physical or occupational therapist to direct your recovery program. The first few therapy treatments will focus on controlling the pain and swelling from surgery. Your therapist may use gentle massage and other hands-on treatments to ease muscle spasm and pain.
Then you’ll begin gentle range-of-motion exercise for the joints above and below the fusion. Strengthening exercises are used to give added stability around the thumb joint. You’ll learn ways to grip and support items in order to do your tasks safely and with the least amount of stress on your thumb joint. As with any surgery, you need to avoid doing too much, too quickly.
Some of the exercises you’ll do are designed get your hand and thumb working in ways that are similar to your work tasks and daily activities. Your therapist will help you find ways to do your tasks that don’t put too much stress on your thumb joint. Before your therapy sessions end, your therapist will teach you a number of ways to avoid future problems.
Your therapist’s goal is to help you keep your pain under control, improve your strength and range of motion, and regain your fine motor abilities with your hand and thumb. When your treatments are well under way, regular visits to your therapist’s office will end. Your therapist will continue to be a resource, but you will be in charge of doing your exercises as part of an ongoing home program.
Endoscopic Carpal Tunnel Release
A Patient’s Guide to Endoscopic Carpal Tunnel Release
Introduction
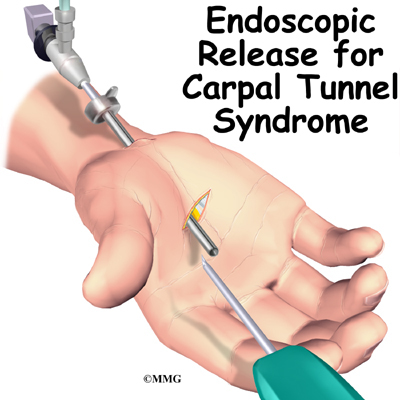
Carpal tunnel syndrome (CTS) is a condition affecting the wrist and hand. While the most common surgical procedure for a carpal tunnel release is still the open-incision technique, some surgeons are using a new procedure, called endoscopic carpal tunnel release.
The procedure is done using an endoscope (a small, fiber-optic TV camera) to look into the carpal tunnel through a small incision just below the wrist. Using the camera allows the surgeon to release the ligament without disturbing the overlying tissues.
This guide will help you understand
- what part of the wrist is treated during surgery
- how surgeons perform the operation
- what to expect before and after the procedure
Related Document: A Patient’s Guide to Carpal Tunnel Syndrome
Anatomy
What part of the wrist is treated during surgery?

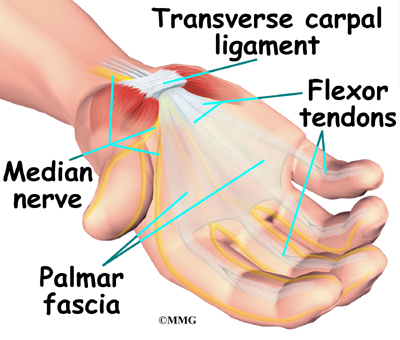
The carpal tunnel is an opening through the wrist into the hand that is formed by the bones of the wrist (carpal bones) on one side and the transverse carpal ligament on the other. (Ligaments connect bones together.) The transverse carpal ligament is at the base of the wrist and crosses from one side of the wrist to the other. (Transverse means across.) It is sometimes referred to as the carpal ligament.
The median nerve and the flexor tendons pass through the carpal tunnel. The median nerve rests on top of the tendons, just below the carpal ligament. Between the skin and the carpal ligament is a thin sheet of connective tissue called the palmar fascia.
Related Document: A Patient’s Guide to Hand Anatomy
Rationale
What does the surgeon hope to achieve?
The surgery releases the carpal ligament, taking pressure off the median nerve. By using the endoscope, surgeons can accomplish this without disrupting the nearby tissues.
Proponents of the procedure feel that patients heal faster, are able to use their hand faster, and have fewer problems of tenderness in the palmar incision. Other physicians are not convinced that this procedure for releasing the carpal ligament is better than the open-incision technique.
Related Document: A Patient’s Guide to Open Carpal Tunnel Release
The endoscopic method is more technically demanding and can be more expensive in most hospitals. There may be a higher complication rate with this procedure involving incomplete release of the carpal ligament or injury to the median nerve inside the carpal tunnel. As more and more surgeons choose to use this method, these questions will probably be resolved.
Preparation
What should I do to prepare for surgery?
The decision to proceed with surgery must be made jointly by you and your surgeon. You need to understand as much about the procedure as possible. If you have concerns or questions, you should talk to your surgeon.
Once you decide on surgery, your surgeon may suggest a complete physical examination by your regular doctor. This exam helps ensure that you are in the best possible condition to undergo the operation.
On the day of your surgery, you will probably be admitted to the hospital early in the morning. You shouldn’t eat or drink anything after midnight the night before. This surgery can usually be done as an outpatient procedure, meaning you can leave the hospital the same day.
Surgical Procedure
What happens during the operation?
The surgery is occasionally done using a general anesthetic (one that puts you to sleep). More often, a regional anesthetic is used. A regional anesthetic blocks the nerves going to only a portion of the body. Injection of medications similar to lidocaine are used to block the nerves for several hours. This type of anesthesia could be an axillary block (only the arm is asleep) or a wrist block (only the hand is asleep). The surgery can also be performed by simply injecting lidocaine around the area of the incision.
Once you have anesthesia, your surgeon will make sure the skin of your palm is free of infection by cleaning the skin with a germ-killing solution.
The surgeon nicks the skin to create a small opening just below the crease in the wrist where the palm starts. This opening allows the surgeon to place the endoscope into the carpal tunnel. Some surgeons make a second small incision within the palm of the hand.
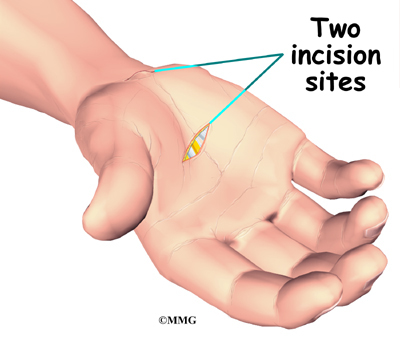
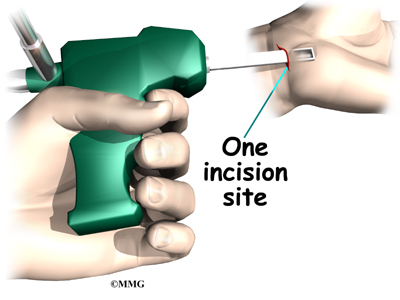
The procedure using a single incision is becoming more popular. The incision allows the surgeon to open the carpal tunnel just below the carpal ligament.
Once the surgeon is sure that the instruments can be passed into the carpal tunnel, a metal or plastic cannula (a tube with a slot on the side) is placed alongside the median nerve. The endoscope can be placed into the tube to look at the underside of the carpal ligament, making sure that the nerves and arteries are safely out of the way.
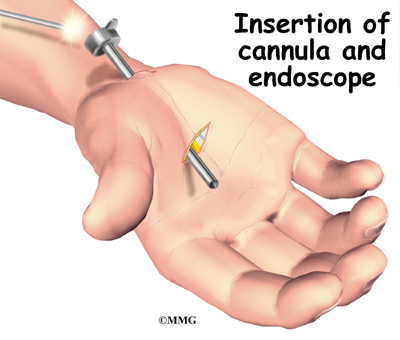
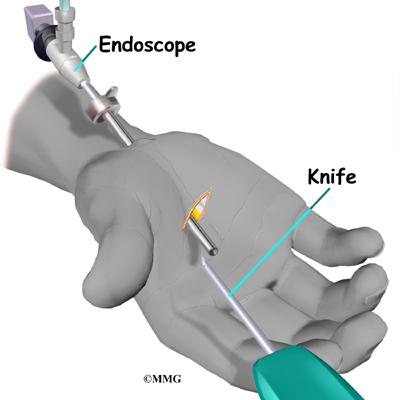
A special knife is inserted through the cannula. This knife has a hook on the end that cuts backwards when the knife is pulled back out of the cannula. Once the knife is pulled all the way back, the carpal ligament is divided, without cutting the palmar fascia or the skin of the palm.
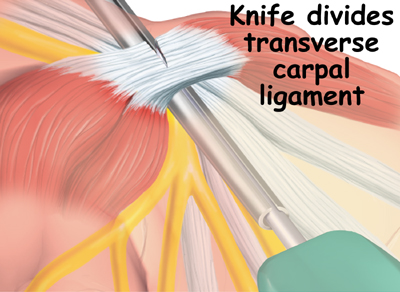
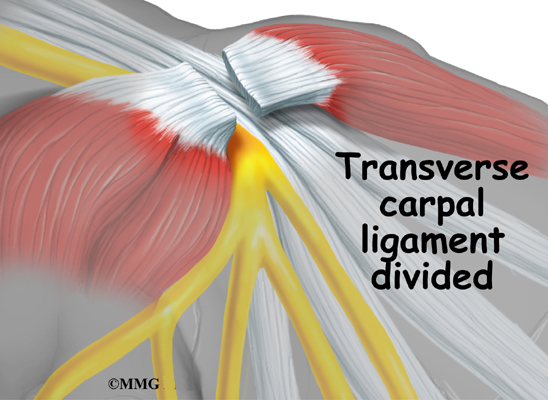
Once the carpal ligament is divided, the median nerve is no longer compressed and begins to return to normal.
After the carpal ligament is released, the surgeon stitches just the skin openings and leaves the loose ends of the carpal ligament separated. The loose ends are left apart to keep pressure off the median nerve. Eventually, the gap between the two ends of the ligament fills in with scar tissue.
Complications
What might go wrong?
As with all major surgical procedures, complications can occur. This document doesn’t provide a complete list of the possible complications, but it does highlight some of the most common problems. Some of the most common complications following endoscopic carpal tunnel release are
- anesthesia
- infection
- incision pain
- persistent symptoms
- incomplete ligament release
- hand weakness
Anesthesia
Problems can arise when the anesthesia given during surgery causes a reaction with other drugs the patient is taking. In rare cases, a patient may have problems with the anesthesia itself. In addition, anesthesia can affect lung function because the lungs don’t expand as well while a person is under anesthesia. Be sure to discuss the risks and your concerns with your anesthesiologist.
Infection
Infection is a possible complication after surgery, especially infection of the incision. Therefore, check your incision every day as instructed by your surgeon. If you think you have a fever take your temperature. If you have signs of infection or other complications, call your surgeon right away.
These are warning signs of infection or other complications:
- pain in your hand that is not relieved by your medicine
- discharge with an unpleasant odor coming from your incision
- swelling, heat, and redness along your incision
- chills or fever over 100.4 degrees Fahrenheit
- bright red blood coming from your incision
Incision Pain
Some patients report having pain along the palm incision, but this happens less than when people have an open release procedure. Sometimes people still feel some numbness and tingling after surgery, especially if they had severe pressure on the median nerve prior to surgery. When the thenar (thumb) muscles are notably shrunken (atrophied) from prolonged pressure on the median nerve, strength and sensation may not fully return even after having this type of surgery.
Persistent Symptoms
There is a small chance that problems of carpal tunnel syndrome don’t go away completely. Sometimes symptoms come back after having the endoscopic release surgery. A return of symptoms is rare, but the likelihood is greatest in workers who go back to a job where they hold on to vibrating tools for long hours.
Incomplete Ligament Release
Releasing the carpal ligament using an endoscope requires skill and experience. One drawback of this procedure is incomplete release of the carpal ligament. When this occurs, symptoms may not go away completely. Some patients end up needing a second surgery to completely release the carpal ligament.
Hand Weakness
Muscles that are used to squeeze and grip may seem weak after surgery. During normal gripping, the tendons of the wrist press outward against the carpal ligament. This allows the carpal ligament to work like a pulley to improve grip strength. People used to think that the tendons lose this mechanical advantage after the carpal ligament has been released. However, recent studies indicate that hand weakness is more likely from pain or swelling that occurs in the early weeks after the procedure. With the exception of patients who have severe atrophy at the time of surgery, most people achieve normal hand strength within two to four months of surgery. Those with severe atrophy commonly see improvements in hand strength, but they rarely regain normal size of the thenar muscles.
After Surgery
What happens immediately after surgery?
After surgery, the incision is wrapped in a soft dressing or simply covered with a bandage. Your surgeon may splint and wrap the wrist.
In the days following surgery, keep emergency phone numbers handy. Call your surgeon’s office if you feel your hand is not healing as it should.
Rehabilitation
What should I expect after surgery?
You’ll be scheduled to see your doctor in 10 to 12 days for a follow-up. Your surgeon may need to take out one or two of the stitches if they haven’t already been absorbed into your body.
Finger motions are safe to begin within one day after surgery. But you need to avoid heavy grasping or pinching with your hand for six weeks. These actions need to be avoided to keep the tendons from pushing out against the healing carpal ligament. After six weeks, you should be safe to resume gripping and pinching without irritating the wrist.
Your surgeon may have you work with a physical or occupational therapist for four to six weeks after the surgery. You’ll begin doing active hand movements and range-of-motion exercises. Therapists also use ice packs, soft-tissue massage, and hands-on stretching to help with the range of motion. When the stitches are removed, you may start carefully strengthening your hand by squeezing and stretching special putty with your hand and fingers. Therapists also use a series of fist positions to encourage the finger tendons to slide within the carpal tunnel.
As you progress, your therapist will give you exercises to help strengthen and stabilize the muscles and joints in the hand. Other exercises are used to improve fine motor control and dexterity. Some of the exercises you’ll do are designed to get your hand working in ways that are similar to your work tasks and sport activities.
Your therapist will help you find ways to do your tasks that don’t put too much stress on your hand and wrist. Before your therapy sessions end, your therapist will teach you a number of ways to avoid future problems.
Dupuytren’s Contracture Surgery
A Patient’s Guide to Dupuytren’s Contracture Surgery
Introduction
Dupuytren’s contracture is a fairly common disorder of the fingers. It most often affects the ring or little finger, sometimes both, and often in both hands. The disorder may occur suddenly but more commonly progresses slowly over a period of years. It is more common in men of a Northern European descent. The disease usually doesn’t cause symptoms until after the age of 40.
A partial palmar fasciectomy remains the “gold standard” surgical procedure, although at earlier stages of this disease a less invasive surgical procedure called a needle aponeurectomy may be done.
Surgical treatment does not stop or cure this disease process, so recurrence is not uncommon.
Related Document: A Patient’s Guide to Dupuytren’s Contracture
This guide will help you understand
- what your surgeon hopes to achieve
- what happens during the operation
- what to expect after the procedure
Anatomy
What part of the hand is affected?
The palmar fascia lies under the skin on the palm of the hands and fingers. This fascia is a thin sheet of connective tissue shaped somewhat like a triangle. It covers the tendons of the palm of the hand and holds them in place. It also prevents the fingers from bending too far backward when pressure is placed against the front of the fingers. The fascia separates into thin bands of tissue at the fingers. These bands continue into the fingers where they wrap around the joints and bones. Dupuytren’s contracture forms when the palmar fascia begins to thicken and tighten, causing the fingers to bend.
The condition commonly first shows up as a thick nodule (knob) or a short cord in the palm of the hand, just below the ring finger. More nodules form and the tissues thicken and shorten until the finger cannot be fully straightened.
Related Document: A Patient’s Guide to Hand Anatomy
Rationale
What is the goal of surgery?
Many cases of Dupuytren’s contracture progress to the point where surgery is needed. The goal of surgery is to remove the diseased fascia, allowing the finger to straighten out again. By removing the tight cords and fascia, the tension on the finger is released. Once the fibrous tissue is removed, the skin is sewn together with fine stitches.
In some cases, grafting extra skin is necessary in the area close to the incision to give the finger more flexibility to straighten. Skin grafting is more commonly necessary in severe Dupuytren’s contractures that have been present for many years. Over time the skin also contracts. When the contracture or the cord is released, the skin cannot stretch enough to allow the finger to straighten. Skin is added, or grafted into place to allow the finger to straighten without being held back by the skin of the palm.
Preparation
How should I prepare for surgery?
The decision to proceed with surgery must be made jointly by you and your surgeon. You need to understand as much about the procedure as possible. If you have concerns or questions, you should talk to your surgeon.
Once you decide on surgery, you need to take several steps. Your surgeon may suggest a complete physical examination by your regular doctor. This exam helps ensure that you are in the best possible condition to undergo the operation.
Surgery for Dupuytren’s Disease is commonly performed as an outpatient – you will probably go home the same day. The surgical procedure may be performed in an operating room in a surgery center or hospital. The needle aponeurotomy may be performed in the office setting. On the day of your surgery, you will arrive at the location chosen by the surgeon and the staff will register and prepare you for the procedure. You shouldn’t eat or drink anything after midnight the night before.
Surgical Procedure
What happens during the operation?
Needle Aponeurotomy (Percutaneous Fasciotomy)

The needle aponeurotomy is available when the disease is at an early stage. Under local anesthesia, the surgeon inserts a very thin needle under the skin. The sharp needle cuts a path through the cord, weakening it enough so that when the surgeon straightens the finger the cord will snap or rupture and allow the finger to straighten. The diseased tissue is not removed. This can be done in an office setting.
Needle aponeurotomy may be used when a patient has a contracture that’s due to a palpable cord lying beneath the skin. It does not work for non-Dupuytren’s related contractures. The advantage of this procedure is that it can be done on older adults who have other health issues that might make surgery under general anesthesia too risky. The disadvantage is there can be a high recurrence rate because the diseased tissue remains and can continue to contract. There is also the potential for nerve injury, infection, and hematoma (pocket of blood) formation similar to the open procedure.
Palmar Fascia Removal (palmar fasciectomy)
Surgery can last up to 90 minutes. Surgery may be done using a general anesthetic (one that puts you to sleep during surgery), or a local anesthetic (one that only numbs the hand). With a local anesthetic you may be awake during the surgery, but you won’t be able to see the surgery.

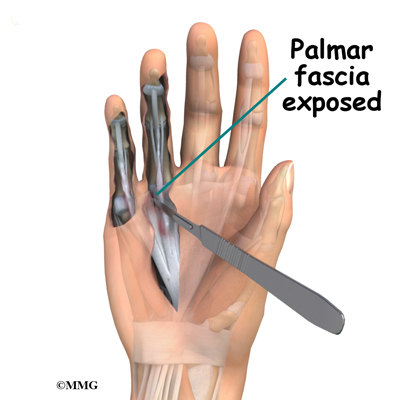
Once you have anesthesia, your surgeon will make sure the skin of your palm is free of infection by cleaning the skin with a germ-killing solution. An incision will be made in the skin. Several types of incisions can be made, but yours will most likely be made along the natural creases and lines in the hand. This will help make the scar less noticeable once the hand is healed.
Once the palmar fascia is exposed, it will be carefully separated from nerves, arteries, and tendons. Special care is taken not to damage the nearby nerves and blood vessels.
Then your surgeon will remove enough of the diseased palmar fascia to allow you to straighten your finger(s). After the diseased tissue is removed, and if the patient has ignored this problem for a long time, the joint capsule or the ligaments of the joint may be stiffened or contracted. Therefore the surgeon may also need to release this tissue in order to allow the finger to straighten up normally. Once the fibrous tissue is removed, the skin is sewn together with fine stitches.
A skin graft may be needed if the skin surface has contracted so much that the finger cannot relax as it should and the palm cannot be stretched out flat. Surgeons graft skin from the wrist, elbow, or groin.
Complications
What might go wrong?
As with all major surgical procedures, complications can occur. This document doesn’t provide a complete list of the possible complications, but it does highlight some of the most common problems. Some of the most common complications following surgery for Dupuytren’s contracture are
- anesthesia
- infection
- nerve and blood vessel damage
Anesthesia
Problems can arise when the anesthesia given during surgery causes a reaction with other drugs the patient is taking. In rare cases, a patient may have problems with the anesthesia itself. In addition, anesthesia can affect lung function because the lungs don’t expand as well while a person is under anesthesia. Be sure to discuss the risks and your concerns with your anesthesiologist.
Infection
Infection of the incision is one possible complication after surgery. Therefore, check your incision every day as instructed by your surgeon. If you think you have a fever, take your temperature. If you have signs of infection or other complications, call your surgeon right away.
Nerve or Blood Vessel Damage
There are many nerves and blood vessels in the hand. It is possible, though uncommon, that these structures can be injured during surgery. If an injury occurs, it can be a serious complication. Injury to nerves can cause numbness or weakness of the hand. Repairing an injury to the blood vessels may require additional surgery.
After Surgery
What happens after surgery?
After a needle aponeurotomy, small adhesive bandages may be applied, or a light gauze wrap. Elevation and ice are recommended for several days following the procedure.
After a partial palmar fasciectomy, your hand will be bandaged with a well-padded dressing and a splint for support after surgery. The splint will keep the hand open and the fingers straight during healing. Your surgeon will want to check your hand within five to seven days. Stitches will be removed after 10 to 14 days, though most of your stitches will be absorbed into your body. Because many nerves are found in the hand, you may have some discomfort after surgery. You will be given pain medicine to control the discomfort.
You should keep your hand elevated above the level of your heart for several days to avoid swelling and throbbing. Keep it propped up on a stack of pillows when sleeping or sitting up.
Rehabilitation
What should I expect during my recovery?
Usually physical therapy is not required after a needle aponeurotomy. NO strenuous gripping for one week. After one week, return to activities as tolerated. Occasionally a splint is prescribed for night use.
After a partial palmar fasciectomy, physical or occupational therapy sessions will be needed for up to six weeks. Therapy visits usually include heat treatments, soft tissue massage, and vigorous stretching. Therapy can make the difference in a successful result after surgery. These sessions are important in limiting the buildup of scar tissue, preventing the return of contractures, and getting the most benefit from surgery.
You’ll gradually be able to put your hand to use. You should be able to straighten all joints within four to eight weeks, sometimes a little longer.
You’ll probably need to wear a splint at night for up to six months after surgery. It is used to keep the joints straight, preventing new contractures from forming. Take all medicine exactly as prescribed by your surgeon, and be sure to keep all follow-up appointments.
Resection (Excision) Arthroplasty of the Thumb
A Patient’s Guide to Resection (Excision) Arthroplasty of the Thumb
Introduction
Thumb arthritis may be surgically treated with a procedure called resection arthroplasty or sometimes called excision arthroplasty. The term excision means to take out. In this surgery, the surgeon takes out a small bone at the base of the thumb and fills in the space with a rolled up section of tendon. The soft tissue forms a false joint that keeps the thumb somewhat mobile and stops pain by preventing the joint surfaces from rubbing together.
This guide will help you understand
- which parts of the thumb are involved
- why this type of surgery is used
- what happens during the procedure
- what to expect before and after surgery
Anatomy
Which parts of the thumb are involved?
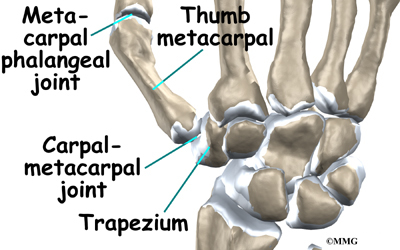
The CMC joint (an abbreviation for carpometacarpal joint) of the thumb is where the metacarpal bone of the thumb attaches to the trapezium bone of the wrist. This joint is sometimes referred to as the basal joint of the thumb. The CMC is this joint that allows you to move your thumb into your palm, a motion called opposition.
Several ligaments (strong bands of tissue) hold the joint together. These ligaments join to form the joint capsule of the CMC joint. The joint capsule is a watertight sac around the joint.
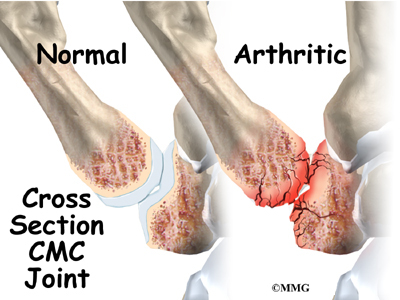
The joint surfaces are covered with a material called articular cartilage. This material is the slick, spongy covering that allows one side of a joint to slide against the other joint surface easily. When this material wears out, the joint develops a type of arthritis called osteoarthritis and becomes painful.
Related Document: A Patient’s Guide to Hand Anatomy
Rationale
What does the surgeon hope to achieve?
The main goal of this surgery is to ease pain where the surfaces of the thumb joint are rubbing together. The surgeon uses a piece of tendon to form a spacer that separates the surfaces of the CMC joint. Unlike a fusion surgery that simply binds the joint together, excision arthroplasty can help take away pain while allowing the thumb joint to retain some movement.
Related Document: A Patient’s Guide to Arthritis of the Thumb
Preparation
What should I do to prepare for surgery?
The decision to proceed with surgery must be made jointly by you and your surgeon. You need to understand as much about the procedure as possible. If you have concerns or questions, you should talk to your surgeon.
Once you decide on surgery, you need to take several steps. Your surgeon may suggest a complete physical examination by your regular doctor. This exam helps ensure that you are in the best possible condition to undergo the operation.
On the day of your surgery, you will probably be admitted to the hospital early in the morning. You shouldn’t eat or drink anything after midnight the night before.
Surgical Procedure
What happens during surgery?

Surgery can last up to 90 minutes. Surgery may be done using a general anesthetic, which puts you completely to sleep, or a local anesthetic, which numbs only the hand. With a local anesthetic you may be awake during the surgery, but you won’t be able to see the surgery.
Once you have anesthesia, your surgeon will make sure the skin of your hand is free of infection by cleaning the skin with a germ-killing solution. An incision will be made that angles along the back of the thumb to the edge of the wrist. Special care is taken not to damage the nearby nerve going to the thumb.
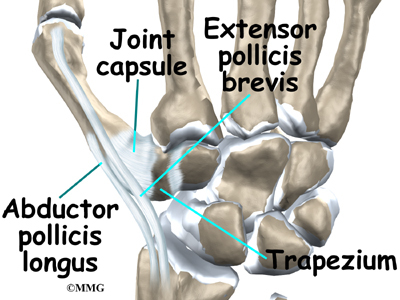
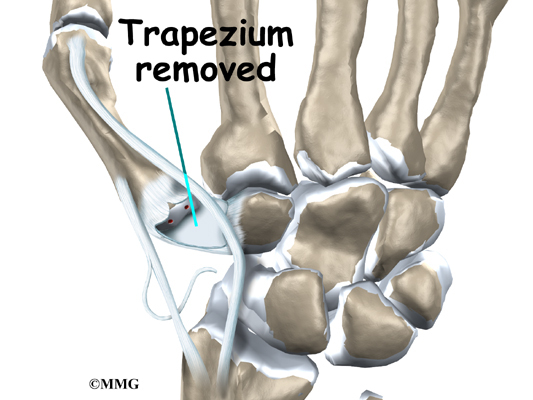
The CMC joint and surrounding tissues are exposed.
Next, the joint capsule surrounding the CMC joint is opened. The surgeon takes out (excises) the trapezium bone at the base of the thumb.
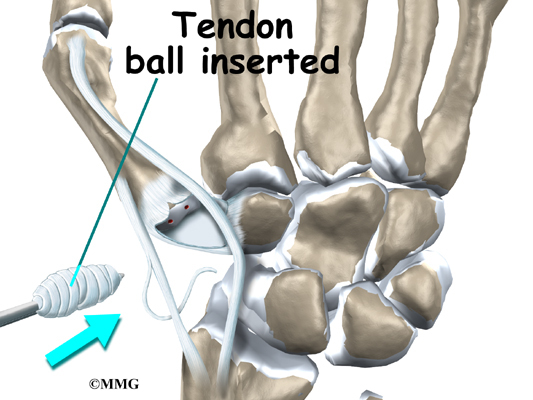

Then the surgeon removes a small section of one of the tendons near the thumb. The piece of tendon is sewn into a small ball and placed into the space where the trapezium bone was removed. The remaining portion of the tendon is sewn to the thumb metacarpal to stabilize the joint. The surgeon may also insert a surgical pin to connect and hold the metacarpal bones of the thumb and index finger. The pin protects the reconstructed joint and is usually removed three weeks after the surgery.
The soft tissues over the joint are sewn back together. The thumb is placed in a splint, and the hand is wrapped in a bulky dressing.
Complications
What might go wrong?
As with all major surgical procedures, complications can occur. This document doesn’t provide a complete list of the possible complications, but it does highlight some of the most common problems. Some of the most common complications following resection arthroplasty are
- anesthesia
- infection
- nerve damage
Anesthesia
Problems can arise when the anesthesia given during surgery causes a reaction with other drugs the patient is taking. In rare cases, a patient may have problems with the anesthesia itself. In addition, anesthesia can affect lung function because the lungs don’t expand as well while a person is under anesthesia. Be sure to discuss the risks and your concerns with your anesthesiologist.
Infection
Any operation carries a small risk of infection. Resection arthroplasty of the thumb is no different. You will probably be given antibiotics before the operation to reduce the risk of infection. If an infection occurs you will most likely need antibiotics to cure it. You may need additional operations to drain the infection if it involves the area around the arthroplasty.
Nerve Damage
All of the nerves and blood vessels that go to the thumb travel across, or near, the CMC joint. Because the operation is performed so close to these important structures, it is possible to injure either the nerves or the blood vessels during surgery. The result may be temporary if the nerves have been stretched by retractors holding them out of the way. It is uncommon to have permanent injury to either the nerves or the blood vessels, but it is possible.
After Surgery
What happens after surgery?
After surgery, your thumb will be bandaged with a well-padded dressing and a splint for support. The splint will keep the thumb in a natural position during healing. Your surgeon will want to check your hand within five to seven days. Stitches will be removed after 10 to 14 days, though most of your stitches will be absorbed into your body. If a surgical pin was used, it will be removed three weeks after surgery. You may have some discomfort after exicision arthroplasty. You will be given pain medicine to control the discomfort.
You should keep your hand elevated above the level of your heart for several days to avoid swelling and throbbing. Keep it propped up on a stack of pillows when sleeping or sitting up.
Rehabilitation
What should I expect during my recovery period?
After surgery, you’ll wear a thumb brace for up to six weeks to give the repair time to heal. Then a physical or occupational therapist will probably direct your recovery program. You will likely need to attend therapy sessions for one to two months, and you should expect full recovery to take up to four months.
The first few therapy treatments will focus on controlling the pain and swelling from surgery. Heat treatments may be used. Your therapist may also use gentle massage and other hands-on treatments to ease muscle spasm and pain.
Then you’ll begin gentle range-of-motion exercise. Strengthening exercises are used to give added stability around the thumb joint. You’ll learn ways to grip and support items in order to do your tasks safely and with the least amount of stress on your thumb joint. As with any surgery, you need to avoid doing too much, too quickly.
Some of the exercises you’ll do are designed get your hand and thumb working in ways that are similar to your work tasks and daily activities. Your therapist will help you find ways to do your tasks that don’t put too much stress on your thumb joint. Before your therapy sessions end, your therapist will teach you a number of ways to avoid future problems.
Your therapist’s goal is to help you keep your pain under control, improve your strength and range of motion, and regain your fine motor abilities with your hand and thumb. When you are well under way, regular visits to the therapist’s office will end. Your therapist will continue to be a resource, but you will be in charge of doing your exercises as part of an ongoing home program.
Artificial Joint Replacement of the Thumb
A Patient’s Guide to Artificial Joint Replacement of the Thumb
Introduction

If nonsurgical treatments are not successful in easing problems of thumb arthritis, your doctor may recommend replacing the surfaces of the joint. Joint replacement surgery is called arthroplasty.
This guide will help you understand
- which parts of the thumb are involved
- how surgeons perform this surgery
- what to expect before and after surgery

Anatomy
Which parts of the thumb are involved?
The CMC joint (an abbreviation for carpometacarpal joint) of the thumb is where the metacarpal bone of the thumb attaches to the trapezium bone of the wrist. This joint is sometimes referred to as the basal joint of the thumb. The CMC is the joint that allows you to move your thumb into your palm, a motion called opposition.
Several ligaments (bands of strong tissue) hold the joint together. These ligaments join to form the joint capsule of the CMC joint. The joint capsule is a watertight sac around the joint.
The joint surfaces are covered with a material called articular cartilage. This material is the slick, spongy covering that allows one side of a joint to slide against the other joint surface easily. When this material wears out, the joint develops a type of arthritis called osteoarthritis and becomes painful.
Related Document: A Patient’s Guide to Hand Anatomy
Rationale

What does the surgeon hope to achieve?
Arthritic joint surfaces can be a source of stiffness, pain, and swelling. The artificial joint is used to replace the damaged joint surfaces so patients can do their activities with less pain. Unlike a fusion surgery that simply binds the joint together, arthroplasty can help take away pain while allowing the thumb joint to retain movement.
Related Document: A Patient’s Guide to Arthritis of the Thumb
Preparation
How should I prepare for surgery?
The decision to proceed with surgery must be made jointly by you and your surgeon. You need to understand as much about the procedure as possible. If you have concerns or questions, you should talk to your surgeon.
Once you decide on surgery, you need to take several steps. Your surgeon may suggest a complete physical examination by your regular doctor. This exam helps ensure that you are in the best possible condition to undergo the operation.
A second purpose of the preoperative visit is to prepare you for your surgery. You’ll begin learning some of the exercises you’ll use during your recovery. And your therapist can help you anticipate any special needs or problems you might have at home, once you are released from the hospital.
On the day of your surgery, you will probably be admitted to the hospital early in the morning. You shouldn’t eat or drink anything after midnight the night before.
Surgical Procedure
What happens during surgery?
Before we describe the procedure, let’s look first at the artificial thumb joint itself.
The Artificial Thumb Joint
Surgeons have several ways to replace the thumb joint surfaces. One way is to attach the ends of a prosthesis implant into the bones of the thumb joint. A newer method uses a small, marble-shaped implant to form the new joint surfaces. This spherical implant works like a ball bearing to give the joint a smooth arc of movement.
The Operation
The procedure to put in the prosthesis implant takes about two hours to complete. The newer method using the ball implant takes 30 to 60 minutes. Surgery may be done using a general anesthetic, which puts you completely to sleep, or a local anesthetic, which numbs only the hand. With a local anesthetic you may be awake during the surgery, but you won’t be able to see the surgery.
Once you have anesthesia, your surgeon will make sure the skin of your hand is free of infection by cleaning the skin with a germ-killing solution.
Prosthesis Implant
In this procedure, an incision is made across the base of the thumb. The soft tissues are spread apart with a retractor. Special care is taken not to damage the nearby nerves going to the thumb. The joint capsule is opened, exposing the CMC joint. The ends of the bones that form the CMC joint surfaces are taken off, forming flat surfaces.

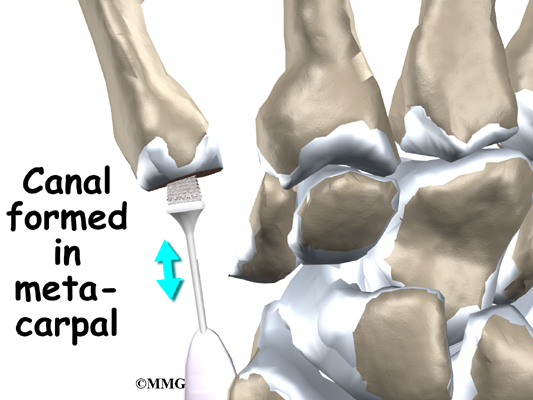
A burr (a small cutting tool) is used to make a canal into the bones that form the thumb joint. The surgeon sizes the stem of the prosthesis to ensure a snug fit into the canal and inserts it. When the new joint is in place, the surgeon wraps the joint with a strip of nearby tendon. This gives the new implant some added protection and stability.
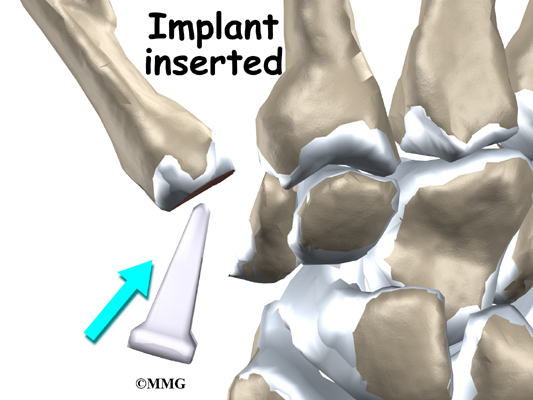

The skin is stitched together and a splint applied.
View animation of joint surface removal
View animation of of canal formation
View animation of stem sizing and insertion
View animation of tendon strip addition
Spherical Implant
A new method for replacing the thumb joint is to use a spherical implant that looks much like a marble. The surgeon makes a small, one-inch incision at the base of the thumb joint. The ends of the bones that form the CMC joint surfaces are removed, forming flat surfaces.
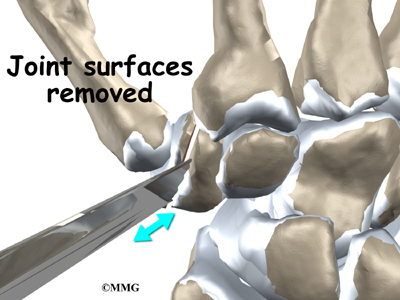
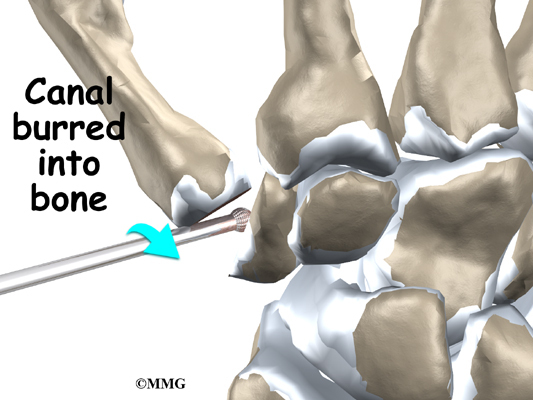
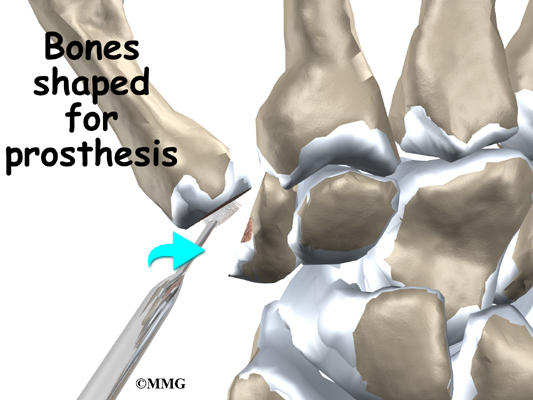
A burr is used to make a small notch, or canal, in the ends of the two bones. The surgeon shapes the notch so the ball-shaped implant will fit snugly in the joint. The implant is placed between the ends of the shaped bones.
The soft tissues are sewn together, and the thumb is splinted and bandaged.
View animation of joint surface removal
View animation of notch formation
View animation of shaping the notch
View animation of implanting the sphere
Complications
What might go wrong?
As with all major surgical procedures, complications can occur. This document doesn’t provide a complete list of the possible complications, but it does highlight some of the most common problems. Some of the most common complications following artificial thumb joint replacement are
- anesthesia
- infection
- nerve damage
- prosthesis failure
Anesthesia
Problems can arise when the anesthesia given during surgery causes a reaction with other drugs the patient is taking. In rare cases, a patient may have problems with the anesthesia itself. In addition, anesthesia can affect lung function because the lungs don’t expand as well while a person is under anesthesia. Be sure to discuss the risks and your concerns with your anesthesiologist.
Infection
Any operation carries a small risk of infection. Replacing the CMC joint with an artificial joint is no different. You will probably be given antibiotics before the operation to reduce the risk of infection. If an infection occurs you will most likely need antibiotics to cure it. You may need additional operations to drain the infection if it involves the area around either implant. In these cases, the artificial joint will need to be removed. A second operation will probably be necessary to fuse the thumb or to perform an arthroplasty that does not require an artificial prosthesis.
Nerve Damage
All of the nerves and blood vessels that go to the thumb travel across, or near, the CMC joint. Since the operation is performed so close to these important structures, it is possible to injure either the nerves or the blood vessels during surgery. The result may be temporary if the nerves have been stretched by retractors holding them out of the way. It is uncommon to have permanent injury to either the nerves or the blood vessels, but it is possible.
Prosthesis Failure
One problem that occurs with artificial replacements is that they can fail. The older silicon-type prosthesis has been shown to break apart and fragment. Most types of prostheses can displace, or move out of the correct position, causing problems. Most of these problems will require a second operation to remove the prosthesis and may need to be repaired with a procedure called an excision arthroplasty.
Related Document: A Patient’s Guide to Resection (Excision) Arthroplasty of the Thumb
After Surgery
What happens after surgery?
After surgery, your thumb will be bandaged with a well-padded dressing and a splint for support. The splint will keep the thumb in a natural position during healing. Your surgeon will want to check your hand within five to seven days. Stitches will be removed after 10 to 14 days, though most of your stitches will be absorbed into your body. You may have some discomfort after surgery. You will be given pain medicine to control the discomfort.
You should keep your hand elevated above the level of your heart for several days to avoid swelling and throbbing. Keep it propped up on a stack of pillows when sleeping or sitting up.
Rehabilitation
What should I expect during my rehabilitation?
A physical or occupational therapist will direct your recovery program. The time it takes to rehabilitate depends on the type of procedure used. Recovery takes up to three months after replacement with a prosthesis implant. Patients wear an arm-length cast with the thumb pointing out for about three weeks after this type of joint replacement surgery.
Patients are able to return to normal activity within three to five weeks after having spherical implant surgery. Recovery is faster because the procedure doesn’t require the surgeon to disturb the tendons near the joint. Range-of-motion exercises can start within one week after surgery using the ceramic ball.
The first few physical therapy treatments will focus on controlling the pain and swelling from surgery. Heat treatments may be used. Your therapist may also use gentle massage and other hands-on treatments to ease muscle spasm and pain.
Then you’ll begin gentle range-of-motion exercise. Strengthening exercises are used to give added stability around the thumb joint. You’ll learn ways to grip and support items in order to do your tasks safely and with the least amount of stress on your thumb joint. As with any surgery, you need to avoid doing too much, too quickly.
Some of the exercises you’ll do are designed get your hand and thumb working in ways that are similar to your work tasks and daily activities. Your therapist will help you find ways to do your tasks that don’t put too much stress on your thumb joint. Before your therapy sessions end, your therapist will teach you a number of ways to avoid future problems.
Your therapist’s goal is to help you keep your pain under control, improve your strength and range of motion, and regain your fine motor abilities with your hand and thumb. When you are well under way, regular visits to your therapist’s office will end. Your therapist will continue to be a resource, but you will be in charge of doing your exercises as part of an ongoing home program.
Guyon’s Canal Syndrome
A Patient’s Guide to Guyon’s Canal Syndrome
Introduction
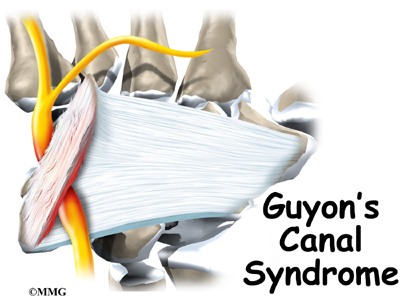
Guyon’s canal syndrome is an entrapment of the ulnar nerve as it passes through a tunnel in the wrist called Guyon’s canal. This problem is similar to carpal tunnel syndrome but involves a completely different nerve. Sometimes both conditions can cause a problem in the same hand.
This guide will help you understand
- how Guyon’s canal syndrome develops
- how doctors diagnose the condition
- what can be done to treat the problem
Anatomy
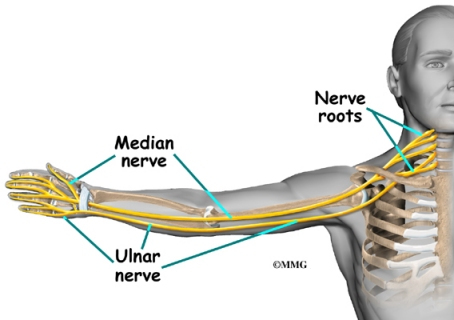
Where is the ulnar nerve, and what does it do?
The ulnar nerve actually starts at the side of the neck, where the individual nerve roots exit the spine through small openings between the vertebrae. The nerve roots then join together to form three main nerves that travel down the arm to the hand, one of which is the ulnar nerve.
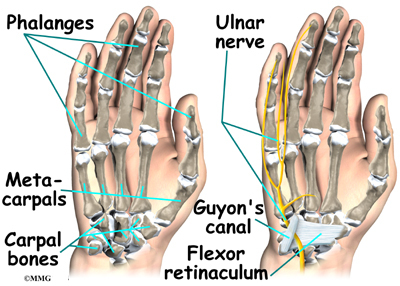
After leaving the side of the neck, the ulnar nerve travels through the armpit and down the arm to the hand and fingers. As it crosses the wrist, the ulnar nerve and ulnar artery run through the tunnel known as Guyon’s canal. This tunnel is formed by two bones (the pisiform and hamate) and the ligament that connects them. After passing through the canal, the ulnar nerve branches out to supply feeling to the little finger and half the ring finger. Branches of this nerve also supply the small muscles in the palm and the muscle that pulls the thumb toward the palm.
The hamate bone forms one side of Guyon’s canal. This bone has a small hook-shaped spur that sticks out to provide an attachment for several wrist ligaments. Known as the hook of hamate, this small bone can break off and press against the ulnar nerve within Guyon’s canal.
Related Document: A Patient’s Guide to Hand Anatomy
Causes
Why do I have this problem?
Guyon’s canal syndrome has several causes. Overuse of the wrist from heavy gripping, twisting, and repeated wrist and hand motions can cause symptoms. Working with the hand bent down and outward can squeeze the nerve inside Guyon’s canal.
Constant pressure on the palm of the hand can produce symptoms. This is common in cyclists and weight lifters from the pressure of gripping. It can also happen after running a jackhammer or when using crutches.
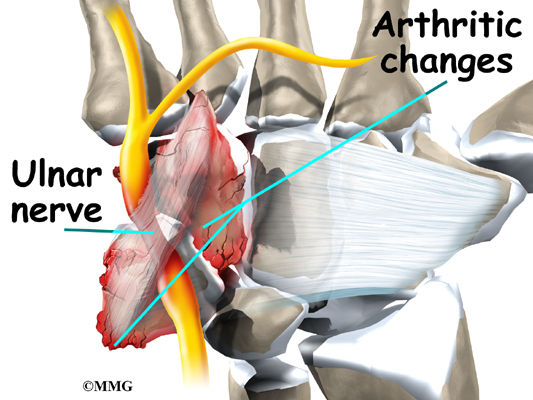
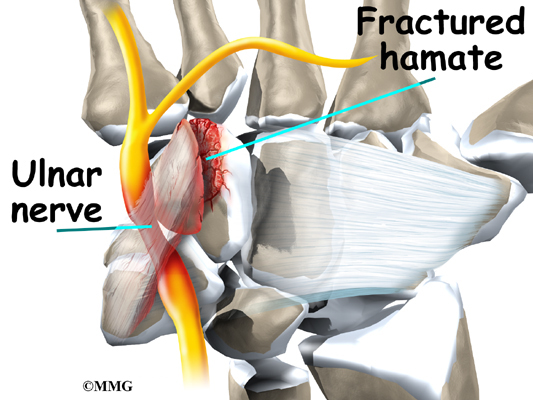
Pressure or irritation of the ulnar nerve can cause symptoms of Guyon’s canal syndrome. A traumatic wrist injury may cause swelling and extra pressure on the ulnar nerve within the canal. Arthritis in the wrist bones and joints may eventually irritate and compress the ulnar nerve. In rare cases, the ulnar artery that travels right beside the nerve may be damaged and form a blood clot. The symptoms caused by the clot mimic Guyon’s canal syndrome. The lack of blood supply to the ulnar nerve is believed to cause the symptoms.
As mentioned earlier, a fractured hamate bone in the wrist can pinch the nerve inside Guyon’s canal. This bone is sometimes fractured when golfers club the ground instead of the golf ball and when baseball players are batting.
Symptoms
What does Guyon’s canal syndrome feel like?
Symptoms usually begin with a feeling of pins and needles in the ring and little fingers, which is often noticed in the early morning when first awakening. This may progress to a burning pain in the wrist and hand followed by decreased sensation in the ring and little fingers. The hand may become clumsy when the muscles controlled by the ulnar nerve become weak. Weakness can affect the small muscles in the palm of the hand and the muscle that pulls the thumb into the palm. Gradual weakness in these muscles makes it hard to spread your fingers and pinch with your thumb.
This syndrome is much less common than carpal tunnel syndrome (CTS), yet both conditions can occur at the same time. The numbness caused by these two syndromes affects the hand in different locations. When the median nerve is compressed in CTS, pain and numbness spread into the thumb, index finger, middle finger, and half of the ring finger. Compression of the ulnar nerve in Guyon’s canal syndrome usually causes numbness in the pinky and half of the ring finger.
Related Document: A Patient’s Guide to Carpal Tunnel Syndrome
Diagnosis
How do doctors identify the problem?
The diagnosis of Guyon’s canal syndrome begins with a careful history and physical examination by your doctor. Compression can occur at several areas along the ulnar nerve, and your doctor will test to find exactly where the nerve is being affected. If it is unclear on the physical examination where the nerve is being squeezed, electrical studies may be ordered to try to find the area of compression.
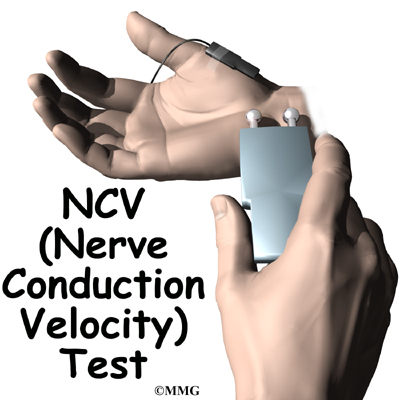
Nerve conduction velocity (NCV) is a test that measures how fast nerve impulses travel along the nerve. Your doctor might want this test to be done to help pinpoint your problem. Special tests may be required to study the nerve.
The NCV is sometimes combined with an electromyogram (EMG). The EMG is done by testing the muscles of the forearm that are controlled by the ulnar nerve to determine if they are working properly. If the test shows a problem with the muscle, the nerve that goes to the muscle might not be working correctly. This is similar to checking whether the wiring in a lamp is working. If the light still doesn’t work after you’ve put in a new bulb, you can begin to tell if there’s a problem in the wiring.
If your symptoms started after a traumatic wrist injury, X-rays may be needed to check for a fractured or dislocated bone.
Treatment
What can be done for the condition?
Nonsurgical Treatment
Activities that might be causing your symptoms need to be changed or stopped if at all possible. Avoid repetitive hand motions, heavy grasping, resting your palm against hard surfaces, and positioning or working with your wrist bent down and out.
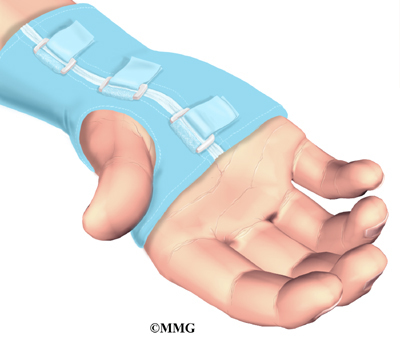
A wrist brace will sometimes decrease the symptoms in the early stages of Guyon’s canal syndrome. A brace keeps the wrist in a resting position (neither bent back nor bent down too far). It can be especially helpful for easing the numbness and pain felt at night because it can keep your hand from curling under as you sleep. The wrist brace can also be worn during the day to calm symptoms and rest the tissues within the canal.
Anti-inflammatory medications may also help control the symptoms of Guyon’s canal syndrome. These medications include common over-the-counter medications such as ibuprofen and aspirin.
You may work with a physical or occupational therapist. The main focus of treatment is to reduce or eliminate the cause of pressure on the ulnar nerve. Your therapist may check your workstation and the way you do your work tasks. Suggestions may be given about the use of healthy body alignment and wrist positions, helpful exercises, and tips on how to prevent future problems.
Surgery
If all attempts to control your symptoms fail, surgery may be suggested to reduce the pressure on the ulnar nerve.
The surgery can be done using a general anesthetic (one that puts you to sleep) or a regional anesthetic. A regional anesthetic blocks the nerves going to only a portion of the body. Injection of medications similar to lidocaine are used to block the nerves for several hours. This type of anesthesia could be an axillary block (only the arm is asleep) or a wrist block (only the hand is asleep). The surgery can also be performed by simply injecting lidocaine around the area of the incision.
Once you have anesthesia, your surgeon will make sure the skin of your palm is free of infection by cleaning the skin with a germ-killing solution.

A small incision is made in the palm of the hand over the spot where the nerve goes through the canal.
The incision makes it possible for the surgeon to see the ligament that crosses over the top of the ulnar nerve. This ligament forms the roof over the top of Guyon’s canal. Once in view, this ligament is released using a scalpel or scissors.
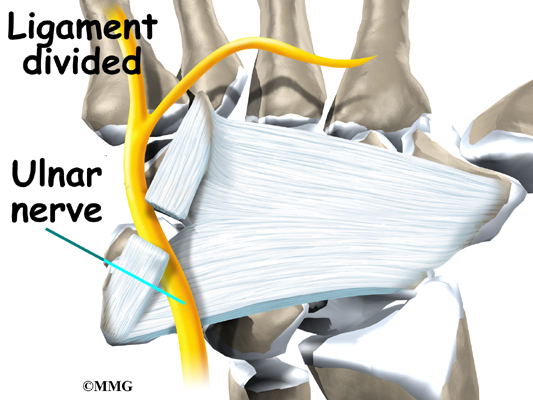
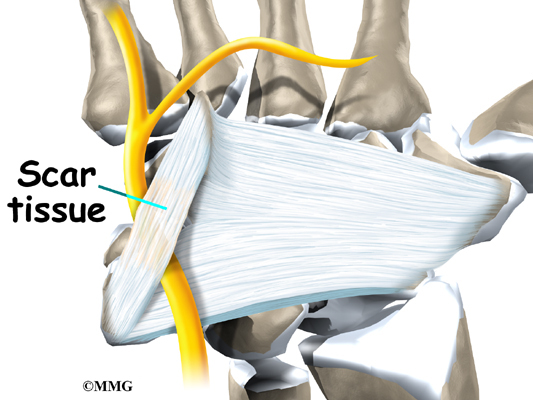
Care is taken to make sure that the ulnar nerve is out of the way and protected. By cutting the ligament, pressure is taken off the ulnar nerve.
Upon releasing the ligament, the surgeon sutures just the skin together and leaves the loose ends of the ligament separated. The loose ends are left apart to keep pressure off the ulnar nerve. Eventually, the gap between the two ends of the ligament fills in with scar tissue. This surgery can usually be done as an outpatient procedure, meaning you can leave the hospital the same day.
Rehabilitation
What can I expect following treatment?
Nonsurgical Rehabilitation
If nonsurgical treatment is successful, you may see improvement in four to six weeks. You may need to continue wearing your wrist splint at night to control symptoms and keep your wrist from curling under as you sleep. Try to do your activities using healthy body and wrist alignment. Limit activities that require repeated motions, heavy grasping, and pressure on the palm of the hand.
After Surgery
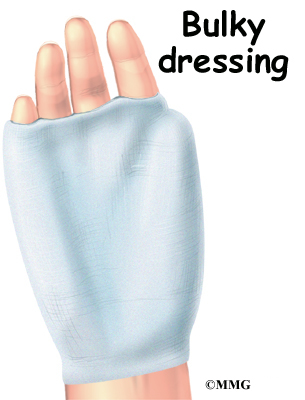
Your hand will be wrapped in a bulky dressing following surgery. Take time during the day to support your arm with your hand elevated above the level of your heart. You are encouraged to move your fingers and thumb occasionally during the day. Keep the dressing on your hand until you return to the surgeon. Avoid getting the stitches wet. Your stitches will be removed 10 to 14 days after surgery.
Pain and numbness generally begin to improve after surgery, but you may have tenderness in the area of the incision for several months.
You will probably need to attend occupational or physical therapy sessions for six to eight weeks, and you should expect full recovery to take several months. You’ll begin doing active hand movements and range-of-motion exercises. Therapists also use ice packs, soft-tissue massage, and hands-on stretching to help with the range of motion. When the stitches are removed, you may start carefully strengthening your hand by squeezing and stretching special putty.
As you progress, your therapist will give you exercises to help strengthen and stabilize the muscles and joints in the hand. Other exercises are used to improve fine motor control and dexterity. Some of the exercises you’ll do are designed get your hand working in ways that are similar to your work tasks and sport activities.
Your therapist will help you find ways to do your tasks that don’t put too much stress on your hand and wrist. Before your therapy sessions end, your therapist will teach you a number of ways to avoid future problems.
Ulnar Collateral Ligament Injuries of the Thumb
A Patient’s Guide to Ulnar Collateral Ligament Injuries of the Thumb
Introduction
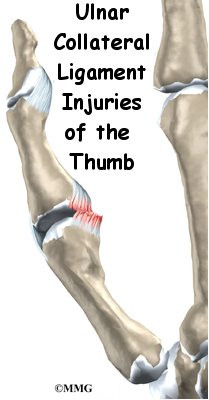
Injury to the ulnar collateral ligament of the thumb is fairly common. This strong band of tissue is attached to the middle joint of the thumb, the joint next to the web space of the thumb. This condition is sometimes called gamekeeper’s thumb because Scottish gamekeepers commonly injured their thumbs as a result of their job.
This guide will help you understand
- how the ulnar collateral ligament is injured
- how doctors diagnose the condition
- what treatments are available
Anatomy


Where does the condition develop?
The joint that is affected is called the metacarpophalangeal joint, or MCP joint. Any hard force on the thumb that pulls the thumb away from the hand (called a valgus force) can cause damage to the ulnar collateral ligaments. When the thumb is straight, the collateral ligaments are tight and stabilize the joint against valgus force. If the force is too strong, the ligaments can tear. They may even tear completely. A complete tear is also called a rupture.
When the collateral ligaments actually tear, the MCP joint becomes very unstable. It is especially unstable when the thumb is bent back. If one of the ligaments pulls away from the bone and folds backwards, it won’t be able to heal in the correct position. When this happens, surgery is needed to fix the ligament.
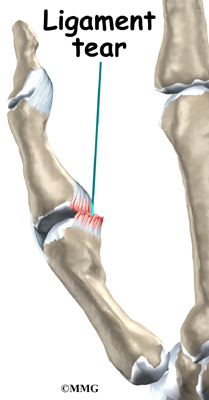

Sometimes the ligament itself will not tear but instead pulls a small piece of bone off the base of the thumb where it attaches. This is called an avulsion fracture. This can also lead to an unstable thumb joint if the fracture does not heal correctly.
Related Document: A Patient’s Guide to Hand Anatomy
Causes
Why do I have this problem?
In Scottish gamekeepers, ligament damage in the MCP joint happened because the ligament stretched out after the gamekeepers repeated the same action over and over. Today, most cases of ligament damage in the MCP joint are caused from sports injuries. Now doctors tend to refer to the condition as skier’s thumb, since it happens so often in downhill ski accidents.
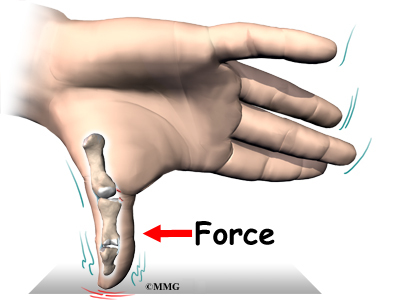
Any extreme force that pulls the thumb away from the palm of the hand can damage the ligaments. The most common way for this to happen is to fall on your hand with your thumb stretched out. When a skier falls down while holding a ski pole, the thumb may get bent out and back, leading to an injury in the ulnar collateral ligament of the thumb.
Symptoms
What does an injured ulnar collateral ligament of the thumb feel like?
When the ulnar collateral ligament of the thumb is injured, the MCP joint becomes painful and swollen, and the thumb feels weak when you pinch or grasp. You may see bruise-like discolorations on the skin around the joint. The loose end of the torn ligament may form a bump that can be felt along the edge of the thumb near the palm of the hand. A torn ligament makes it difficult to hold or squeeze things between your thumb and index finger.
Diagnosis
How do doctors identify the problem?
Your doctor will ask you to describe your injury and symptoms. Your doctor will also do a complete physical exam of both thumbs and hands.
You will need to have X-rays or other imaging tests.
X-rays are required to see if there is an associated avulsion fracture, since this may change the recommended treatment. X-rays cannot show all types of damage to ligaments. For example, an X-ray of your thumb can look perfectly normal, even if the ulnar collateral ligament is partially or completely torn.
To check the ligament, your doctor will perform a valgus stress test. This involves pushing your thumb backwards and out in different positions. Valgus tests can be painful, so you may be given a local anesthetic before being tested.
The stress test is done to determine how stable your joint is. If your joint holds steady, the ligaments may only have been strained or partially torn. If your joint is loose and unstable, your ligaments have probably completely ruptured. Your doctor may do the stress test at the same time your thumb is being X-rayed. The X-ray image shows how unstable the joint is when it is stressed.
Treatment
What can be done for the condition?
The MCP joint needs to be stable for the thumb to be strong enough to grasp objects. The goal of treatment is to help the ligaments heal so that the thumb can be restored to full function.
Nonsurgical Treatment
If the thumb ligaments are only partially torn, they usually heal without surgery. Your thumb will be immobilized for four to six weeks in a special cast, called a thumb spica cast. After that, you will begin to do exercises to regain your range of motion and to strengthen your grip.
Getting treatment soon after an injury to the ulnar collateral ligament of the thumb may improve your ability to regain strength and range of motion.
Surgery
If the ligaments are completely torn, you will most likely have surgery to repair them. A torn ligament cannot fully heal itself. Surgery for the thumb collateral ligaments is usually done as an outpatient procedure, meaning you will probably go home the same day as the surgery.
Suture Repair
In the surgery, your surgeon will make a small V- or S-shaped cut over the back of the MCP joint of the thumb. This helps isolate and protect the nerve branches running up your thumb. Your surgeon will then cut through a sheet of tissue called the adductor aponeurosis. This helps expose the MCP joint and the ligaments. The area around the injury is examined for any soft tissue damage. Your surgeon then repairs the ligaments with stitches that anchor them back to the bone.
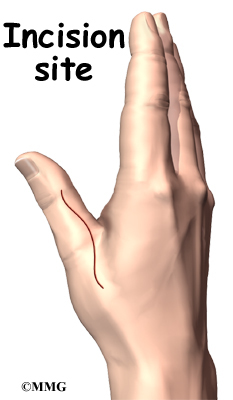
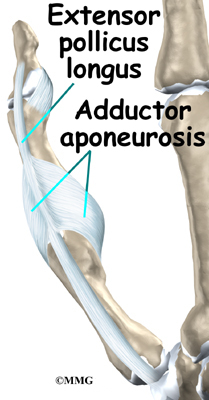
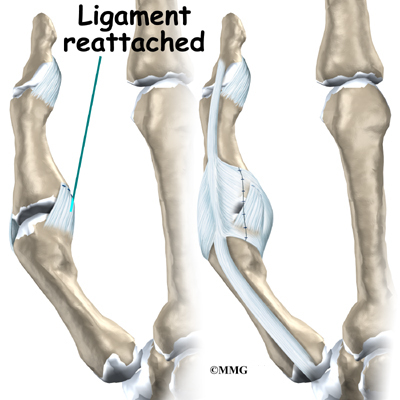
Patients usually have good results when suture repair is done within four weeks after the injury. After surgery, pain and stiffness are usually minimal, and thumb strength will normally return.
In some patients, the MCP joint continues to be unstable. The joint feels painful when pinching or grasping and is generally weak. Most of the time, chronic instability tends to happen when the patient doesn’t get treatment or when a doctor wasn’t aware of a ruptured tendon. However, even when skilled surgery is performed, the thumb sometimes ends up being chronically unstable.
Fusion Surgery

A thumb that is loose and unstable will eventually develop arthritis. Some surgeons have had success by grafting in new tissue to reconstruct the ligaments. When the ligament has been unstable for a long time, surgery may be needed to keep the MCP joint from moving. This type of surgery is called fusion. A fusion procedure is often the best choice when a patient’s job involves heavy labor that would continue to put too much strain on his or her unstable thumb joint.
When the joint is fused together, a person’s ability to do day-to-day tasks isn’t affected that much. This is because some people have a very small range of motion in the MCP joint anyway. Fusion keeps the joint from moving, but it also protects it from eventually becoming arthritic and painful.
Surgery does carry some risks. In rare cases, some of the small nerves to the skin on the back of the thumb may be damaged during surgery. This may cause numbness on the back of the thumb. When this happens, it usually gets better on its own. Sometimes the MCP and other thumb joints become stiff. Physical or occupational therapy treatments are helpful for easing the stiffness and helping you regain thumb movement.
Related Document: A Patient’s Guide to Thumb Fusion Surgery
Rehabilitation
What should I expect following treatment?
Nonsurgical Rehabilitation
Patients who are treated nonsurgically with a thumb spica cast start an exercise program when the cast is removed, usually after four to six weeks. Motion and strength usually improve within another two to four weeks, allowing people to get back to normal activity.
After Surgery
You will be placed in a thumb spica cast after surgery for four weeks. Some surgeons will take the spica cast off at four weeks and then place your thumb in an immobilizing splint for another two weeks. Some patients work with a physical or occupational therapist to help regain range of motion and strength in the thumb. Most patients are able to return to normal activity three months after their surgery.
Artificial Joint Replacement of the Finger
A Patient’s Guide to Artificial Joint Replacement of the Finger
Introduction
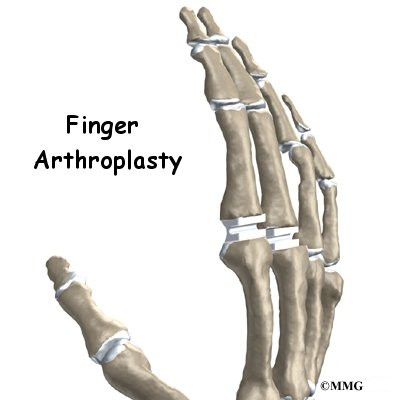
If nonsurgical treatments are not successful in easing problems of finger arthritis, your doctor may recommend replacing the surfaces of the joint. Joint replacement surgery is called joint arthroplasty.
This guide will help you understand
- what parts make up the finger joint
- how the operation is performed
- what to expect before and after surgery
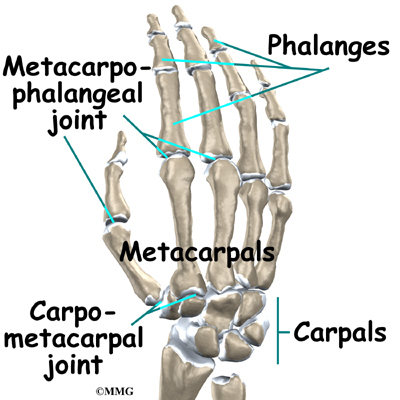
Anatomy
What parts of the finger are involved?
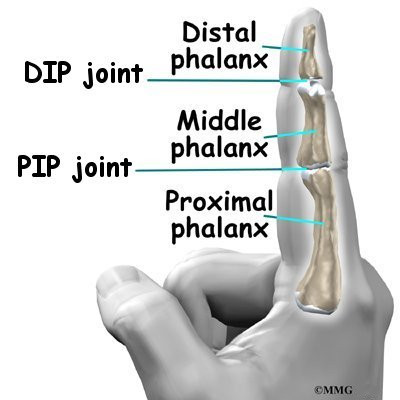
The finger joints work like hinges when the fingers bend and straighten. The main knuckle joint is the metacarpophalangeal joint (MCP joint). It is formed by the connection of the metacarpal bone in the palm of the hand to the finger bone, or phalanx. Each finger has three phalanges, separated by two interphalangeal joints (IP joints). The one closest to the MCP joint (knuckle) is called the proximal IP joint (PIP joint). The joint near the end of the finger is called the distal IP joint (DIP joint).
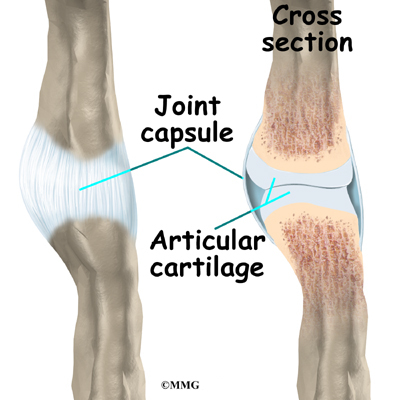
Ligaments are tough bands of tissue that connect bones together. Several ligaments hold each finger joint together. These ligaments join to form the joint capsule of the finger joint. The joint capsule is a watertight sac around the joint. The joint surfaces are covered with a material called articular cartilage. This material is the slick, spongy material that allows one side of a joint to slide against the other joint surface easily. When this material wears out, the joint develops a type of arthritis called osteoarthritis and becomes painful.
Related Document: A Patient’s Guide to Hand Anatomy
Rationale
What does the surgeon hope to achieve?
Arthritic joint surfaces can be a source of stiffness, pain, and swelling. The artificial joint is used to replace the damaged joint surfaces so patients can do their activities with freedom of movement and less pain.
Preparation
What should I do to prepare for surgery?
The decision to proceed with surgery must be made jointly by you and your surgeon. You need to understand as much about the procedure as possible. If you have concerns or questions, you should talk to your surgeon.
Once you decide on surgery, you need to take several steps. Your surgeon may suggest a complete physical examination by your regular doctor. This exam helps ensure that you are in the best possible condition to undergo the operation.
On the day of your surgery, you will probably be admitted to the hospital early in the morning. You shouldn’t eat or drink anything after midnight the night before. The length of time you spend in the hospital depends a lot on your recovery from anesthesia after surgery. In general, finger joint surgery can be done on an outpatient basis, meaning you can leave the hospital the same day.
Surgical Procedure
What happens during the operation?
Before we describe the procedure, let’s look first at the artificial finger joint itself.
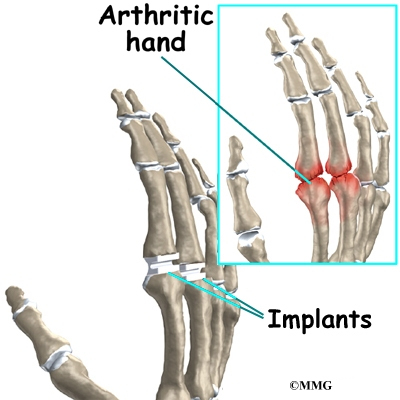
The Artificial Finger Joint
Surgeons use silicon plastic implants to replace the original joint surfaces. The artificial joint functions the same way a hinge on a door does.
The Operation
The procedure takes about two hours to complete. Surgery may be done using a general anesthetic, which puts you completely to sleep, or a local anesthetic, which numbs only the hand. With a local anesthetic you may be awake during the surgery, but you won’t be able to see the surgery.
Once you have anesthesia, your surgeon will make sure the skin of your hand is free of infection by cleaning the skin with a germ-killing solution.
An incision is made across the back of the finger joints that are to be replaced. The soft tissues are spread apart with a retractor. Special care is taken not to damage the nearby nerve that passes by the joint. The joint is exposed. The ends of the bones that form the finger joint surfaces are taken off, forming flat surfaces.
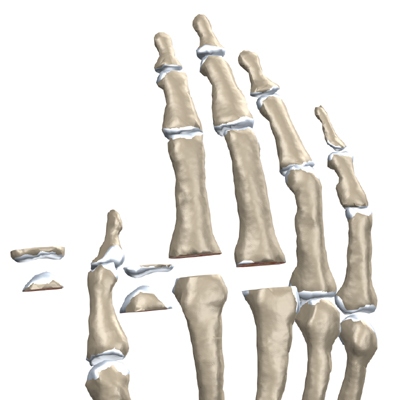
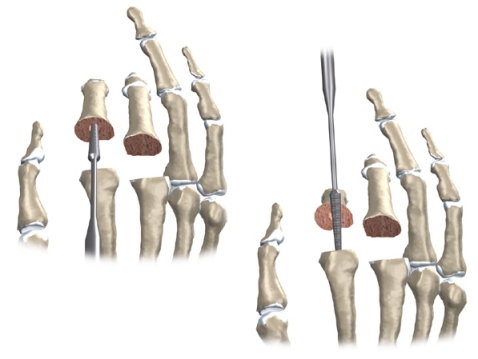
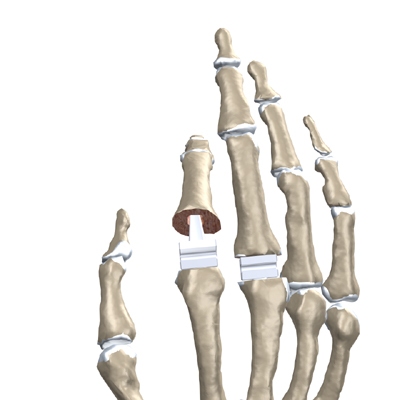
A burr (a small cutting tool) is used to make a canal into the bones that form the finger joint.
The surgeon then sizes the stem of the prosthesis to ensure a snug fit into the hollow bone marrow space of the bone. The prosthesis is inserted into the ends of both finger bones.
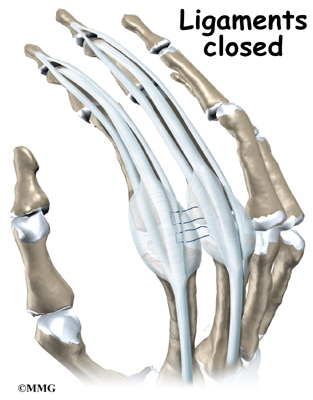
When the new joint is in place, the surgeon wraps the joint with a strip of nearby ligament to form a tight sac. This gives the new implant some added protection and stability.
The soft tissues are sewn together, and the finger is splinted and bandaged.
View animation of removing the joint surfaces
View animation of forming the canal in the bones of the finger
View animation of inserting the new finger joint
Complications
What might go wrong?
As with all major surgical procedures, complications can occur. This document doesn’t provide a complete list of the possible complications, but it does highlight some of the most common problems. Some of the most common complications following artificial finger joint replacement are
- anesthesia
- infection
- nerve damage
- prosthesis failure
Anesthesia
Problems can arise when the anesthesia given during surgery causes a reaction with other drugs the patient is taking. In rare cases, a patient may have problems with the anesthesia itself. In addition, anesthesia can affect lung function because the lungs don’t expand as well while a person is under anesthesia. Be sure to discuss the risks and your concerns with your anesthesiologist.
Infection
Any operation carries a small risk of infection. Replacing the finger joint with an artificial joint is no different. You will probably be given antibiotics before the operation to reduce the risk of infection.
If an infection occurs you will most likely need antibiotics to cure it. You may need additional operations to drain the infection if it involves the area around either implant. In these cases, the artificial joint will need to be removed. The surgeon will most likely fuse the joint rather than attempt another artificial joint replacement.
Nerve Damage
All of the nerves and blood vessels that go to the finger travel across, or near, the finger joint. Since the operation is performed so close to these important structures, it is possible to injure either the nerves or the blood vessels during surgery. The result may be temporary if the nerves have been stretched by retractors holding them out of the way. It is uncommon to have permanent injury to either the nerves or the blood vessels, but it is possible.
Prosthesis Failure
One of the problems that occurs with artificial replacements is that they can fail. The older silicon-type prosthesis has been shown to break apart and fragment. Most types of prostheses can displace, or move out of the correct position, causing problems. Most of these problems will require a second operation to remove and replace the prosthesis.
After Surgery
What happens immediately after surgery?
After surgery, your finger will be bandaged with a well-padded dressing and a splint for support. The splint will keep the finger in a straightened position during healing. Some patients are placed in an arm-length cast with the finger in a straightened position for about three weeks after the prosthesis is implanted. Your surgeon will want to check your hand in five to seven days. Stitches will be removed after 10 to 14 days, though most of your stitches will be absorbed into your body. You may have some discomfort after surgery. You will be given pain medicine to control the discomfort you have.
You should keep your hand elevated above the level of your heart for several days to avoid swelling and throbbing. Keep it propped up on a stack of pillows when sleeping or sitting up.
Rehabilitation
What should I expect during my rehabilitation?
A physical or occupational therapist will direct your recovery program. Recovery takes up to three months after a prosthesis is implanted.
The first few therapy treatments will focus on controlling the pain and swelling from surgery. Heat treatments may be used. Your therapist may also use gentle massage and other hands-on treatments to ease muscle spasm and pain.
Then you’ll begin gentle range-of-motion exercise. Strengthening exercises are used to give added stability around the finger joint. You’ll learn ways to grip and support items in order to do your tasks safely and with the least amount of stress on your new finger joint. As with any surgery, you need to avoid doing too much, too quickly.
Some of the exercises you’ll do are designed to get your hand and fingers working in ways that are similar to your work tasks and daily activities. Your therapist will help you find ways to do your tasks that don’t put too much stress on your finger joint. Before your therapy sessions end, your therapist will teach you a number of ways to avoid future problems.
The therapist’s goal is to help you keep your pain under control, improve your strength and range of motion, and regain your fine motor abilities with your hand and fingers. When you are well underway, regular visits to the therapist’s office will end. Your therapist will continue to be a resource, but you will be in charge of doing your exercises as part of an ongoing home program.