Ankle
Ankle Arthroscopy
A Patient’s Guide to Ankle Arthroscopy
Introduction

Arthroscopy is a procedure where a small video camera attached to a fiberoptic lens is inserted into the body to allow a physician or surgeon to see without making a large incision. Arthroscopy is now used to evaluate and treat orthopedic problems in many different joints of the body. The ankle joint is one of the common joints that arthroscopy is used to evaluate and treat problems with this minimally invasive technique.
This guide will help you understand
- what parts of the ankle are treated during ankle arthroscopy
- what types of conditions are treated with ankle arthroscopy
- what to expect before and after ankle arthroscopy
Anatomy
What parts of the ankle are involved?
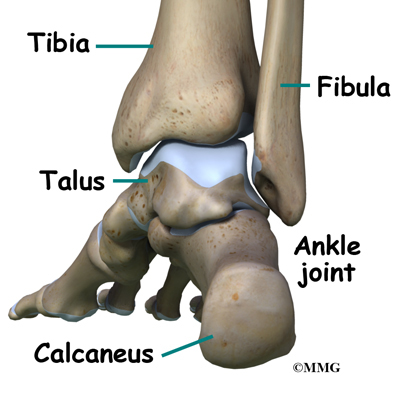
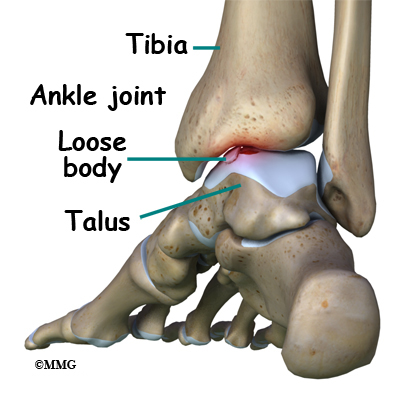
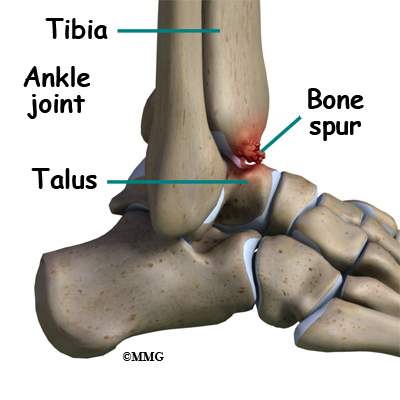
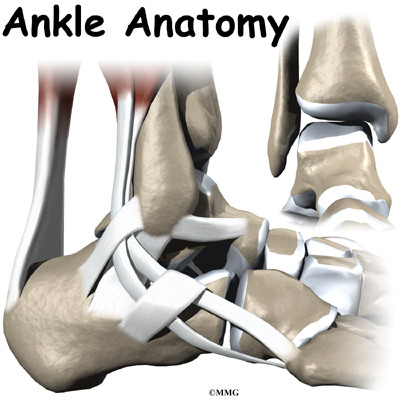
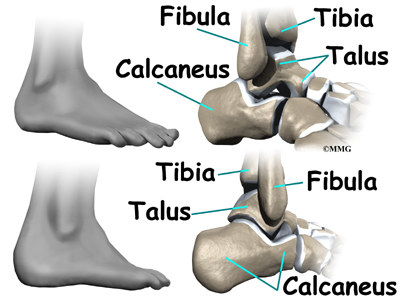
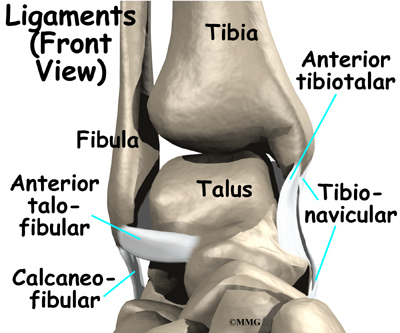
The ankle joint is formed by the connection of three bones. The top of the talus fits inside a socket that is formed by the lower end of the tibia (shinbone) and the fibula (the small bone of the lower leg). The bottom of the talus sits on the heel bone, called the calcaneus.
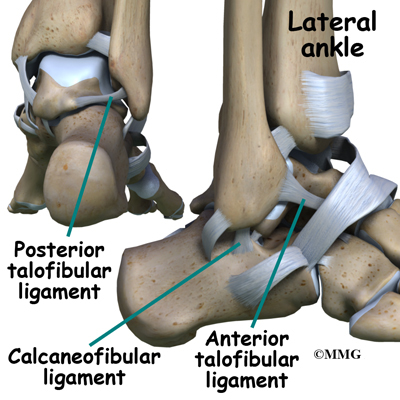
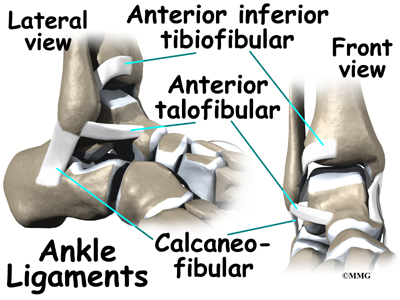
Ligaments are tough bands of tissue that connect bones together. Three ligaments make up the lateral ligament complex on the side of the ankle farthest from the other ankle. They are the anterior talofibular ligament (ATFL), the calcaneofibular ligament (CFL), and the posterior talofibular ligament (PTFL).
The common ankle sprain, or inversion injury to the ankle, usually involves two ligaments, the ATFL and CFL. Normally, the ATFL keeps the ankle from sliding forward, and the CFL keeps the ankle from rolling inward on its side. On the side of the ankle joint closest to the other foot (the medial side) is another ligament called the deltoid ligament.
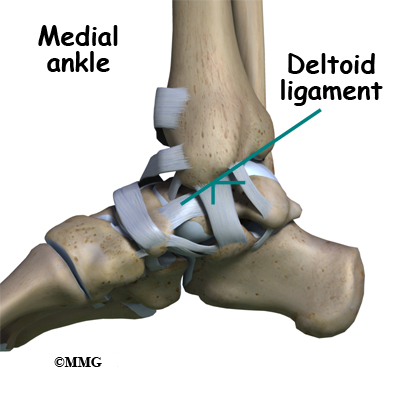
The deltoid ligament can be torn, but it is usually torn in a combination of injuries when the ankle is broken; it is uncommon to injure the deltoid ligament alone.
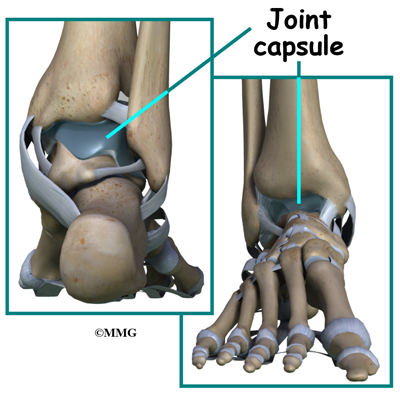
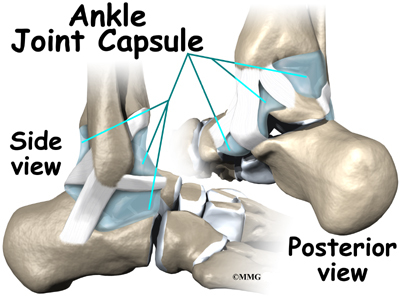
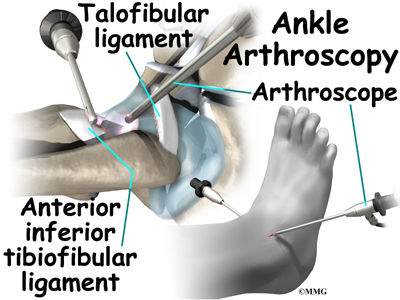
The ankle joint is surrounded by a water tight pocket called the joint capsule. This capsule is formed by ligaments, connective tissue and synovial tissue. When the joint capsule is filled with sterile saline and is distended, the surgeon can insert the arthroscope into the pocket that is formed, turn on the lights and the camera and see inside the ankle joint as if looking into an aquarium. The surgeon can see the structures that are inside the ankle joint including the joint surfaces of the distal tibia, fibula and talus and the synovial lining of the joint.
Rationale
What does my surgeon hope to accomplish?
When ankle arthroscopy first became available it was used primarily to look inside the ankle joint and make a diagnosis. Today, ankle arthroscopy is used to perform a wide range of surgical procedures including confirming a diagnosis, removing loose bodies, removing bone spurs, debriding excess inflamed synovial tissue, and fixing fractures of the joint surface.
Your surgeon’s goal is to fix or improve your problem by performing a suitable surgical procedure; the arthroscope is a tool that improves the surgeon’s ability to perform that procedure. The arthroscope image is magnified and allows the surgeon to see better and clearer. The arthroscope allows the surgeon to see and perform surgery using much smaller incisions. This results in less tissue damage to normal tissue and can shorten the healing process. But remember, the arthroscope is only a tool. The results that you can expect from a ankle arthroscopy depend on what is wrong with your ankle, what can be done inside your ankle to improve the problem and your effort at rehabilitation after the surgery.
Preparations
What do I need to know before surgery?
You and your surgeon should make the decision to proceed with surgery together. You need to understand as much about the procedure as possible. If you have concerns or questions, be sure and talk to your surgeon.
Once you decide on surgery, you need to take several steps. Your surgeon may suggest a complete physical examination by your regular doctor. This exam helps ensure that you are in the best possible condition to undergo the operation.
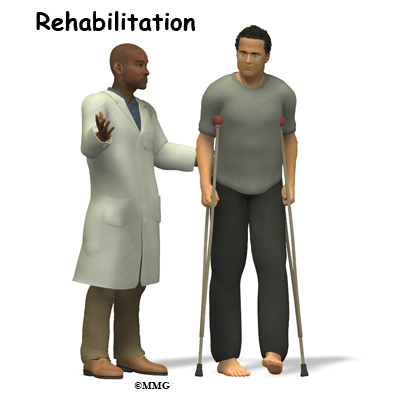
You may also need to spend time with the physical therapist who will be managing your rehabilitation after surgery. This allows you to get a head start on your recovery. One purpose of this preoperative visit is to record a baseline of information. The therapist will check your current pain levels, ability to do your activities and the movement and strength of each ankle.
A second purpose of the preoperative visit is to prepare you for surgery. The therapist will teach you how to walk safely using crutches or a walker. And you’ll begin learning some of the exercises you’ll use during your recovery.
On the day of your surgery, you will probably be admitted for surgery early in the morning. You shouldn’t eat or drink anything after midnight the night before.
Surgical Procedure
What happens during ankle arthroscopy?

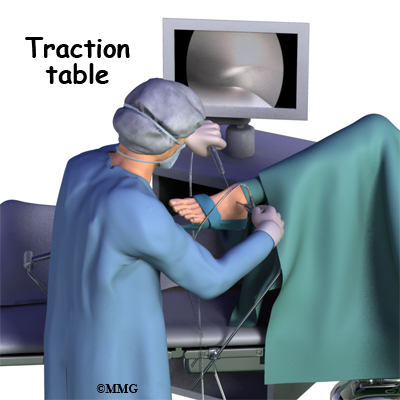
Before surgery you will be placed under either general anesthesia or a type of spinal anesthesia. The ankle joint is very tight with little space between the tibia and the talus. By applying traction, the surgeon is able to increase this space and allow the arthroscope to be inserted into that space. The end of the arthroscope will be moved about in this space to look throughout the joint. Finally, sterile drapes are placed to create a sterile environment for the surgeon to work. There is a great deal of equipment that surrounds the operating table including the TV screens, cameras, light sources and surgical instruments.
The surgeon begins the operation by making two or three small openings into the ankle, called portals. These portals are where the arthroscope and surgical instruments are placed inside the ankle. Care is taken to protect the nearby nerves and blood vessels. A small metal or plastic tube (or cannula) will be placed through one of the portals to inflate the ankle with sterile saline.
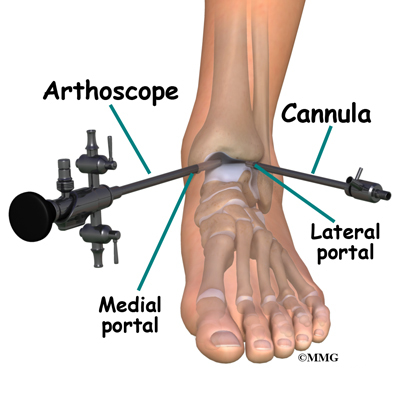
The arthroscope is a small fiber-optic tube that is used to see and operate inside the joint. The arthroscope is a small metal tube about 1/4 inch in diameter (slightly smaller than a pencil) and about 7 inches in length. The fiberoptics inside the metal tube of the arthroscope allows a bright light and TV camera to be connected to the outer end of the arthroscope. The light shines through the fiberoptic tube and into the ankle joint. A TV camera is attached to the lens on the outer end of the arthroscope. The TV camera projects the image from inside the ankle joint on a TV screen next to the surgeon. The surgeon actually watches the TV screen (not the ankle) while moving the arthroscope to different places inside the ankle joint.
Over the years since the invention of the arthroscope, many very specialized instruments have been developed to perform different types of surgery using the arthroscope to see what is going on while the instruments are being used. Today, many surgical procedures that once required large incisions for the surgeon to see and fix the problem can be done with much smaller incisions. For example, simple removal of a loose body in the ankle can be done using two or three small 1/4 inch incisions. More extensive surgical procedures may require larger incisions. Your surgeon may decide during the procedure that the problem requires a more traditional open type operation. If this has been discussed before the operation the surgery may be performed immediately; if not, the arthroscopic procedure will be concluded and a later operation planned. Your surgeon will discuss the details of what was found at the time of the arthroscopy and what more needs to be done in the later operation.
Once the surgical procedure is complete, the arthroscopic portals and surgical incisions will be closed with sutures or surgical staples. You may be placed in a large compressive bandage and splint that will be applied from the knee to the toes. The splint and bandage is used to immobilize and protect the ankle. If your surgeon feels that you do not need a bulky bandage and splint, you may be placed in compression stockings. A compressive bandage (or stockings) reduce swelling and help prevent blood clots in the leg. Once the bandage has been placed, you will be taken to the recovery room.
Complications
What can go wrong?
As with all major surgical procedures, complications can occur during ankle arthroscopy. This document doesn’t provide a complete list of the possible complications, but it does highlight some of the most common problems. Some of the most common complications following ankle arthroscopy are
- anesthesia complications
- thrombophlebitis
- infection
- equipment failure
- slow recovery
Anesthesia Complications
Most surgical procedures require that some type of anesthesia be done before surgery. A very small number of patients have problems with anesthesia. These problems can be reactions to the drugs used, problems related to other medical complications, and problems due to the anesthesia. Be sure to discuss the risks and your concerns with your anesthesiologist.
Thrombophlebitis (Blood Clots)
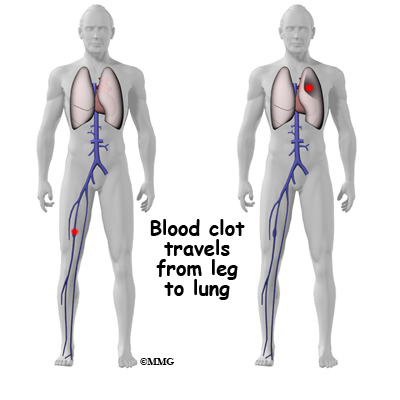
Thrombophlebitis, sometimes called deep venous thrombosis (DVT), can occur after any operation, but is more likely to occur following surgery on the hip, pelvis, or knee. DVT occurs when blood clots form in the large veins of the leg. This may cause the leg to swell and become warm to the touch and painful. If the blood clots in the veins break apart, they can travel to the lung, where they lodge in the capillaries and cut off the blood supply to a portion of the lung. This is called a pulmonary embolism. (Pulmonary means lung, and embolism refers to a fragment of something traveling through the vascular system.) Most surgeons take preventing DVT very seriously. There are many ways to reduce the risk of DVT, but probably the most effective is getting you moving as soon as possible after surgery. Two other commonly used preventative measures include
- pressure stockings to keep the blood in the legs moving
- medications that thin the blood and prevent blood clots from forming
Infection
Following ankle arthroscopy, it is possible that a postoperative infection may occur. This is very uncommon and happens in less than 1% of cases. You may experience increased pain, swelling, fever and redness or drainage from the incisions. You should alert your surgeon if you think you are developing an infection.
Infections are of two types: superficial or deep. A superficial infection may occur in the skin around the incisions or portals. A superficial infection does not extend into the joint and can usually be treated with antibiotics alone. If the ankle joint itself becomes infected, this is a serious complication and will require antibiotics and possibly another surgical procedure to drain the infection.
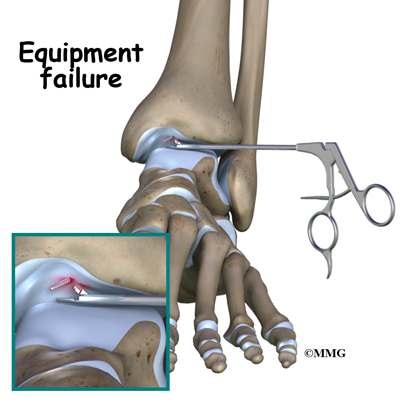
Equipment Failure
Many of the instruments used by the surgeon to perform ankle arthroscopy are small and fragile. These instruments can be broken resulting in a piece of the instrument floating inside of the joint. The broken piece is usually easily located and removed, but this may cause the operation to last longer than planned. There is usually no damage to the joint due to the breakage.
Different types of surgical devices (screws, pins and suture anchors) are used to hold tissue in place during and after arthroscopy. These devices can cause problems. If one breaks, the free-floating piece may hurt other parts inside the joint, particularly the articular cartilage. The end of the tissue anchor may poke too far through tissue and the point may rub and irritate nearby tissues. A second surgery may be needed to remove the device or fix problems with these devices.
Slow Recovery
Not everyone gets quickly back to routine activities after ankle arthroscopy. Because the arthroscope allows surgeons to use smaller incisions than in the past, many patients mistakenly believe that less surgery was necessary. This is not always true. The arthroscope allows surgeons to do a great deal of reconstructive surgery inside the ankle joint without making large incisions. How fast you recover from ankle arthroscopy depends on what type of surgery was done inside your ankle. Simple problems that require simple procedures using the arthroscope generally get better faster. Patients with extensive damage to the articular cartilage in the ankle joint tend to require more complex and extensive surgical procedures. These more extensive reconstructions take longer to heal and have a slower recovery. You should discuss this with your surgeon and make sure that you have realistic expectations of what to expect following arthroscopic ankle surgery.
After Surgery
What happens after ankle arthroscopy?
Ankle arthroscopy is usually done on an outpatient basis meaning that patients go home the same day as the surgery. More complex reconstructions that require larger incisions and surgery that alters bone may require a short stay in the hospital to control pain more aggressively and monitor the situation carefully. You may also begin physical therapy while in the hospital.
The portals are covered with surgical strips, the larger incisions may have been repaired with either surgical staples or sutures. Crutches are commonly used after ankle arthroscopy. They may only be needed for one to two days after a simple procedures.
Follow your surgeon’s instructions about how much weight to place on your foot while standing or walking. Avoid doing too much, too quickly. You may be instructed to use a cold pack on the ankle and to keep your leg elevated and supported.
Rehabilitation
What will my recovery be like?
Your rehabilitation will depend on the type of surgery required. You may not need formal physical therapy after simple procedures such as a simple debridement. Some patients may simply do exercises as part of a home program after some simple instructions.
Many surgeons have patients take part in formal physical therapy after any type of ankle arthroscopy procedure. Generally speaking, the more complex the surgery the more involved and prolonged your rehabilitation program will be. The first few physical therapy treatments are designed to help control the pain and swelling from the surgery. Physical therapists will also work with patients to make sure they are putting only a safe amount of weight on the affected leg.
Today, the arthroscope is used to perform quite complicated major reconstructive surgery using very small incisions. Remember, just because you have small incisions on the outside, there may be a great deal of healing tissue on the inside of the ankle joint. If you have had major reconstructive surgery, you should expect full recovery to take several months. The physical therapist’s goal is to help you keep your pain under control and improve the range of motion and strength of your ankle. When you are well under way, regular visits to your therapist’s office will end. The therapist will continue to be a resource, but you will be in charge of doing your exercises as part of an ongoing home program.
Ankle Anatomy
A Patient’s Guide to Ankle Anatomy
Introduction
The ankle joint acts like a hinge. But it’s much more than a simple hinge joint. The ankle is actually made up of several important structures. The unique design of the ankle makes it a very stable joint. This joint has to be stable in order to withstand 1.5 times your body weight when you walk and up to eight times your body weight when you run.
Normal ankle function is needed to walk with a smooth and nearly effortless gait. The muscles, tendons, and ligaments that support the ankle joint work together to propel the body. Conditions that disturb the normal way the ankle works can make it difficult to do your activities without pain or problems.
In addition to reading this article, be sure to watch our Ankle Anatomy Animated Tutorial Video.
This guide will help you understand
- what parts make up the ankle
- how the ankle works
Important Structures
The important structures of the ankle can be divided into several categories. These include
- bones and joints
- ligaments and tendons
- muscles
- nerves
- blood vessels
The top of the foot is referred to as the dorsal surface. The sole of the foot is the plantar surface.
Bones and Joints
The ankle joint is formed by the connection of three bones. The ankle bone is called the talus. The top of the talus fits inside a socket that is formed by the lower end of the tibia (shinbone) and the fibula (the small bone of the lower leg). The bottom of the talus sits on the heelbone, called the calcaneus.
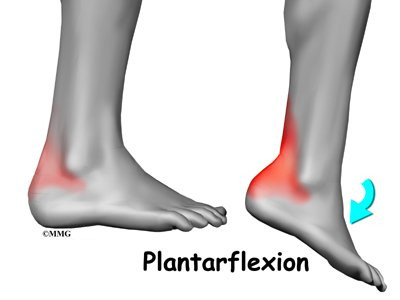
The talus works like a inside the socket to allow your foot to move up (dorsiflexion) and down (plantarflexion).

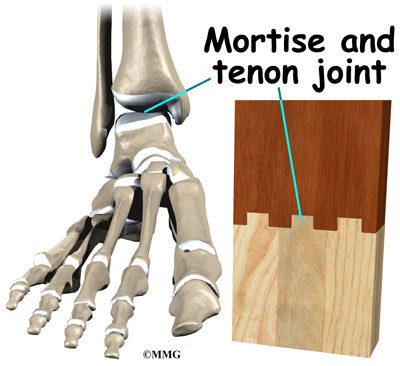
Woodworkers and craftsmen are familiar with the design of the ankle joint. They use a similar construction, called a mortise and tenon, to create stable structures. They routinely use it to make strong and sturdy items, such as furniture and buildings.
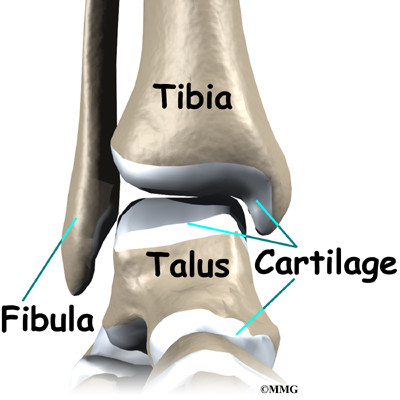
Inside the joint, the bones are covered with a slick material called articular cartilage. Articular cartilage is the material that allows the bones to move smoothly against one another in the joints of the body.
The cartilage lining is about one-quarter of an inch thick in most joints that carry body weight, such as the ankle, hip, or knee. It is soft enough to allow for shock absorption but tough enough to last a lifetime, as long as it is not injured.
Ligaments and Tendons
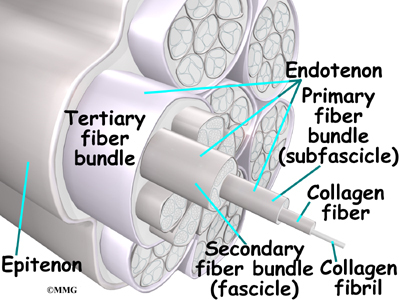
Ligaments are the soft tissues that attach bones to bones. Ligaments are very similar to tendons. The difference is that tendons attach muscles to bones. Both of these structures are made up of small fibers of a material called collagen. The collagen fibers are bundled together to form a rope-like structure. Ligaments and tendons come in many different sizes and like rope, are made up of many smaller fibers. Thickness of the ligament or tendon determines its strength.

Ligaments on both sides of the ankle joint help hold the bones together. Three ligaments make up the lateral ligament complex on the side of the ankle farthest from the other ankle. (Lateral means further away from the center of the body.) These include the anterior talofibular ligament (ATFL), the calcaneofibular ligament(CFL), and the posterior talofibular ligament (PTFL). A thick ligament, called the deltoid ligament, supports the medial ankle (the side closest to your other ankle).
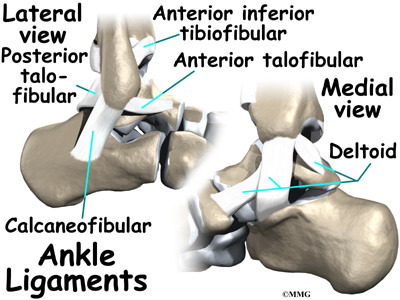
Ligaments also support the lower end of the leg where it forms a hinge for the ankle. This series of ligaments supports the ankle syndesmosis, the part of the ankle where the bottom end of the fibula meets the tibia. Three main ligaments support this area. The ligament crossing just above the front of the ankle and connecting the tibia to the fibula is called the anterior inferior tibiofibular ligament (AITFL). The posterior fibular ligaments attach across the back of the tibia and fibula. These ligaments include the posterior inferior tibiofibular ligament (PITFL) and the transverse ligament. The interosseous ligament lies between the tibia and fibula. (Interosseous means between bones.) The interosseus ligament is a long sheet of connective tissue that connects the entire length of the tibia and fibula, from the knee to the ankle.

The ligaments that surround the ankle joint help form part of the joint capsule. A joint capsule is a watertight sac that forms around all joints. It is made up of the ligaments around the joint and the soft tissues between the ligaments that fill in the gaps and form the sac.

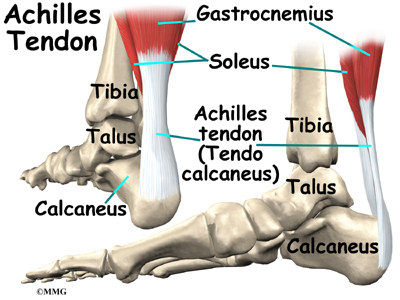
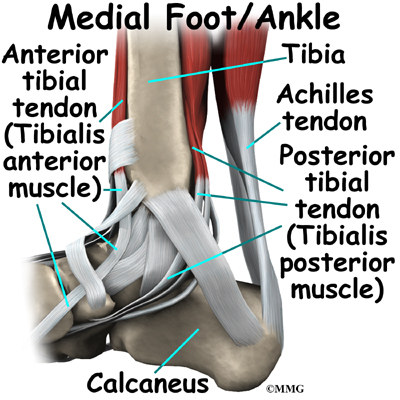
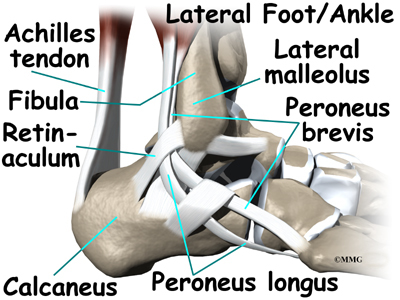
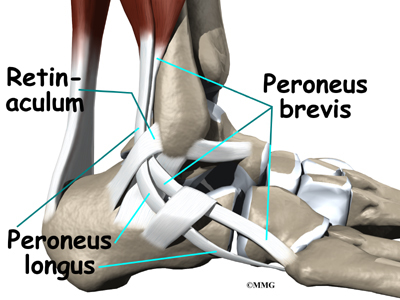
The ankle joint is also supported by nearby tendons. The large Achilles tendon is the most important tendon for walking, running, and jumping. It attaches the calf muscles to the calcaneus (heelbone) and allows us to raise up on our toes. The posterior tibial tendon attaches one of the smaller muscles of the calf to the underside of the foot. This tendon helps support the arch and allows us to turn the foot inward. The anterior tibial tendon allows us to raise the foot. Two tendons run behind the outer bump of the ankle (the lateral malleolus). These two tendons, called the peroneals, help turn the foot down and out.
Muscles
Most of the motion of the ankle is caused by the stronger muscles in the lower leg whose tendons pass by the ankle and connect in the foot. Contraction of the muscles in the leg is the main way that we move our ankle when we walk, run, and jump.
The key ankle muscles have been discussed earlier in the section on ligaments and tendons. These muscles and their actions are also listed here.
- The peroneals (peroneus longus and peroneus brevis) on the outside edge of the ankle and foot bend the ankle down and out.
- The calf muscles (gastrocnemius and soleus) connect to the calcaneus by the Achilles tendon. When the calf muscles tighten, they bend the ankle down.
- The posterior tibialis muscle supports the arch and helps turn the foot inward.
- The anterior tibialis pulls the ankle upward.
Nerves
The nerve supply of the ankle is from nerves that pass by the ankle on their way into the foot. The tibial nerve runs behind the medial malleolus. Another nerve crosses in front of the ankle on its way to top of the foot. There is also a nerve that passes along the outer edge of the ankle.

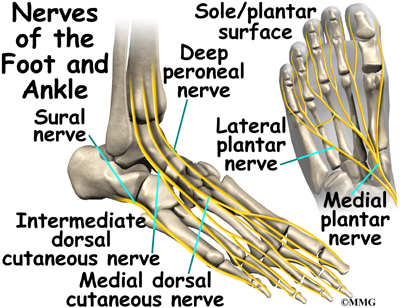
The nerves on the front and outer edge of the ankle control the muscles in this area, and they give sensation to the top and outside edge of the foot.
Blood Vessels
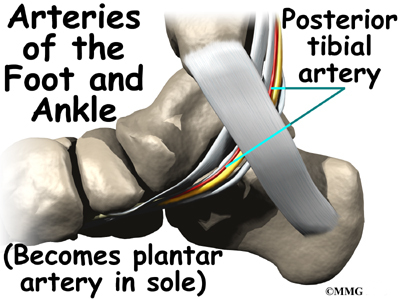
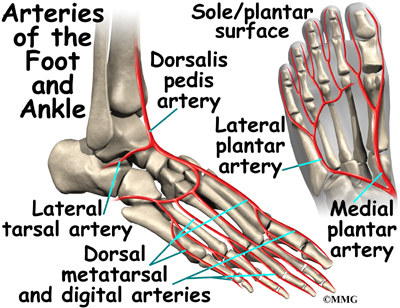
The ankle gets blood from nearby arteries that pass by the ankle on their way to the foot. The dorsalis pedis runs in front of the ankle to the top of the foot. (You can feel your pulse where this artery runs in the middle of the top of the foot.) Another large artery, called the posterior tibial artery, runs behind the medial malleolus. It sends smaller blood vessels to the inside edge of the ankle joint. Other less important arteries entering the foot from other directions also supply blood to the ankle.
Summary
As you can see, the anatomy of the ankle is very complex. When everything works together, the ankle functions correctly. When one part becomes damaged, it can affect every other part of the ankle and foot, leading to problems.
Peroneal Tendon Subluxation
A Patient’s Guide to Peroneal Tendon Subluxation
Introduction
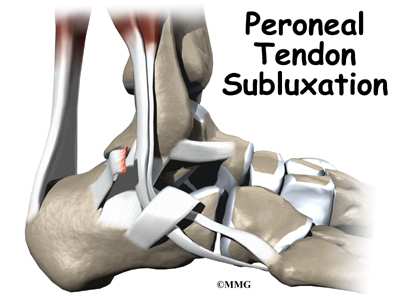
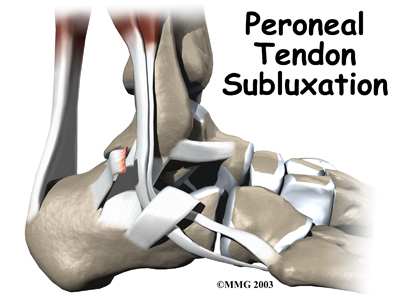
The peroneals are two muscles and their tendons that attach along the outer edge of the lower leg. The peroneal tendons are enclosed in a fibrous tunnel that runs behind the outside ankle bone (the lateral malleolus). Damage or injury to the structures that form and support this tunnel may lead to a condition in which the peroneal tendons snap out of place. This condition is called peroneal tendon subluxation.
This guide will help you understand
- how peroneal tendon subluxation happens
- how doctors diagnose the condition
- what can be done to treat this problem
Anatomy
What part of the ankle is involved?
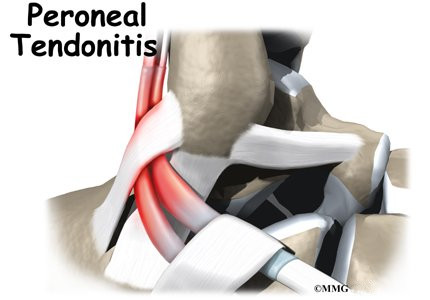
The primary muscles supporting the lateral (outer) part of the ankle are the peroneals. These two muscles and their tendons lie along the outside of the lower leg bone (fibula) and cross behind the lateral malleolus (the outside ankle bone).

The tendons of the peroneal muscles pass together through a groove behind the lateral malleolus. The tendons are kept within the groove by a sheath that forms a tunnel around the tendons. The surface of this sheath is reinforced by a band of ligament called a retinaculum.
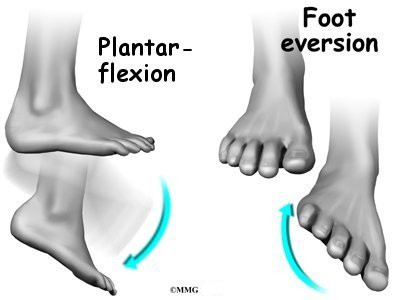
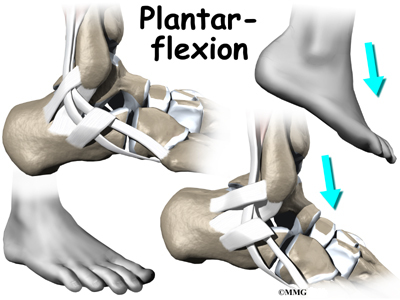
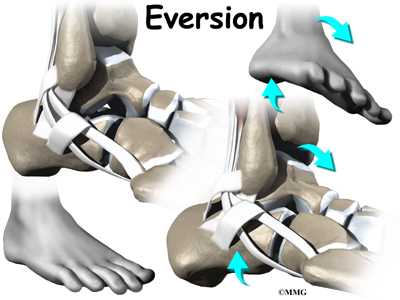
Contracting the peroneals makes the tendons glide in the groove like a pulley. This pulley action points the foot downward (plantarflexion) and outward (eversion).
Related Document: A Patient’s Guide to Ankle Anatomy
Causes
Why do I have this problem?
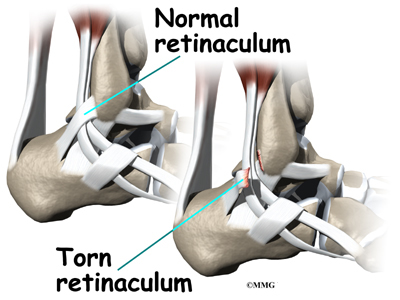
Tendons attach muscles to bone. Tightening a muscle puts tension on the tendon, which can move bone. Many tendons in the body are held in place by supportive connective tissue, such as a ligament or retinaculum. If the supportive tissue has been damaged or injured, the tendon may be free to slip out of its normal position. This is called subluxation. When the subluxed tendon slips back into place, this is called relocating. A tendon that forcefully snaps out of position and can’t relocate has dislocated.
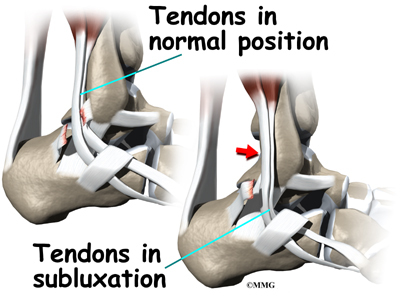
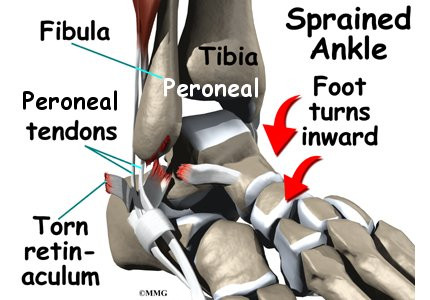
The main cause of peroneal tendon subluxation is an ankle sprain. A sprain that injures the ligaments on the outer edge of the ankle can also damage the peroneal tendons. During the typical inversion ankle sprain, the foot rolls in. The forceful stretch on the peroneals can rip the retinaculum that keeps the peroneal tendons positioned in the groove. As a result, the tendons can jump out of the groove. The tendons usually relocate by snapping back into place.
The injury to the retinaculum may be overlooked at first while treatment focuses on the injury to other ankle ligaments. This means the subluxation may begin much later, and it may not seem to be caused by the initial ankle sprain. If not corrected, this snapping of the tendons can become a chronic and recurring problem.
An acute dislocation of the peroneal tendons is rare. It occasionally happens during sport activities that force the foot up and in, for example during skiing, ice skating, or soccer. At the moment the foot turns up and in, the peroneals violently contract to protect the ankle. This can cause the retinaculum to tear, allowing the tendons to slip out of the groove.
Differences in the anatomy of the groove may predispose some people to peroneal tendon subluxations. The groove may be too shallow. Or the ridge that helps deepen this groove may be too small or even absent. Sometimes, the retinaculum that keeps the tendons in the groove may be too loose. In these cases, patients may not recall any injury to explain the persistent snapping of the peroneal tendons.
Symptoms
What does peroneal tendon subluxation feel like?
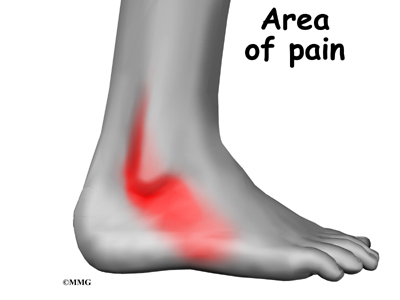
Patients describe a popping or snapping sensation on the outer edge of the ankle. The tendons may even be seen to slip out of place along the lower tip of the fibula. It is common to feel pain and tenderness along the tendons. There may also be swelling just behind the bottom edge of the fibula.
Diagnosis
How do doctors diagnose the condition?
The diagnosis of peroneal subluxation begins with an examination of the ankle. The doctor will move your ankle in different positions to see when the tendons snap out of place and if they relocate. One test involves holding pressure down on the ankle as you pull your foot up and out. The doctor feels behind the fibula during this test to determine if the tendons are popping out of place.
If your doctor suspects a tear in the retinaculum, X-rays will probably by taken. X-rays can show if the torn retinaculum has pulled off a piece of the fibula bone. This is called an avulsion fracture. X-rays are also used to look for other injuries to the ankle.
Your doctor may also order a magnetic resonance imaging (MRI) scan of your ankle. MRI scans can show abnormal swelling and scar tissue or tears in the tendons. However, MRIs won’t always show subluxation of the peroneal tendons.
Treatment
What can be done for the problem?
Nonsurgical treamtment for peroneal tendon subluxations helps control symptoms. However, nonsurgical treatment of acute subluxations in active patients is successful only about 50 percent of the time. Chronic cases of peroneal subluxation that have not responded to nonsurgical measures generally require surgery.
Nonsurgical Treatment
If the injury is acute, treatment without surgery may involve placing the ankle in a short-leg cast for four to six weeks. The goals are to allow the torn retinaculum to heal and to prevent chronic subluxation. Doctors may have their patients begin physical therapy once the cast is removed.
Your doctor may also prescribe medications. Anti-inflammatory medications can help ease pain and swelling and get you back to activity sooner. These medications include common over-the-counter drugs such as ibuprofen.
Surgery
Many patients with peroneal tendon subluxation will eventually require surgery, especially when symptoms have not been controlled with nonsurgical measures.
Retinaculum Repair
Retinaculum repair is gaining popularity. This procedure restores the normal anatomy of the retinaculum that covers and reinforces the tendon sheath around the peroneal tendons.
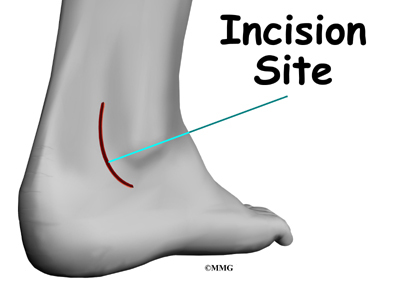
In surgery to repair the retinaculum, the surgeon first makes an incision along the back and lower edge of the fibula bone. This lets the surgeon see the spot where the retinaculum is torn.
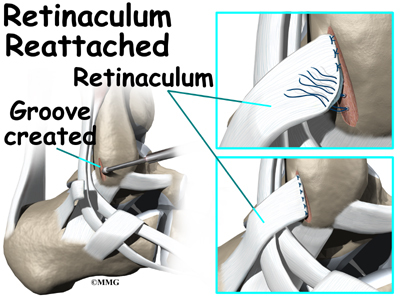
The surgeon uses a burr to create a trough along the fibula bone next to the original attachment of the retinaculum. The torn edge of the retinaculum is then pulled into the trough and sutured in place. The skin is closed with stitches.
Groove Reconstruction
Groove reconstruction is done to deepen the groove so the peroneals stay in place behind the bottom tip of the fibula. In this procedure, the surgeon first makes an incision along the back and lower edge of the fibula bone.

The surgeon cuts a small flap in the bone near the bottom corner of the fibula. The surgeon then carefully folds the flap back, like a hinge. With the hinge held open, the doctor scoops out a small amount of bone under the flap to deepen the groove.
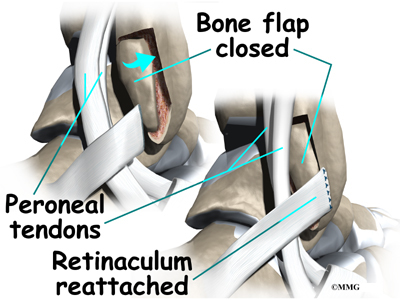
The surgeon closes the flap on its hinge and tamps it in place. A screw may be used to hold the flap down.
Next, the tendons are returned to their location behind the tip of the fibula. Repair of the retinaculum may also be required with this procedure (see above). The skin is closed and sutured.
Bony Blocks
The purpose of a bony block is to form a barrier that keeps the tendons from slipping out of place. The block is usually formed with bone taken from the lower end of the fibula bone.
To create a bony block, the surgeon opens the skin along the lower edge of the fibula. The surgeon then measures a small area on the back of the fibula, near the lower tip of the bone. A special tool is used to cut this small section of the fibula. The cut only goes partway through the bone.

The surgeon slides the small block of bone backward, out of its original spot. The bone may be rotated slightly to create a solid barrier that will help keep the tendons from sliding around the lower edge of the fibula. A screw is inserted through the small block of bone into the fibula. The screw keeps the bony block in its new location until it heals.
The surgeon checks the fit to make sure the tendons can glide behind the new block of bone without slipping out of place. The skin is then closed and sutured.
Rehabilitation
What should I expect following treatment?
Nonsurgical Rehabilitation
Even if you don’t need surgery, you may need to follow a program of rehabilitation exercises. Your doctor may recommend that you work with a physical therapist after the short-leg cast is removed. Your therapist can create a program to help you regain normal ankle function. It is very important to improve strength and coordination in the ankle.
After Surgery
Patients who have surgery are usually placed in a short-leg cast for six weeks. A special walking boot is then worn for another four weeks. Patients usually start formal physical therapy once the cast is removed. Rehabilitation after surgery can be a slow process. You will probably need to attend therapy sessions for two to three months, and you should expect full recovery to take up to six months.
The first few physical therapy treatments are designed to help control pain and swelling from the surgery. Ice and electrical stimulation treatments may be used during your first few therapy sessions. Your therapist may also use massage and other hands-on treatments to ease muscle spasm and pain. Treatments are also used to help improve ankle range of motion without putting too much strain on the area.
After about six weeks you may start doing more active exercise. Exercises are added slowly to improve the strength in the peroneal muscles. Your therapist will also help you regain position sense in the ankle joint to improve its overall stability.
The physical therapist’s goal is to help you keep your pain under control, improve your range of motion, and maximize strength and control in your ankle. When you are well under way, regular visits to the therapist’s office will end. Your therapist will continue to be a resource, but you will be in charge of doing your exercises as part of an ongoing home program.
Peroneal Tendon
A Patient’s Guide to Peroneal Tendon Problems
Introduction
Problems affecting the two peroneal tendons that lie behind the outer ankle bone (the lateral malleolus) are common in athletes. These problems mainly occur in the area where the two tendons glide within a fibrous tunnel behind the lateral malleolus.
This guide will help you understand
- how peroneal tendon problems develop
- how doctors diagnose the condition
- what can be done to treat this problem
Anatomy
What part of the ankle is involved?
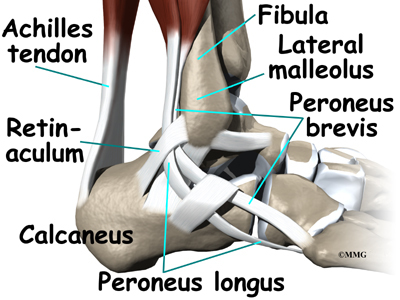
The peroneals are two muscles and their tendons that lie along the outside of the lower leg bone (the fibula) and cross behind the lateral malleolus (the outer ankle bone). The term medial refers to a point closer to the center of the body. So the ankle bump on the inside edge of the ankle (closest to your other ankle) is the medial malleolus. The term lateral refers to structures furthest from the center. Major muscles that support the lateral part of the ankle are the peroneus longus and the peroneus brevis.
The tendons of these two muscles pass together in a groove behind the lateral malleolus. (Tendons attach muscles to bones.) The tendons are kept within the groove by a sheath that forms a tunnel around the tendons. The surface of the tunnel is reinforced by a band of tissue called a retinaculum. Contracting the peroneal muscles makes the tendons glide in the groove like a pulley. The pulley action causes the foot to point downward (plantarflexion) and outward (eversion).
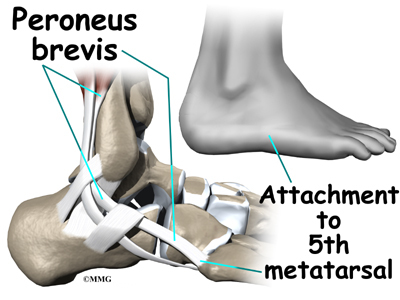
The peroneus brevis tendon connects to a bump on the base of the fifth metatarsal. This spot can be felt midway down the outer edge of the foot.
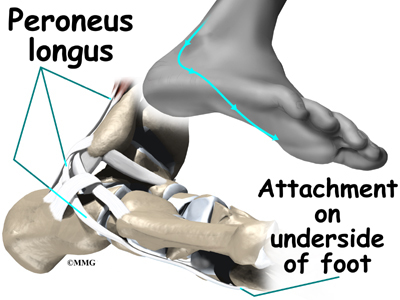
The peroneus longus tendon lies behind and below the peroneus brevis tendon. It wraps down and under the foot by way of the cuboid bone, the outer tarsal bone just in front of the heelbone (the calcaneus). The peroneus longus tendon angles forward under the sole of the foot and connects to the bottom of the main bone of the big toe. This tendon stabilizes the arch of the foot when walking.
Related Document: A Patient’s Guide to Ankle Anatomy
Causes
Why do I have this problem?
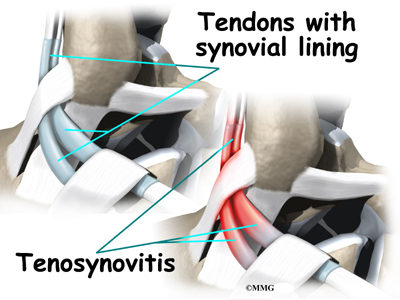
Peroneal tendon problems mostly occur where the tendons glide within the pulley behind the lateral malleolus. Their movement can cause irritation of the lining of the tendons. This condition is called tenosynovitis. The irritation can also occur after an ankle injury, such as a blow to the outside of the ankle or an ankle sprain.
Repetitive ankle motions in sports, such as running and jumping, can lead to wear and tear on the tendons inside the groove. A high arch puts extra tension on the peroneal tendons within the groove and has also been found to cause peroneal tendon problems.
Peroneal tendon problems commonly occur from an ankle sprain. During the typical inversion ankle sprain, the foot rolls in. This type of injury sprains or tears the ligaments that support the lateral part of the ankle. The forceful stretch on the peroneals when the foot rolls in can also cause a lengthwise tear in the peroneal tendons.
An inversion ankle sprain can also cause the peroneal tendons to momentarily slip out of the groove. This is called subluxation. Peroneal tendonitis often occurs during the recovery period after an ankle sprain. Because the ankle is unstable, the peroneals may need to work harder to give needed support to the damaged lateral ankle ligaments. The overwork sets them up for subluxation.
Related Document: A Patient’s Guide to Peroneal Tendon Subluxation
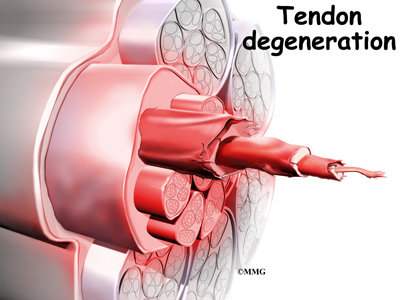
In some patients, a peroneal tendon problem is caused by degenerative changes in the tendons themselves rather than by inflammation around the tendons. The tendon itself becomes abnormal. Doctors call this condition tendonosis.

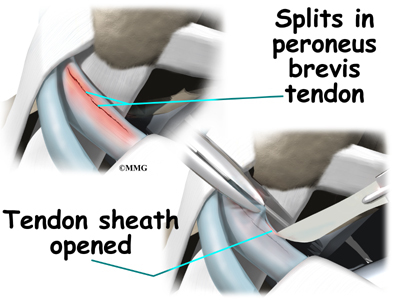
In tendonosis, the tendon becomes weakened. Tendons are made up of strands of a material called collagen. (If you think of a tendon as a nylon rope, the collagen is the nylon strands.) Degeneration in a tendon causes a loss of the normal arrangement of the collagen fibers that join together to form the tendon. Some of the individual strands of the tendon become jumbled due to the degeneration, some fibers break, and the tendon loses strength.
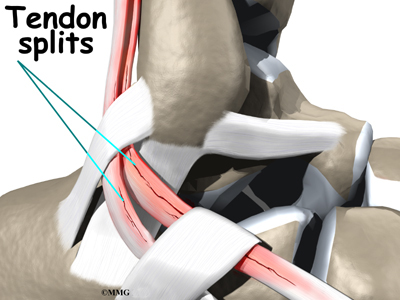
Over time, the tendon thickens as scar tissue tries to repair the damaged tendon. The area of tendonosis in the tendon is weaker than normal tendon. The weakened, degenerative tendon may tear. This usually causes a lengthwise split in the peroneal tendons rather than a rupture. These splits or tears are most common in the peroneus brevis tendon, probably because it lies in front of the peroneus longus. It is more vulnerable to friction because it rubs against the groove in the fibula bone.
Symptoms
What do peroneal tendon problems feel like?
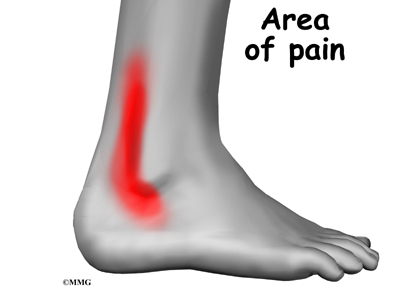
Patients with peroneal tendon problems usually describe pain in the outer part of the ankle or just behind the lateral malleolus. This pain commonly worsens with activity and eases with rest. Patients may have swelling behind or under the lateral malleolus. They may notice more pain when pressure is applied along the tendons.
Diagnosis
How do doctors diagnose the condition?
The diagnosis of peroneal tendonitis is usually made by examination of the ankle. X-rays may be ordered to make sure there is no fracture or other problem. The physical examination helps determine where the tendons are inflamed, ruptured, or degenerated. The doctor will move your ankle into different positions. The peroneal tendons are checked by holding your foot up and out against the doctor’s downward pressure. Stretching the foot up and in can also be used test whether the tendons hurt.
Your doctor may order a magnetic resonance imaging (MRI) scan of your ankle. These images can show if there is abnormal swelling or scar tissue in the tendons. MRI scans can also show lengthwise tears in the tendons.
Treatment
What can be done for the problem?
Nonsurgical treatment for peroneal tendon problems helps control symptoms. Surgery is usually not considered until it has become impossible to control the symptoms without it.
Nonsurgical Treatment
Initial treatments may involve resting and protecting the sore tendons. You may need to immobilize your foot and lower leg in a a short-leg walking boot for two to four weeks. In less severe cases, you may use a stirrup ankle brace, arch support, or lateral heel wedge to take tension off the sore tendons.
You will probably work with a physical therapist. The therapist may use heat, ice, and ultrasound treatments to reduce pain and swelling. Stretching, strengthening, and ankle coordination exercises are added as symptoms ease.
Your doctor may also prescribe medications. Anti-inflammatory medications can help ease pain and swelling and get you back to activity sooner. These medications include common over-the-counter drugs such as ibuprofen.
In rare cases, cortisone can be injected into the sore tendons to relieve symptoms that won’t go away. Cortisone is a powerful anti-inflammatory medication. Because there is a risk that cortisone will cause a tendon to rupture, doctors are very cautious about injecting cortisone into the peroneal tendons.
Surgery
Tendon Release
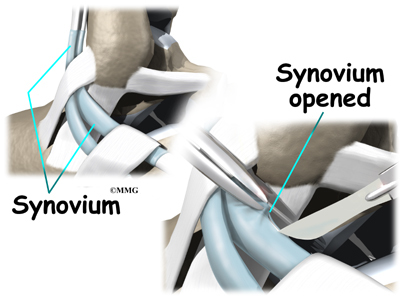
When the lining of the tendon is painful and inflamed (as in tenosynovitis), the goal of surgery is to remove the irritated tissue from around the tendon. This operation is called tendon release. This procedure is done by carefully dividing the tendon sheath that encloses the tendon. Once the sheath is opened, the surgeon clears away the irritated tissues around the tendon. The sheath is not stitched back together. The gap in the sheath will eventually fill in with scar tissue. The skin is closed with sutures.
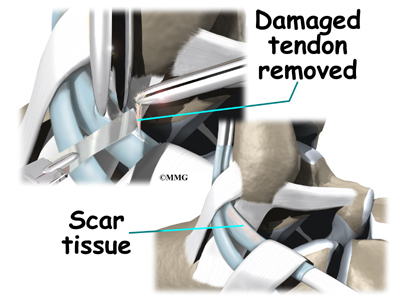
Debridement
The procedure for surgically treating tendinosis is similar to the method used for tenosynovitis. However, extra measures are taken to thoroughly remove (debride) the degenerated tissue around and within the involved tendon.
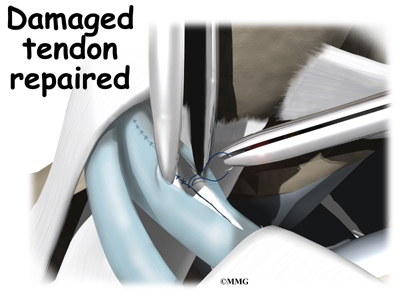
Tendon Repair
Tendinosis may require repair if a preoneal tendon is split down its length. This type of tear mainly affects the peroneus brevis. The surgeon fixes this problem by first dividing the sheath around the tendons. If the split is smaller than one-third the width of the tendon, the torn portion may simply be removed. Larger splits are sutured along the length of the tendon. The tendon sheath is repaired, and the skin is closed with sutures.
Rehabilitation
What should I expect following treatment?
Nonsurgical Rehabilitation
Even if you don’t need surgery, you may need to follow a program of rehabilitation exercises. Your doctor may recommend that you work with a physical therapist. Your therapist can create a program to help you regain normal ankle function. It is very important to improve strength and coordination in the ankle.
After Surgery
Patients are usually placed in a short-leg cast for four to six weeks after surgery. A special walking boot is worn for another four weeks. Patients usually take part in formal physical therapy once the cast is removed. Rehabilitation after surgery can be a slow process. You will probably need to attend therapy sessions for one to two months, and you should expect full recovery to take up to four months.
The first few physical therapy treatments are designed to help control pain and swelling from the surgery. Ice and electrical stimulation treatments may be used during your first few therapy sessions. Your therapist may also use massage and other hands-on treatments to ease muscle spasm and pain. Treatments are also used to help improve ankle range of motion without putting too much strain on the healing tendons.
After about four weeks you may start doing more active exercise. Exercises are added slowly to improve the strength in the peroneal muscles. Your therapist will also help you regain position sense in the ankle joint to improve its overall stability.
The physical therapist’s goal is to help you keep your pain under control, improve your range of motion, and maximize strength and control in your ankle. When you are well under way, regular visits to the therapist’s office will end. Your therapist will continue to be a resource, but you will be in charge of doing your exercises as part of an ongoing home program.
Ankle Impingement
A Patient’s Guide to Ankle Impingement Problems
Introduction

Ankle impingement occurs when soft tissues around the ankle are pinched or nipped. Impingement mainly happens when the ankle is fully bent up or down, leading to pain either in the front or back of the ankle joint. Problems near the front of the joint are usually associated with past ankle sprains. Pinching in the back of the ankle occurs most often in ballet dancers and is usually due to irritation around a bony prominence on the back of the ankle.
This guide will help you understand
- how ankle impingement problems occur
- how doctors diagnose the condition
- what can be done to treat it
Anatomy

What parts of the ankle are involved?
The ankle joint is formed where the bones of the lower leg, the tibia and the fibula, connect above the anklebone, called the talus. The tibia is the main bone of the lower leg. The fibula is the small, thin bone along the outer edge of the
tibia.
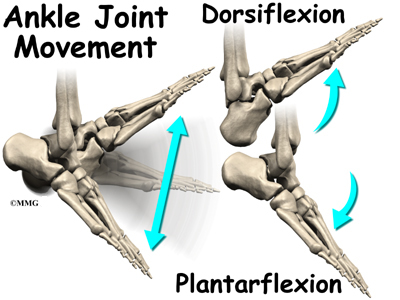
The ankle joint is a hinge that allows the foot to move up (dorsiflexion) and down (plantarflexion). The ankle is a synovial joint, meaning it is enclosed in a joint capsule that contains a lubricant called synovial fluid.
Strong ligaments surround and support the ankle joint.
The ligament that crosses just above the front of the ankle and connects the tibia to the fibula is called the anterior inferior tibiofibular ligament (AITFL). The anterior talofibular ligament (ATFL) supports the outer edge of the ankle. The ATFL goes from the tip of the fibula and angles forward to connect with the talus.
The talus rests on the the heelbone (the calcaneus). The joint formed between these two bones is called the subtalar joint. The calcaneus extends backward below the ankle, forming a shelf on which the talus rests.
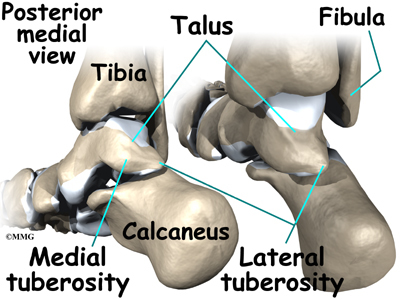
Two small bony bumps, called tuberosities, project from the back of the talus, one on the inside (medial) edge and one on the outer (lateral) edge.
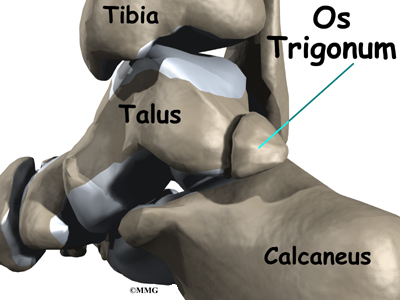
In some people the lateral tuberosity is not united to the talus. The separate piece of bone is called an os trigonum. This separation of the os trigonum from the talus is usually not a fracture. About 15 percent of people have an os trigonum. An os trigonum sometimes causes problems of impingement in the back of the ankle.
Related Document: A Patient’s Guide to Ankle Anatomy
Causes
Why do I have this problem?
Pinching of tissues in the front of the ankle is called anterior impingement. Athletes who have had several mild ankle sprains or one severe sprain are most likely to have anterior impingement. This is especially true for athletes who repeatedly bend the ankle upward (dorsiflexion), such as baseball catchers, basketball and football players, and dancers. Over time, irritation along the front edge of the ankle can lead to impingement.
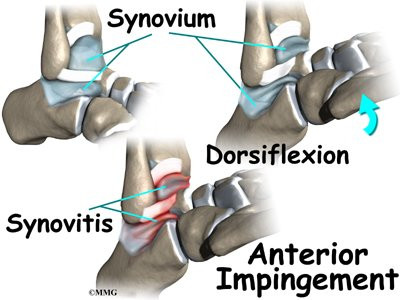
Irritation in the lower edge of the AITFL and the front of the ATFL can thicken these ligaments. The irritated ligaments become vulnerable to getting pinched between the tibia and talus as the foot is dorsiflexed. These ligaments may also begin to rub on the joint capsule of the ankle. This can inflame the synovial lining of the capsule, a condition called synovitis.
A similar problem can happen after an ankle sprain. As the torn or ruptured ligament heals, the body responds by forming too much scar tissue along the front and side of the ankle joint. This creates a small mass of tissue called a meniscoid lesion. Dorsiflexing the ankle can trap the tissue between the edge of the ankle joint, causing pain, popping, and a feeling that the ankle will give out and not support your body weight.
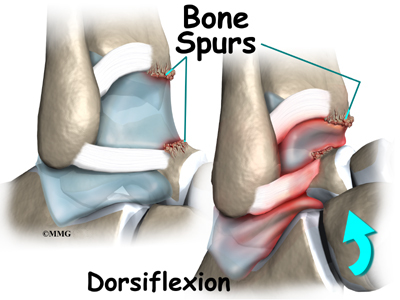
Over time, damage from past ankle sprains may also lead to the formation of small projections of bone called bone spurs. Bone spurs can form along the bottom ledge of the tibia bone or on the upper surface of the talus. As the ankle hinges into dorsiflexion, the bone spurs may begin to jab into the soft tissues along the front edge of the ankle joint, causing symptoms of anterior impingement.

Posterior impingement occurs in the back of the ankle. It is most common in ballet dancers who must continually rise up on their toes, pointing their foot downward into extreme plantarflexion. Other athletes are rarely affected but may have problems if they routinely plantarflex their feet.
The usual cause of posterior impingement is an os trigonum (described earlier). This normal fragment of bone is a separation of the lateral tuberosity from the talus. When an os trigonum is present, it can cause problems, especially among ballet dancers who constantly rise up on their toes into the dance position called pointe. Pointe is a position of extreme ankle plantarflexion. As the foot points downward sharply, the os trigonum can get sandwiched between the bottom edge of the tibia and the top surface of the calcaneus (the heelbone). This can trap the tissues above and below the os trigonum, leading to symptoms of posterior impingement.
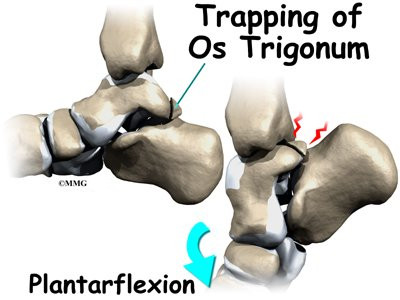
Posterior impingement can also occur in a ballet dancer who has had a previous ankle sprain. Damage from the past ankle sprain may create too much instability in the ankle. As the dancer rises up on the toes, the talus may be free to slide forward slightly. This allows the shelf of the heelbone to come into contact with the back of the tibia, pinching the soft tissues in between. Posterior impingement from ankle instability can also happen in other athletes. But this is uncommon, because forceful plantarflexion is rarely required in other sports.
Related Document: A Patient’s Guide to Ankle Sprain and Instability
Symptoms
What does ankle impingement feel like?
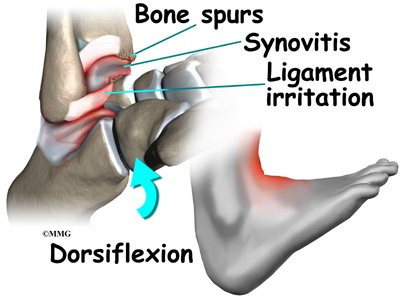
Anterior impingement may feel like ankle pain that continues long after an ankle sprain. The ankle may feel weak, like it can’t be trusted to hold steady during routine activities. When anterior impingement comes from ligament irritation, pain and tissue thickening are usually felt in front and slightly to the side of the ankle. This is the area of the ATFL. The pain worsens as the foot is forced upward into dorsiflexion. If the ligaments have irritated the synovium of the ankle joint capsule, throbbing pain and swelling from inflammation (synovitis) may also be felt in this area.
Symptoms of posterior impingement include pain behind the heel or deep in the back of the ankle. There is usually tenderness just behind the bottom tip of the fibula, by the outer ankle bone. Pain is usually worse when the foot is pointed down into plantarflexion. A painful clicking sensation may also be felt as the foot is twisted in and out.
Diagnosis
How do doctors diagnose the condition?
The diagnosis of ankle impingement is usually made by examining the ankle. The doctor will move your ankle to see what movements or positions cause your pain. If anterior impingement is suspected, the doctor may bend your ankle upward or ask you to squat down. To check for posterior impingement, the doctor may push your foot downward or have you rise up on your toes. Tenderness can usually be pinpointed over the tissues that are being pinched.
If the doctor believes that pinching in the back of the ankle is from an os trigonum, a numbing medication may be injected into this area. If it feels better, the problem is a posterior impingement from the os triogonum. If the pain doesn’t change, the problem could be in the tendon that runs along the inside edge of the os trigonum.
The doctor will probably order X-rays if impingement is suspected. X-rays can show if there are bone spurs on the tibia or talus. In cases of posterior impingement, an X-ray can show if an os trigonum is present. You may be asked to squat down or rise up on your toes during the X-ray. This helps show if impingement is due to bone pinching the soft tissues.
A bone scan may be recommended in select cases, such as when surgery is being considered. In general, MRI scans are not helpful for impingement problems, but they may be ordered to check for other ankle problems that could be causing your pain.
Treatment
What can be done for the problem?
Nonsurgical Treatment
You may be told to rest the ankle for a short time to reduce swelling and pain. A special walking boot or short-leg cast may be recommended to restrict ankle movement for up to four weeks. Mild pain medications and anti-inflammatory medicine, such as ibuprofen, may also be prescribed. An ice pack can also help alleviate swelling and may encourage a faster return of normal ankle movement.
Your doctor may recommend a steroid injection into the painful area. Steroids are strong anti-inflammatory medications. A steroid injection can help relieve irritation and swelling in the soft tissues that are being pinched, reducing their tendency to get pinched.
Your doctor may suggest that you work with a physical therapist to help you regain normal use of your ankle. Patients often progress in a series of exercises including stationary cycling, range of motion, and ankle strengthening.
Surgery
If nonsurgical treatments do not work, surgery may be recommended. The type of surgery will vary depending on the location and cause of ankle impingement.
Debridement
Debridement is the most common surgery for anterior ankle impingement. Many surgeons prefer to perform this procedure with an arthroscope. An arthroscope is a tiny TV camera that can be inserted into a very small incision. It allows the surgeon to see the area where he or she is working on a TV screen.
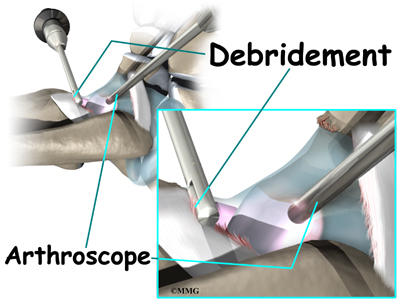
To begin, two small incisions are made through the skin on each side of the impingement area. The surgeon inserts the arthroscope to see which area of the tendons or joint capsule are irritated and thickened. The arthroscope lets the doctor see if a meniscoid lesion (mentioned earlier) is present. A small shaver is used to clear away (debride) irritated tissue from the affected ligaments. The surgeon also debrides the tissue forming a meniscoid lesion and any areas of the joint capsule that are inflamed. Small forceps may also be used to clear away irritated or inflamed tissue.

Small bone spurs on the tibia or talus are removed. If the spurs are large, the surgeon may decide to create a new incision over or next to the spur. This allows a special instrument, called an osteotome, to be inserted. The surgeon uses the osteotome to carefully remove these larger bone spurs.
Before concluding the procedure, a fluoroscope is used to check the debridement and to make sure no bony fragments remain. A fluoroscope is a special X-ray machine that allows the surgeon to see a live X-ray picture on a TV screen during surgery. When the surgeon is satisfied that debridement and removal of bone fragments is complete, the skin is stitched together.
Os Trigonum Excision
The goal of an os trigonum excision is to carefully remove (excise) the os trigonum to alleviate pinching of the tissues above or below it. It is standard to use an open surgical method which requires a one- to two-inch incision over the outer part of the back of the ankle. An arthroscope is not routinely used for os trigonum excision because there are many nerves and blood vessels in the back of the ankle that could be injured by an arthroscope.
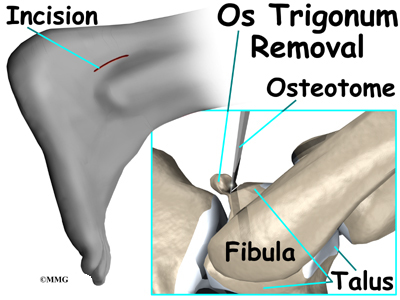
This surgery begins by placing the patient face down on the operating table. The surgeon makes a small incision over the lateral side of the back of the ankle, just behind the outer anklebone. A retractor is used to carefully hold the nearby tendons, nerves, and blood vessels out of the way. The surgeon locates the os trigonum. A scalpel is usually sufficient to dissect the os trigonum. However, if a bony bridge binds the os trigonum to the talus, the surgeon may need to use a chisel or osteotome.
A fluoroscope is used to check for any remaining bony fragments. When the surgeon is satisfied that all bone fragments have been removed, the skin is stitched together. Patients are placed in a special splint designed to protect the ankle and to keep the foot from pointing downward.
Rehabilitation
What should I expect following treatment?
Nonsurgical Rehabilitation
Even if you don’t need surgery, you may need to follow a program of rehabilitation exercises. Your doctor may recommend that you work with a physical therapist. Your therapist can create a program to help you regain ankle function. It is very important to improve strength and coordination in the ankle.
After Surgery
After debridement surgery, patients are usually placed in an ankle splint. Patients begin by using crutches. The amount of weight put on the foot is gradually increased over a period of one to two weeks. Patients generally advance quickly in rehabilitation and are able to resume normal activity within four to six weeks.
Rehabilitation after excision of the os trigonum is a slower process. You will probably need to attend therapy sessions for two to three months, and you should expect full recovery to take up to six months. Patients are kept in the ankle splint for up to two weeks. Crutches are used during this time as the amount of weight borne on the foot is gradually increased.
After removing the stitches and the ankle brace, patients are usually able to begin formal physical therapy. Initial treatments begin with gentle range-of-motion exercises for the ankle and toes. The first few physical therapy treatments are also designed to help control pain and swelling from the surgery. Ice and electrical stimulation treatments may be used. Your therapist may also use massage and other hands-on treatments to ease muscle spasm and pain.
As the symptoms from surgery begin to ease, you may be shown how to do easy ankle motions on a stationary bicycle. After three or four weeks you may start doing more active ankle exercises. Exercises are used to improve the strength in the ankle muscles. Your therapist will also help you regain position sense in the ankle joint to improve its stability.
The physical therapist’s goal is to help you keep your pain under control, improve your range of motion, and maximize strength and control in your ankle. When you are well under way, regular visits to the therapist’s office will end. Your therapist will continue to be a resource, but you will be in charge of doing your exercises as part of an ongoing home program.
High Ankle Sprain – Ankle Syndesmosis
A Patient’s Guide to Ankle Syndesmosis Injuries
Introduction
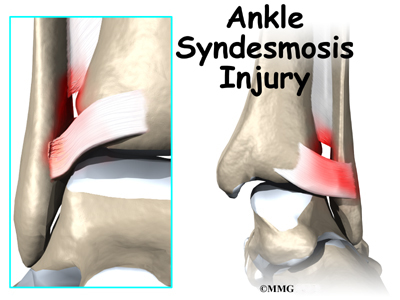
An ankle injury common to athletes is the ankle syndesmosis injury. This type of injury is sometimes called a high ankle sprain because it involves the ligaments above the ankle joint. In an ankle syndesmosis injury, at least one of the ligaments connecting the bottom ends of the tibia and fibula bones (the lower leg bones) is sprained. Recovering from even mild injuries of this type takes at least twice as long as from a typical ankle sprain.
This guide will help you understand
- how ankle syndesmosis injuries occur
- how doctors diagnose the condition
- what can be done to treat it
Anatomy

What part of the ankle is involved?
A syndesmosis is a joint where the rough edges of two bones are held together by thick connective ligaments. The connection of the lower leg bones, the tibia and fibula, is a syndesmosis. The tibia is the main bone of the lower leg. The fibula is the small, thin bone that runs down the outer edge of the tibia.
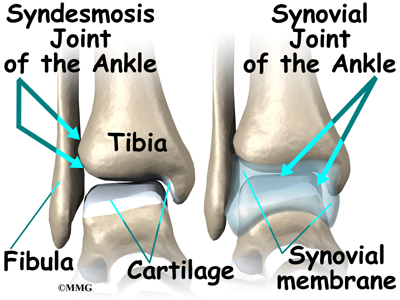
Only a few joints in the body are syndesmosis joints. In addition to the ankle syndesmosis (the connection of the tibia and fibula), syndesmosis joints are also located in the lower spine, where the top of the triangular-shaped sacrum bone fits between the pelvis bones.
Most joints in the body are synovial joints. Synovial joints are enclosed by a ligament capsule and contain a fluid, called synovium, that lubricates the joint. The ankle syndesmosis sits next to the ankle synovial joint, where the tibia meets the talus bone.

The ankle syndesmosis is supported and held together by three main ligaments. The ligament crossing just above the front of the ankle and connecting the tibia to the fibula is called the anterior inferior tibiofibular ligament (AITFL). The posterior fibular ligaments attach across the back of the tibia and fibula. These ligaments include the posterior inferior tibiofibular ligament (PITFL) and the transverse ligament.
The interosseous ligament lies between the tibia and fibula. (Interosseous means between bones.) The interosseus ligament is a long sheet of connective tissue that connects the entire length of the tibia and fibula, from the knee to the ankle.
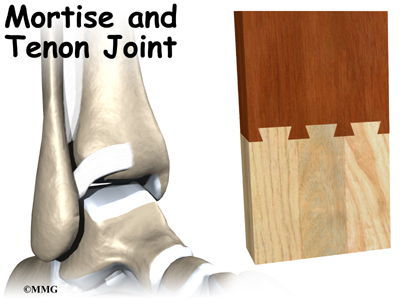
The syndesmosis ligaments hold the bottom ends of the tibia and fibula in place. This arrangement forms the upper surface of the ankle joint. The ankle joint is a hinge joint. The hinge is formed where the tibia and fibula sit above the talus bone. This connection is called a mortise and tenon, a stable connection that woodworkers and craftsmen routinely use to create strong and stable constructions.
Related Document: A Patient’s Guide to Ankle Anatomy
Causes
Why do I have this problem?
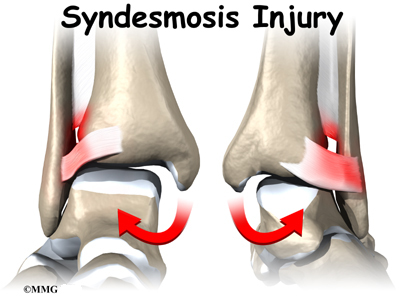
Doctors do not completely understand how syndesmosis injuries occur, though they appear to happen most often when the foot is forced upward and outward. Such injuries frequently happen in high-level football players, although snow skiers also account for a high percentage of syndesmosis injuries.
Many times, a patient describes having sprained an ankle. It isn’t until later, when standard treatments for the ankle sprain aren’t helping, that further testing shows a syndesmosis injury.
An ankle syndesmosis injury involves a sprain of one or more of the ligaments that support the ankle syndesmosis. A ligament is made up of multiple strands of connective tissue, similar to a nylon rope. A sprain stretches or tears the ligaments. Minor sprains only stretch the ligament. A tear may be either a complete tear of all the strands of the ligament or a partial tear of only some of the strands. The ligament is weakened by the injury. How much it is weakened depends on the degree of the sprain.
Mild syndesmosis sprains usually involve a stretch or slight tear in only one of the ligaments making up the syndesmosis. Moderate tears of the ankle syndesmosis may lead to ankle joint instability, which make the ankle mortise loose. In severe tears of the ligaments, the ends of the tibia and fibula actually spread apart. This condition is called diastasis.
Symptoms
What does an ankle syndesmosis injury feel like?
Syndesmosis injuries are the most severe sprains of the foot and ankle. They also cause the most problems for people trying to get back to normal activity, especially athletes hoping to resume intense running, cutting, and jumping.
Mild to moderate syndesmosis sprains may at first feel like a routine sprained ankle. Symptoms include pain and swelling on the outside of the ankle.

If the problem has been ongoing, patients may have pain due to an unstable ankle joint. They may feel vague pain around the ankle. Attempts to turn or twist the injured foot may cause sharp pain in the ankle joint. Pain may radiate upward along the side of the lower leg. And the ankle may feel weak, like it can’t be trusted to hold steady, even during routine activities.
Related Document: A Patient’s Guide to Ankle Sprain and Instability
Diagnosis
How do doctors diagnose the condition?
The diagnosis of syndesmosis injuries is usually made by examining the ankle. The doctor moves your ankle in different positions in order to check the ligaments and tendons around the ankle. The syndesmosis is stressed by turning the ankle outward while holding the lower leg still. Another test, called the squeeze test, is done by grabbing the calf just above the ankle joint and squeezing it. Pain with this test is a hallmark of a syndesmosis injury.
Tenderness can usually be pinpointed over the front ankle ligaments (the AITFL) and possibly over the posterior fibular ligaments (the PITFL and transverse ligaments).
X-rays are used to determine the severity of the syndesmosis injury. Stress X-rays are done to see if the tibia and fibula splay apart. The stress X-ray is done with the foot angled outward. An enlarged gap between the tibia and fibula indicates a diastasis (mentioned earlier). X-rays are also used to check for other problems, such as a fracture in the leg or ankle.
Doctors usually suspect a syndesmosis injury when patients have severe pain that lingers after what was thought to be a routine ankle sprain.
Treatment
What can be done for the problem?
Nonsurgical Treatment
Mild syndesmosis sprains are treated much like a regular ankle sprain. Treatment includes mild pain medications and anti-inflammatory medicine such as ibuprofin. Patients rest the ankle for a short time to reduce swelling and pain. Unlike a regular ankle sprain, doctors are much more likely to recommend using crutches to keep weight off the foot for several weeks if a syndesmosis sprain is suspected. Treatments of ice and compression (such as an elastic wrap) can help alleviate swelling and encourage a faster return of normal ankle movement. An ankle brace is worn during the rehabilitation period.
As the ankle heals, patients progress to normal walking. They also begin a series of exercises to strengthen the outer ankle muscles and to maximize balance.
Moderate syndesmosis injuries that do not show a diastasis on X-ray may be treated nonsurgically. Patients may be placed in a cast for four weeks. They use crutches to keep from putting weight on the foot during this time. After four weeks, patients are placed in a walking boot and allowed to gradually place more weight on their foot over another three to four weeks. X-rays are usually taken every two weeks to make sure the ankle mortise isn’t separating. Treatment gradually intensifies over a three-month period.
Surgery
Syndesmosis injuries that cause ankle instability may require surgery. Some doctors prefer to try nonsurgical treatment first. However, if at any point during treatment an X-ray shows a diastasis, surgery will probably be recommended.
Screw Fixation
Surgery for a syndesmosis injury is designed to reduce the separation between the tibia and fibula. If there are no barriers keeping the tibia and fibula apart, the surgeon may simply need to place screws through the two bones to hold them together while the ligaments heal.
To begin the procedure, the surgeon bends the ankle slightly upward. A clamp may be placed around the lower leg to squeeze the tibia and fibula together, reducing the separation. This places the two bones in the proper alignment.

Working from the outer side of the leg, the surgeon inserts a screw through fibula into the tibia. This is done with the aid of a fluoroscope. A fluoroscope is a special X-ray machine that allows the surgeon to see the live X-ray picture on a TV screen during surgery. Using the fluoroscope allows the surgeon to direct the drill and place the screws into the right spot to hold the bones in the right position. This can usually be done through small, quarter-inch incisions in the side of the ankle. Some surgeons place a second screw right above the first screw.
Surgeons generally use a screw with a large head. This ensures easy removal of the screw after two or three months.
Open Incision
If the tibia and fibula can’t be squeezed together, the surgeon may have to make an incision on the front edge of the ankle. This allows the surgeon to find and remove any scar tissue or other barriers that are keeping the bones apart.
In both procedures, X-rays of both ankles are taken after the screws are in place. Comparing the X-rays lets the surgeon see if the space between the tibia and fibula is now the same on both sides.
Rehabilitation
What should I expect following treatment?
Nonsurgical Rehabilitation
Even if you don’t need surgery, you may need to follow a program of rehabilitation exercises. Your doctor may recommend that you work with a physical therapist. Your therapist can create a program to help you regain ankle function. It is very important to improve strength and coordination in the ankle. It is vital to remember that an ankle syndesmosis injury is more complex than a simple ankle sprain. The healing time is at least twice as long, and getting back to normal activity is usually a more gradual process.
After Surgery
For two to four weeks after surgery, patients usually wear an ankle splint and avoid placing weight down when standing or walking. Then a stirrup brace is worn as the amount of weight put on the foot is gradually increased. Rehabilitation after surgery can be a slow process. You will probably need to attend therapy sessions for two to three months, and you should expect full recovery to take up to six months.
The first few physical therapy treatments are designed to help control pain and swelling from the surgery. Ice and electrical stimulation treatments may be used during your first few therapy sessions. Your therapist may also use massage and other hands-on treatments to ease muscle spasm and pain. Treatments are also used to help improve ankle range of motion without putting too much strain on the ankle.
Gentle ankle movements can begin after two to four weeks. You may begin easy ankle motions on a stationary bicycle. After about six weeks you may start doing more active exercise. Exercises are used to improve the strength in the ankle muscles. Your therapist will also help you regain position sense in the ankle joint to improve its stability. A careful progression to running and other impact activities begins a minimum of 12 weeks after surgery.
The physical therapist’s goal is to help you keep your pain under control, improve your range of motion, and maximize strength and control in your ankle. When you are well under way, regular visits to the therapist’s office will end. Your therapist will continue to be a resource, but you will be in charge of doing your exercises as part of an ongoing home program.
Ankle Sprain
A Patient’s Guide to Ankle Sprain
Introduction
An ankle sprain is a common injury and usually results when the ankle is twisted, or turned in (inverted). The term sprain signifies injury to the soft tissues, usually the ligaments, of the ankle.
This guide will help you understand
- how an ankle sprain occurs
- how doctors diagnose the condition
- what can be done to treat a sprain
Anatomy
What part of the ankle is involved?
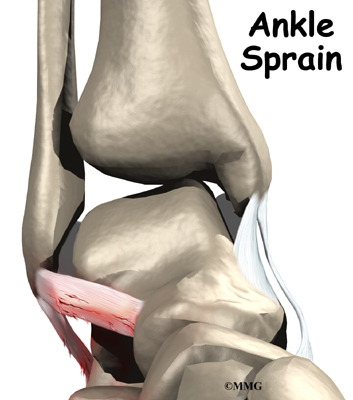
Ligaments are tough bands of tissue that help connect bones together. Three ligaments make up the lateral ligament complex on the side of the ankle farthest from the other ankle. They are the anterior talofibular ligament (ATFL),

the calcaneofibular ligament (CFL), and the posterior talofibular ligament (PTFL).The common inversion injury to the ankle usually involves two ligaments, the ATFL and CFL. Normally, the ATFL keeps the ankle from sliding forward, and the CFL keeps the ankle from rolling inward on its side.
Related Document: A Patient’s Guide to Ankle Anatomy
Causes
Why do I have this problem?

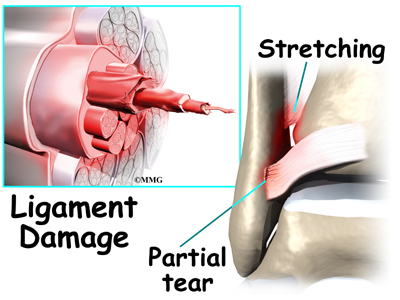
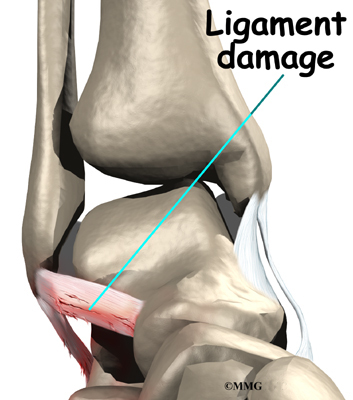
A ligament is made up of multiple strands of connective tissue, similar to a nylon rope. A sprain results in stretching or tearing of the ligaments. Minor sprains only stretch the ligament. A tear may be either a complete tear of all the strands of the ligament or a partial tear of only some of the strands. The ligament is weakened by the injury; how much it is weakened depends on the degree of the sprain.
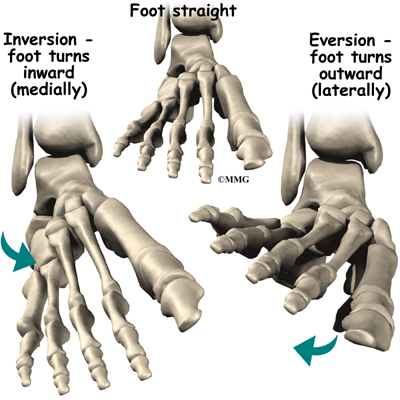
The lateral ligaments are by far the most commonly injured ligaments in a typical inversion injury of the ankle. In an inversion injury the ankle tilts inward, meaning the bottom of the foot angles toward the other foot. This forces all the pressure of your body weight onto the outside edge of the ankle. As a result, the ligaments on the outside of the ankle are stretched and possibly torn.

A severe form of ankle sprain, called an ankle syndesmosis injury, involves damage to other supportive ligaments in the ankle. This type of injury is sometimes called a high ankle sprain because it involves the ligaments above the ankle joint. In an ankle syndesmosis injury, at least one of the ligaments connecting the tibia and fibula bones (the lower leg bones) is sprained. Recovering from even mild injuries of this type takes at least twice as long as from a typical ankle sprain.
Related Document: A Patient’s Guide to Ankle Syndesmosis Injuries
Symptoms
What does an ankle sprain feel like?
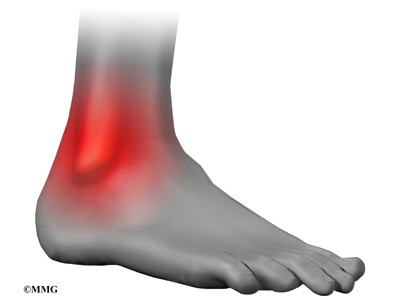
Initially the ankle is swollen, painful, and may turn ecchymotic (bruised). The bruising and swelling are due to ruptured blood vessels from the tearing of the soft tissues. Most of the initial swelling is actually bleeding into the surrounding tissues. The ankle swells as extra fluid continues to leak into the tissues over the 24 hours following the sprain.
People who have sprained an ankle often end up spraining the ankle again. If the ankle keeps turning in with activity, the condition is called ankle instability. Patients who have ankle instability lose confidence in their ankle to support them, especially on uneven ground. They often have swelling around the ankle that doesn’t go away. Pain and swelling in a joint can cause a reflex where the body turns off the muscles around the joint. This can cause times when the ankle feels like it is going to give way, meaning it may have a tendency to twist again very easily.
People who have had several mild ankle sprains or one severe sprain are prone to impingement problems in the ankle. The ligaments that were sprained may become irritated and thickened, causing them to get pinched near the edge of the ankle joint.
Related Document: A Patient’s Guide to Ankle Impingement Problems
Diagnosis
How do doctors diagnose the condition?
The diagnosis of an ankle sprain is usually made by examination of the ankle and X-rays to make sure that the ankle is not fractured. A physical examination is used to determine which ligament has been injured. The doctor will move your ankle in different positions in order to check the ligaments and other soft tissues around the ankle. Some tests place stress directly on the ankle ligaments to see if the ankle has become unstable and to find out if one or more ligaments has been partially or completely torn.
If a complete rupture of the ligaments is suspected, your doctor may order stress X-rays as well. These X-rays are taken while the ligaments are placed in a stretched position. The X-ray will show a slight tilt in the ankle bone if the ligaments have been torn.
Treatment
What can be done for the problem?
Nonsurgical Treatment
Nonsurgical treatment options depend on whether your problem is an ankle sprain or ankle instability.
Ankle Sprain
The best results after an ankle sprain come when treatment is started right away. Treatments are used to stop the swelling, ease pain, and protect how much weight is placed on the injured ankle. A simple way to remember these treatments is by the letters in the word RICE. These stand for rest, ice, compression, and elevation.
- Rest: The injured tissues in the ankle need time to heal. Crutches will prevent too much weight from being placed on the ankle.
- Ice: Applying ice can help ease pain and may reduce swelling.
- Compression: Gentle compression pushes extra swelling away from the ankle. This is usually accomplished by using an elastic wrap.
- Elevation: Supporting your ankle above the level of your heart helps control swelling.
Your doctor may also prescribe medications. Mild pain relievers help with the discomfort. Anti-inflammatory medications can help ease pain and swelling and get people back to activity sooner after an ankle sprain. These medications include common over-the-counter drugs such as ibuprofen. But newer anti-inflammatory medicines called COX-2 inhibitors show promising results and don’t seem to cause as much stomach upset and other intestinal problems.
As treatment progresses, it is helpful to gradually begin putting weight through the joint. Casts have fallen out of favor because soft tissues weaken when they are kept immobile. But braces that can be worn to support the ankle, but still allow weight bearing, are the most popular treatment for helping reduce strain on the healing tissues.
Healing of the ligaments usually takes about six weeks, but swelling may be present for several months. Your doctor may suggest that you work with a physical therapist to help you regain full range of ankle motion, improve balance, and maximize strength.
Ankle Instability
If the ankle ligaments do not heal adequately, you may end up with ankle instability. This can cause the ankle to give way and feel untrustworthy on uneven terrain. If your ankle ligaments do not heal adequately following an ankle sprain, your doctor may suggest several things.
Changes in your footwear may be prescribed to help keep your ankle from turning in. Placing a heel wedge under the outer half of your heel blocks the ankle from rolling, as does a flared heel built into your shoe. In extreme cases, doctors may prescribe a plastic brace, called an orthosis, to firmly hold your ankle from rocking side to side. Some patients feel a sense of steadiness from wearing high-topped shoes. Patients with ankle instability should avoid wearing high-heeled shoes.
Physical therapy treatments will likely be initiated to help restore joint range of motion, strength, and joint stability.
Small nerve sensors inside the ligament are injured when a ligament is stretched or torn. These nerve sensors give your brain information about the position of your joints, a sensation called position sense. For example, nerve sensors in your arm and hand give you the ability to touch your nose when your eyes are closed. The ligaments in the ankle work the same way. They send information to your nervous system to alert you about the position of your ankle joint. A physical therapist will help you retrain this sensation as a way to steady the ankle joint and protect you from spraining your ankle again.
Many people who have ankle instability have weakness in the muscles along the outside of the leg and ankle. These are called the peroneal muscles. Strengthening these muscles may help control the ankle joint and improve joint stability.
Surgery
Surgeons will occasionally do procedures right away in athletes who tear a lateral ankle ligament. In most other cases of torn ankle ligaments, surgeons will try nonsurgical treatments before doing reconstructive surgery of the ligaments.
Ligament Tightening Procedure
Chronic ankle instability can happen when the lateral ankle ligaments are stretched or torn and the ankle keeps giving way. Surgery can be done to tighten the stretched ligaments and improve the stability of the ankle. The surgery usually involves the ATFL and the
CFL.
In this procedure, an incision is made in the skin that lies over the lateral ligaments. Using a scalpel, the surgeon cuts the ATFL and CFL in half.
Holes are drilled along the lower end of the fibula bone, the small bone of the lower leg. The two ends of the cut ligament are overlapped and sewn together. The surgeon uses the drill holes in the fibula to hold the stitches to the bone.
A large band of connective tissue crosses the front of the ankle just below the lateral ligaments. This band, called the ankle retinaculum, holds the tendons in place. The surgeon pulls the top edge of the ankle retinaculum upward and sews it into the fibula.
This helps reinforce the reconstructed ligaments.
The following images show each step of the ligament tightening procedure:
Step 1

Step 2
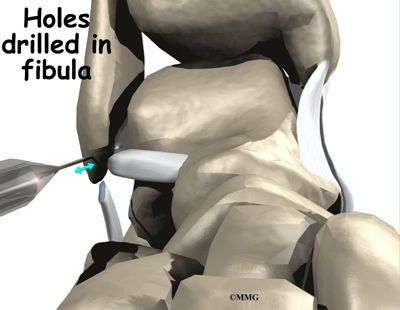
Step 3
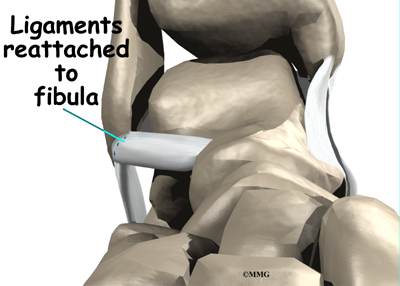
Step 4
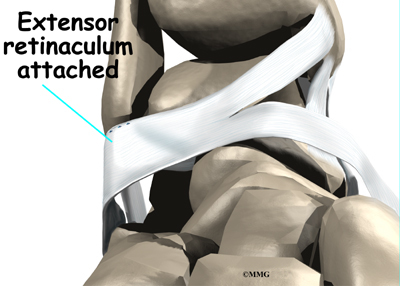
Tendon Graft Procedure
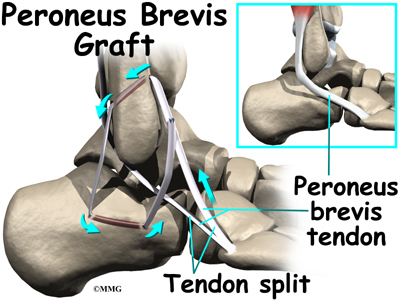
Another type of reconstruction is done using a tendon graft. If your surgeon feels that the stretched and scarred ligaments are not strong enough to simply repair in a ligament tightening procedure, then the ligaments must be reinforced with a tendon graft.
In this procedure, the surgeon removes a portion of one of the nearby tendons to use as a tendon graft. The tendon most commonly used attaches the peroneus brevis muscle to the outside edge of the small toe. A section of this tendon is put in place of the torn lateral ligaments.
After making the skin incision, the surgeon drills a hole in the fibula near the attachment of the original ligament. A second drill hole is made in the area where the ligament attaches on the talus (the anklebone).
The tendon graft is then removed (or harvested) and woven between these holes to recreate the ligament complex.
After surgery, you will probably be placed in a cast or brace for about six weeks to allow the tendon reconstruction to heal. Following removal of the cast, physical therapy will be required to regain full use of the ankle.
Rehabilitation
What will it take to make my ankle healthy again?
Nonsurgical Rehabilitation
Even if you don’t need surgery, you may need to follow a program of rehabilitation and exercise. Doctors recommend that their patients work with a physical therapist for two to four weeks. Your therapist can create a program to help you regain ankle function. It is very important to improve strength and coordination in the ankle.
Swelling and pain are treated with ice and electrical stimulation. If swelling in the ankle is severe, therapists may also apply massage strokes from the ankle toward the knee with your leg kept in an elevated position. This helps get the swelling moving out of the ankle and back into circulation. Your therapist may issue a compression wrap and instruct you to wrap your ankle and lower limb and to elevate your leg.
Therapists also apply specialized hands-on treatment called joint mobilization to improve normal joint motion. These treatments restore the gliding motion within the ankle joint where the lower leg meets the talus bone. This form of treatment speeds healing after an ankle sprain, and it helps return people and players more quickly to their activity or sport.
An effective treatment for ankle sprains is disc training, which uses a circular platform with a small sphere under it. Patients place their feet on it while they sit or stand and work the ankle by tilting the disc in various positions. This form of exercise strengthens the muscles around the ankle, and it improves joint sense (mentioned earlier).
When you get full ankle movement, your ankle isn’t swelling, and your strength is improving, you’ll be able to gradually get back to your work and sport activities. An ankle brace may be issued for athletes who intend to return quickly to their sport.
After Surgery
Patients usually take part in formal physical therapy after surgery. Rehabilitation after surgery can be a slow process. You will probably need to attend therapy sessions for two to three months, and you should expect full recovery to take up to six months.
Rehabilitation proceeds cautiously after reconstruction of the ankle ligaments. Most patients are prescribed an ankle brace to wear when they are up and about, and they are strongly advised to follow the recommendations about how much weight can be borne while standing or walking. You may be instructed to put little or no weight on your foot when standing or walking for up to 12 weeks. Your physical therapist will work with you to make sure you are using crutches safely and only bearing the recommended amount of weight on your foot.
The first few physical therapy treatments are designed to help control pain and swelling from the surgery. Ice and electrical stimulation treatments may be used during your first few therapy sessions to help control pain and swelling. Your therapist may also use massage and other hands-on treatments to ease muscle spasm and pain.
Treatments are also used to help improve ankle range of motion without putting too much strain on the healing ligaments.
After about six weeks you may start doing more active exercise. Exercises are used to improve the strength in the peroneal muscles. Your therapist will also help you retrain position sense in the ankle joint to improve the stability of the joint.
The physical therapist’s goal is to help you keep your pain under control, improve range of motion, and maximize strength and control in your ankle. When you are well under way, regular visits to the therapist’s office will end. Your therapist will continue to be a resource, but you will be in charge of doing your exercises as part of an ongoing home program.
Ankle Replacement
A Patient’s Guide to Artificial Joint Replacement of the Ankle
Introduction
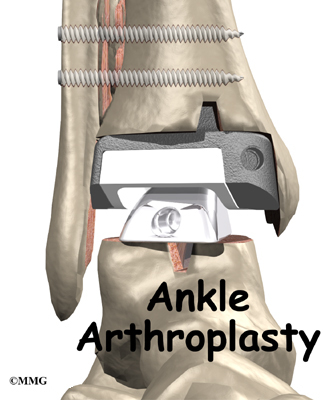
Surgery to replace the ankle joint with an artificial joint (called ankle arthroplasty) is becoming more common. This surgery is not done as often as replacement of the knee or hip joints. Still, when necessary, this operation can reduce the pain from arthritis of the ankle. Recent advances in the design of the artificial ankle and changes in the way the operation is performed have made artificial ankle replacement a growing alternative to ankle fusion for the treatment of ankle arthritis.
This guide will help you understand
- why artificial ankle replacement becomes necessary
- what happens during surgery
- what to expect after treatment
Related Document: A Patient’s Guide to Osteoarthritis of the Ankle
Anatomy
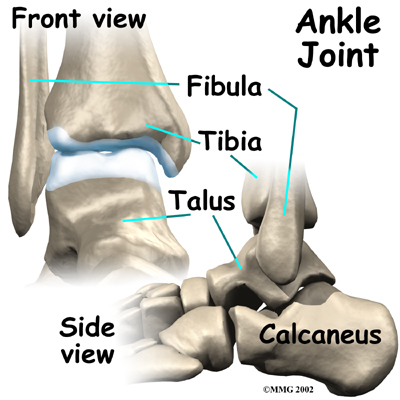
How does the ankle joint work?
The ankle joint is made up of three bones: the lower end of the tibia (shinbone), the fibula (the small bone of the lower leg), and the talus, the bone that fits into the socket formed by the tibia and fibula. The talus sits on top of the calcaneus (the heelbone). The talus moves mainly in one direction. It works like a hinge to allow your foot to move up and down.
Ligaments on both sides of the ankle joint help hold the bones together. Many tendons cross the ankle to move the ankle and the toes. (Ligaments connect bone to bone, while tendons connect muscle to bone.) The large Achilles tendon at the back of the ankle is the most powerful tendon in the foot. It connects the calf muscles to the heelbone and gives the foot the power for walking, running, and jumping.
Inside the joint, the bones are covered with a slick material called articular cartilage. Articular cartilage is the material that allows the bones to move smoothly against one another in the joints of the body. The cartilage lining is about one-quarter of an inch thick in most joints that carry body weight, such as the ankle, hip, or knee. It is soft enough to allow for shock absorption but tough enough to last a lifetime, as long as it is not injured.
Related Document: A Patient’s Guide to Ankle Anatomy
Rationale
What does the surgeon hope to accomplish?

The symptoms of osteoarthritis of the ankle are pain and reduced movement in the ankle joint. The pain is typically aching in nature and can make walking difficult. Certain movements may cause a grinding or catching sensation as the arthritic bone surfaces move against one another. The ankle joint may swell. This swelling is worse after heavy use at first, but as the problem grows worse the ankle may stay swollen all the time. Bone spurs, or outgrowths, may form around the edges of the joint and can also be a source of pain and swelling. The benefit of an artificial joint is to ease the symptoms of ankle osteoarthritis and provide you with a mobile joint.
Preparation
What should I do to prepare for surgery?
The decision to proceed with surgery should be made jointly by you and your surgeon only after you feel that you understand as much about the procedure as possible.
Once the decision to proceed with surgery is made, several steps may be needed. Your orthopedic surgeon may suggest a complete physical examination by your medical or family doctor. This is to ensure that you are in the best possible condition to undergo the operation.
You may also need to spend time with the physical therapist who will be managing your rehabilitation after the surgery. One purpose of this preoperative visit is to record a baseline of information. This includes measurements of your current pain levels, functional abilities, and the available movement and strength of each ankle. A second purpose of the preoperative visit is to prepare you for your upcoming surgery. You’ll begin to practice using crutches since you will need to use these for several weeks after surgery. Finally, an assessment will be made of any needs you’ll have at home once you’re released from the hospital.
On the day of your surgery, you will probably be admitted to the hospital early in the morning. You will be instructed to not eat or drink anything after midnight the night before surgery. You should plan on being in the hospital for several nights following surgery. The amount of time a patient spends in the hospital varies. You will need to stay until your medical condition has stabilized and you can safely use crutches or a walker.
Surgical Procedure
What happens during the operation?
Before we describe the procedure, let’s look first at the artificial ankle itself.
The Artificial Ankle
Each artificial ankle prosthesis is made of two parts:
- The tibial component is the part of the artificial joint that replaces the socket portion of the ankle (the top section).
- The talus component replaces the top of the talus.
The tibial component is usually made up of two parts: a flat metal piece called a metal tray that is attached directly to the tibia bone, and a plastic cup that fits onto the metal piece, forming a socket for the artificial ankle joint. The talus component is made of metal and fits into the socket of the tibial component.
Your surgeon may use a special type of epoxy cement to attach the metal components to the bone. This is called a cemented prosthesis.
Some surgeons prefer to put the new joint in without using cement. This is called an uncemented prosthesis. The surface of this type of prosthesis bears a fine mesh of holes that allow bone to grow into the mesh and attach the prosthesis to the bone.
The Operation
Before surgery you will be placed under either general anesthesia or a spinal type of anesthesia.
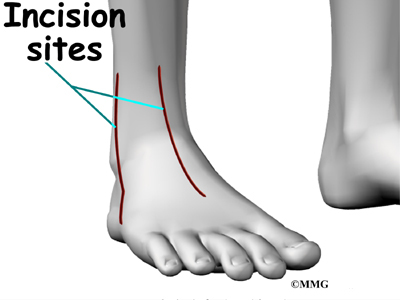
The surgeon begins the operation by making an incision through the skin on the front of the ankle. Once through the skin, the nerves and blood vessels are protected and moved to the side. The tendons are also moved to the side. An incision is then made into the joint capsule that encloses the ankle joint. The surgeon opens the joint to prepare the surfaces to be replaced.

To fit the metal socket in place, the ends of the ankle bones are shaped. The tibia and fibula are shaped first. Next, the top of the talus is shaped so the metal talus component can be inserted. Finally, all the different pieces of the artificial ankle joint are put in place, and the ankle is tested to make sure the pieces fit properly.
View animation of bone shaping

To make sure that the ankle socket or the tibial component fits tightly, two screws are placed through the fibula and the tibia just above the artificial ankle joint.
View animation of tibial implant
View animation of talar implant
View animation of screw placement
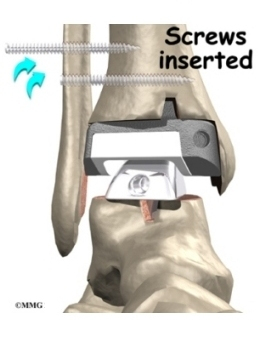
Bone is grafted between the fibula and tibia to create a fusion between them. This stops any motion between the two bones that could loosen the artificial joint. The bone graft is taken from the bone that was removed from the ankle earlier during the shaping procedure.
View animation of insertion of bone graft material
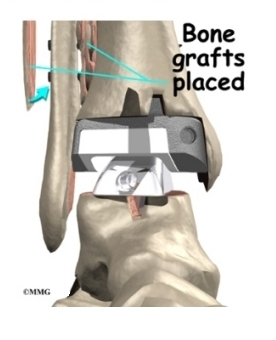

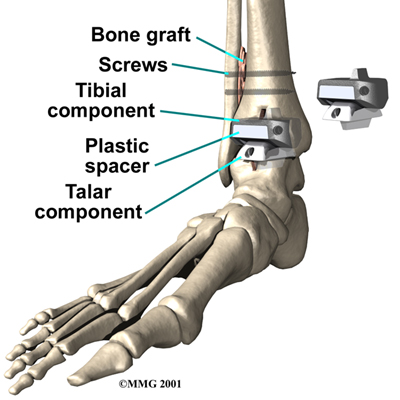
When the surgeon feels that everything is satisfactory, the joint capsule is sewn back together, and the skin is stitched together. A large bandage and splint are placed on the lower leg to protect the new ankle joint as your leg heals.
Complications
What might go wrong?
As with all major surgical procedures, complications can occur. This document doesn’t provide a complete list of the possible complications, but it does highlight some of the most common problems. Some of the most common complications following artificial ankle replacement are
- anesthesia
- infection
- loosening
- nerve injury
Anesthesia
Problems can arise when the anesthesia given during surgery causes a reaction with other drugs the patient is taking. In rare cases, a patient may have problems with the anesthesia itself. In addition, anesthesia can affect lung function because the lungs don’t expand as well while a person is under anesthesia. Be sure to discuss the risks and your concerns with your anesthesiologist.
Infection
Infection can be a very serious complication following an artificial joint surgery. The chance of getting an infection following artificial ankle replacement is probably two to four percent. This is somewhat higher than the risk of infection after a hip or knee replacement.
Some infections may show up very early, even before you leave the hospital. Others may not become apparent for months, or even years, after the operation. Infection can spread into the artificial joint from other infected areas. Your surgeon may want to make sure that you take antibiotics when you have dental work or surgical procedures on your bladder or colon to reduce the risk of spreading germs to the joint.
Loosening
The major reason that artificial joints eventually fail continues to be a process of loosening of the metal or cement from the bone. Great advances have been made in extending how long an artificial joint will last, but most will eventually loosen and require a revision.
In the past, the artificial ankle has not been considered as successful as the hip and knee replacement. The artificial ankle replacement has a much higher risk of loosening and failure. Many have lasted only five to eight years. The risk of loosening is much higher in younger, more active patients and patients who are overweight. A loose prosthesis is a problem because it causes pain. Once the pain becomes unbearable, another operation will probably be required to either revise the ankle replacement or perform an ankle fusion.
Related Document: A Patient’s Guide to Ankle Fusion
Nerve Injury
All of the nerves and blood vessels that go to the foot travel across the ankle joint. Since the operation is performed so close to these important structures, it is possible to injure either the nerves or the blood vessels during surgery. The result may be temporary if the nerves have been stretched by retractors holding them out of the way. It is rare to have permanent injury to either the nerves or the blood vessels, but it is possible.
After Surgery
What happens after surgery?
Your ankle will probably be placed in a cast or splint after surgery. A small plastic tube may drain blood from the joint. Draining prevents excessive swelling from the blood. (This excess swelling is sometimes called a hematoma.) The draining tube will likely be removed within the first day.
Your surgeon will want to check your ankle within five to seven days. Stitches will be removed after 10 to 14 days, although most of them will have been absorbed into your body. You may have some discomfort after surgery. Your surgeon can give you medication to control any pain.
You should keep your ankle elevated above the level of your heart for several days to avoid swelling and throbbing. Keep it propped up on a stack of pillows when sleeping or sitting.
Rehabilitation
What should I expect during my recovery period?
Most surgeons will recommend that you use crutches or a walker for 10 to 12 weeks following surgery. During this time, you’ll wear a cast or ankle splint and will not be permitted to put weight on your foot when standing or walking.
X-rays will be taken several times after your surgery to make sure that the artificial joint has not moved out of place and that the fusion between the fibula and the tibia is forming. When the uncemented type of implant is used, X-rays also help determine whether bone is attaching to the metal implant.
A physical therapist will likely direct your recovery program. Recovery from ankle replacement surgery takes up to three months. When you begin therapy, your therapist will check to make sure you are using your walker or crutches safely and that you are placing only the right amount of weight on your foot.
The first few therapy treatments will focus on controlling the pain and swelling from surgery. Heat treatments may be used. Your therapist may also use gentle massage and other hands-on treatments to ease muscle spasm and pain.
Range-of-motion exercises are used to maximize the mobility of the new ankle joint. Strengthening exercises help improve stability around the joint. As with any surgery, you need to avoid doing too much, too quickly.
Therapists sometimes design pool therapy programs for patients after artificial ankle joint surgery. Exercising in a swimming pool puts less stress on the new ankle joint, and the buoyancy lets you move and exercise easier. Once you’ve gotten your pool exercises down and the other parts of your rehab program advance, you may be instructed in an independent program.
Other exercises you’ll do are designed to get your leg and ankle working in ways that are similar to your work tasks and daily activities. Your therapist will help you find ways to do your tasks that don’t put too much stress on your ankle joint. Before your therapy sessions end, your therapist will teach you a number of ways to avoid future problems.
Your therapist’s goal is to help you control your pain, improve your strength and range of motion, and walk smoothly and without a limp. When you are well under way, regular visits to the therapist’s office will end. Your therapist will continue to be a resource for you. But you will be in charge of doing your exercises as part of an ongoing home program.
Ankle Fusion
A Patient’s Guide to Ankle Fusion
Introduction

An ankle fusion is a surgical procedure that is usually done when an ankle joint becomes worn out and painful, a condition called degenerative arthritis. Ankle fusion is sometimes called ankle arthrodesis.
Probably the most common cause of degenerative arthritis of the ankle is an ankle fracture. Many years after a serious fracture, the joint may wear out and become painful. Just as an out-of-balance piece of machinery wears out faster, a joint that is out of balance after it heals from a fracture can wear out faster than normal. This process may take many years. Other types of arthritis can lead to a painful ankle joint as well. For example, rheumatoid arthritis can destroy the ankle, leading to a painful joint.
Related Document: A Patient’s Guide to Osteoarthritis of the Ankle
This guide will help you understand
- why an ankle fusion becomes necessary
- what happens during surgery
- what to expect during your recovery
Anatomy

How does the ankle joint work?
The ankle joint is made up of three bones: the lower end of the tibia (shinbone), the fibula (the small bone of the lower leg), and the talus (the bone that fits into the socket formed by the tibia and fibula). The talus sits on top of the calcaneus (the heelbone).
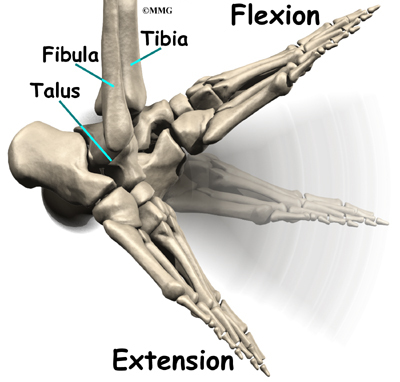
The talus moves mainly in one direction. It works like a hinge to allow your foot to move up and down.

Ligaments on both sides of the ankle joint help hold the bones together. Many tendons cross the ankle to move the ankle and the toes. (Ligaments connect bone to bone, while tendons connect muscle to bone.)
The large Achilles tendon at the back of the ankle is the most powerful tendon in the foot. It connects the calf muscles to the heel bone and gives the foot the power for walking, running, and jumping.

Inside the joint, the bones are covered with a slick material called articular cartilage. Articular cartilage is the material that allows the bones to move smoothly against one another in the joints of the body.
The cartilage lining is about one-quarter of an inch thick in most joints that carry body weight, such as the ankle, hip, or knee. It is soft enough to allow for shock absorption but tough enough to last a lifetime, as long as it is not injured.
Related Document: A Patient’s Guide to Ankle Anatomy
Rationale
What does the surgeon hope to accomplish?
An ankle fusion actually removes the surfaces of the ankle joint and allows the tibia to grow together, or fuse, with the talus. There are operations for many joints in the body that surgically fuse the joint to control pain. Before the development of artificial joints this was the primary operation available to treat an extremely painful joint. In some cases, fusion is still the best choice.
For the ankle, a fusion is a very good operation for treating a worn-out joint. This is especially true if the patient is young and very active. An ankle fusion, if successful, is not in danger of wearing out like an artificial ankle. An ankle fusion should last the patient a lifetime. But it is also important that the other foot joints are normal. A fusion keeps the ankle joint from moving during walking and other activities, so the other foot joints will need good mobility.
Related Document: A Patient’s Guide to Artificial Joint Replacement of the Ankle
Preparation
What do I need to do before surgery?
The decision to proceed with surgery must be made jointly by you and your surgeon. You need to understand as much about the procedure as possible. If you have concerns or questions, you should talk to your surgeon.
Once you decide on surgery, you need to take several steps. Your surgeon may suggest a complete physical examination by your regular doctor. This exam helps ensure that you are in the best possible condition to undergo the operation.
On the day of your surgery, you will probably be admitted to the hospital early in the morning. You shouldn’t eat or drink anything after midnight the night before. The amount of time patients spend in the hospital varies. You will need to stay until your medical condition has stabilized and you can safely use crutches or a walker.
Surgical Procedure
What happens during surgery?
Open Method
Several different operations have been developed to perform an ankle fusion. The basic procedure in each operation remains the same, however. The most common way that an ankle fusion is done is by making an incision through the skin to open the joint. Once the joint is opened, the surgeon uses a surgical saw to remove the articular cartilage surfaces of the ankle joint. Once the articular cartilage is removed on both sides of the joint, the body will try to heal the two surfaces together just as if it were fractured or broken.
It is important when the surfaces are removed that the angles of the cut surfaces are correct. When the tibia is brought against the talus, the foot should be at a right angle to the lower leg. Once the cuts are made the bones must be held in place while they fuse. This can be done using large metal screws and metal plates if necessary. The screws are usually under the skin and are not removed unless they begin to rub and cause pain.
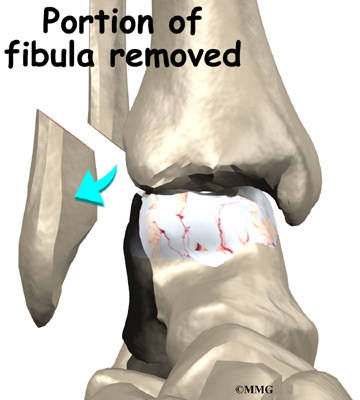


Removing part of the fibula…View animation
Removing part of the tibia…View animation
Removing the articular surface of the tibia…View animation
Removing the articular surface of the talus…View animation

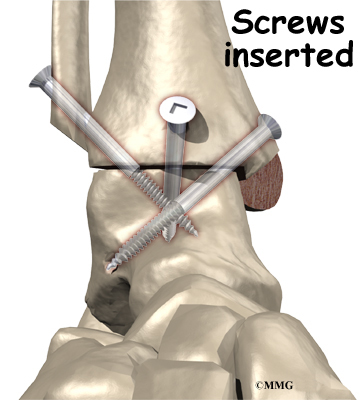
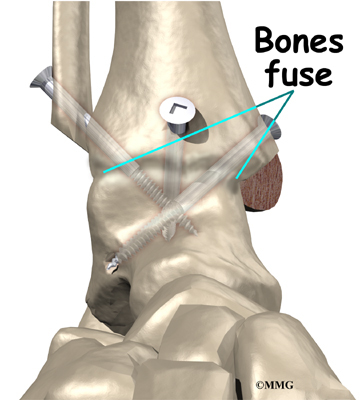
Remainder of the talar articular surface removed… View animation
Inserting the screws… View animation
Fusion healed.
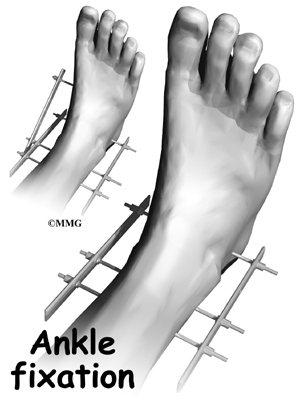
In some cases, especially if the fusion is being done because of an infection or a failed initial fusion, an apparatus called an external fixator is used to hold the bones together while they heal. This apparatus has metal pins that are inserted through the skin and into the bone. The metal pins are connected to metal rods and bolts outside the skin that hold the bones in position while the ankle fuses. The fixator is removed after the bones have healed, usually in 12 to 15 weeks.
Arthroscopic Method
Some surgeons have performed ankle fusions with the help of an arthroscope. The arthroscope is a miniature TV camera that is inserted into the ankle joint through a small incision.

Using the arthroscope to watch, other instruments are inserted into the ankle joint to remove the cartilage surface. The cartilage surface is removed using a small rotary cutting tool. Once the surfaces are prepared, screws are placed through small incisions in the skin to hold the bones together as they heal, or fuse. This procedure is not significantly different from the open procedure except that the incisions are smaller.
Complications
What might go wrong?
As with all major surgical procedures, complications can occur. This document doesn’t provide a complete list of the possible complications, but it does highlight some of the most common problems. Some of the most common complications following ankle fusion are
- anesthesia
- nerve or blood vessel injury
- infection
- nonunion of the bones
- malunion of the bones
Anesthesia
Problems can arise when the anesthesia given during surgery causes a reaction with other drugs the patient is taking. In rare cases, a patient may have problems with the anesthesia itself. In addition, anesthesia can affect lung function because the lungs don’t expand as well while a person is under anesthesia. Be sure to discuss the risks and your concerns with your anesthesiologist.
Nerve or Blood Vessel Injury
During surgery, it is possible that either the nerves of the foot or the blood vessels around the ankle can be injured. This may result in numbness in the foot if the nerves are injured. Severe injuries of the blood vessels of the foot could lead to the need for an amputation.
Infection
Following surgery, it is possible that the surgical incision can become infected. This will require antibiotics and possibly another surgical procedure to drain the infection.
Nonunion
Sometimes the bones do not fuse as planned. This is called a nonunion, or pseudarthrosis. (The term pseudarthrosis means false joint.) This condition requires another operation to add bone graft and perhaps additional fixation. The bones need to be completely immobilized to fuse, so an external fixator may be needed to help hold the bones in position as they heal.
Malunion
Another possible complication is that the bones may heal in the wrong position. This is called a malunion. If the malunion is too extreme and causes problems with walking, another operation may be required to try to achieve a better position of healing.
After Surgery
What happens after surgery?
After surgery, your ankle will be wrapped in a padded plaster cast. This will be removed after two weeks and replaced with a short-leg cast. You will not be permitted to put weight down on your foot until it is certain the bones are fusing. This usually takes between eight and 12 weeks.
You should keep your leg elevated above the level of your heart for several days to avoid swelling and throbbing. Keep it propped up on a stack of pillows when sleeping or sitting up.
Rehabilitation
What will my recovery be like?
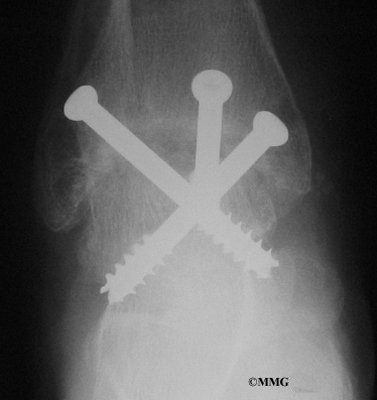
An ankle brace will replace the cast after eight to 12 weeks. Your surgeon will take x-rays frequently to see if the bones are fusing together. You will probably need to use crutches for most of the time you wear the cast. As the fusion grows stronger, you will begin to put more weight on your foot when walking. You may need the help of a physical therapist to learn to walk smoothly and without a limp.
Once the fusion has completely healed, you will be fitted with several special shoe modifications to make walking easier. An insert in the shoe called a SACH foot is sometimes useful to help you walk more normally. This heel cushion compresses as you put your weight on the foot and allows the foot to roll more normally as you step. Another useful modification of the shoe is a rocker sole. Unlike a typical flat shoe sole, the rocker sole is rounded, allowing your foot to roll as you move through a step.
While you won’t be able to run normally after an ankle fusion, a successful operation should result in a nearly natural walking gait.
Ankle Arthritis
A Patient’s Guide to Osteoarthritis of the Ankle
Introduction
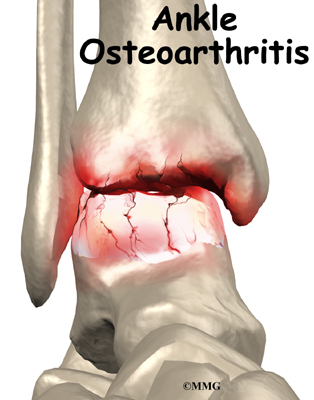
This is due to the wear and tear that occurs over the years after the injury. This condition is called osteoarthritis (OA) or posttraumatic arthritis. Trauma means injury, and the term posttraumatic arthritis is used to describe arthritis that develops after an injury.
This guide will help you understand
- how arthritis of the ankle develops
- how doctors diagnose the condition
- what treatment options are available
Anatomy

How does the ankle joint work?
The ankle joint is made up of three bones: the lower end of the tibia (shinbone), the fibula (the small bone of the lower leg), and the talus (the bone that fits into the socket formed by the tibia and fibula).
The talus sits on top of the calcaneus (the heelbone). The talus moves mainly in one direction. It works like a hinge to allow your foot to move up and down.
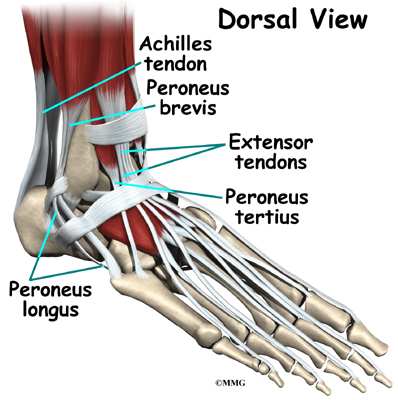
Ligaments on both sides of the ankle joint help hold the bones together. Many tendons cross the ankle to move the ankle and the toes. (Ligaments connect bones to bones while tendons connect muscles to bones.) The large Achilles tendon in the back is the most powerful tendon in the foot. It connects the calf muscles to the heel bone and gives the foot the power for walking, running, and jumping.
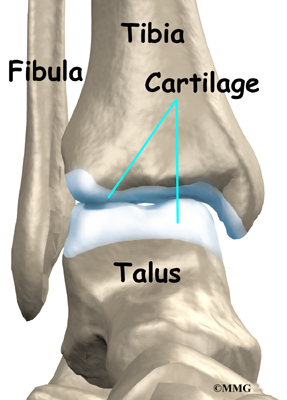
Inside the joint, the bones are covered with a slick, smooth material called articular cartilage. Articular cartilage is the material that allows the bones to move against one another in the joints of the body. The cartilage lining is about one-quarter of an inch thick in most joints that carry body weight, such as the ankle, hip, or knee. It is soft enough to allow for shock absorption but tough enough to last a lifetime, as long as it is not injured.
Related Document: A Patient’s Guide to Ankle Anatomy
Causes
Why do I have this problem?

OA is usually considered a type of degenerative arthritis, or wear-and-tear arthritis. Doctors consider OA pretty much the same whether it appears years after an injury to the joint or whether it appears without any history of injury. It behaves more or less the same way.
Over the past several years, there has been increasing evidence that OA is genetic, meaning that it runs in families. OA that occurs without any injury may prove to be related to differences in the chemical makeup of articular cartilage. People are born with these differences.
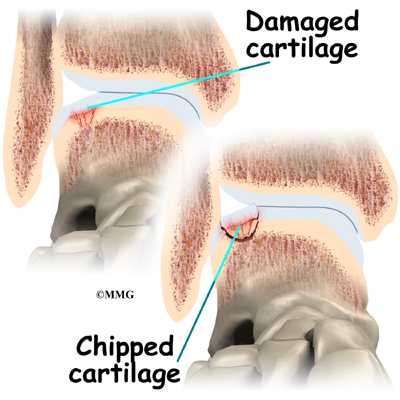
Injury to a joint, such as a bad sprain or fracture, can cause damage to the articular cartilage. The cartilage can be bruised when too much pressure is exerted on it. This damages the cartilage, although if you look at the surface it may not appear to be any different. The injury to the material doesn’t show up until months later. Sometimes the cartilage surface is damaged even more severely, and pieces of the cartilage are ripped from the bone. These pieces do not heal back and usually must be removed from the joint surgically. If not, they may float around in the joint, causing the joint to catch and be painful. These fragments of cartilage may also do more damage to the joint surface.
Once this cartilage is ripped away, it does not normally grow back. Unlike bone, holes in the surface are not simply replaced by the cartilage tissue around the hole. Instead the defects are filled with scar tissue. The scar tissue that forms is not nearly as good a material for covering joint surfaces as the cartilage it replaces. It just can’t support weight and isn’t smooth like true articular cartilage.
An injury to a joint, even if it does not injure the articular cartilage directly, can alter how the joint works. This is true for a fracture where the bone fragments heal differently from the way they were before the break occurred. It is also true when ligaments are damaged that lead to instability in the joint. When an injury results in a change in the way the joint moves, the injury may increase the forces on the articular cartilage. This is similar to any mechanical device or machinery. If the mechanism is out of balance, it wears out faster.
Over many years this imbalance in the joint mechanics can lead to damage to the articular surface. Since articular cartilage cannot heal itself very well, the damage adds up. Finally, the joint is no longer able to compensate for the increasing damage, and it begins to hurt. The damage occurs well before the pain begins.
In summary, arthritis may come from differences in how each of us is put together based on our genes, a condition best described as OA. Or arthritis may develop years after an injury that leads to slow damage to the joint surfaces, a condition probably best described as post-traumatic arthritis. Either way the joint is worn out, and it hurts. For the purposes of this document, we will refer to both types as OA.
Symptoms
What does arthritis of the ankle feel like?
Pain is the main problem with arthritis of any joint. This pain occurs at first only related to activity. Usually, once the activity gets underway there is not much pain, but after resting for several minutes the pain and stiffness increase. Later, when the condition worsens, pain may be present even at rest. The pain may interfere with sleep. The joint may swell, fill with fluid, and feel tight, especially following increased activity. As the articular cartilage starts to wear off the joint surface, the joint may squeak when moved. Doctors refer to this sound as crepitation.
OA will eventually affect the motion of a joint. The joint becomes stiff and loses flexibility. Certain movements can become painful, and it may become difficult to trust the joint to hold your weight in certain positions. The body has a pain reflex such that when a joint is put into a position that causes pain the muscles around the joint may stop working without warning. This reflex can cause a person to stumble or even fall when arthritis affects the ankle joint.
When OA has reached a very severe stage, the bone itself under the articular cartilage may become worn away. This can lead to increasing deformities around the joint. In the final stages, the alignment of the bones can begin to form odd angles where they meet at the joint.
Diagnosis
How do doctors identify OA?
The diagnosis of OA begins with a history of the problem. Details about any injuries that may have occurred to the joint, even years before, are important to understanding why the condition exists. Whether or not other family members have OA may shed some light on the problem.
Following the history, your doctor will examine the ankle joint and possibly other joints in your body. It will be important for your doctor to see how the motion of the ankle has been affected. The alignment of the ankle will be assessed. The nerves and circulation going to the legs and ankle will be checked. Your doctor will watch you walk to see if you have a noticeable limp.
Regular X-rays will be taken to see how severely the joint is damaged. This is usually the most important test to determine how bad the OA has become. How much articular cartilage is left in the ankle joint can be estimated with the X-rays.

If there is any question whether the arthritis may be coming from something other than OA, blood tests may be ordered to look for systemic diseases such as rheumatoid arthritis. A needle may be inserted into the joint to remove some of the joint fluid. This fluid may be sent to a lab to look for crystals due to gouty arthritis or signs of infection.
Treatment
What can be done for the condition?
The treatment of OA of the ankle can be divided into the nonsurgical means to control the symptoms and the surgical procedures that are available to treat the condition. Surgery is usually not considered until it has become impossible to control the symptoms without it.
Nonsurgical Treatment
Treatment usually begins when the ankle first becomes painful. The pain may only occur at first with heavy use and may simply require the use of mild anti-inflammatory medications such as aspirin or ibuprofen. Reducing the activity or changing from occupations that require long periods of standing and walking may be necessary to help control the symptoms.
Newer medications such as glucosamine and chondroitin sulfate are being used by orthopedic surgeons more commonly today. These medications seem to be effective in reducing the pain of OA in all joints.
There are also new injectable medications that lubricate the arthritic joint. These medications have been studied mainly in the knee. It is unclear if they will help the arthritic ankle joint. These injectable medications are not usually prescribed for this condition yet.
Rehabilitation services, such as physical therapy, play a critical role in the treatment plan for ankle joint arthritis. The main goal of therapy is to help you learn how to control symptoms and maximize the health of your ankle. You’ll learn ways to calm your pain and symptoms. You may use rest, heat, or topical rubs. Your therapist will work with you to improve flexibility, balance, and strength. Training is done to help you walk smoothly and without a limp, which may require that you use a walking aid such as a walker, crutches, or cane.
Modifying your shoe with a rocker sole may give some relief of symptoms. The rocker sole replaces your normal sole with a rounded one, allowing your foot to roll as you move through a step. This can help take stress off the ankle as you walk.
Braces that reduce the motion in the ankle can also be beneficial in reducing pain. Special braces that transfer some of the body weight to the knee can help protect the ankle. These braces are called patellar tendon bearing braces. They are quite large and bulky and may not be well tolerated by some patients.
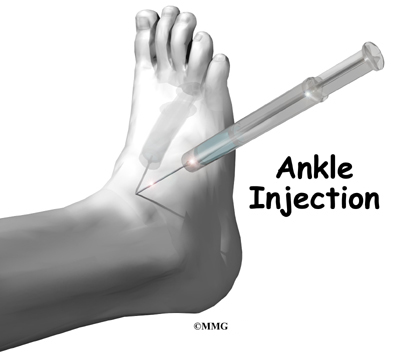
An injection of cortisone into the joint can give temporary relief from symptoms of OA. Cortisone is a powerful anti-inflammatory medication. When injected into the joint itself, cortisone can help relieve the pain. The pain relief is temporary and usually only lasts several weeks to months. There is a small risk of infection with any injection into a joint, and cortisone injections are no exception.
Surgery
Eventually, it may be necessary to consider surgery for OA of the ankle. There are several different types of surgery that can be performed to help with your condition. Which procedure is recommended by your surgeon will be determined by many things. These include how much the degeneration in the ankle has progressed, how active you are, how old you are, and what other medical problems you have. Each type of procedure has risks and benefits that should be discussed with your surgeon. The choices for surgery are arthroscopic surgery to clean up the joint, fusion of the joint, or replacing the joint with an artificial ankle joint.
Arthroscopic Debridement
Sometimes when OA of the ankle occurs, loose pieces of cartilage and bone float around inside the ankle joint. These loose bodies can cause irritation in the joint, leading to inflammation. They can also get caught between the joint surfaces of the ankle. This can cause a sharp pain when it happens. The cartilage surfaces of the joint also become rough, with flaps of cartilage that peel off the surface, much like paint peeling off the ceiling. Bone spurs, or outgrowths, form around the joint and can grow larger over time. These bone spurs can rub against the soft tissues around the ankle joint when the ankle moves, again causing pain and swelling.
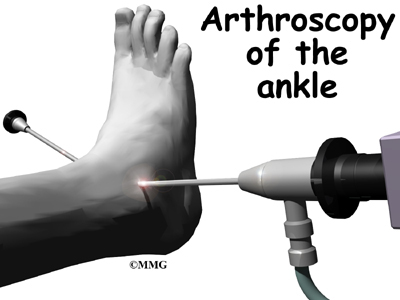
The arthroscope can help the doctor remove these loose bodies and bone spurs and smooth the cartilage surfaces of the ankle joint. The arthroscope is a special TV camera that is inserted through small incisions (one-quarter of an inch) around the ankle. Small surgical tools can also be inserted through these incisions to work in the ankle joint.
Ankle Fusion
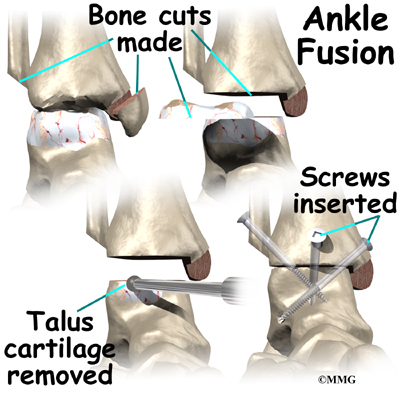
When the ankle joint becomes so painful that it is difficult to walk, surgery may be suggested to fuse the ankle joint. An ankle fusion is sometimes also called an ankle arthrodesis. In this operation, the three bones that make up the ankle joint (the talus, the tibia, and the fibula) are allowed to grow together, or fuse, into one bone. Once this is done the ankle no longer is able to move, but with a successful fusion the pain is gone. Most people with a successful fusion of the ankle are able to walk without much trouble, and in some cases it is almost impossible to tell that the ankle is stiff. But it is very difficult to run because you lose the ability to push off with the toes. The foot can’t bend down.
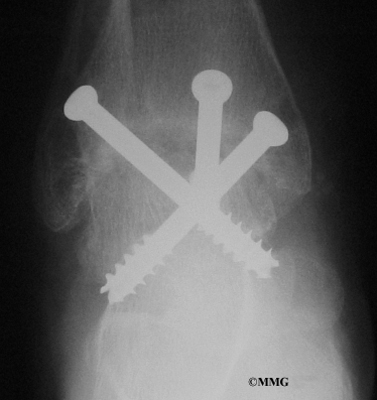
Most people will need some changes made to their shoes following an ankle fusion. Because the ankle no longer moves, it is difficult to roll over the top of the foot when you take a step. For this reason, shoes are usually fitted with a rocker sole. This allows the shoe to roll instead of the foot. A special heel is sometimes built on the shoe to absorb some of the shock.
The ankle fusion is a good operation, especially for a young, active person. It is usually the preferred option for post-traumatic arthritis of the ankle. Once the ankle is successfully fused it can last a lifetime, and no other operations are expected later unless there are problems. But there are complications associated with the ankle fusion, and not all ankle fusions are successful.
Related Document: A Patient’s Guide to Ankle Fusion
Artificial Ankle Replacement
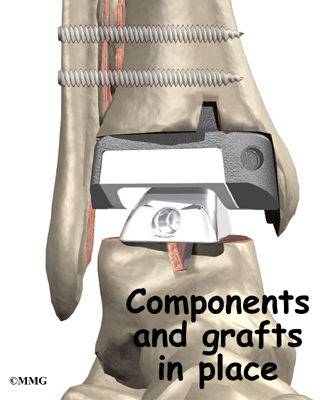
Because no one wants to lose the ability to move the ankle, much research has been done trying to perfect an artificial ankle replacement. Until now, the artificial ankle has not been nearly as successful as the artificial hip or knee.
The ankle is a difficult joint to replace for many reasons. The socket (usually called the mortise) is actually made up of two bones, the tibia and the fibula. These two bones move against one another slightly when we walk. This makes it difficult to get the artificial ankle socket to stay connected to the bone.
The biggest problem with the older artificial ankle designs is that they loosened after a relatively short time and began to cause pain. When using the newer artificial ankle designs, surgeons have tried to solve this problem by actually fusing the tibia and fibula together during the operation and placing screws across the two bones. This has dramatically increased the success rate for the artificial ankle replacements done today. Many surgeons are now beginning to use the artificial ankle for post-traumatic arthritis instead of doing a fusion. Patients are able to keep the motion in the ankle and avoid some of the problems associated with the ankle fusion.
Related Document: A Patient’s Guide to Artificial Joint Replacement of the Ankle
Rehabilitation
What should I expect following treatment?
Nonsurgical Rehabilitation
If you don’t need surgery, range-of-motion exercises for the ankle should be started as pain eases, followed by a program of strengthening. The program advances to include strength and balance exercises. You’ll be given tips on keeping your symptoms controlled. You will probably progress to a home program within four to six weeks.
In cases of advanced OA where surgery is called for, patients may also see a physical therapist before surgery to discuss exercises that will be used just after surgery and to begin practicing using crutches or a walker.
After Surgery
Your ankle will be bandaged with a well-padded dressing and a splint for support after surgery. Most patients are instructed not to place weight on their foot for a period of time after surgery. After arthroscopy, this period lasts about one week. After ankle joint replacement, patients usually avoid placing weight on their foot for up to 12 weeks.
Physical therapy sessions may be needed after surgery for up to two months. The first few treatments are used to help control the pain and swelling after surgery. Treatments include electrical stimulation, ice, and soft tissue massage. Hands-on joint movements and stretching are used to improve range of motion and flexibility.
Therapists sometimes treat their patients in a pool. Exercising in a swimming pool puts less stress on the ankle joint, and the buoyancy lets you move and exercise easier. Once you’ve gotten your pool exercises down and the other parts of your rehab program advance, you may be instructed in an independent program.
Your therapist will also work with you to safely progress the amount of weight you are able to place on your foot. The goal will be to help you walk comfortably and with a smooth walking pattern. Some of the exercises you’ll do are to help strengthen and stabilize the muscles around the ankle joint. You’ll be given tips on ways to do your activities while avoiding extra strain on the ankle joint.
Shin Splints
A Patient’s Guide to Shin Splints
Introduction

Pain along the front or inside edge of the shinbone (tibia) is commonly referred to as shin splints. The problem is common in athletes who run and jump. It is usually caused by doing too much, too quickly. The runner with this condition typically reports a recent change in training, such as increasing the usual pace, adding distance, or changing running surfaces. People who haven’t run for awhile are especially prone to shin splints after they first get started, especially when they run downhill. Shin splints on the front of the tibia are called anterior shin splints. Posterior shin splints cause pain along the inside edge of the lower leg.
This guide will help you understand
- how shin splints start
- what shin splints feel like
- how this condition is treated
Anatomy
What parts of the leg are involved?
The lower leg is made up of two bones. The shinbone is the larger of the two bones. It is called the tibia. The small, thin bone that runs alongside the tibia from the knee to the ankle is the fibula.
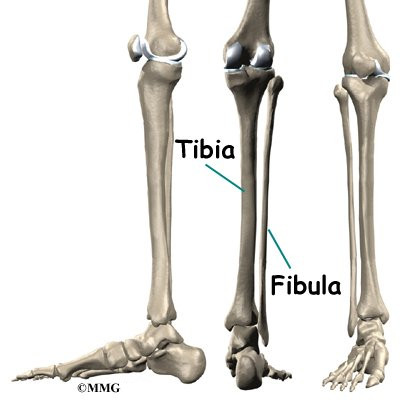
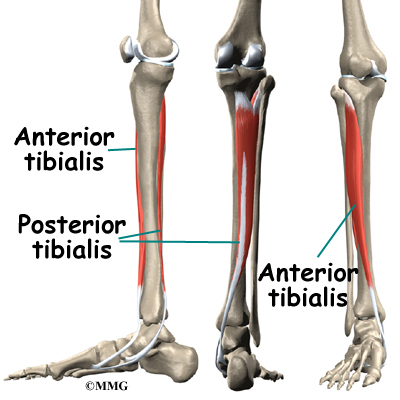
The tibia and fibula provide a connecting point for several muscles that move the foot. The main muscle that bends the foot upward connects on the front (anterior) of the tibia. It is called the anterior tibialis. The posterior tibialis, which pulls the foot down and in, attaches along the back (posterior) and inside edge of the tibia. Together, the anterior and posterior tibialis muscles are called the tibialis muscles.
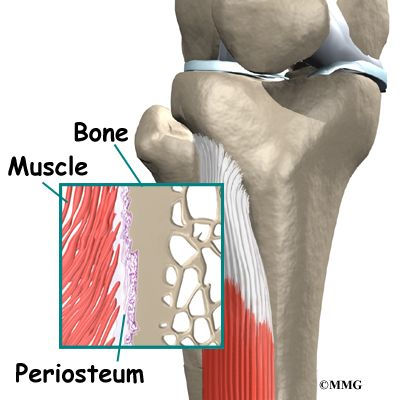
The tibialis muscles have tiny fibers that fasten the muscle to the bony surface of the tibia. This bony covering, or membrane, is called the periosteum (peri means around, and osteum means bone).
Related Document: A Patient’s Guide to Ankle Anatomy
Causes
Why do I have shin splints?
Shin splints usually result from overuse. Repeated movements of the foot can cause damage where the tibialis muscles attach to the tibia. Soon the edge of the muscles may begin to pull away from the bone. The injured muscle and the bone covering (the periosteum) become inflamed.
Overuse commonly happens after changes in training. Increasing running speed and distance and running on hard or angled surfaces can contribute to overuse. Overuse can also occur from running in flimsy footwear or in shoes with soles that are worn out.
Anterior shin splints tend to affect people who take up a new activity, such as jogging, sprinting, or playing sports that require quick starts and stops. The unfamiliar forces place a heavy strain on the anterior tibialis muscle, causing it to become irritated and inflamed. This commonly happens when people who aren’t regular runners decide to go on a long jog. The anterior tibialis muscle must work hard to control the landing of the forefoot with each stride. Running downhill puts even more demands on this muscle in order to keep the forefoot from slapping down. People who run on the balls of their feet or who run in shoes with poor shock absorption also tend to get anterior shin splints.
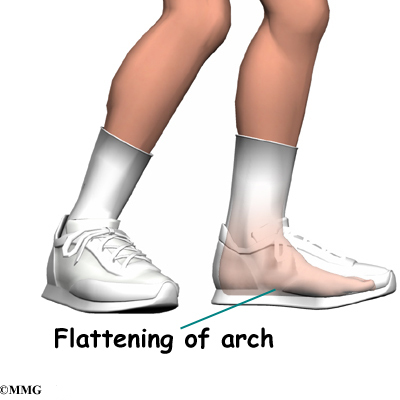
Posterior shin splints are generally caused by imbalances in the leg and foot. Muscle imbalances from tight calf muscles can cause this condition. Imbalances in foot alignment, such as having flat arches (called pronation), can also cause posterior shin splints. As the foot flattens out with each step, the posterior tibialis muscle gets stretched, causing it to repeatedly tug on its attachment to the tibia. The posterior tibialis muscle attachment eventually becomes damaged, leading to pain and inflammation along the inside edge of the lower leg.
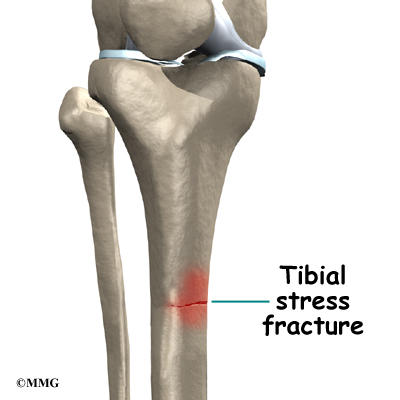
A stress fracture in the tibia is a serious problem that at first may have the same symptoms as shin splints. A stress fracture is a crack in a weakened area of bone. Continual stresses from running on hard surfaces or from heavy strain in the tibialis muscles can weaken and eventually fracture the tibia. People with shin pain who try to work through it sometimes end up developing a stress fracture in the tibia.
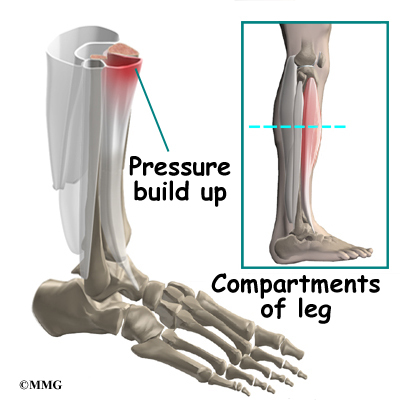
A concerning complication of shin splints is compartment syndrome. Compartment syndrome is a condition where pressure from muscle damage and swelling builds up inside a section, or compartment, within the body. There are four compartments in the lower limb. As the pressure builds in the compartment, the small blood vessels (called capillaries) that supply blood to the muscles in the compartment are squeezed shut. This happens when the pressure in the compartment is higher than the blood pressure that keeps the small blood vessels open. When the muscle loses its blood supply it begins to ache, like a muscle cramp.
If the continues to rise, it can squeeze the larger blood vessels and nerves as well. Patients may feel coldness, numbness, and swelling in the lower leg and foot. If pressure builds up and is not treated, it can cause serious tissue damage in the leg and foot.
Symptoms
What do shin splints feel like?
Dull, aching pain is felt where the involved tibialis muscle attaches to the tibia. Redness and swelling can also occur in this area. Tenderness is felt where the muscle attaches to the bone.
Anterior shin splints are usually felt on the front of the tibia, especially when using the anterior tibialis muscle to bend your foot upward.
Posterior shin splints produce symptoms along the inside edge of the lower leg. Small bumps may also be felt along the edge of the tibia in this area.
Symptoms of shin splints generally get worse with activity and ease with rest. Pain may be worse when you first get up after sleeping. The sore tibialis muscle shortens while you rest, and it stretches painfully when you put weight on your foot.
Diagnosis
How will my doctor know if I have shin splints?
The diagnosis of shin splints is usually made using your history and physical examination. The doctor may ask you questions about your training schedule and footwear. The doctor may also want to know whether you’ve recently begun a new sport that requires running or jumping.
The physical examination lets the doctor see exactly where your leg hurts. The doctor will probably move your ankle in different positions and have you hold your foot against the doctor’s pressure. By stretching the tibialis muscles and by feeling where these muscles attach on the tibia, the doctor can begin to tell where the problem is.
X-rays may be ordered to make sure you don’t have a stress fracture. However, recent stress injuries may not show up on X-ray for the first few weeks. In these cases, a bone scan may be ordered. A bone scan involves injecting tracers into your blood stream. The tracers then show up on special X-rays of your leg. The tracers build up in areas of extra stress to bone tissue. The extra stress can be caused by a stress fracture or an inflamed periosteum (bony covering). This condition is called periostitis.
Your doctor may also order a magnetic resonance imaging (MRI) scan. An MRI scan is a special imaging test that uses magnetic waves to create pictures of your body in slices. The MRI scan shows tendons as well as bones. It also shows abnormal swelling or scar tissue. An MRI is painless and requires no needles or injections.
A test for measuring pressure in the sore leg may be needed if you have symptoms of compartment syndrome. Pressures within the tissues of the leg are checked before and after exercise to see if exercise causes the pressure readings to go up.
Treatment
How are shin splints treated?
Nonsurgical Treatment
Most cases of shin splints respond to nonsurgical treatments. Rest plays a key role in decreasing pain and inflammation. Patients are usually encouraged to stop doing the activity that caused the problem, at least until their symptoms are under control. Applying cold packs and taking anti-inflammatory medications calm pain and inflammation and are useful in the early stages of treatment.
Special taping techniques may be used to support the sore tissues and ease pain. However, taping should be used to help the area heal, not as a way to keep on training.
Patients may be encouraged to purchase a pair of shock-absorbing shoe insoles. People with flat arches may need shoe inserts, called orthotics, to support the arch.
Doctors may have their patients work with a physical therapist. Therapists apply treatments to reduce pain and inflammation. Whenever possible, the underlying problems causing the shin splints are also addressed. The therapist may offer ideas to avoid overuse while training, evaluate your running style, and suggest tips on footwear. Treating the main cause will normally help get rid of shin splints.
In rare instances, an injection of cortisone along the edge of the muscular connection to the bone may be used. However, cortisone is used very sparingly because it can weaken the soft tissues of the tibialis muscles.
Surgery
Surgery is rarely needed to correct problems of shin splints. However, shin splints that are complicated by compartment syndrome may require surgery, sometimes immediately.
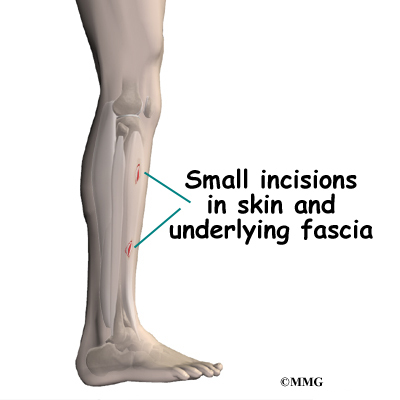
If compartment syndrome is discovered and diagnostic tests show high pressures within the tissues of the lower leg, surgery may be recommended right away. The procedure to remove the pressure is called fasciotomy. Fascia is the connective tissue around and between muscles and organs. The surgeon makes a few small incisions on either side of the lower leg. The nearby layer of fascia within several compartments is cut and removed to reduce the pressure within the compartment. The incisions are left open at first. Tissue pressures are checked over a period of two to three days. The wounds are then closed.
If the problem has been present for more than three months, the surgeon may only need to make one or two incisions to cut the layer of fascia and reduce pressure inside a single problem compartment.
Rehabilitation
When can I get back to my usual activities?
Nonsurgical Rehabilitation
You will need to hold off heavy training and sports activity for three to four weeks. As the pain starts to go away, it should be safe to begin doing more normal activities.
Your doctor may prescribe a carefully progressed physical therapy program lasting four to six weeks. At first, treatments are used to calm inflammation. Iontophoresis uses a mild electrical current to push a topical steroid medicine into the sore area. Ultrasound treatments, often used in combination with a topical steroid medicine, are also effective in halting pain and inflammation. Your therapist may show you how to ice, rest, and tape the injured area.
Deep tissue massage is commonly done along the junction where the sore tibialis muscle meets the tibia. Afterward, the calf and tibialis muscles are gently stretched.
Your therapist will evaluate your posture and alignment to see if you have problems with pronation (arch flattening). This condition tends to be more common with posterior shin splints. Sometimes a small heel wedge placed under the inside edge of the heel is enough to ease tension on the posterior tibialis muscle. More severe problems of pronation may require foot orthotics to support the arch and reduce stresses on the posterior tibialis muscle.
Therapists work with athletes to avoid overuse problems. Knowing your training schedule, pace, and the surface you use will guide your therapist in making recommendations. Alterations are suggested when needed, especially as you attempt to safely resume your sport. Recommendations may be offered regarding footwear and the use of shock-absorbing insoles.
After Surgery
If surgery is required, the rehabilitation is a bit different at first. A protective dressing covers the incisions. You may need to use crutches for several days after surgery, but you should be able to bear weight on the foot within the first week. Your stitches will be removed in 10 to 14 days (unless they are absorbable stitches, which will not need to be taken out).
Athletes work gradually back to activity. They start by using a stationary bike within 10 to 14 days. It is usually safe to begin a light jogging program within six weeks. Most patients can safely begin full activity within eight to 10 weeks.