A Patient’s Guide to Low Back Pain
Introduction

Low back pain is one of the main reasons Americans visit their doctor. For adults over 40, it ranks third as a cause for doctor visits, after heart disease and arthritis.
Eighty percent of people will have low back pain at some point in their lives. And nearly everyone who has low back pain once will have it again.
Very few people who feel pain in their low back have a serious medical problem. Ninety percent of people who experience low back pain for the first time get better in two to six weeks. Only rarely do people with low back pain develop chronic back problems.
With these facts in mind, you can be assured that back pain is common, that it usually only causes problems for a short period of time, and that you can take steps to ease symptoms and prevent future problems.
This guide will help you understand
- which parts make up the spine and low back
- what causes low back pain, and what the most common symptoms are
- what tests your doctor may run
- how to manage your pain and prevent future problems
Anatomy
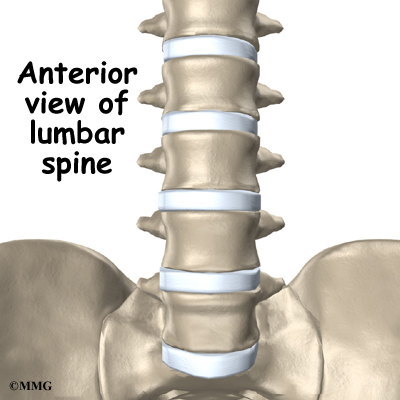
Which parts make up the lumbar spine, and how do they work?
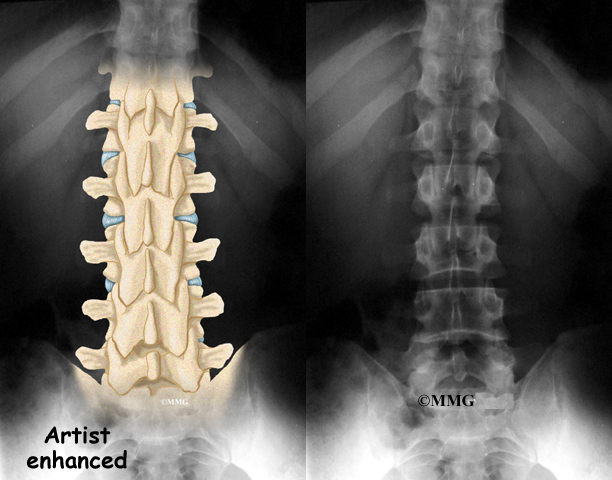
The human spine is made up of 24 spinal bones, called vertebrae Vertebrae are stacked on top of one another to create the spinal column. The spinal column gives the body its form. It is the body’s main upright support.
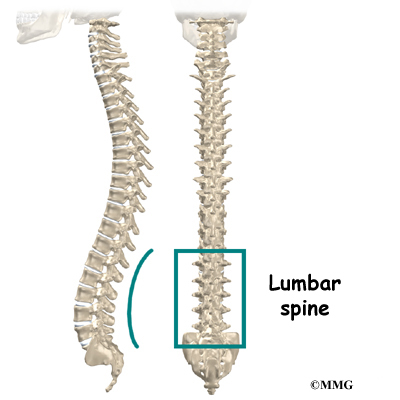
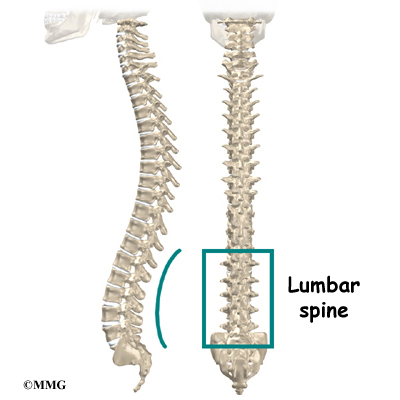
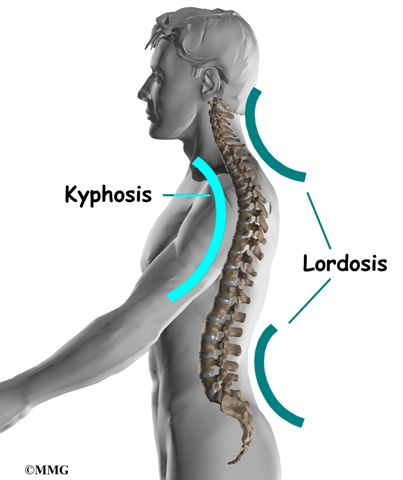
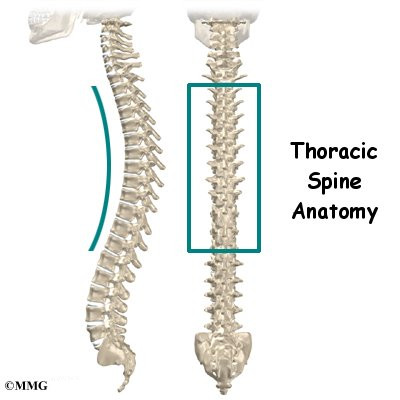
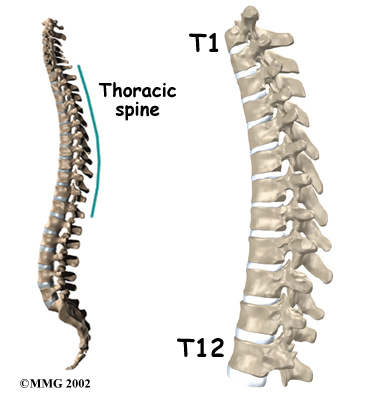
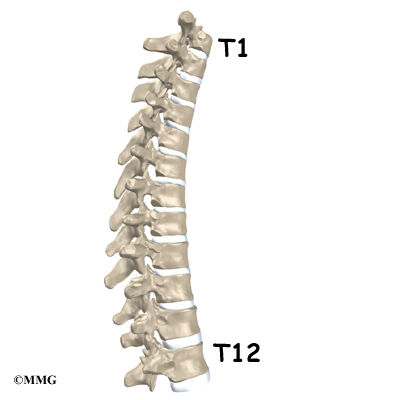
From the side, the spine forms three curves. The neck, called the cervical spine, curves slightly inward. The mid back, or thoracic spine curves outward. The outward curve of the thoracic spine is called kyphosis. The low back, also called the lumbar spine, curves slightly inward. An inward curve of the spine is called lordosis.
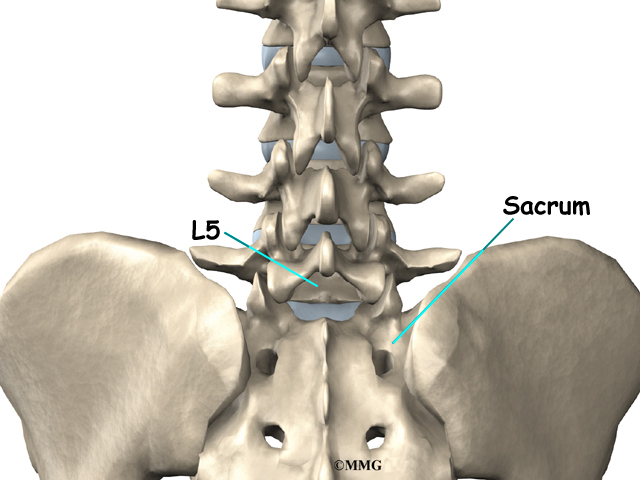
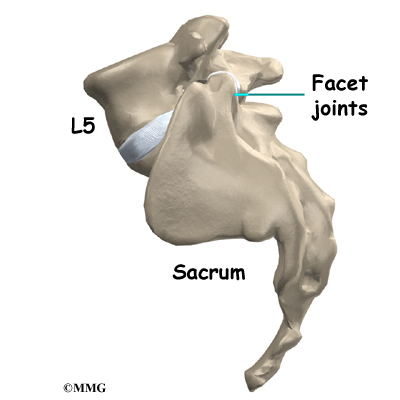
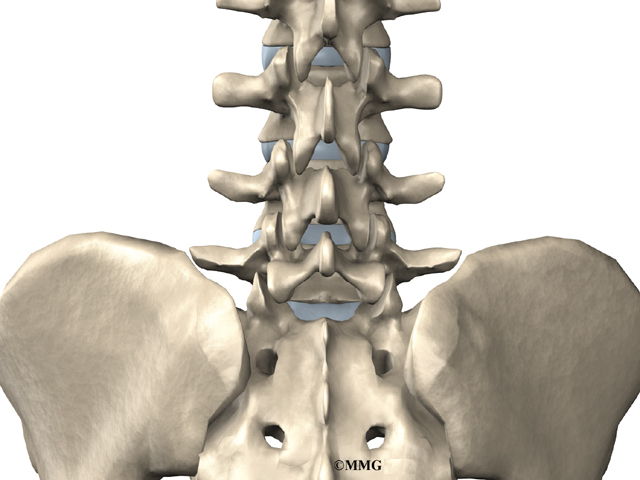
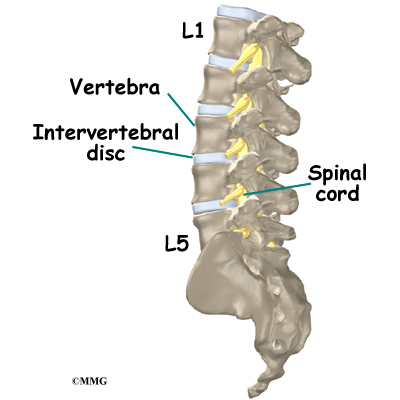
The lumbar spine is made up of the lower five vertebrae. Doctors often refer to these vertebrae as L1 to L5. The lowest vertebra of the lumbar spine, L5, connects to the top of the sacrum, a triangular bone at the base of the spine that fits between the two pelvic bones. Some people have an extra, or sixth, lumbar vertebra. This condition doesn’t usually cause any particular problems.
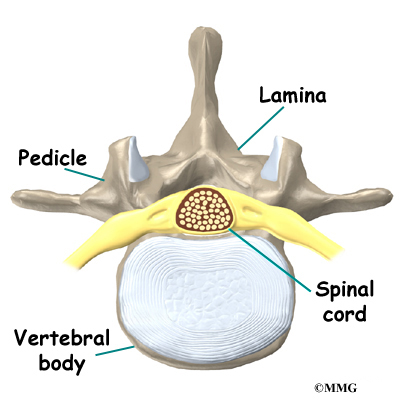
Each vertebra is formed by a round block of bone, called a vertebral body. The lumbar vertebral bodies are taller and bulkier compared to the rest of the spine. This is partly because the low back has to withstand pressure from body weight and from daily actions like lifting, carrying, and twisting. Also, large and powerful muscles attaching on or near the lumbar spine place extra force on the lumbar vertebral bodies.
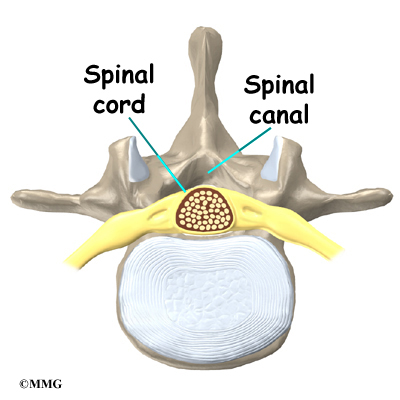
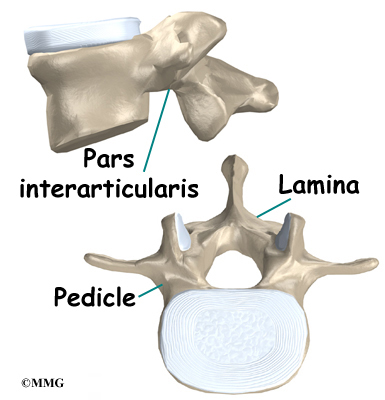
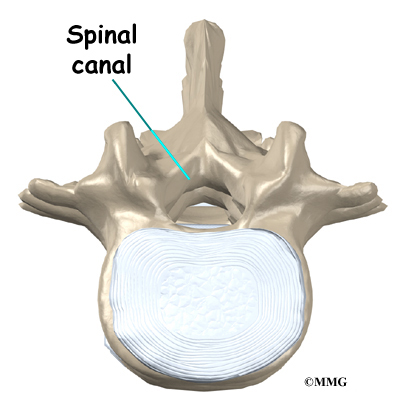
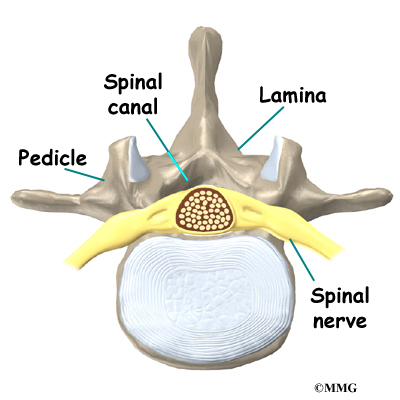
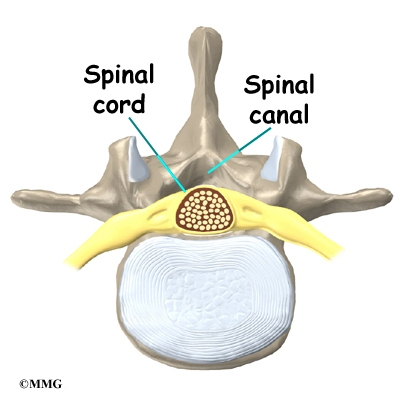
A bony ring attaches to the back of each vertebral body. When the vertebrae are stacked on top of each other, these rings form a hollow tube. This bony tube surrounds the spinal cord as it passes through the spine. Just as the skull protects the brain, the bones of the spinal column protect the spinal cord.
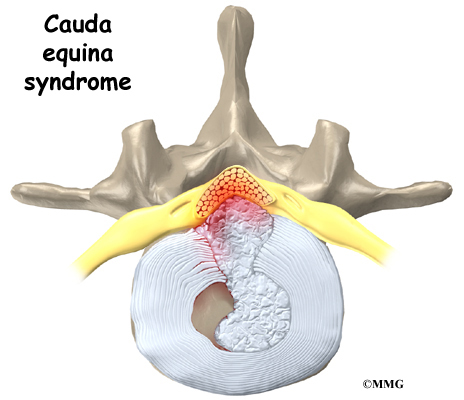
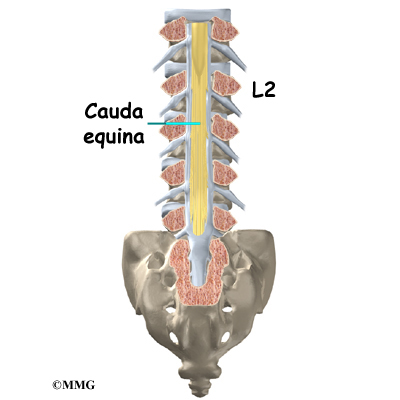
The spinal cord extends down to the L2 vertebra. Below this level, the spinal canal encloses a bundle of nerves that goes to the lower limbs and pelvic organs.
The Latin term for this bundle of nerves is cauda equina, meaning horse’s tail.
As the spinal cord travels from the brain down through the spine, it sends out nerves on the sides of each vertebra called nerve roots. These nerve roots join together to form the nerves that travel throughout the body and form the body’s electrical system. The nerve roots that come out of the lumbar spine form the nerves that go to the lower limbs and pelvis. The thoracic spine nerves go to the abdomen and chest. The nerves coming out of the cervical spine go to the neck, shoulders, arms, and hands.
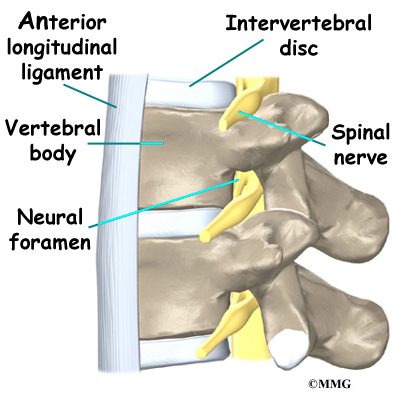
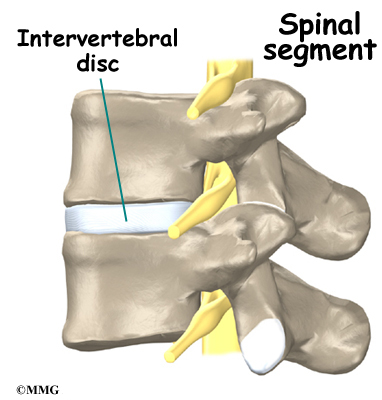
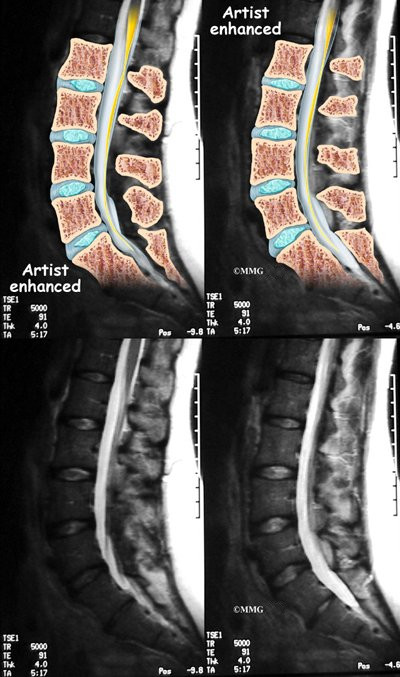
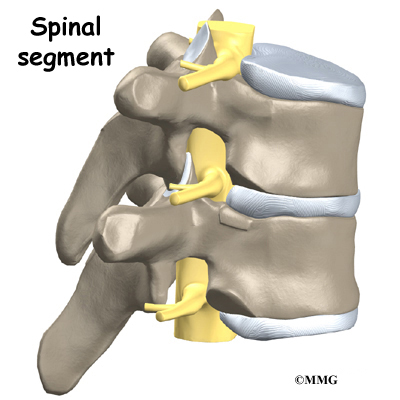
It is sometimes easier to understand what happens in the spine by looking at a spinal segment. A spinal segment includes two vertebrae separated by an intervertebral disc, the nerves that leave the spinal cord at that level, and the small facet joints that link each level of the spinal column.
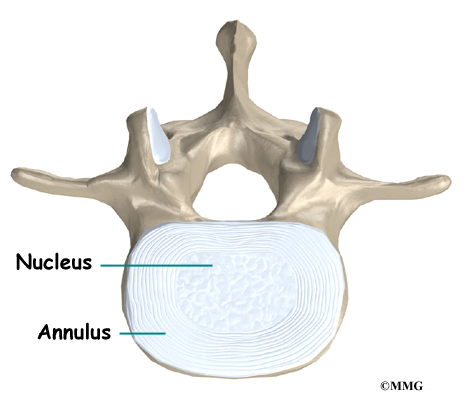
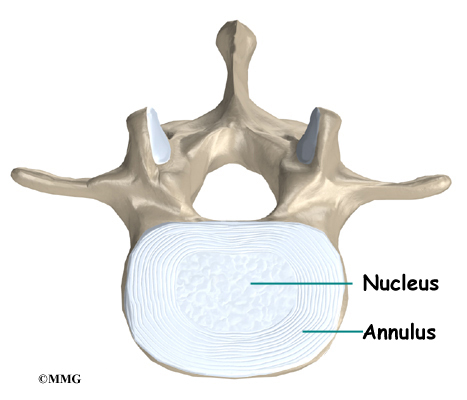
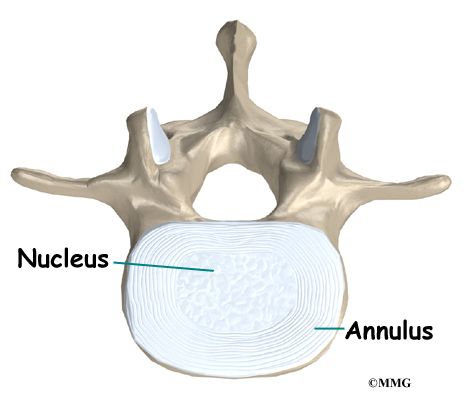
The intervertebral disc normally works like a shock absorber. It protects the spine against the daily pull of gravity. It also protects the spine during heavy activities that put strong force on the spine, such as jumping, running, and lifting.
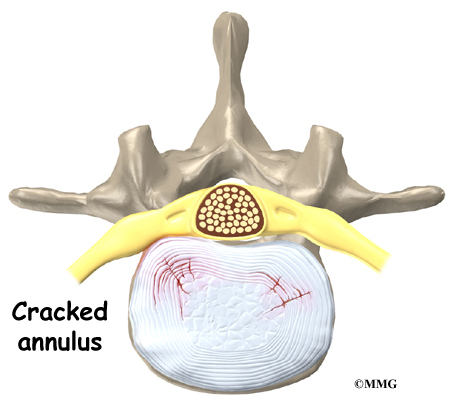
An intervertebral disc is made up of two parts. The center, called the nucleus, is spongy. It provides most of the disc’s ability to absorb shock. The nucleus is held in place by the annulus, a series of strong ligament rings surrounding it. Ligaments are strong connective tissues that attach bones to other bones.
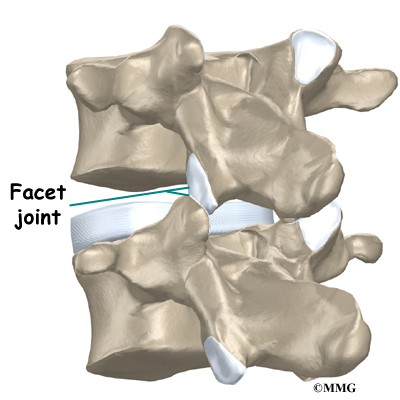
Between the vertebrae of each spinal segment are two facet joints. The facet joints are located on the back of the spinal column. There are two facet joints between each pair of vertebrae, one on each side of the spine. A facet joint is made of small, bony knobs that line up along the back of the spine. Where these knobs meet, they form a joint that connects the two vertebrae. The alignment of the facet joints of the lumbar spine allows freedom of movement as you bend forward and back.
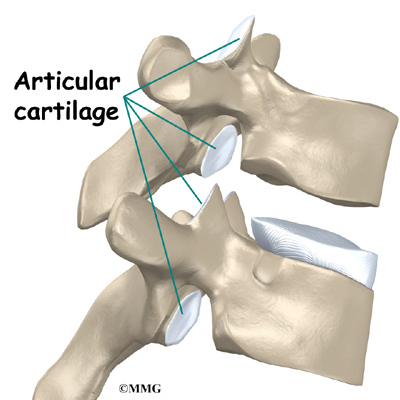
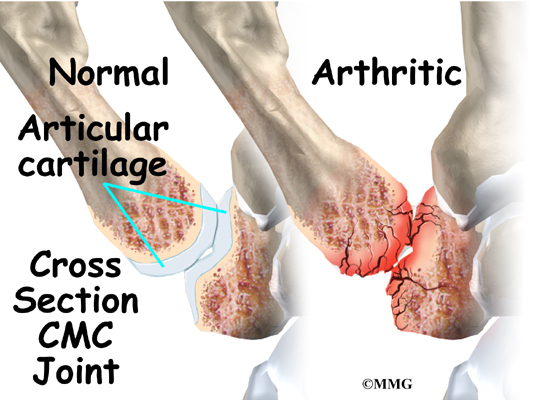
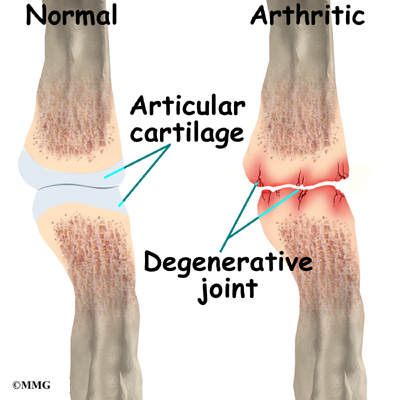
The surfaces of the facet joints are covered by articular cartilage. Articular cartilage is a smooth, rubbery material that covers the ends of most joints. It allows the bone ends to move against each other smoothly, without pain.
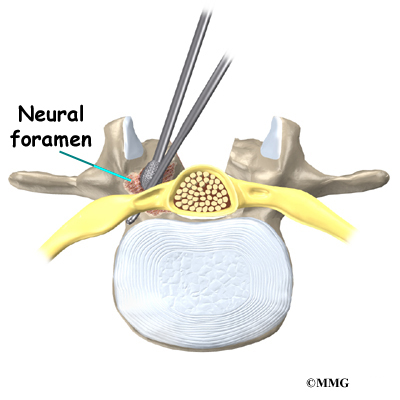
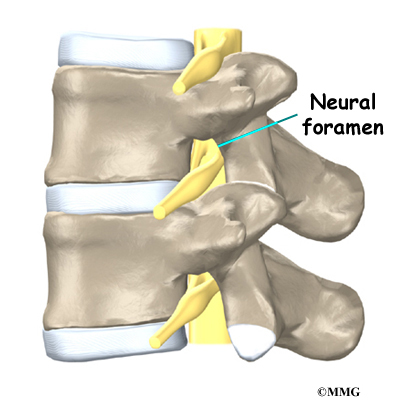
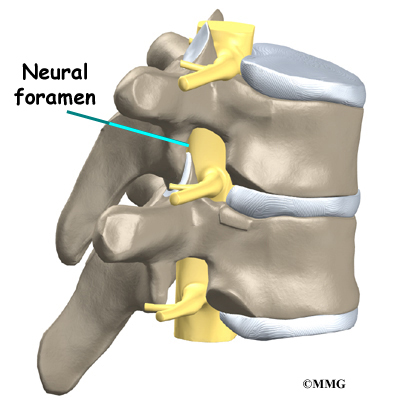
Two spinal nerves exit the sides of each spinal segment, one on the left and one on the right. As the nerves leave the spinal cord, they pass through a small bony tunnel on each side of the vertebra, called a neural foramen. (The term used to describe more than one opening is neural foramina.)
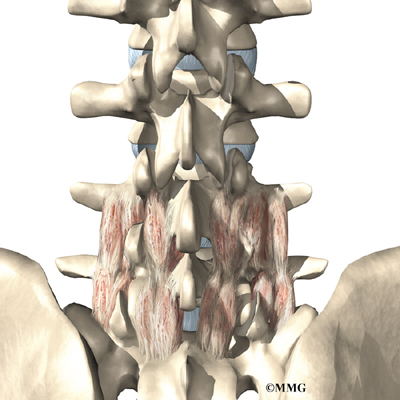
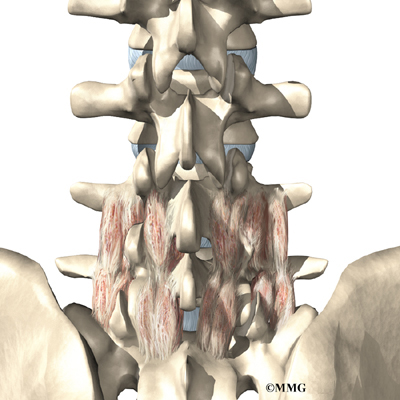
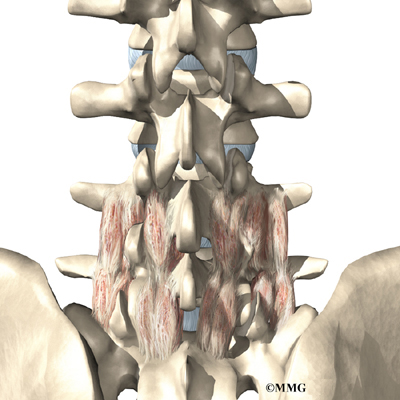
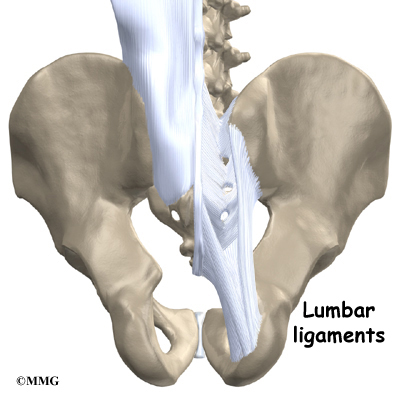
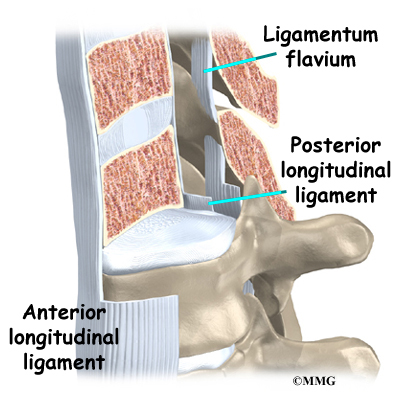
The lumbar spine is supported by ligaments and muscles. The ligaments are arranged in various layers and run in multiple directions. Thick ligaments connect the bones of the lumbar spine to the sacrum (the bone below L5) and pelvis.
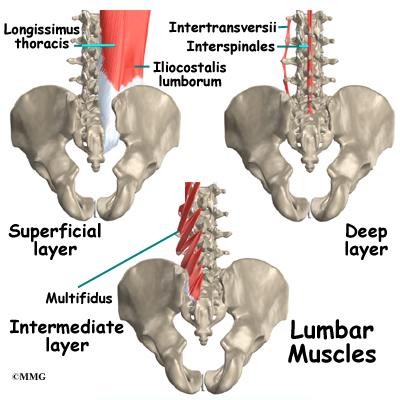
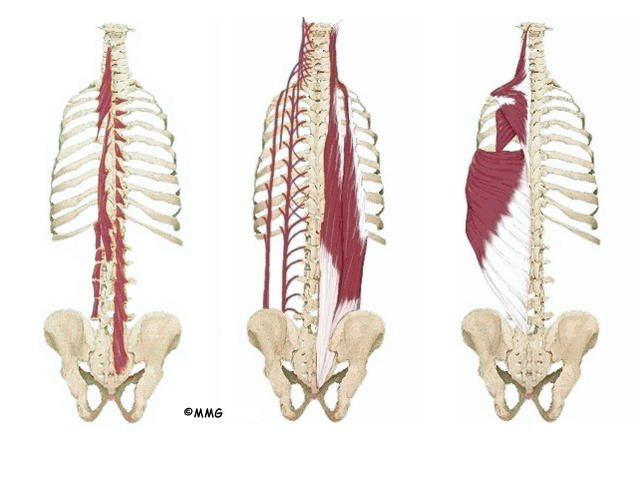
The muscles of the low back are also arranged in layers. Those closest to the surface are covered by a thick tissue called fascia.
The middle layer, called the erector spinae, has strap-shaped muscles that run up and down over the lower ribs, chest, and low back. They blend in the lumbar spine to form a thick tendon that binds the bones of the low back, pelvis, and sacrum.
The deepest layer of muscles connects along the back surface of the spine bones. The muscles also connect the low back, pelvis, and sacrum. These deepest muscles coordinate their actions with the muscles of the abdomen to help hold the spine steady during activity.
Causes
Why do I have low back pain?
There are many causes of low back pain. Doctors are not always able to pinpoint the source of a patient’s pain. But your doctor will make every effort to ensure that your symptoms are not from a serious medical cause, such as cancer or a spinal infection.
The vast majority of back problems are a result of wear and tear on the parts of the spine over many years. This process is called degeneration. Over time, the normal process of aging can result in degenerative changes in all parts of the spine.
Injuries to the spine, such as a fracture or injury to the disc, can make the changes happen even faster. There is strong evidence that cigarette smoking also speeds up degeneration of the spine. Scientists have found links among family members, showing that genetics plays a role in how fast these changes occur.
Degeneration
The intervertebral disc changes over time. At first, the disc is spongy and firm. The nucleus in the center of the disc contains a great deal of water. This gives the disc its ability to absorb shock and protect the spine from heavy and repeated forces.
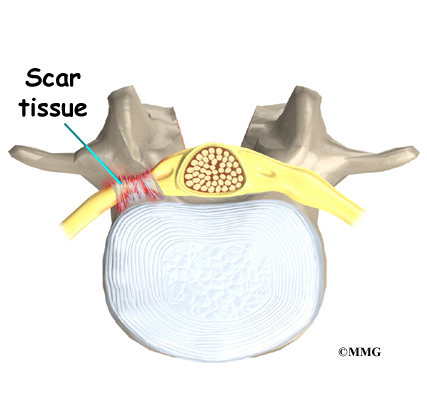
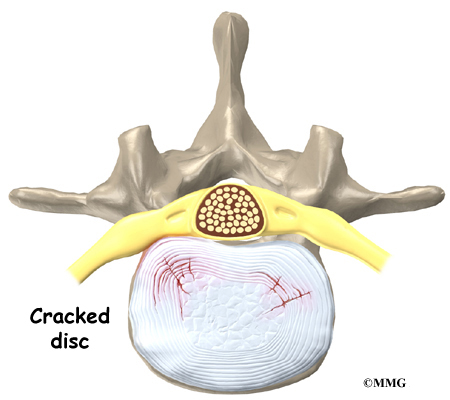
The first change that occurs is that the annulus around the nucleus weakens and begins to develop small cracks and tears. The body tries to heal the cracks with scar tissue. But scar tissue is not as strong as the tissue it replaces. The torn annulus can be a source of pain for two reasons. First, there are pain sensors in the outer rim of the annulus. They signal a painful response when the tear reaches the outer edge of the annulus. Second, like injuries to other tissues in the body, a tear in the annulus can cause pain due to inflammation.
With time, the disc begins to lose water, causing it to lose some of its fullness and height. As a result, the vertebrae begin to move closer together.
As the disc continues to degenerate, the space between the vertebrae shrinks. This compresses the facet joints along the back of the spinal column. As these joints are forced together, extra pressure builds on the articular cartilage on the surface of the facet joints. This extra pressure can damage the facet joints. Over time, this may lead to arthritis in the facet joints.
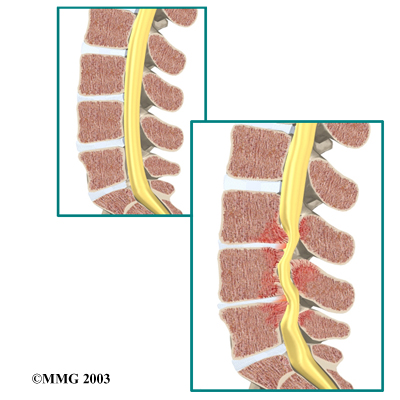
These degenerative changes in the disc, facet joints, and ligaments cause the spinal segment to become loose and unstable. The extra movement causes even more wear and tear on the spine. As a result, more and larger tears occur in the annulus.
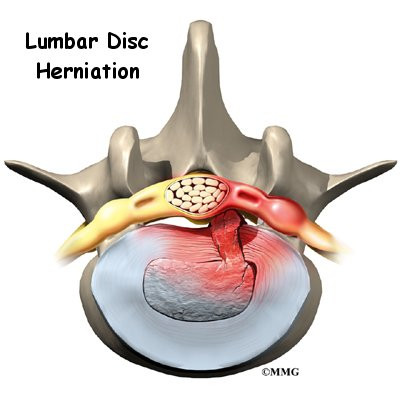
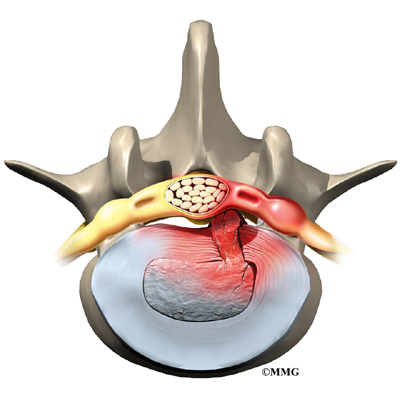
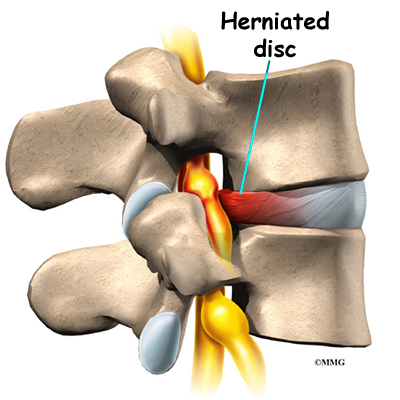
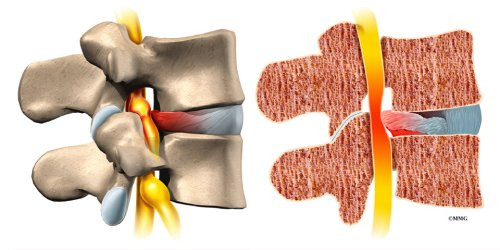
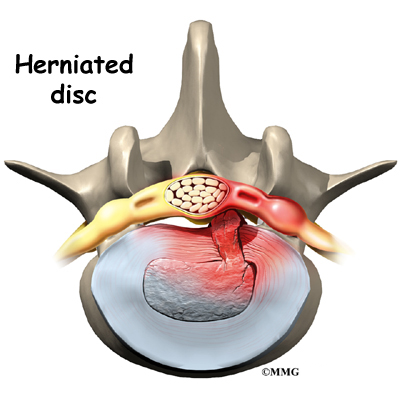
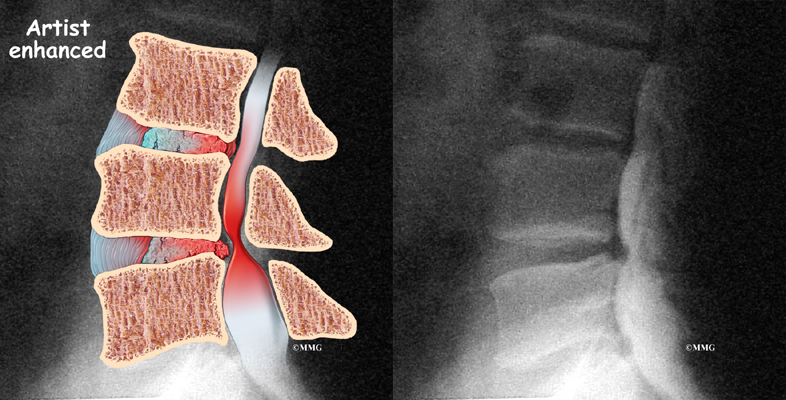
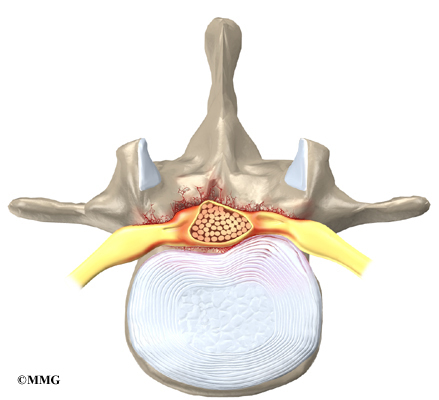
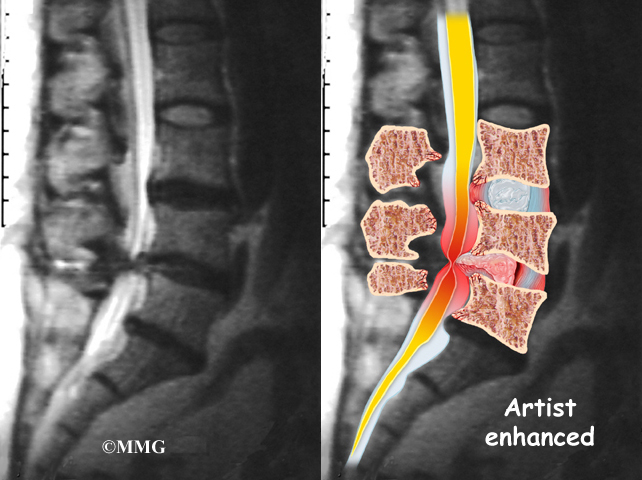
The nucleus may push through the torn annulus and into the spinal canal. This is called a herniated or ruptured disc. The disc material that squeezes out can press against the spinal nerves. The disc also emits enzymes and chemicals that produce inflammation. The combination of pressure on the nerves and inflammation caused by the chemicals released from the disc cause pain.
View animation of degeneration
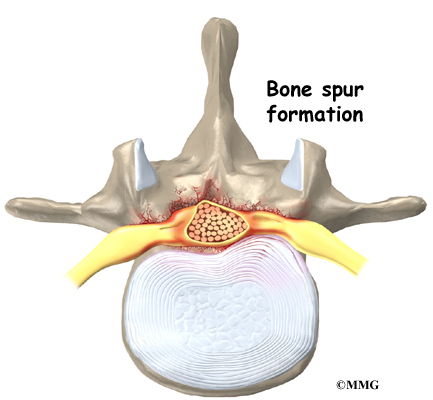
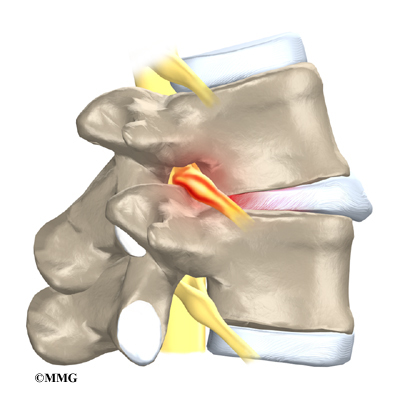
As the degeneration continues, bone spurs develop around the facet joints and around the disc. No one knows exactly why these bone spurs develop. Most doctors think that bone spurs are the body’s attempt to stop the extra motion between the spinal segment. These bone spurs can cause problems by pressing on the nerves of the spine where they pass through the neural foramina. This pressure around the irritated nerve roots can cause pain, numbness, and weakness in the low back, buttocks, and lower limbs and feet.
A collapsed spinal segment eventually becomes stiff and immobile. Thickened ligaments and facet joints, scarred and dried disc tissue, and protruding bone spurs prevent normal movement. Typically, a stiff joint doesn’t cause as much pain as one that slides around too much. So this stage of degeneration may actually lead to pain relief for some people.
Mechanical and Neurogenic Pain
To best understand the cause of your pain, spine specialists sometimes divide low back pain into two categories:
- mechanical pain
- neurogenic pain
Mechanical Pain
Mechanical back pain is caused by wear and tear in the parts of the lumbar spine. This type of pain is similar in nature to a machine that begins to wear out. Mechanical pain usually starts from degenerative changes in the disc. As the disc begins to collapse and the space between the vertebrae narrows, the facet joints may become inflamed. Mechanical pain typically gets worse after activity due to strain on the moving parts of the spine. Mechanical pain is usually felt in the back, but it may spread into the buttocks, hips, and thighs. The pain rarely goes down past the knee. Mechanical back pain usually doesn’t cause weakness or numbness in the leg or foot, because the problem is not from pressure on the spinal nerves.
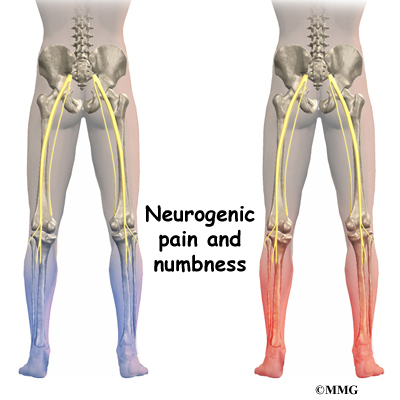
Neurogenic Pain
Neurogenic pain means pain from nerve injury. Neurogenic pain occurs when spinal nerves are inflamed, squeezed, or pinched. This can happen when a disc herniates or when a nerve gets pinched where it leaves the spine. Recently it has also become known that when a disc ruptures, chemicals are released that inflame the nerves even if there is no pressure directly on the nerve. Neurogenic symptoms concern doctors more than mechanical pain because they can signal damage to the nerves and lead to weakness or numbness in the lower extremities.
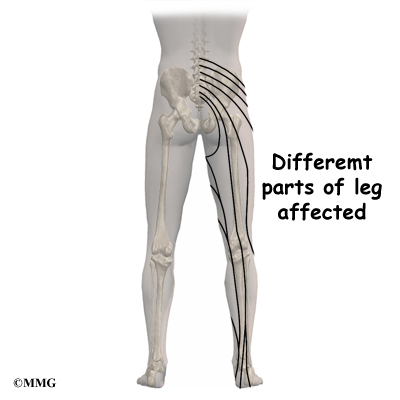
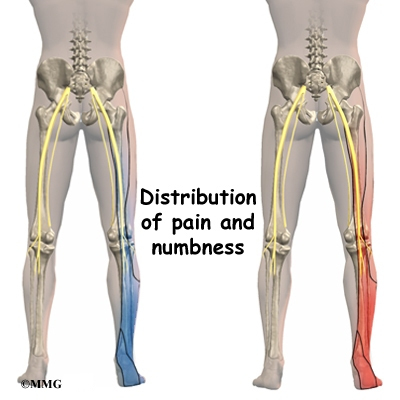
The nerve pressure causes symptoms in the areas where the nerve travels, rather than in the low back. This happens because pressure on the spinal nerve affects structures away from the spine, such as the muscles. As a result, a person’s back may not hurt, yet the person feels pain, numbness, or weakness in the leg or foot. This indicates there’s a problem with the body’s electrical wiring. The pressure on the nerve affects how the body functions. Muscles weaken. Reflexes slow. Sensations of pins, needles, and numbness may be felt where the nerve travels.
Spine Conditions
The effects of spine degeneration or back injury can lead to specific spine conditions. These include
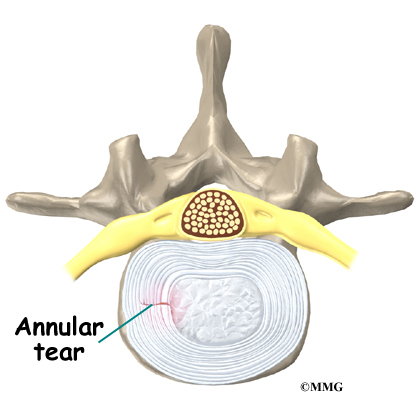
- annular tears
- internal disc disruption
- herniated disc
- facet joint arthritis
- segmental instability
- spinal stenosis
- foraminal stenosis
Annular Tears
Our intervertebral discs change with age, much like our hair turns gray. Perhaps the earliest stage of degeneration occurs due to tears that occur in the annulus. These tears can result from wear and tear over a period of time. They can also be the result of a sudden injury to the disc due to a twist or increased strain on the disc that overpowers the strength of the annulus. These annular tears may cause pain in the back until they heal with scar tissue.
View animation of annular tearing
Related Document: A Patient’s Guide to Lumbar Degenerative Disc Disease
Internal Disc Disruption
Multiple annular tears can lead to a disc that becomes weak. The disc starts to degenerate and collapse. The vertebrae begin to compress together. The collapsing disc can be the source of pain because it has lost the ability to be a shock absorber between the vertebrae. This condition is sometimes referred to as internal disc disruption. This type of problem causes primarily mechanical back pain due to inflammation of the disc and surrounding structures.
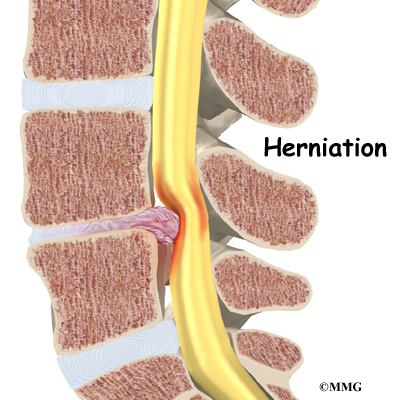
Herniated Disc
A disc that has been weakened may rupture or herniate. If the annulus ruptures, or tears, the material in the nucleus can squeeze out of the disc, or herniate. A disc herniation usually causes compressive problems if the disc presses against a spinal nerve. The chemicals released by the disc may also inflame the nerve root, causing pain in the area where the nerve travels down the leg. This type of pain is referred to as sciatica.
Even a normal disc can rupture. Heavy, repetitive bending, twisting, and lifting can place too much pressure on the disc, causing the annulus to tear and the nucleus to rupture into the spinal canal.
Related Document: A Patient’s Guide to Lumbar Disc Herniation
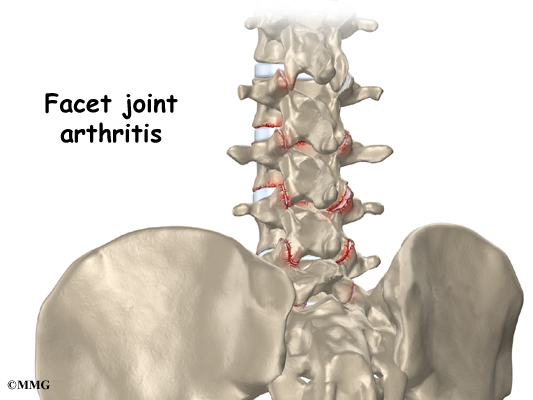
Facet Joint Arthritis
The facet joints along the back of the spinal column link the vertebrae together. They are not meant to bear much weight. However, if a disc loses its height, the vertebra above the disc begins to compress toward the one below. This causes the facet joints to press together. Articular cartilage covers the surfaces where these joints meet. Like other joints in the body that are covered with articular cartilage, the facet joints can develop osteoarthritis as the articular cartilage wears away over time. Extra pressure on the facet joints, such as that from a collapsing disc, can speed the degeneration in the facet joints. The swelling and inflammation from an arthritic facet joint can be a source of low back pain.
Related Document: A Patient’s Guide to Lumbar Facet Joint Arthritis
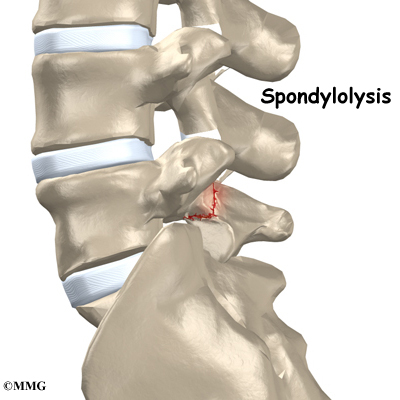
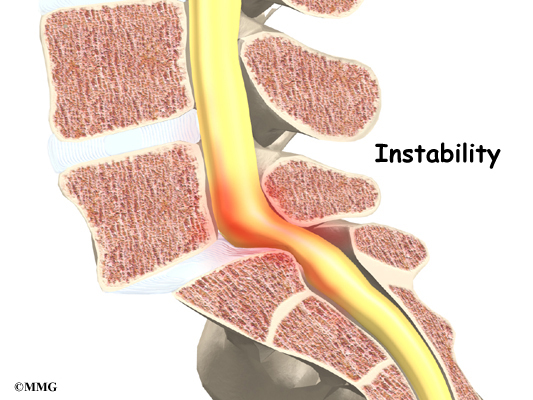
Segmental Instability
Segmental instability means that the vertebral bones within a spinal segment move more than they should. In the lumbar spine, this can develop if the disc has degenerated. Usually the supporting ligaments around the vertebrae have also been stretched over time.
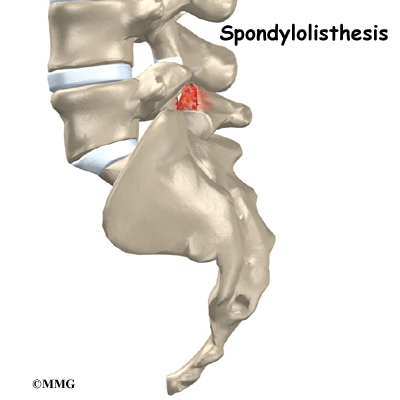
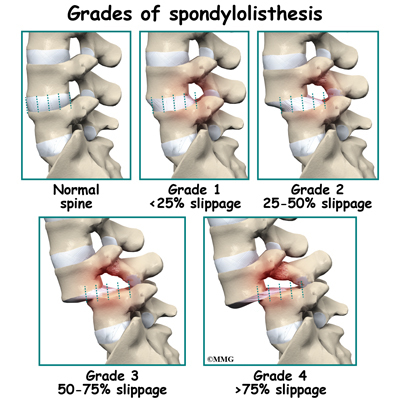
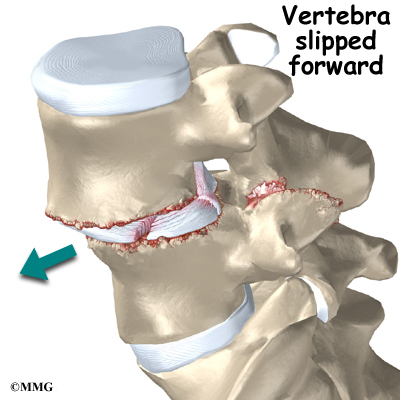
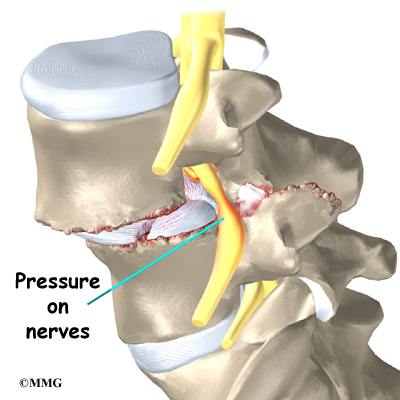
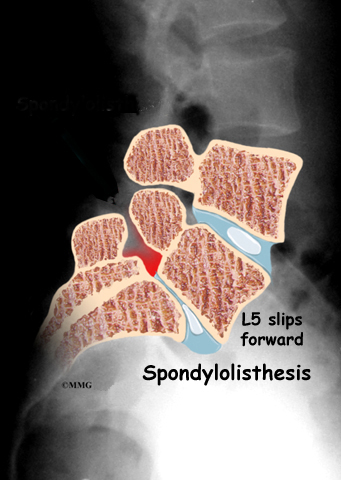
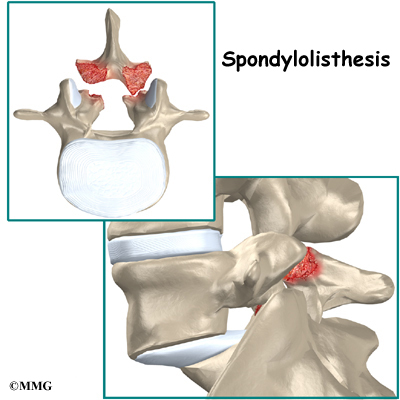
Segmental instability also includes conditions in which a vertebral body begins to slip over the one below it. When a vertebral body slips too far forward, the condition is called spondylolisthesis. Whatever the cause, this extra movement in the bones of the spine can create problems. It can lead to mechanical pain simply because the structures of the spine move around too much and become inflamed and painful. The extra movement can also cause neurogenic symptoms if the spinal nerves are squeezed as a result of the segmental instability.
Related Document: A Patient’s Guide to Lumbar Spondylolisthesis
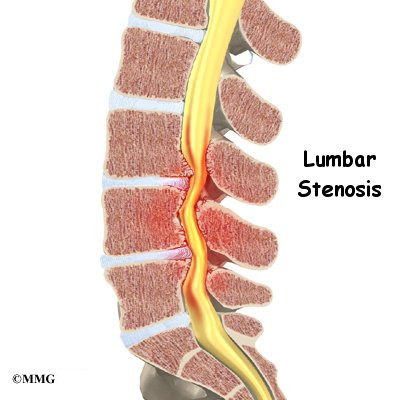
Spinal Stenosis
Stenosis means closing in. Spinal stenosis refers to a condition in which the tissues inside the spinal canal are closed in, or compressed. The spinal cord ends at L2. Below this level, the spinal canal contains only spinal nerves that travel to the pelvis and legs. When stenosis narrows the spinal canal, the spinal nerves are squeezed inside the canal.
The pressure from the condition can cause problems in the way the nerves work. The resulting problems include pain and numbness in the buttocks and legs and weakness in the muscles supplied by the nerves. Because these nerves travel to the bladder and rectum, weakness in the these muscles can cause problems with control of the bladder and bowels.
Related Document: A Patient’s Guide to Lumbar Spinal Stenosis
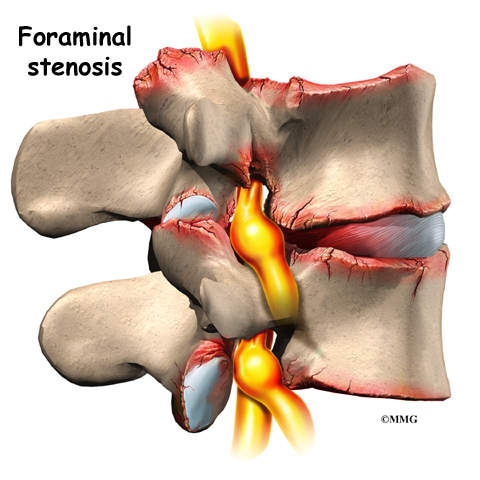
Foraminal Stenosis
Spinal nerves exit the spinal canal between the vertebrae in a tunnel called the neural foramen. Anything that causes this tunnel to become smaller can squeeze the spinal nerve where it passes through the tunnel. This condition is called foraminal stenosis, meaning the foramen is narrowed. As the disc collapses and loses height, the vertebral body above begins to collapse toward the one below. The opening around the nerve root narrows, squeezing the nerve. Arthritis of the facet joints causes bone spurs to form and point into the foramen, causing further nerve compression and irritation. Foraminal stenosis can cause a combination of mechanical pain and neurogenic pain from the irritated nerve root.
Related Document: A Patient’s Guide to Lumbar Disc Herniation
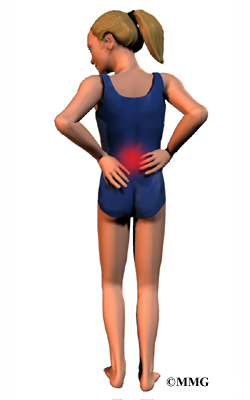
Symptoms
What are some of the symptoms of low back problems?
Symptoms from low back problems vary. They depend on a person’s condition and which structures are affected. Some of the more common symptoms of low back problems are
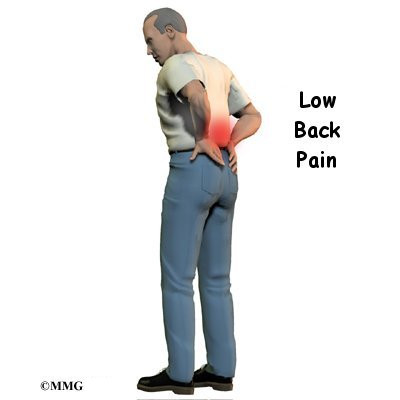
- low back pain
- pain spreading into the buttocks and thighs
- pain radiating from the buttock to the foot
- back stiffness and reduced range of motion
- muscle weakness in the hip, thigh, leg, or foot
- sensory changes (numbness, prickling, or tingling) in the leg, foot, or toes
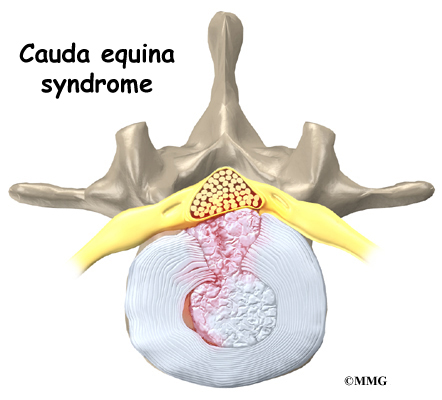
Rarely, symptoms involve changes in bowel or bladder function. A large disc herniation that pushes straight back into the spinal canal can put pressure on the nerves that go to the bowels and bladder. The pressure may cause symptoms of low back pain, pain running down the back of both legs, and numbness or tingling between the legs in the area you would contact if you were seated on a saddle. The pressure on the nerves can cause a loss of control in the bowels or bladder.
This is an emergency.
If the pressure isn’t relieved, it can lead to permanent paralysis of the bowels and bladder. This condition is called cauda equina syndrome. Doctors recommend immediate surgery to remove pressure from the nerves.
Diagnosis
How will my doctor find out what’s causing my problem?
The diagnosis of low back problems begins with a thorough history of your condition. You might be asked to fill out a questionnaire describing your back problems. Your doctor will ask you questions to find out when you first started having problems, what makes your symptoms worse or better, and how the symptoms affect your daily activity. Your answers will help guide the physical examination.
Your doctor will then physically examine the muscles and joints of your low back. It is important that your doctor see how your back is aligned, how it moves, and exactly where it hurts.
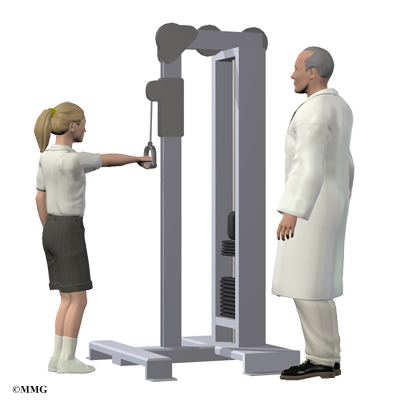
Your doctor may do some simple tests to check the function of the nerves. These tests are used to measure the strength in your lower limbs, check your reflexes, and determine whether you have numbness in your legs or feet.
The information from your medical history and physical examination will help your doctor decide which further tests to run. The tests give different types of information.
Radiological Imaging
Radiological imaging tests help your doctor see the anatomy of your spine. There are several kinds of imaging tests that are commonly used.
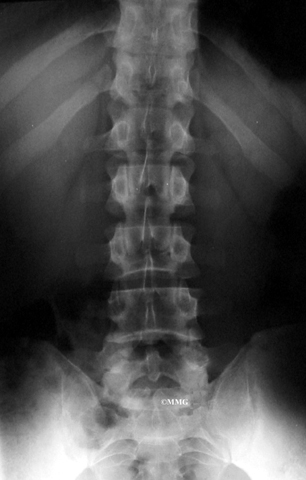
X-rays
X-rays show problems with bones, such as infection, bone tumors, or fractures. X-rays of the spine also can give your doctor information about how much degeneration has occurred in the spine, such as the amount of space in the neural foramina and between the discs. X-rays are usually the first test ordered before any of the more specialized tests.
Flexion and Extension X-rays
Special X-rays called flexion and extension X-rays may help to determine if there is instability between vertebrae. These X-rays are taken from the side as you lean as far forward and then as far backward as you can. Comparing the two X-rays allows the doctor to see how much motion occurs between each spinal segment.
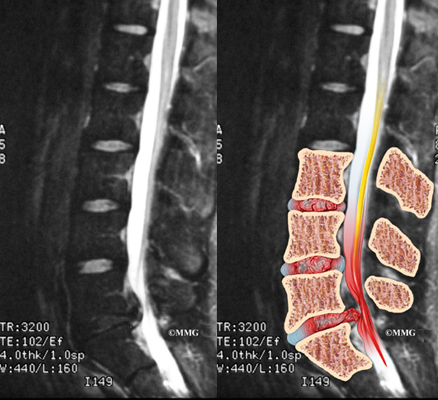
MRI Scans
The magnetic resonance imaging (MRI) scan uses magnetic waves to create pictures of the lumbar spine in slices. The MRI scan shows the lumbar spine bones as well as the soft tissue structures such as the discs, joints, and nerves. MRI scans are painless and don’t require needles or dye. The MRI scan has become the most common test to look at the lumbar spine after X-rays have been taken.
CT Scans
The computed tomography (CT) scan is a special type of X-ray that lets doctors see slices of bone tissue. The machine uses a computer and X-rays to create these slices. It is used primarily when problems are suspected in the bones.
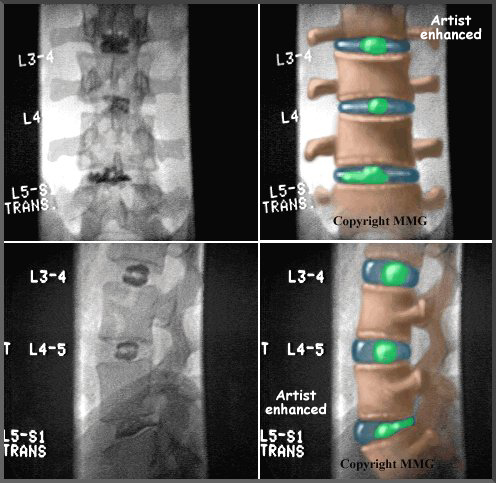
Myelogram
The myelogram is a special kind of X-ray test where a special dye is injected into the spinal sac. The dye shows up on an X-ray. It helps a doctor see if there is a herniated disc, pressure on the spinal cord or spinal nerves, or a spinal tumor. Before the CT scan and the MRI scan were developed, the myelogram was the only test that surgeons had to look for a herniated disc. The myelogram is still used today but not nearly as often. The myelogram is usually combined with CT scan to give more detail.
Discogram
The discogram is another specialized X-ray test. A discogram has two parts. First, a needle is inserted into the problem disc, and saline is injected into the disc to create pressure inside the disc. If this reproduces your pain, then it suggests that the disc is the source of your pain. During the second part of the test, dye is injected into the disc. The dye can be seen on X-ray. Using both regular X-rays and CT scan images, the dye outlines the inside of the disc. This can show abnormalities of the nucleus such as annular tears and ruptures of the disc.
Bone Scan
A bone scan is a special test where radioactive tracers are injected into your blood stream. The tracers then show up on special X-rays of your back. The tracers build up in areas where bone is undergoing a rapid repair process, such as a healing fracture or the area surrounding an infection or tumor. Usually the bone scan is used to locate the problem. Other tests such as the CT scan or MRI scan are then used to look at the area in detail.
Other Tests
Your doctor may also ask you to do other tests.
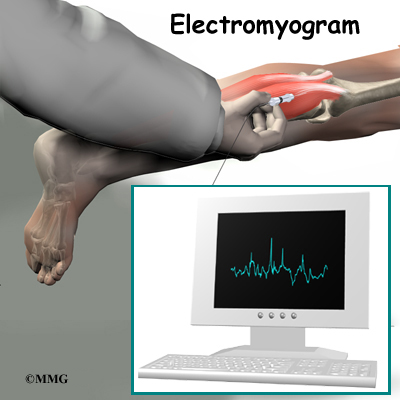
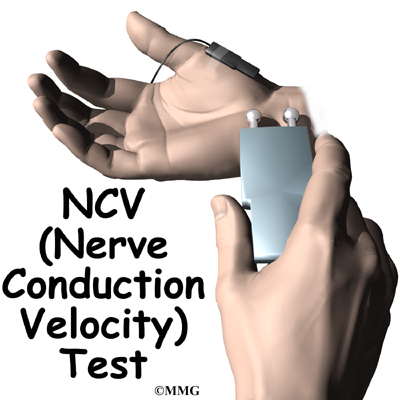
Electromyogram
An electromyogram (EMG) is a special test used to determine if there are problems with any of the nerves going to the lower limbs. EMGs are usually done to determine whether the nerve roots have been pinched by a herniated disc. During the test, small needles are placed into certain muscles that are supplied by each nerve root. If there has been a change in the function of the nerve, the muscle will send off different types of electrical signals. The EMG test reads these signals and can help determine which nerve root is involved.
Laboratory Tests
Not all causes of low back pain are from degenerative conditions. Doctors use blood tests to identify other conditions, such as arthritis or infection. Low back pain can be caused by problems that do not involve the spine, such as stomach ulcers, kidney problems, and aneurysms of the aorta. Other tests may be needed to rule out problems that do not involve the spine.
Treatment
What can be done to relieve my symptoms?
Ninety percent of people who experience low back pain for the first time get better in two to six weeks without any treatment at all. Patients often do best when encouraged to stay active and to get back to normal activities as soon as possible, even if there is still some pain. The pain may not go away completely. One goal of treatment is to help you find ways to control the pain and allow you to continue to do your normal activities.
Nonsurgical Treatment
Whenever possible, doctors prefer to use treatments other than surgery. The first goal of these nonsurgical treatments is to ease your pain and other symptoms.
Bed Rest
In cases of severe pain, doctors may suggest a short period of bed rest, usually no more than two days. Lying on your back can take pressure off sore discs and nerves. Most doctors advise against strict bed rest and prefer that patients do ordinary activities using pain to gauge how much is too much.
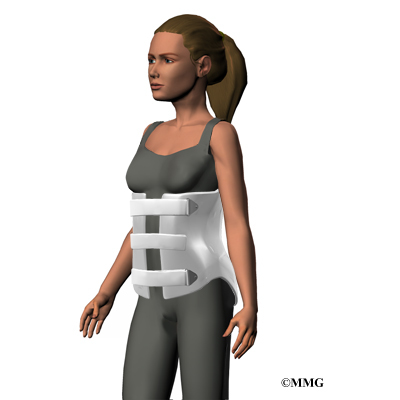
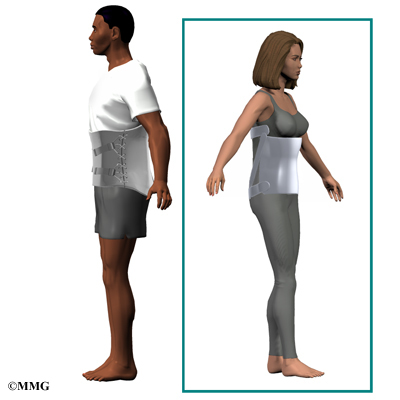
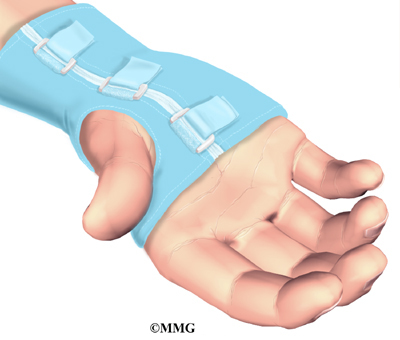
Back Brace
A back support belt is sometimes recommended when back pain first strikes. It can help provide support and lower the pressure inside a problem disc. Patients are encouraged to gradually discontinue wearing the support belt over a period of two to four days. Otherwise, back muscles begin to rely on the belt and start to shrink (atrophy).
Medications
Many different types of medications are typically prescribed to help gain control of the symptoms of low back pain. There is no medication that will cure low back pain. Medications are prescribed to help with sleep disturbances and to help control pain, inflammation, and muscle spasm.
Physical Therapy and Exercise
In addition to other nonsurgical treatments, doctors often ask their patients to work with a physical therapist. Therapy treatments focus on relieving pain, improving back movement, and fostering healthy posture. A therapist can design a rehabilitation program to address a particular condition and to help the patient prevent future problems. There is a great deal of scientific proof that exercise and increased overall fitness reduce the risk of developing back pain and can improve the symptoms of back pain once it begins.
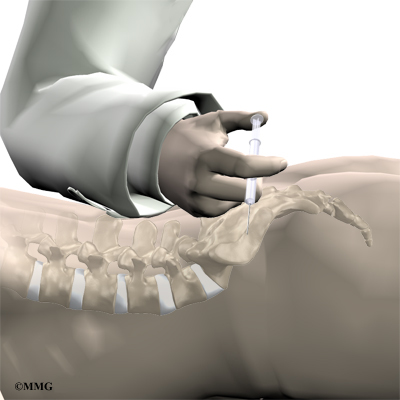
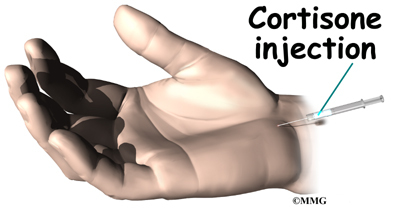
Injections
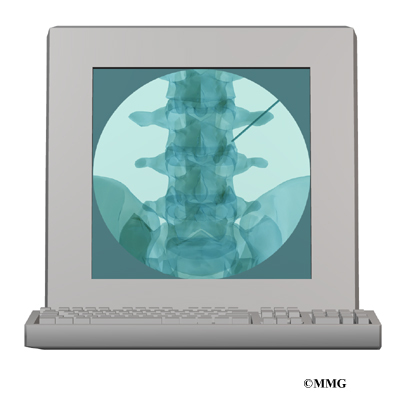
Spinal injections are used for both treatment and diagnostic purposes. There are several different types of spinal injections that your doctor may suggest. These injections usually use a mixture of an anesthetic and some type of cortisone preparation. The anesthetic is a medication that numbs the area where it is injected. If the injection takes away your pain immediately, this gives your doctor important information suggesting that the injected area is indeed the source of your pain. The cortisone decreases inflammation and can reduce the pain from an inflamed nerve or joint for a prolonged period of time.
Some injections are more difficult to perform and require the use of a fluoroscope. A fluoroscope is a special type of X-ray that allows the doctor to see an X-ray picture continuously on a TV screen. The fluoroscope is used to guide the needle into the correct place before the injection is given.
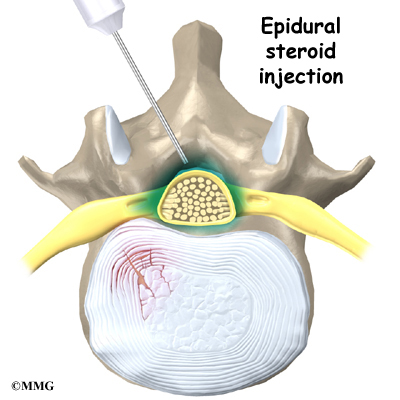
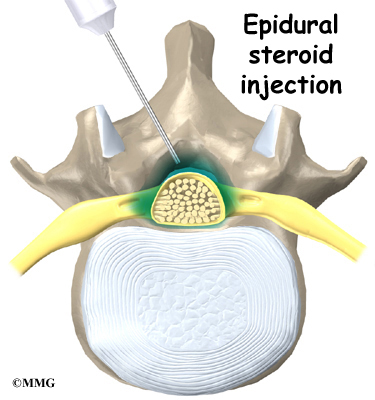
- Epidural Steroid Injection (ESI): Back pain from inflamed nerve roots and facet joints may benefit from an epidural steroid injection (ESI). In an ESI, the medication mixture is injected into the epidural space around the nerve roots. Generally, an ESI is given only when other nonoperative treatments aren’t working. ESIs are not always successful in relieving pain. If they do work, they may only provide temporary relief.
- Selective Nerve Root Injection: Another type of injection to place steroid medication around a specific inflamed nerve root is called a selective nerve root injection. The fluoroscope is used to guide a needle directly to the painful spinal nerve root. The nerve root is then bathed with the medication. Some doctors believe this procedure gets more medication to the painful spot. In difficult cases, the selective nerve root injection can also help surgeons decide which nerve root is causing the problem before surgery is planned.
- Facet Joint Injection: When the problem is thought to be in the facet joints, an injection into one or more facet joints can help determine which joints are causing the problem and ease the pain as well. The fluoroscope is used to guide a needle directly into the facet joint. The facet joint is then filled with medication mixture. If the injection immediately eases the pain, it helps confirm that the facet joint is a source of pain. The steroid medication will reduce the inflammation in the joint over a period of days and may reduce or eliminate your back pain.
- Trigger Point Injections: Injections of anesthetic medications mixed with a cortisone medication are sometimes given in the muscles, ligaments, or other soft tissues near the spine. These injections are called trigger point injections. These injections can help relieve back pain and ease muscle spasm and tender points in the back muscles.
Surgery
Only rarely is lumbar spine surgery scheduled right away. Your doctor may suggest immediate surgery if you are losing control of your bowels and bladder or if your muscles are becoming weaker very rapidly.
For other conditions, doctors prefer to try nonsurgical treatments for a minimum of three months before considering surgery. Most people with back pain tend to get better, not worse. Even people who have degenerative spine changes tend to gradually improve with time. Only one to three percent of patients with degenerative lumbar conditions typically require surgery. Surgery may be suggested when severe pain is not improving.
There are many different operations for back pain. The goal of nearly all spine operations is to remove pressure from the nerves of the spine, stop excessive motion between two or more vertebrae, or both. The type of surgery that is best depends on that patient’s conditions and symptoms.
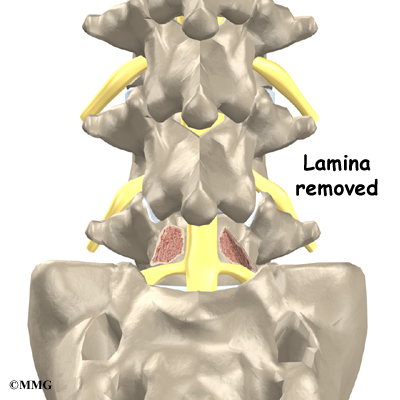
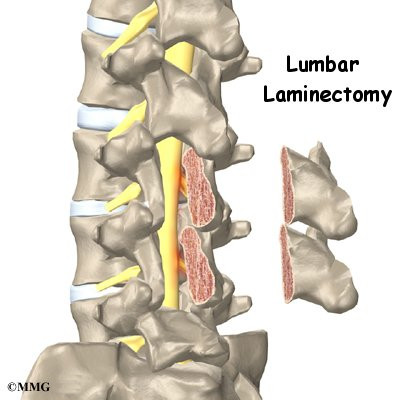
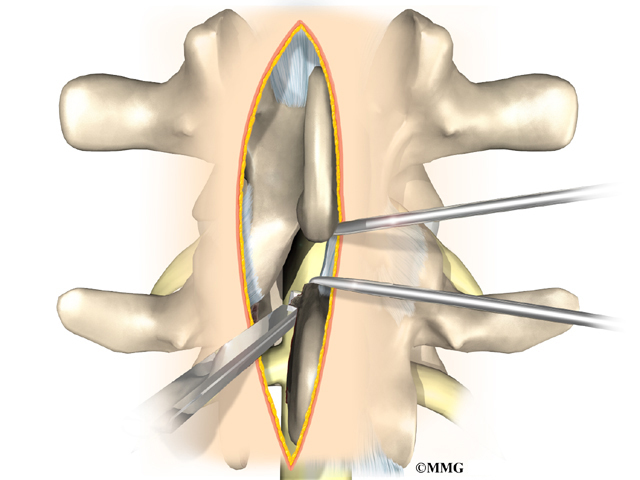
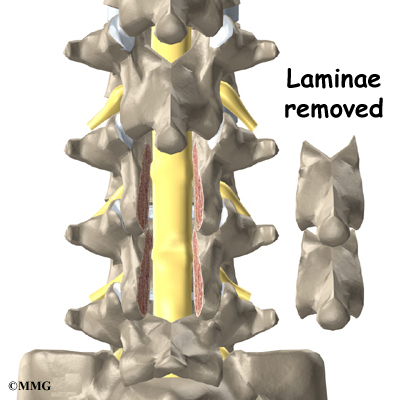
Laminectomy
The lamina is the covering layer of the bony ring of the spinal canal. It forms a roof-like structure over the back of the spinal column. When the nerves in the spinal canal are being squeezed by a herniated disc or from bone spurs pushing into the canal, a laminectomy removes part or all of the lamina to release pressure on the spinal nerves.
Related Document: A Patient’s Guide to Lumbar Laminectomy
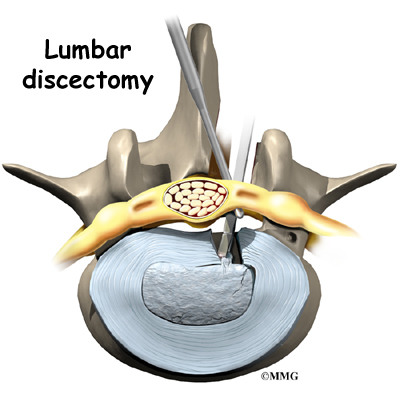
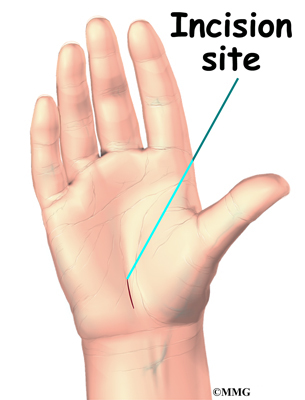
Discectomy
When the intervertebral disc has ruptured, the portion that has ruptured into the spinal canal may put pressure on the nerve roots. This may cause pain, weakness, and numbness that radiates into one or both legs. The operation to remove the portion of the disc that is pressing on the nerve roots is called a discectomy. This operation is performed through an incision in the low back immediately over the disc that has ruptured.
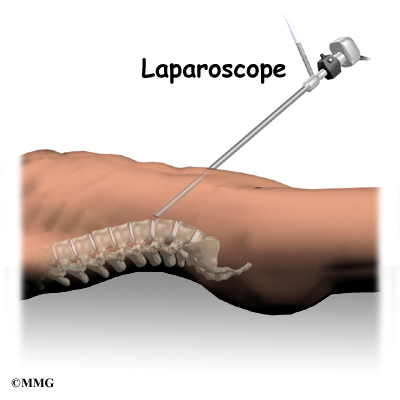
Many spine surgeons now perform discectomy procedures that require only small incisions in the low back (minimally invasive). The advantage of these minimally invasive procedures is less damage to the muscles of the back and a quicker recovery. Many surgeons are now performing minimally invasive discectomy as an outpatient procedure.
Related Document: A Patient’s Guide to Lumbar Discectomy
Lumbar Fusion
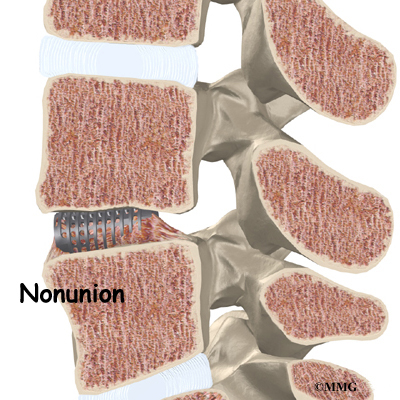
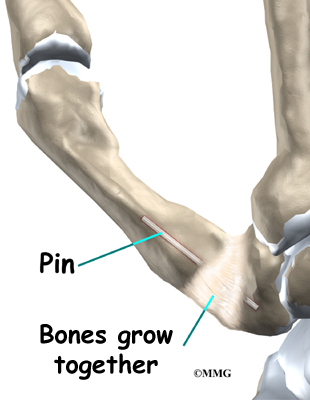
When there is excessive motion between two or more vertebrae, the excess motion can cause both mechanical pain and irritation of the nerves of the lumbar spine. In this case some type of spinal fusion is usually recommended. The goal of a spinal fusion is to force two or more vertebrae to grow together, or fuse, into one bone. A solid fusion between two vertebrae stops the movement between the two bones. The pain is reduced because the fusion reduces the constant irritation and inflammation of the nerve roots. There are many different types of spinal fusions.
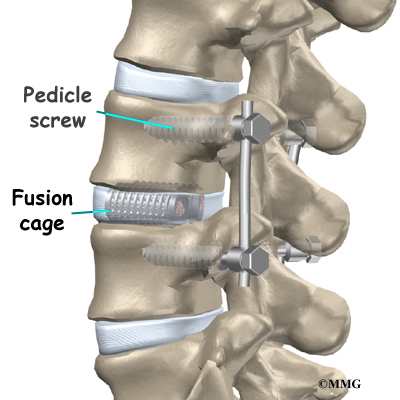
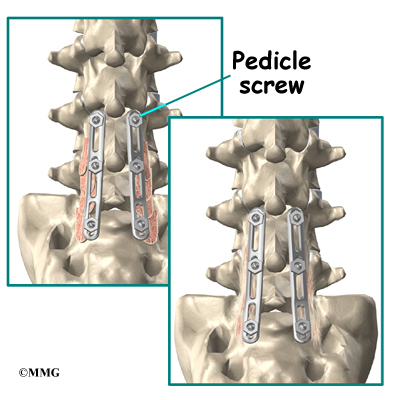
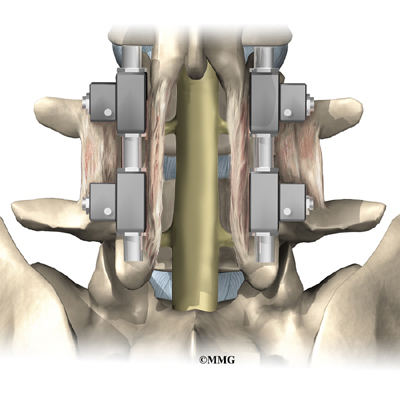
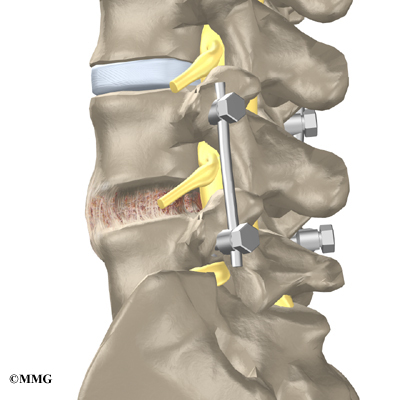
- Posterior Lumbar Instrumented Fusion: Major advances have been made in recent years in developing metal rods, metal plates, and special screws that are designed to hold the vertebrae together while the fusion takes place. These new techniques of spinal fusion are referred to as instrumented fusions because of the special devices used to secure the vertebrae to be fused. Today the most common type of posterior fusion is performed using special screws called pedicle screws that are inserted into each vertebra and connected to either a metal plate or metal rod along the back of the spine. The vertebrae are still decorticated, and bone graft is still used to stimulate the bones to heal together and fuse into one solid bone.
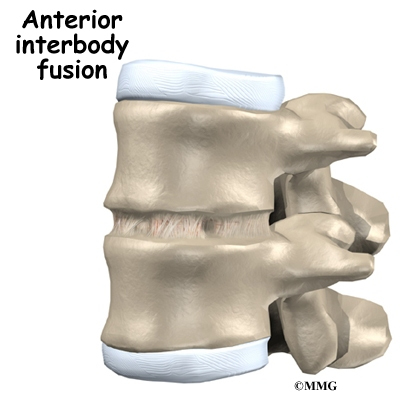
- Anterior Lumbar Interbody Fusion: A fusion of the lumbar spine can be accomplished in other ways. In some cases, surgeons feel that it is best to perform a fusion from the front of the spine. This is termed an anterior interbody fusion. This type of fusion requires an incision in the side of the abdomen to allow the surgeon to see the front of the spine. The intervertebral disc is removed between two vertebral bodies and bone graft is inserted where the disc was removed. The two vertebral bodies heal together and fuse.Related Document: A Patient’s Guide to Anterior Lumbar Interbody Fusion
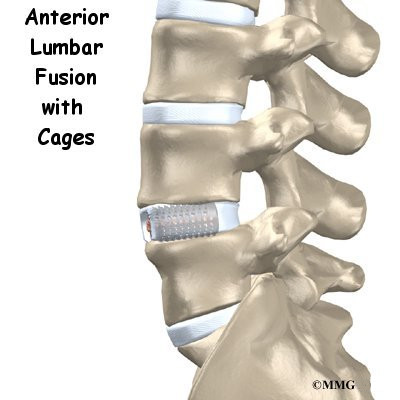
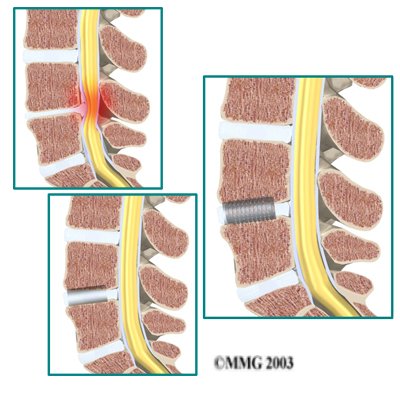
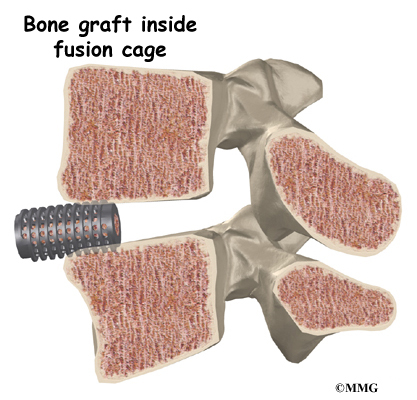
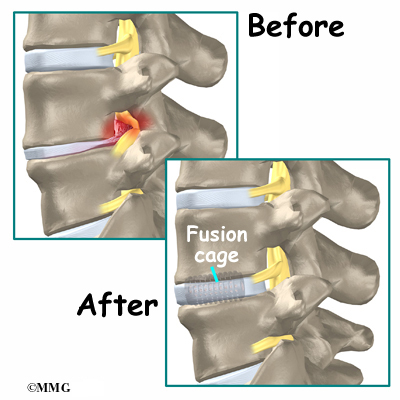
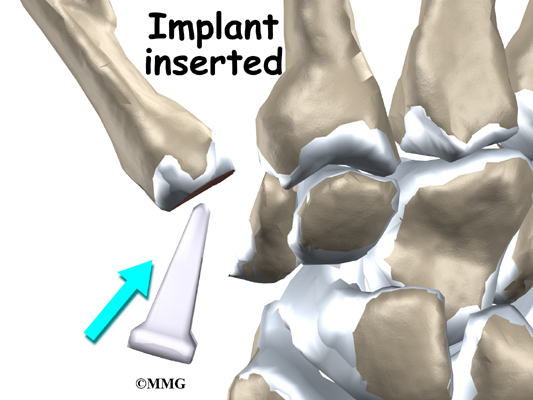
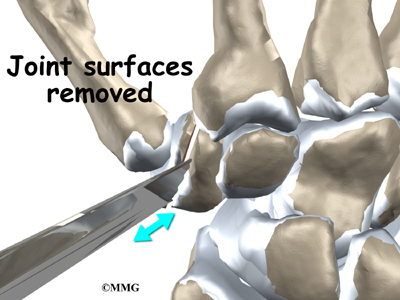
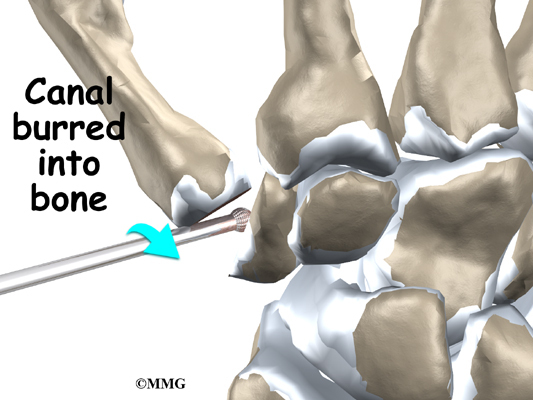
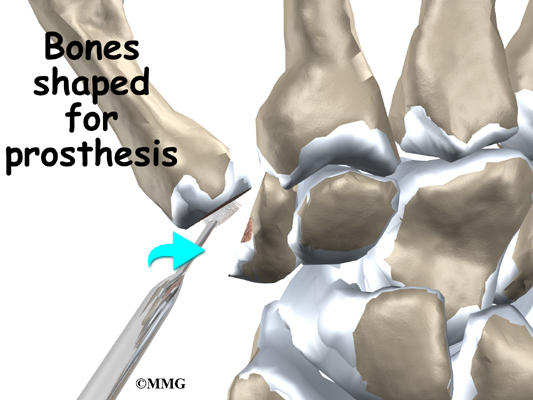
- Anterior Lumbar Discectomy and Fusion with Cages: Degeneration of the intervertebral disc allows the vertebrae to move closer together, which narrows the openings (the neural foramina) where the nerve roots leave the spinal canal.Surgeons realized that restoring the normal separation between the vertebrae would open the foramina and take pressure off the nerve roots. Over the last several years, devices called fusion cages have been designed that can be placed between
the vertebrae to hold them apart while the fusion occurs. Enlarging the space between two vertebrae widens the opening of the neural foramina, taking pressure off the spinal nerves that pass through them. The extra space also pulls taut the ligaments inside the spinal canal so they don’t buckle.
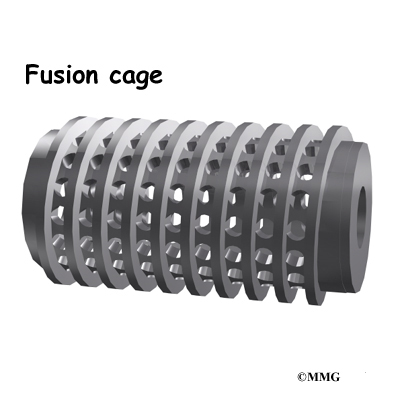
Fusion cages are made of metal, bone, or graphite material. Some of these cages are shaped like cylinders. They are threaded like a screw on the outside and hollow on the inside. Some are rectangular in shape. The main purpose of the cage, regardless of the shape or material, is to hold the two vertebrae apart while the fusion becomes solid.
Related Document: A Patient’s Guide to Anterior Lumbar Fusion with Cages
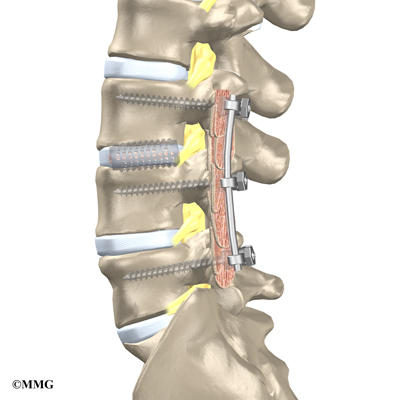
- Posterior Lumbar Interbody Fusion: Finally, surgeons may combine the two methods of anterior fusion and posterior fusion. Fusing both the anterior and posterior portions of the spine gives the most solid fusion. Placing intervertebral cages between the two vertebrae also allows the surgeon to restore the disc height and help take pressure off of the nerve roots that exit at that spinal segment. A common method of doing this is called a posterior lumbar interbody fusion, combined with a posterior lumbar instrumented fusion (described earlier).
Related Document: A Patient’s Guide to Posterior Lumbar Interbody Fusion
Rehabilitation
What should I expect after treatment?
Nonsurgical Rehabilitation
For acute back pain, you may be prescribed two to four weeks of physical therapy. You might need to continue therapy for two to four months for chronic back problems. Treatments are designed to ease pain and to improve your mobility, strength, posture, and function. You’ll also learn how to control your symptoms and how to protect your spine for the years ahead.
At first, your therapist may apply various forms of treatment to address your symptoms. These are especially helpful in the early weeks to improve your comfort so you can get back to your normal activities. You’ll be shown ways to position your spine for maximum comfort while you move, recline, or sleep. To help calm pain and muscle spasm, your therapist may apply heat or ice packs, electrical stimulation, and ultrasound.
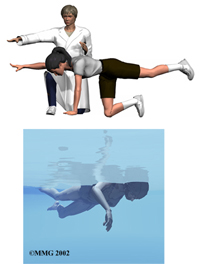
If you have severe back pain, your therapist may work with you in a pool. Therapy done in water puts less stress on your low back, and the buoyancy allows you to move easier during exercise.
Hands-on treatments such as massage and specialized forms of soft-tissue mobilization may be used. They can help you begin moving with less pain and greater ease. Medical guidelines also include the early use of spinal manipulation, which has shown short-term benefits in people with acute low back pain. Commonly thought of as an adjustment, spinal manipulation helps reset the sensitivity of the spinal nerves and muscles, easing pain and improving mobility. It involves a high-impulse stretch of the spinal joints and is often characterized by the sound of popping as the stretch is done. It doesn’t provide effective long-term help when used routinely for chronic conditions.
You may be tempted to limit your activity because of your back pain. However, as a result of pain and inactivity, your muscles may become weak and deconditioned, and your back won’t function optimally. Therapists use active rehabilitation to prevent the harmful effects of deconditioning. With this active approach, you’ll be shown how to lift and move safely. And you’ll be shown how to strengthen your back muscles. In addition, aerobic exercises are used to improve your general fitness and endurance.
Aerobic exercises may include walking on a treadmill, riding a stationary bike, or swimming. These activities can relieve the stress of low back pain, and they can cause your body to release endorphins into the blood stream. Endorphins are your body’s own natural painkillers.
An active approach to therapy can help you attain better muscle function, so you can get your activities done easier. Active rehabilitation speeds recovery, reducing the possibility that back pain will become a chronic problem. Activity helps you resume normal activity as swiftly as possible. Though you’ll be cautioned about trying to do too much, too quickly, you’ll be guided toward a return to your usual activities. This approach gives you a greater sense of control. You’ll take an active role in learning how to care for your back pain. Treatment sessions focus on reassuring you that getting back to work and other normal activities swiftly won’t cause you harm and can actually help you get better faster.
When needed, you’ll be encouraged to take certain actions to improve your spine health. For example, if you smoke, you’ll be encouraged to get help to quit. Because of the limited blood supply in the tissues of the low back, smoking speeds the degenerative process and impairs healing. If you’re out of shape, you’ll be encouraged to get fit. This strategy makes it less likely that back pain or injury will strike again in the future.
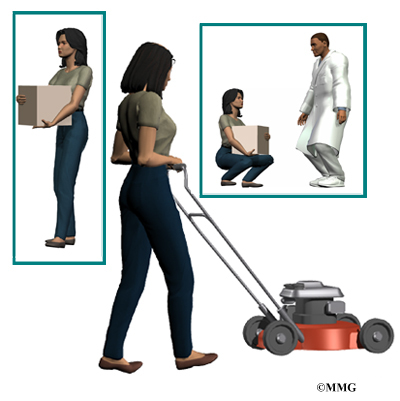
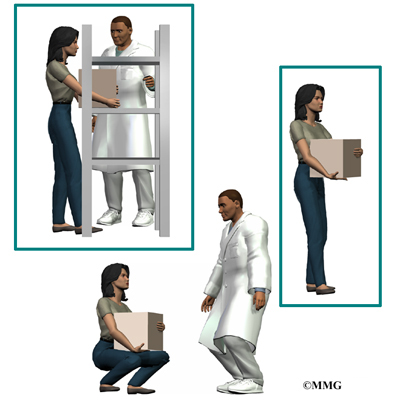
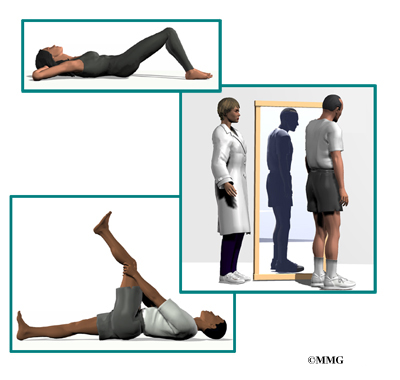
Your therapist will show you how to keep your spine safe during routine activities. You’ll learn about healthy posture and how posture relates to the future health of your spine. And you’ll learn about body mechanics, how the body moves and functions during activity. Your therapist will also teach safe body mechanics to help you protect your low back as you go about your day. This includes the use of safe positions and movements while lifting and carrying, standing and walking, and performing work duties.
As you recover, you will gradually advance in a series of strengthening exercises for the abdominal and low back muscles. Working these core muscles can help you begin moving easier and lessens the chances of future pain and problems.
As the rehabilitation program evolves, you will progress with more challenging exercises. The goal is to safely advance your strength and function.
Your therapist will work closely with your doctor and employer to help you get back on the job as quickly as reasonably possible. You may be required to do lighter duties at first, but as soon as you are able, you’ll begin doing your normal work activities. Your therapist can also do a work assessment to make sure you’ll be safe to do your job. Your therapist may suggest changes that could help you work safely, with less chance of re-injuring your back.
After Surgery
Rehabilitation after surgery is much more complex. Depending on what operation you’ve had, you may leave the hospital shortly after surgery. Some procedures, such as fusion surgery, require that you stay in the hospital for a few days. When you stay in the hospital, a physical therapist may visit you in your hospital room soon after surgery. Physical therapy sessions help you learn to move and begin doing routine activities without putting extra strain on your low back.
During recovery from surgery, you should follow your surgeon’s instructions about wearing a back brace or soft lumbar support belt. You should be cautious about overdoing activities in the first few weeks after surgery.
You may need therapy outside of the hospital. If you had a lumbar fusion, your surgeon may have you wait six weeks to three months before starting therapy. Once you start in therapy, you’ll usually go for one to three months, depending on your progress and the type of surgery you had.
At first, your therapist may use treatments such as heat or ice, electrical stimulation, massage, and ultrasound to help calm pain and muscle spasm. Pool therapy is often helpful after lumbar surgery.
Exercises are used to improve flexibility in your trunk and lower limbs. Strengthening for your abdominal and low back muscles is started. You’ll be shown safe ways to sleep, sit, lift, and carry. And you’ll be given ideas on how to do your work activities safely.
Ideally, you’ll be able to go back to your previous activities. However, you may need to modify your activities to avoid future problems.
When treatment is well under way, regular visits to the therapist’s office will you’re your therapist will continue to be a resource. But you are in charge of doing your exercises as part of an ongoing home program.


