Bipartite Patella

A Patient’s Guide to Bipartite Patella

Introduction

Bipartite Patella

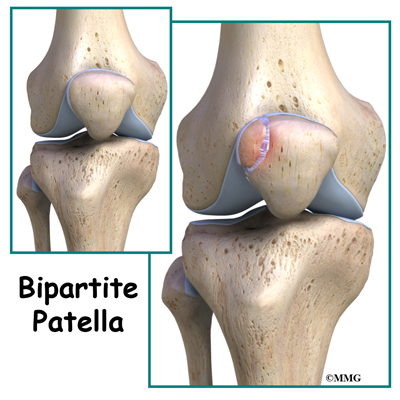
Bipartite patella is a congenital condition (present at birth) that occurs when the patella (kneecap) is made of two bones instead of a single bone. Normally, the two bones would fuse together as the you grow. But in bipartite patella, they remain as two separate bones. About one per cent of the population has this condition. Boys are affected much more often than girls. When this condition is discovered in adulthood it is oftentimes an “incidental finding”.

This guide will help you understand

  • what parts of the knee are involved
  • how this condition develops
  • how doctors diagnose this condition
  • what treatment options are available

Anatomy

What is the patella and what does it do?


Bipartite Patella

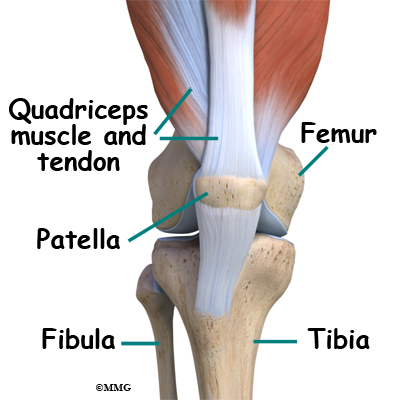
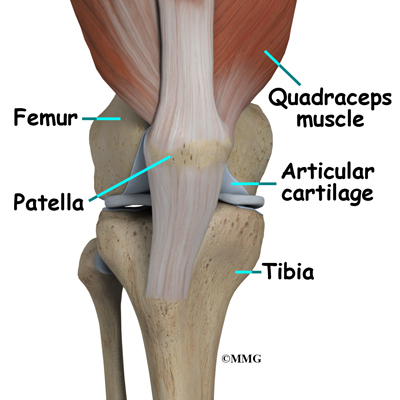
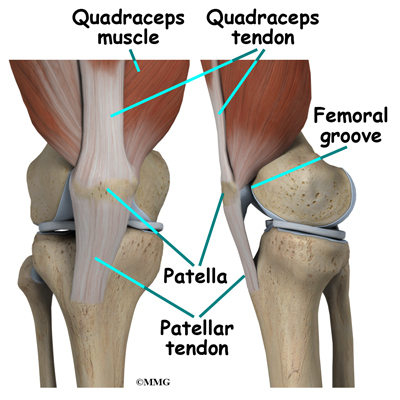
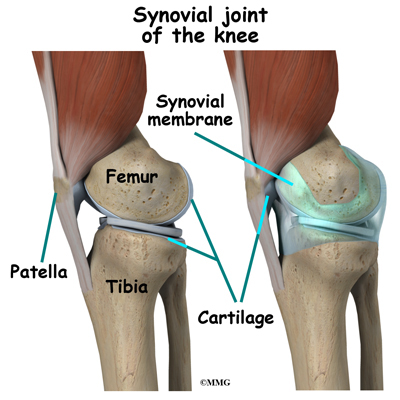
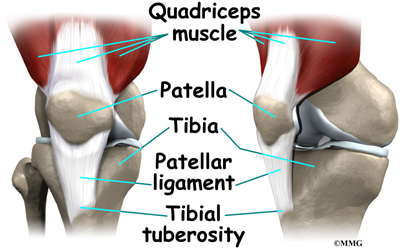
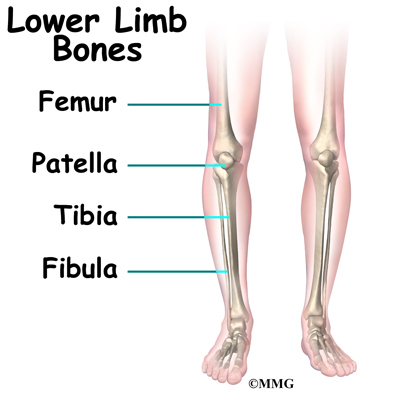
The knee is the meeting place of two important bones in the leg, the femur (the thighbone) and the tibia (the shinbone). The patella (kneecap) is the moveable bone that sits in front of the knee. This unique bone is wrapped inside a tendon that connects the large muscles on the front of the thigh, the quadriceps muscles, to the lower leg bone.

Related Document: A Patient’s Guide to Knee Anatomy

Causes

What causes this condition?

The patella starts out as a piece of fibrous cartilage. It turns into bone or ossifies as part of the growth process. Each bone has an ossification center. This is the first area of the structure to start changing into bone.

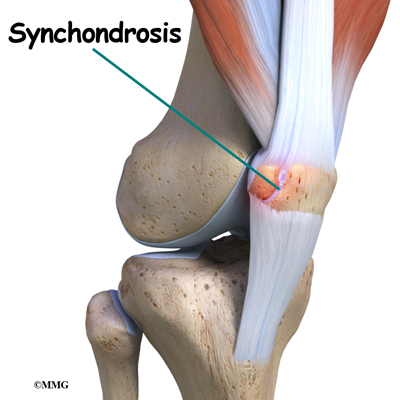
Most bones (including the patella) only have one primary ossification center. But in some cases, a second ossification center is present. Normally, these two centers of bone will fuse together during late childhood or early adolescence. If they don’t ossify together, then the two pieces of bone remain connected by fibrous or cartilage tissue. This connective tissue is called a synchondrosis.


Bipartite Patella

The most common location of the second bone is the supero-lateral (upper outer) corner of the patella. But the problem can occur at the bottom of the patella or along the side of the kneecap.

Injury or direct trauma to the synchondrosis can cause a separation of this weak union leading to inflammation. Repetitive microtrauma can have the same effect. The cartilage has a limited ability to repair itself. The increased mobility between the main bone and the second ossification center further weakens the synchondrosis resulting in painful symptoms.

Symptoms

What does bipartite patella feel like?

Most of the time, there are no symptoms. Sometimes there is a bony bump or place where the bone sticks out more on one side than the other. If inflammation of the fibrous tissue between the two bones occurs, then painful symptoms develop directly over the kneecap. The pain is usually described as dull aching. There may be some swelling.

Movement of the knee can be painful, especially when bending the joint. Atrophy of the quadriceps and malalignment of the patella can lead to patellar tracking problems. Squatting, stair climbing, weight training, and strenuous activity aggravate the knee causing increased symptoms. For the runner, running down hill causes increased pain, tenderness, and swelling.

Diagnosis

How will my doctor diagnose this condition?

Most of the time, this condition is seen on X-rays of the knee that are taken for some other reason. This is referred to as an incidental finding. Sometimes, it is mistaken for a fracture of the patella. But since the problem usually affects both knees, an X-ray of the other knee showing the same condition can confirm the diagnosis.

MRIs or bone scans are useful when a fracture is suspected but doesn’t show up on the X-rays. The presence of fibrocartilaginous material between the two bones helps confirm a diagnosis of bipartite patella. An MRI can show the condition of articular cartilage at the patellar-fragment interface. The lack of bone marrow edema helps rule out a bone fracture. CT scans will show the bipartite fragment but are not as helpful as MRIs because bone marrow or soft tissue edema does not show up, so it’s still not clear from CT findings whether the symptoms are from the fragment or fracture.

Treatment

What treatment options are available?

Most of the time, no treatment is necessary. Most people who have a bipartite patella, probably don’t even know it. But if an injury occurs and/or painful symptoms develop, then treatment may be needed.

Nonsurgical Treatment

Conservative care involves rest, over-the-counter nonsteroidal antiinflammatory drugs (NSAIDs) such as ibuprofen, and activity modification. Avoiding deep flexion such as squatting, excess use of the stairs, and resisted weight training are advised.


Bipartite Patella

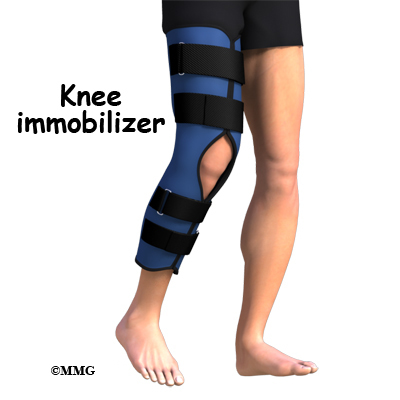
Separation of the synchondrosis can be treated with immobilization for four to six weeks. The knee is placed in full extension using a cylinder cast, knee immobilizer, or dynamic patellar brace. An immobilizer is a removable splint. It’s usually only taken off to wash the leg and remains in place the rest of the time. The dynamic brace immobilizes the knee in an extended (straight-leg) position with limited flexion (up to 30 degrees). The brace reduces pain by decreasing the pull on the patella from the quadriceps muscle. Once healing occurs and the cast or brace is no longer needed, then stretching exercises of the quadriceps muscle are prescribed.

Surgery

If conservative care with immobilization is not successful in alleviating swelling and pain, then surgery may be suggested. When the bipartite fragment is small, then the surgeon can simply remove the smaller fragment of bone. When the bipartite fragment is larger and also contains part of the joint surface, the surgeon may decide to try and force the two fragments to heal together or fuse. The connective tissue between the two fragments is removed first and the two bony fragments are then held together or stabilized with a metal screw or
pin. This is called internal fixation. The two fragments of bone heal
together or fuse, creating a solid connection between the two fragments. Although successful in reuniting the patella, the procedure may require several weeks of immobilization. As a result, knee stiffness may occur. This usually requires physical therapy once the bones have healed to regain strength and motion.


Bipartite Patella

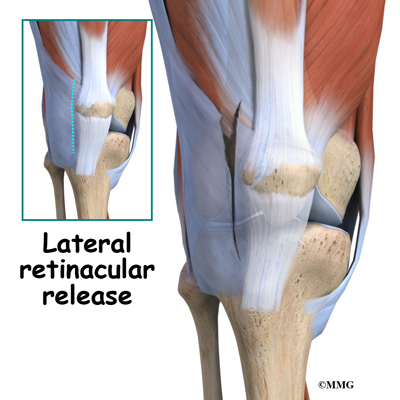
Another potential treatment option is a procedure called a lateral
retinacular release
. It may be beneficial to remove the constant pull
of the vastus lateralis tendon (a part of the large quadriceps muscle
of the thigh) where it attaches to the bone of the bipartite fragment of the upper, outer patella. Simply cutting this attachment reduces the constant pull on the bony fragment. Healing of the two fragments may occur as a result.

Rehabilitation

What should I expect after Treatment?

Nonsurgical Rehabilitation

Most patients respond well to activity modification and immobilization. When the X-ray shows complete ossification of the two bone fragments, then you’ll be able to return to your regular activities. If there is no improvement after three months of conservative care, then surgery is considered.

After Surgery

Usually, the removal of a bipartite patella is a simple surgery with prompt relief of pain and quick recovery. Athletes can expect full range of motion, a stable knee, and a fairly rapid return to normal activity (one to two months). But runners and other athletes who have had an extended time of immobility, muscle weakness and atrophy, loss of normal joint motion, and patellar tracking problems may require a special rehab program. A physical therapist will prescribe and monitor a rehabilitation program starting with range of motion and quadriceps strengthening exercises.

Athletes will be progressed quickly to restore full motion and strength. An aerobic program to improve cardiovascular endurance is often needed after so many months of inactivity. Proprioception and functional activities are added in order to prepare the individual to return to full sports participation. Proprioceptive exercises help restore the joint’s sense of position. Proprioceptive activities are needed to restore normal movement and prevent further injury.

Osteonecrosis of the Humeral Head

A Patient’s Guide to Osteonecrosis of the Humeral Head

Introduction

Osteonecrosis of the Humeral Head

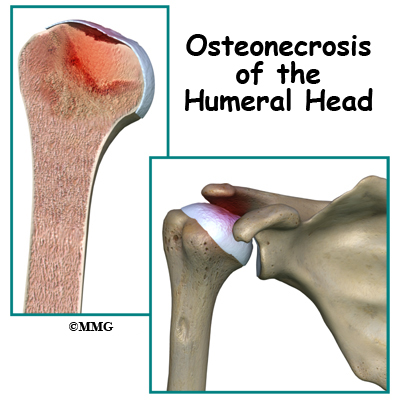
Osteonecrosis of the humeral head is a condition where a portion of the bone of the humeral head (the top of the humerus or upper arm bone) loses its blood supply, dies and collapses. Another term used for osteonecrosis is avascular necrosis. The term avascular means that a loss of blood supply to the area is the cause of the problem and necrosis means death.

This condition has been reported in all age groups but seems more common between the ages of 20 and 50. Men are affected by osteonecrosis of the shoulder twice as often as women but women with osteonecrosis from an autoimmune disease (e.g., lupus) develop this condition more often than men with the same disease.

This guide will help you understand

  • how osteonecrosis develops
  • how doctors diagnose the condition
  • what treatment options are available

Anatomy

Where does this condition occur?

Osteonecrosis of the Humeral Head

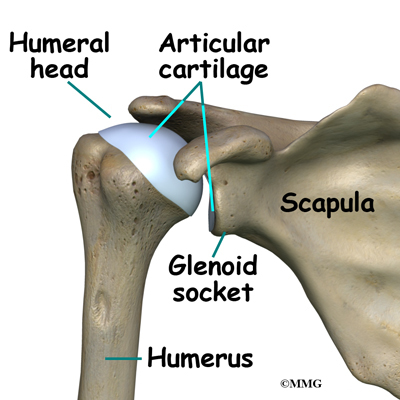
The shoulder joint is a ball-and-socket joint. The ball portion of the joint is called the humeral head. The humeral head is the uppermost part of the humerus, or upper arm bone. The shoulder socket is called the glenoid fossa. This socket is shallow and is part of the scapula (shoulder blade). The surface of the humeral head and the inside of the fossa are covered with articular cartilage. Articular cartilage is a tough, slick material that allows the surfaces to slide against one another with very little friction. The cartilage is about one-quarter of an inch thick in most large weight-bearing joints, but a bit thinner in the shoulder, which normally doesn’t support much weight.

Osteonecrosis of the Humeral Head

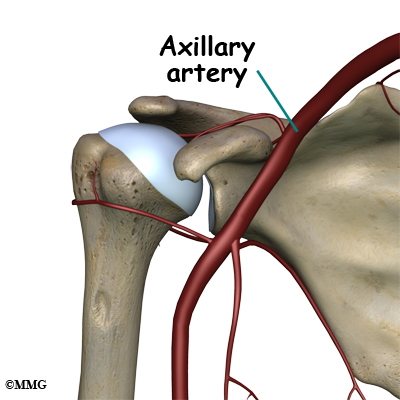
Large blood vessels supply the arm with blood. The large axillary artery travels through the axilla (armpit). If you place your hand in your armpit, you may be able to feel the pulsing of this large artery. The axillary artery has many smaller branches that supply blood to different parts of the shoulder. The shoulder has a very rich blood supply. But if this blood supply is damaged, there is no backup.

Causes

What causes this condition?

Osteonecrosis of the Humeral Head

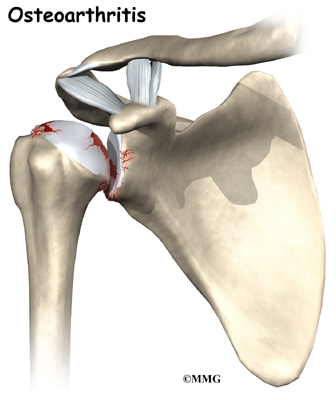
When osteonecrosis occurs in the shoulder joint, the top of the humeral head (the ball portion) collapses and begins to flatten. The flattening creates a situation where the ball no longer fits perfectly inside the socket. Like two pieces of a mismatched piece of machinery, the joint begins to wear itself out. This leads to osteoarthritis of the joint and pain.

Bone tissue is constantly being remodeled – old bone is removed and replaced with new bone. Osteonecrosis occurs when there is a loss of blood circulation in the bone of the humeral head. This causes the cells that remove and produce new bone to die in the area of lost circulation. New bone is no longer produced, but the old bone matrix still survives. Without the constant ability to repair itself through remodeling, the dead bone matrix eventually begins to lose strength and crumble. This causes the bone matrix to collapse. New blood vessels begin to grow into the area, but this is a slow process. The situation becomes a race to see whether new blood vessels will grow into the area and restore the ability to remodel the bone or whether collapse will occur.

The articular cartilage on the surface of the humeral head does not rely on the blood supply of the bone to survive. The articular surface is nourished by the synovial fluid; it survives the loss of blood flow to the bone. But, the articular cartilage relies on the bone underneath to keep its round shape. When the bone underneath collapses, the articular cartilage loses its round shape and no longer fits, or matches, the shape of the glenoid socket. The constant abnormal friction between the two mismatched joint surfaces causes mechanical wear and tear in both the humeral head and the glenoid socket. This degeneration is called osteoarthritis.

There are two forms of humeral head osteonecrosis: traumatic and atraumatic. The traumatic type can develop after an injury such as a bone fracture or shoulder dislocation. The nontraumatic form occurs with the use of corticosteroids, or it can be associated with other diseases or blood disorders (e.g., sickle cell disease, problems with coagulation or making blood clots). Sometimes it develops with no known cause. In those cases, it is called idiopathic (unknown cause).

There does seem to be a genetic link but exposure to certain risk factors is also part of the picture. For example, alcohol abuse, tobacco use, chemotherapy, radiation, pregnancy, inflammatory bowel disease, and organ transplantation are considered associated risk factors. A clear link exists between osteonecrosis and alcoholism. Excessive alcohol intake somehow damages the blood vessels and leads to osteonecrosis. Organ recipients must be on lifelong steroids to prevent inflammation, infection, and rejection of the organ. These medications have the adverse side effect of endangering blood supply and weakening the bone.

Symptoms

What does osteonecrosis feel like?

The first symptom of osteonecrosis of the humeral head is shoulder and arm pain. The location of the pain is difficult to isolate. You may not be able to point to it with one finger. You may feel like the pain is deep and throbbing. You may have difficulty reaching your arms out to the sides or overhead.

At first, the symptoms seem to come and go, but as the problem progresses (gets worse), the symptoms become more constant and stiffness develops in the shoulder joint. Pain may radiate, or travel, from your shoulder down to your elbow. There may be a sound and sensation of crunching called crepitus and locking in the joint. With arthritic changes, range of motion decreases. Eventually, the pain will also be present at rest and may even interfere with sleep. In a small number of cases, there are no symptoms despite X-rays that show advanced disease.

Diagnosis

How do doctors diagnose this condition??

Your doctor will conduct a thorough history and carry out a clinical exam. The history helps identify associated risk factors, which will have to be addressed during treatment in order to get the most successful results. Your doctor will also check other joints for any signs of similar problems. In about half the patients, osteonecrosis is also present at the hip, knee, ankle, wrist, and/or elbow.

Lab studies can be done to rule out infection or test for systemic diseases or blood disorders that can cause osteonecrosis.

Standard X-rays are usually ordered to confirm the diagnosis. Several different views are needed. Besides the usual anterior-posterior (AP) views, radiographs should include views with the joint in external (outward) and internal (inward) rotation. That will help show all areas of the diseased humeral head, important information for planning treatment.

X-rays don’t always show all of the changes until the condition has been present for quite some time. MRIs may be used to define more clearly early changes in fat and water content of the bone marrow that won’t be seen on X-ray. Bone scans have fallen out of favor for the detection and diagnosis of osteonecrosis. Studies show only one-third of true cases are successfully identified with this imaging tool.

Osteonecrosis of the Humeral Head

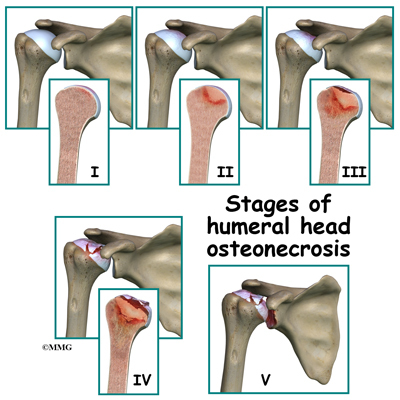
Treatment is based on the severity of disease, so part of the diagnosis is to identify what stage the disease is in. The stages start with stage I, which means no changes are seen on X-ray images and go up to stage V. In stage V (the most advanced disease) the humeral head is collapsed and the socket is damaged as well. There may be soft tissue tears present in the more advanced stages.

Treatment

What treatment options are available?

Osteonecrosis of the Humeral Head

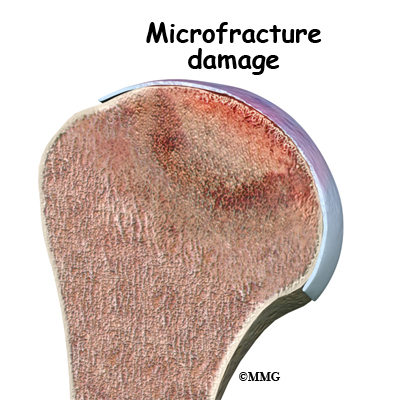
The first goal in treating osteonecrosis of the humeral head is to save the bone. Left untreated, the disease process will continue until the layer of bone just under the joint surface cracks causing small microfractures. Once enough microfactures happen, the bone begins to collapse and the articular cartilage covering the joint surface also starts to collapse. Eventually, there will be damage to the entire shoulder joint. The second goal is to keep shoulder function while relieving pain. Various nonsurgical and surgical methods have been used to treat this problem.

Nonsurgical Treatment

The first line of treatment is medication to restore blood supply and allow new bone growth. Some of the more common drugs used include lipid-lowering (cholesterol-lowering) agents, vasodilators (opens up the blood vessels), anticoagulants (prevents blood clotting), and bisphosphonates (prevents bone loss). The type of medication used depends on the underlying systemic disease causing the bone problem. Nonsteroidal antiinflammatory drugs (NSAIDs) may provide some symptom relief of the osteoarthritis but they do not slow or stop the osteonecrosis.

Osteonecrosis of the Humeral Head

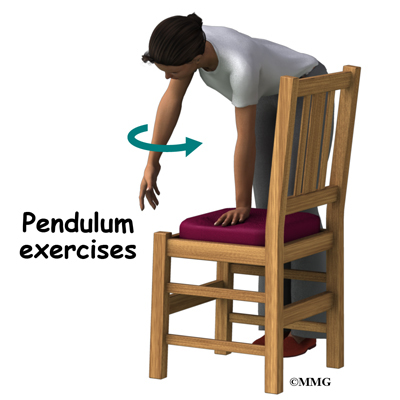
Depending on your symptoms and limitations in motion and strength, you may be started on a series of exercises called pendulum exercises. These are designed to help keep full motion in the shoulder joint but without stressing the joint. You may be told to avoid lifting your arm overhead or away from the body against resistance. You should also avoid lifting or holding anything heavy. Your doctor may give you a weight restriction (i.e., don’t lift anything more than two to five pounds). Putting away heavy groceries for example should be avoided at this time.

Physical therapy that include modalities for pain control and progression of range-of-motion exercises with subsequent strengthening is helpful in all stages, particularly in stage I and stage II.

Patients are advised to stop using tobacco or alcohol. Anyone taking corticosteroids should consult with the prescribing physician to review the need for and use of these medications because of their possible adverse effect on bone.

Surgery

Core Decompression

Osteonecrosis of the Humeral Head

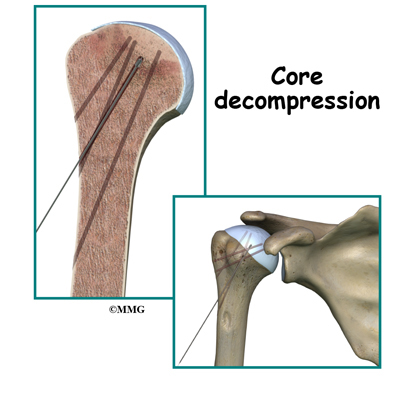
Surgical intervention may be needed in the more advanced stages of osteonecrosis. When the condition is in the early stages, a procedure called core decompression is used to reduce bone marrow pressure and allow the formation of new blood supply to the area. The new blood vessels help the necrotic area start to form new, healthy bone.

Core decompression is done by drilling small holes from the healthy bone to the area of necrosis in the humeral head. This creates channels that allow new blood vessels to grow into the necrotic area. The surgeon uses a special type of X-ray called fluoroscopy to guide the placement of the pins used to drill the holes. Removing some of the dead bone also causes bleeding into the region of necrotic bone and stimulates new bone growth.

Arthroscopy

Osteonecrosis of the Humeral Head

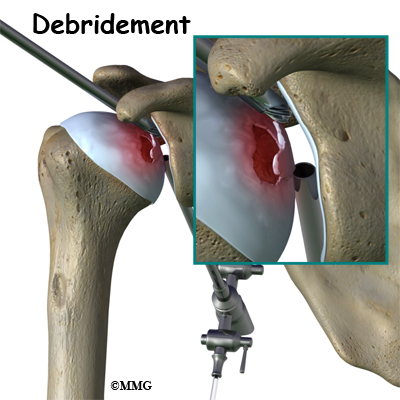
If there are any loose bits of bone or cartilage in the joint, then the surgeon may have to perform arthroscopic debridement . The arthroscope is a small fiberoptic camera that can be inserted into the joint allowing the surgeon to see the inside of the joint. Other instruments can be inserted into the joint though small incisions to remove tissue and smooth the surface of the joint. The shoulder joint is cleaned up of any debris. Any frayed edges of joint cartilage are smoothed down. Sometimes the surgeon combines these two procedures (decompression and arthroscopy). The arthroscopic exam shows the location and extent of the disease in the joint while the decompression addresses the necrotic area of bone.

Bone Grafting

Bone grafting replaces the necrotic (dead) bone with donor bone that is usually taken from the patient’s own hip. This treatment approach is used for mild to moderate disease. It is not advised for late stage disease as studies show patients with more advanced disease do better with arthroplasty (joint replacement). The bone graft gives the joint surface support needed to keep it from collapsing. With that support in place, the bone can begin to heal.

Arthroplasty

Osteonecrosis of the Humeral Head

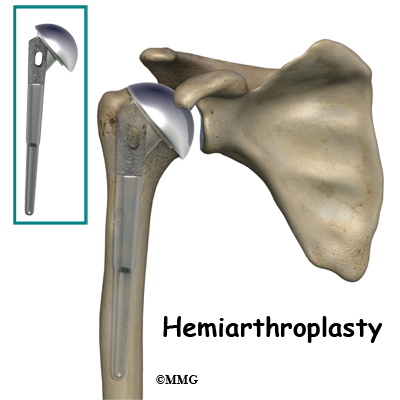
Joint replacement is used for more severe damage of the the joint. A hemiarthroplasty (partial replacement) may be all that’s needed when only one side of the joint has been affected. Full joint replacement is reserved for patients with significant involvement of both the humeral head and the glenoid fossa (socket).

Osteonecrosis of the Humeral Head

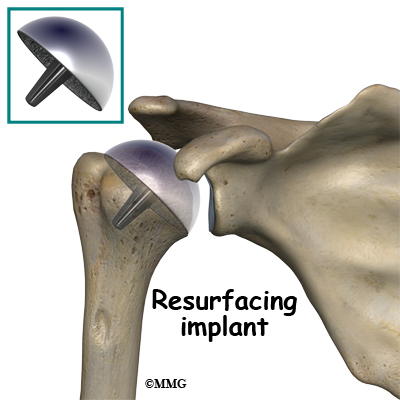
A newer procedure called humeral head resurfacing is gaining popularity and may help save the joint. Instead of removing the head of the humerus and replacing it, the bone is smoothed down and a metal cap placed over the smoothed head like a tooth capped by the dentist. The cap is held in place with a small peg that fits down into the bone. Joint resurfacing requires that the patient have enough healthy bone to support the cap.

Rehabilitation

What should I expect after treatment?

Nonsurgical Rehabilitation

Studies show that the results of nonsurgical treatment are satisfactory when the disease is caught during the early stages. Symptoms often remain mild, even when the disease is advanced. Since the shoulder does not involve weight-bearing like the hip, good results are obtained with conservative care. Physical therapy may be needed for extended periods of time. There are some patients who will continue to progress despite early conservative care. Predicting who might develop more advanced disease is difficult, so close monitoring is advised.

After Surgery

After core decompression, you may be wearing a sling for a few days. Many patients report immediate pain relief. Active-assisted motion is allowed in all directions. Active-assisted means you use your other hand (or hold a cane or some other type of stick with both hands) to help guide the involved side through the motion. Movements are not forced. You’ll go as far as you can comfortably.

You will gradually resume all normal activities over a period of four or five weeks — as long as you remain pain free. High-impact activities or activities that load the joint are not allowed for a full year following decompression.

With any of the more invasive procedures such as joint replacement, passive range-of-motion is carried out under the supervision of a physical therapist. Because major muscles are cut and reattached during the operation, regaining motion is progressed slowly to protect the healing soft tissues.

Active motion (moving under your own muscle power without help) is not allowed for the first three weeks. In fact, the therapist will move you from passive motion through active-assistive motion and then to active motion over a period of six weeks. Stretching and strengthening don’t begin until around week 12 post-op.

Results of treatment are often good but patients should be prepared for the possibility that the condition can progress over time. Further surgery may be needed. For those who have decompression or bone grafting, joint replacement may be needed eventually.

Ankle Arthroscopy

A Patient’s Guide to Ankle Arthroscopy

Introduction

Ankle Arthroscopy

Arthroscopy is a procedure where a small video camera attached to a fiberoptic lens is inserted into the body to allow a physician or surgeon to see without making a large incision. Arthroscopy is now used to evaluate and treat orthopedic problems in many different joints of the body. The ankle joint is one of the common joints that arthroscopy is used to evaluate and treat problems with this minimally invasive technique.

This guide will help you understand

  • what parts of the ankle are treated during ankle arthroscopy
  • what types of conditions are treated with ankle arthroscopy
  • what to expect before and after ankle arthroscopy

Anatomy

What parts of the ankle are involved?


Ankle Arthroscopy

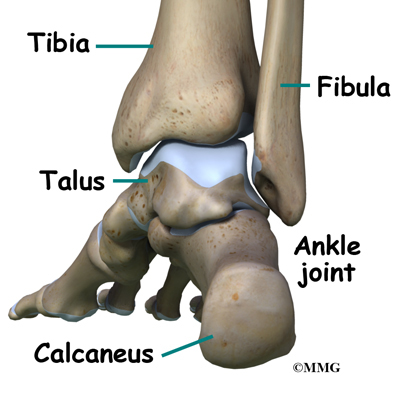
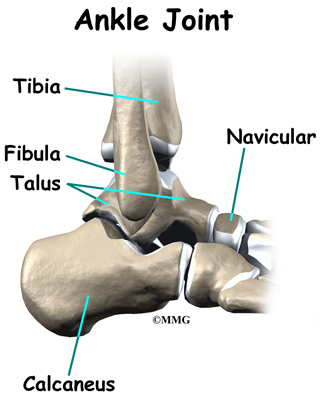
The ankle joint is formed by the connection of three bones. The top of the talus fits inside a socket that is formed by the lower end of the tibia (shinbone) and the fibula (the small bone of the lower leg). The bottom of the talus sits on the heel bone, called the calcaneus.


Ankle Arthroscopy

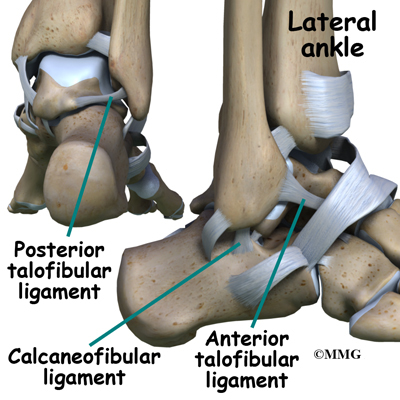
Ligaments are tough bands of tissue that connect bones together. Three ligaments make up the lateral ligament complex on the side of the ankle farthest from the other ankle. They are the anterior talofibular ligament (ATFL), the calcaneofibular ligament (CFL), and the posterior talofibular ligament (PTFL).

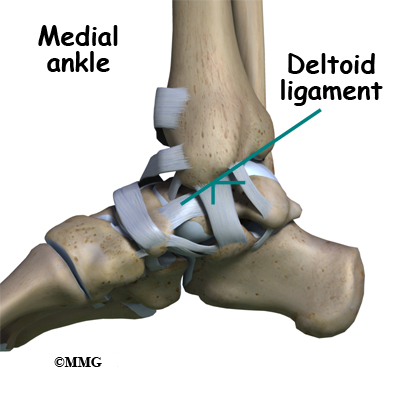
The common ankle sprain, or inversion injury to the ankle, usually involves two ligaments, the ATFL and CFL. Normally, the ATFL keeps the ankle from sliding forward, and the CFL keeps the ankle from rolling inward on its side. On the side of the ankle joint closest to the other foot (the medial side) is another ligament called the deltoid ligament.


Ankle Arthroscopy

The deltoid ligament can be torn, but it is usually torn in a combination of injuries when the ankle is broken; it is uncommon to injure the deltoid ligament alone.


Ankle Arthroscopy

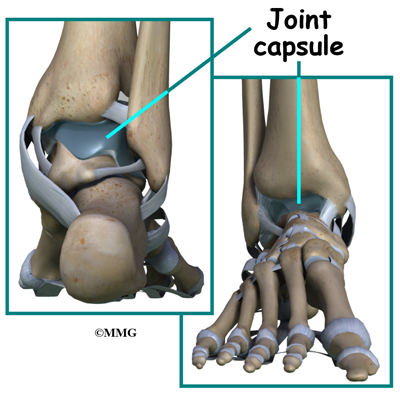
The ankle joint is surrounded by a water tight pocket called the joint capsule. This capsule is formed by ligaments, connective tissue and synovial tissue. When the joint capsule is filled with sterile saline and is distended, the surgeon can insert the arthroscope into the pocket that is formed, turn on the lights and the camera and see inside the ankle joint as if looking into an aquarium. The surgeon can see the structures that are inside the ankle joint including the joint surfaces of the distal tibia, fibula and talus and the synovial lining of the joint.

Rationale

What does my surgeon hope to accomplish?

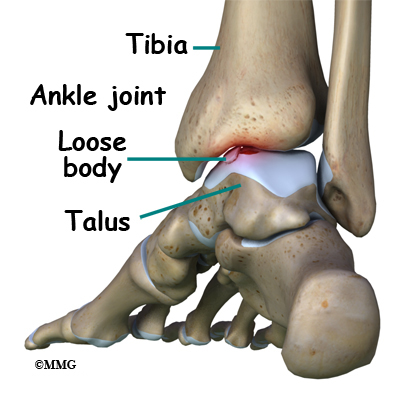
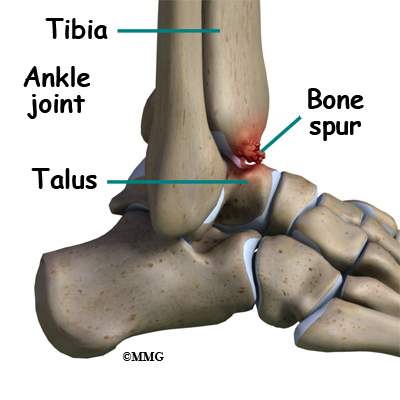
When ankle arthroscopy first became available it was used primarily to look inside the ankle joint and make a diagnosis. Today, ankle arthroscopy is used to perform a wide range of surgical procedures including confirming a diagnosis, removing loose bodies, removing bone spurs, debriding excess inflamed synovial tissue, and fixing fractures of the joint surface.


Ankle Arthroscopy

Your surgeon’s goal is to fix or improve your problem by performing a suitable surgical procedure; the arthroscope is a tool that improves the surgeon’s ability to perform that procedure. The arthroscope image is magnified and allows the surgeon to see better and clearer. The arthroscope allows the surgeon to see and perform surgery using much smaller incisions. This results in less tissue damage to normal tissue and can shorten the healing process. But remember, the arthroscope is only a tool. The results that you can expect from a ankle arthroscopy depend on what is wrong with your ankle, what can be done inside your ankle to improve the problem and your effort at rehabilitation after the surgery.


Ankle Arthroscopy

Preparations

What do I need to know before surgery?

You and your surgeon should make the decision to proceed with surgery together. You need to understand as much about the procedure as possible. If you have concerns or questions, be sure and talk to your surgeon.

Once you decide on surgery, you need to take several steps. Your surgeon may suggest a complete physical examination by your regular doctor. This exam helps ensure that you are in the best possible condition to undergo the operation.

You may also need to spend time with the physical therapist who will be managing your rehabilitation after surgery. This allows you to get a head start on your recovery. One purpose of this preoperative visit is to record a baseline of information. The therapist will check your current pain levels, ability to do your activities and the movement and strength of each ankle.

A second purpose of the preoperative visit is to prepare you for surgery. The therapist will teach you how to walk safely using crutches or a walker. And you’ll begin learning some of the exercises you’ll use during your recovery.

On the day of your surgery, you will probably be admitted for surgery early in the morning. You shouldn’t eat or drink anything after midnight the night before.

Surgical Procedure

What happens during ankle arthroscopy?


Ankle Arthroscopy

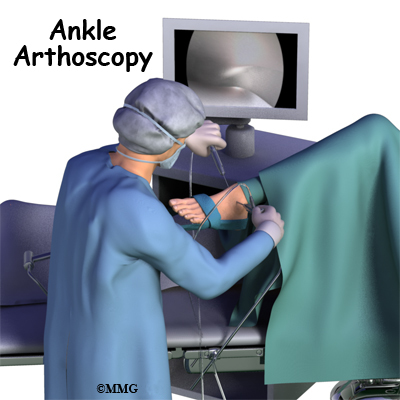
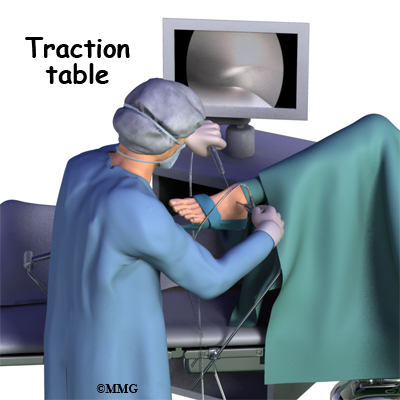
Before surgery you will be placed under either general anesthesia or a type of spinal anesthesia. The ankle joint is very tight with little space between the tibia and the talus. By applying traction, the surgeon is able to increase this space and allow the arthroscope to be inserted into that space. The end of the arthroscope will be moved about in this space to look throughout the joint. Finally, sterile drapes are placed to create a sterile environment for the surgeon to work. There is a great deal of equipment that surrounds the operating table including the TV screens, cameras, light sources and surgical instruments.


Ankle Arthroscopy

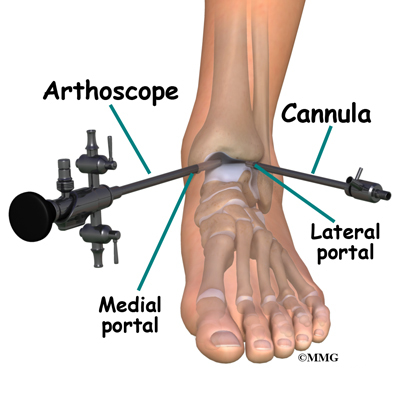
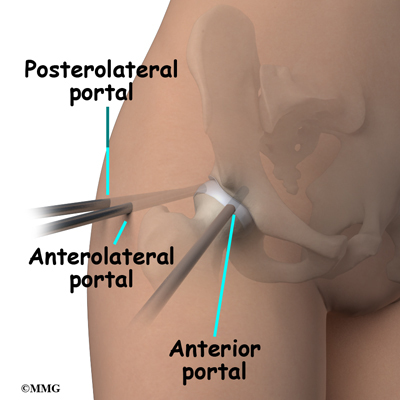
The surgeon begins the operation by making two or three small openings into the ankle, called portals. These portals are where the arthroscope and surgical instruments are placed inside the ankle. Care is taken to protect the nearby nerves and blood vessels. A small metal or plastic tube (or cannula) will be placed through one of the portals to inflate the ankle with sterile saline.


Ankle Arthroscopy

The arthroscope is a small fiber-optic tube that is used to see and operate inside the joint. The arthroscope is a small metal tube about 1/4 inch in diameter (slightly smaller than a pencil) and about 7 inches in length. The fiberoptics inside the metal tube of the arthroscope allows a bright light and TV camera to be connected to the outer end of the arthroscope. The light shines through the fiberoptic tube and into the ankle joint. A TV camera is attached to the lens on the outer end of the arthroscope. The TV camera projects the image from inside the ankle joint on a TV screen next to the surgeon. The surgeon actually watches the TV screen (not the ankle) while moving the arthroscope to different places inside the ankle joint.

Over the years since the invention of the arthroscope, many very specialized instruments have been developed to perform different types of surgery using the arthroscope to see what is going on while the instruments are being used. Today, many surgical procedures that once required large incisions for the surgeon to see and fix the problem can be done with much smaller incisions. For example, simple removal of a loose body in the ankle can be done using two or three small 1/4 inch incisions. More extensive surgical procedures may require larger incisions. Your surgeon may decide during the procedure that the problem requires a more traditional open type operation. If this has been discussed before the operation the surgery may be performed immediately; if not, the arthroscopic procedure will be concluded and a later operation planned. Your surgeon will discuss the details of what was found at the time of the arthroscopy and what more needs to be done in the later operation.

Once the surgical procedure is complete, the arthroscopic portals and surgical incisions will be closed with sutures or surgical staples. You may be placed in a large compressive bandage and splint that will be applied from the knee to the toes. The splint and bandage is used to immobilize and protect the ankle. If your surgeon feels that you do not need a bulky bandage and splint, you may be placed in compression stockings. A compressive bandage (or stockings) reduce swelling and help prevent blood clots in the leg. Once the bandage has been placed, you will be taken to the recovery room.

Complications

What can go wrong?

As with all major surgical procedures, complications can occur during ankle arthroscopy. This document doesn’t provide a complete list of the possible complications, but it does highlight some of the most common problems. Some of the most common complications following ankle arthroscopy are

  • anesthesia complications
  • thrombophlebitis
  • infection
  • equipment failure
  • slow recovery

Anesthesia Complications

Most surgical procedures require that some type of anesthesia be done before surgery. A very small number of patients have problems with anesthesia. These problems can be reactions to the drugs used, problems related to other medical complications, and problems due to the anesthesia. Be sure to discuss the risks and your concerns with your anesthesiologist.

Thrombophlebitis (Blood Clots)


Ankle Arthroscopy

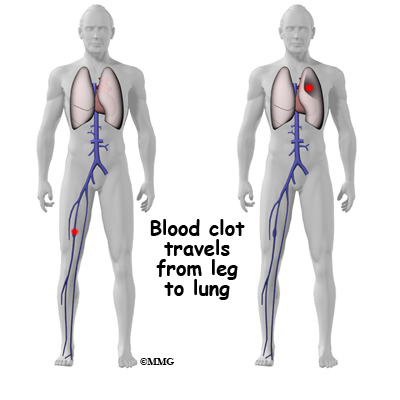
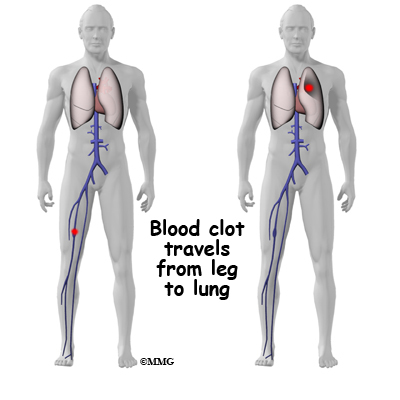
Thrombophlebitis, sometimes called deep venous thrombosis (DVT), can occur after any operation, but is more likely to occur following surgery on the hip, pelvis, or knee. DVT occurs when blood clots form in the large veins of the leg. This may cause the leg to swell and become warm to the touch and painful. If the blood clots in the veins break apart, they can travel to the lung, where they lodge in the capillaries and cut off the blood supply to a portion of the lung. This is called a pulmonary embolism. (Pulmonary means lung, and embolism refers to a fragment of something traveling through the vascular system.) Most surgeons take preventing DVT very seriously. There are many ways to reduce the risk of DVT, but probably the most effective is getting you moving as soon as possible after surgery. Two other commonly used preventative measures include

  • pressure stockings to keep the blood in the legs moving
  • medications that thin the blood and prevent blood clots from forming

Infection

Following ankle arthroscopy, it is possible that a postoperative infection may occur. This is very uncommon and happens in less than 1% of cases. You may experience increased pain, swelling, fever and redness or drainage from the incisions. You should alert your surgeon if you think you are developing an infection.

Infections are of two types: superficial or deep. A superficial infection may occur in the skin around the incisions or portals. A superficial infection does not extend into the joint and can usually be treated with antibiotics alone. If the ankle joint itself becomes infected, this is a serious complication and will require antibiotics and possibly another surgical procedure to drain the infection.

Equipment Failure

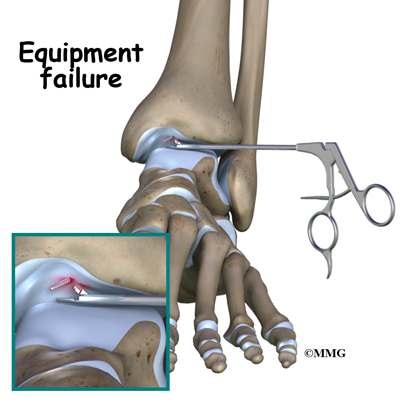
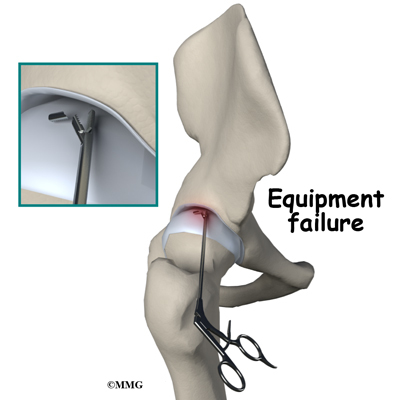
Many of the instruments used by the surgeon to perform ankle arthroscopy are small and fragile. These instruments can be broken resulting in a piece of the instrument floating inside of the joint. The broken piece is usually easily located and removed, but this may cause the operation to last longer than planned. There is usually no damage to the joint due to the breakage.

Different types of surgical devices (screws, pins and suture anchors) are used to hold tissue in place during and after arthroscopy. These devices can cause problems. If one breaks, the free-floating piece may hurt other parts inside the joint, particularly the articular cartilage. The end of the tissue anchor may poke too far through tissue and the point may rub and irritate nearby tissues. A second surgery may be needed to remove the device or fix problems with these devices.


Ankle Arthroscopy

Slow Recovery

Not everyone gets quickly back to routine activities after ankle arthroscopy. Because the arthroscope allows surgeons to use smaller incisions than in the past, many patients mistakenly believe that less surgery was necessary. This is not always true. The arthroscope allows surgeons to do a great deal of reconstructive surgery inside the ankle joint without making large incisions. How fast you recover from ankle arthroscopy depends on what type of surgery was done inside your ankle. Simple problems that require simple procedures using the arthroscope generally get better faster. Patients with extensive damage to the articular cartilage in the ankle joint tend to require more complex and extensive surgical procedures. These more extensive reconstructions take longer to heal and have a slower recovery. You should discuss this with your surgeon and make sure that you have realistic expectations of what to expect following arthroscopic ankle surgery.

After Surgery

What happens after ankle arthroscopy?

Ankle arthroscopy is usually done on an outpatient basis meaning that patients go home the same day as the surgery. More complex reconstructions that require larger incisions and surgery that alters bone may require a short stay in the hospital to control pain more aggressively and monitor the situation carefully. You may also begin physical therapy while in the hospital.

The portals are covered with surgical strips, the larger incisions may have been repaired with either surgical staples or sutures. Crutches are commonly used after ankle arthroscopy. They may only be needed for one to two days after a simple procedures.

Follow your surgeon’s instructions about how much weight to place on your foot while standing or walking. Avoid doing too much, too quickly. You may be instructed to use a cold pack on the ankle and to keep your leg elevated and supported.

Rehabilitation

What will my recovery be like?

Your rehabilitation will depend on the type of surgery required. You may not need formal physical therapy after simple procedures such as a simple debridement. Some patients may simply do exercises as part of a home program after some simple instructions.

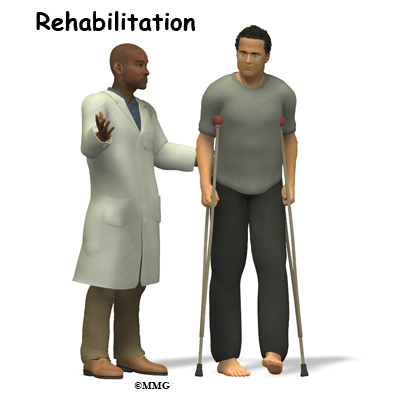
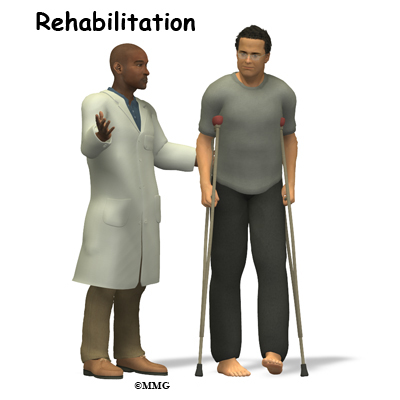
Many surgeons have patients take part in formal physical therapy after any type of ankle arthroscopy procedure. Generally speaking, the more complex the surgery the more involved and prolonged your rehabilitation program will be. The first few physical therapy treatments are designed to help control the pain and swelling from the surgery. Physical therapists will also work with patients to make sure they are putting only a safe amount of weight on the affected leg.


Ankle Arthroscopy

Today, the arthroscope is used to perform quite complicated major reconstructive surgery using very small incisions. Remember, just because you have small incisions on the outside, there may be a great deal of healing tissue on the inside of the ankle joint. If you have had major reconstructive surgery, you should expect full recovery to take several months. The physical therapist’s goal is to help you keep your pain under control and improve the range of motion and strength of your ankle. When you are well under way, regular visits to your therapist’s office will end. The therapist will continue to be a resource, but you will be in charge of doing your exercises as part of an ongoing home program.

Tobacco Cessation – Quit Smoking

A Patient’s Guide to Tobacco Cessation

Introduction

Congratulations! If you are reading this Patient’s Guide to Tobacco Cessation, you have taken the first step toward helping yourself (or perhaps a loved one) to quit smoking and forge a new path toward health and renewal.

It will come as no surprise to you that tobacco use remains the underlying cause of disease, illness, and even death for many, many people. But did you know that tobacco use is linked with twice as many deaths each year in the United States as AIDS, alcohol and other drug abuse, car accidents, fires, and suicides all combined together.

You will notice the term “tobacco cessation” rather than “smoking cessation.” That’s because many people don’t smoke, they chew tobacco. This type of tobacco is referred to as spit tobacco, smokeless tobacco, or chewing tobacco. And smoking doesn’t just refer to cigarette smokers but also to pipe and cigar smokers.

This guide will help you understand

  • why you should stop smoking or using tobacco products
  • why it is so hard to stop smoking or using tobacco products
  • what treatment options are available

Why should I stop smoking (or using tobacco)?

Smoking and the use of tobacco products are associated with a number of chronic diseases, including chronic pulmonary diseases (COPD), cataracts, and cardiovascular conditions (e.g., high blood pressure, heart disease, stroke).

Tobacco use increases the risk of lung cancer and is the single most preventable cause of cancer death. Tobacco use is also linked with cancer in many other parts of the body (e.g., head, neck, throat, bladder, cervix, kidney, pancreas, stomach).

Smoking in particular harms nearly every organ of the body, damaging the smoker’s overall health even when it does not cause a specific illness. The 4000 chemical compounds in cigarette smoke make the heart beat faster and harder, narrow blood vessels, and increase blood pressure. Smokers are at an increased risk of developing diabetes, heart disease, major depression, and suicide and other problem behaviors.

For those who smoke, quitting smoking affects not only your health but also the health of those around you. The adverse effects of second-hand (passive) smoke (also known as environmental tobacco smoke or ETS) have been clearly shown in many studies.

The Surgeon General has concluded that exposure to passive smoke increases the risk of sudden infant death syndrome (SIDS), respiratory infections, ear problems, asthma, heart disease, and lung cancer in children and other family members who do not smoke but who are exposed to it on a daily basis. Exposure to second-hand smoke is also an occupational hazard in individuals working in bars, restaurants, or other places that are not smoke-free.

But the good news is that individuals who start smoking early in life (i.e., during their teen years and early 20s) but who quit before middle-age can avoid much of the risk of tobacco-related diseases and death. And even if you quit after years of tobacco use, there are many benefits for you and for those who share the air that you breathe.

Many people find the cost savings a good enough reason to quit. This doesn’t just refer to the cost of tobacco products but also the amount of money spent on health care for tobacco-related illnesses.

What’s the link between tobacco use and back pain?

There is evidence that tobacco users (especially smokers) are at increased risk of low back pain. In fact, exposure to tobacco smoke in nonsmokers has been shown to increase pain and pain intensity affecting many parts of the body, including the back.

Nicotine has also been linked with accelerated disk degeneration although the exact mechanism for this remains unknown. Smoking has a negative effect on wound healing, bone graft incorporation, and pain reduction. Smoking slows down and alters the normal processes of repair cells in the body called fibroblasts. This effect contributes to slower repair of injured tissue.

Smoking also appears to contribute to increased fibroblast accumulation in some wounds, allowing cells that would normally die to remain alive, but with decreased mobility (movement). These slower fibroblasts collect in areas of the wound where they are not needed and inhibit normal healing. Instead of healing normally, the wound fails to heal or fills in scar tissue. This explains why healing after back surgery can be delayed in those who use tobacco products.

There is also a known association between smoking and pseudoarthrosis (nonunion with the formation of a “false joint”) after spinal fusion. Examination 1 to 2 years after surgery shows that as much as 40 per cent of smokers who have spinal fusion surgery develop a pseudoarthrosis. Among nonsmokers, the rate is much lower (less than 10 per cent).

Why is it so hard to stop using tobacco?

Tobacco use isn’t just a habit – it’s a powerful addiction. It takes willpower to kick a bad habit. It takes willpower and much more to overcome an addiction. Nicotine is a drug that stimulates the brain to crave it. Within seconds of smoking, nicotine reaches the brain and triggers the release of dopamine and other chemicals that activate nerve endings. The brain’s reward center for is flooded with these chemicals. The result is a feeling of pleasure that is reinforced over and over each time you smoke or chew. Without nicotine, withdrawal symptoms create a craving for that next nicotine hit to the pleasure zone.

Knowing the dangers of smoking isn’t enough to motivate most people to quit. Even when smokers or other tobacco users see a loved one die from use of this substance, it isn’t any easier to quit. Besides nicotine being an addictive drug, the habitual act of smoking tobacco products or chewing tobacco actually adds a psychologic component that must be overcome as well. But many people have done it and you can too!

Treatment

What treatment options are available?

The majority of current tobacco users want to break this habit. There are many local, state, and national programs designed to help tobacco users stop using all forms of tobacco. Your primary care physician or local physician’s assistant or nurse practitioner can guide you through a tobacco-cessation process utilizing support from local services.

There are two main ways to approach tobacco or smoking cessation: cold turkey (all at once) or with nicotine replacement therapy (NRT). Going “cold turkey” refers to quitting the use of all tobacco all of a sudden and never going back. This method is less expensive and faster than nicotine replacement therapy but it is more difficult in the short-term.

Nicotine replacement therapy uses a nicotine patch, inhaler, gum, or lozenges (all sold over-the-counter without a prescription) to ease the symptoms of nicotine withdrawal. Your physician may also prescribe other medications such as an antidepressant (e.g., Zyban or Wellbutrin) or Chantix (varenicline).

Zyban replaces the “high” that nicotine provides by increasing the brain’s supply of the dopamine neurotransmitter. Chantix blocks nicotine receptors in the brain so the nicotine can’t activate the brain’s pleasure center. Instead, dopamine is slowly released, easing the withdrawal symptoms.

As with any medication, adverse side effects can occur. If you experience irritability or agitation, depression, vivid dreams, drowsiness, or suicidal thoughts (rare), nausea, insomnia, or headaches, see your doctor right away. A change in dosage or medication may be all that’s needed.

Regardless of which route you go (cold turkey versus nicotine replacement therapy), plan on making use of smoking cessation counseling or support groups. Studies show that people who get help to stop using tobacco are much more successful than those who try to quit on their own.

The U.S. Public Health Service suggests the following plan called the STAR quit plan for tobacco (smoking) cessation:

Set a quit date within two weeks of your decision to stop using tobacco/smoking.

Tell family, friends, and coworkers about your decision to quit and ask for their support.

Anticipate challenges to quitting, especially during the first few weeks.

Remove all tobacco products from your work, home, and car.

Exercise is a key tool in fighting cravings. Study after study has shown that exercise reduces cravings for up to 50 minutes afterwards. For those who don’t like exercise, there is good news. Long workouts aren’t necessary. Even a five-minute walk can make a difference.

Other activities that you may enjoy (and perhaps had to give up when you were smoking) such as bowling, golfing, gardening, dancing, bicycling, swimming, horseshoes or other active games can provide you with beneficial yet enjoyable physical activity and exercise.

Some people seek alternative help through acupuncture, hypnosis, herbal remedies, biofeedback, or other forms of complementary care. If you prefer an on-line approach, the American Lung Association has a website that will take you through several steps toward tobacco cessation (www.lungusa.org/stop-smoking/).

Freedom From Smoking is an online group clinic that teaches the skills and techniques that have been proven to help tobacco users quit. You can participate before you are even ready to get serious about cessation and continue all the way through to successful completion of the program. A small financial commitment provides you with the necessary ingredients for successful tobacco cessation, daily/weekly support, and tips for staying tobacco free. You can go on-line and access this tool at www.ffsonline.org.

For free advice, counseling, and education, check out the smokefree.gov website at smokefree.gov.

Most experts recommend a tobacco cessation program that combines many of these stop-smoking aids. Attending support group meetings, having a partner to quit with, making use of on-line programs, and seeking counseling are all tools that help with long-term successful tobacco cessation.

Recovery

What should I expect as I go through tobacco cessation?

Not everyone is successful the first time they attempt to quit using tobacco. That is okay. Each time a person makes the effort, he or she is that much closer to being successful. Because tobacco is so highly addictive, quitting smoking is hard but not impossible. This is one time that the old expression, “If at first you don’t succeed, try, try again” is excellent advice.

You can expect real changes in your body within 20 minutes of tobacco cessation. For example, your blood pressure and pulse rate will drop. Within the first eight hours of tobacco cessation, your oxygen levels will increase and within the first 24-hours, your risk of heart attack decreases.

If you hold out for two-days, you will start to notice an increased ability to taste and smell again. By the end of two weeks, your ability to exercise will be noticeably better. For more details of the day-by-day, week-by-week, month-by-month, and year-by-year changes you can expect as a result of this life-changing decision you have made, go to the American Cancer Society’s webpage (cancer.org) and type in the search window: when smokers quit.

No method of quitting or effort made toward quitting is successful unless you are genuinely committed to it and have support to achieve this goal. Why not get started now by calling the American Cancer Society’s Quit For Life: 866-784-8454. You can also find an individual program in your state called Quit Line by going on-line and typing in the search line: tobacco quit line.

Join the thousands of teens and adults who have already taken this bold and courageous step. Regain energy, health, and money and improve the quality of life for your family and friends. They will thank you when they no longer have to suffer the effects of second hand smoke. It’s a win-win situation for everyone!

Knee Arthroscopy

A Patient’s Guide to Knee Arthroscopy

Introduction

Knee Arthroscopy

The use of arthroscopy has revolutionized many different types of orthopedic surgery. During knee arthroscopy, a small video camera attached to a fiberoptic lens is inserted into the body to allow a physician or surgeon to see without making a large incision (arthro means joint scopy means look). The knee was the first joint in which the arthroscope was commonly used to both diagnose problems and to perform surgical procedures inside the knee joint.

This guide will help you understand

  • what parts of the knee are involved
  • what types of conditions can be treated
  • what to expect after surgery

Anatomy

What parts of the knee are involved?

Knee Arthroscopy

The knee joint is formed where the femur (lower end of the thighbone) connects with the tibia (upper end of the main lower leg bone). On the front of the joint is the patella (kneecap). The patella is what is called a sesamoid bone that is a part of the extensor mechanism of the knee joint. The extensor mechanism connects the large muscles of the thigh to the tibia; contracting the thigh muscles pulls on the tibia and allows us to straighten the knee. The parts of the extensor mechanism include the thigh muscles, the quadriceps tendon, the patella and the patella tendon.

Knee Arthroscopy

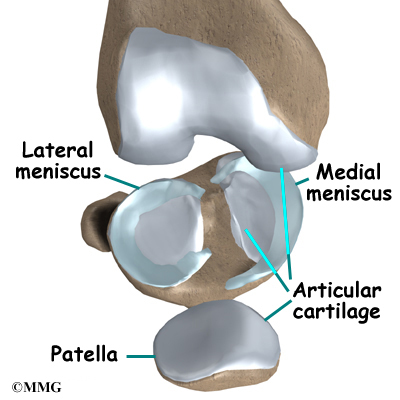
The knee joint is surrounded by a water tight pocket called the joint capsule. This capsule is formed by the knee ligaments, connective tissue and synovial tissue. When the joint capsule is filled with sterile saline and is distended, the surgeon can insert the arthroscope into the pocket that is formed, turn on the lights and the camera and see inside the knee joint as if looking into an aquarium. The surgeon can see nearly everything that is inside the knee joint including: (1) the joint surfaces of the tibia, femur and patella, (2) the two menisci, (3) the two cruciate ligaments, and (4) the synovial lining of the joint.

Knee Arthroscopy

There is one meniscus on each side of the knee joint. The C-shaped medial meniscus is on the inside part of the knee, closest to your other knee. (Medial means closer to the middle of the body.) The U-shaped lateral meniscus is on the outer half of the knee joint. (Lateral means further out from the center of the body.)

Knee Arthroscopy

The menisci (plural for meniscus) protect the articular cartilage on the surfaces of the thighbone (femur) and the shinbone (tibia). Articular cartilage is the smooth, slippery material that covers the ends of the bones that make up the knee joint. The articular cartilage allows the joint surfaces to slide against one another without damage to either surface.

Ligaments are tough bands of tissue that connect the ends of bones together. The Anterior Cruciate Ligament (ACL) is located in the center of the knee joint where it runs from the backside of the femur (thighbone) to connect to the front of the tibia (shinbone).

The ACL runs through a special notch in the femur called the intercondylar notch and attaches to a special area of the tibia called the tibial spine.

The ACL is the main controller of how far forward the tibia moves under the femur. This is called anterior translation of the tibia. If the tibia moves too far, the ACL can rupture. The ACL is also the first ligament that becomes tight when the knee is straightened. If the knee is forced past this point, or hyperextended, the ACL can also be torn.

Knee Arthroscopy

The Posterior Cruciate Ligament (PCL) is located near the back of the knee joint. It attaches to the back of the femur (thighbone) and the back of the tibia (shinbone) behind the ACL.

The PCL is the primary stabilizer of the knee and the main controller of how far backward the tibia moves under the femur. This motion is called posterior translation of the tibia. If the tibia moves too far back, the PCL can rupture.

Related Document: A Patient’s Guide to Knee Anatomy

Rationale

What does my surgeon hope to accomplish?

When knee arthroscopy first became widely available in the 1970’s it was used primarily to look inside the knee joint and make a diagnosis. Today, knee arthroscopy is used in performing a wide range of different types of surgical procedures on the knee joint including confirming a diagnosis, removing loose bodies, removing or repairing a torn meniscus, reconstructing torn ligaments, repairing articular cartilage and fixing fractures of the joint surface.

Your surgeon’s goal is to fix or improve your problem by performing a suitable surgical procedure; the arthroscope is a tool that improves the surgeons ability to perform that procedure. The arthroscope image is magnified and allows the surgeon to see better and clearer. The arthroscope allows the surgeon to see and perform surgery using much smaller incisions. This results in less tissue damage to normal tissue and can shorten the healing process. But remember, the arthroscope is only a tool. The results that you can expect from a knee arthroscopy depend on what is wrong with your knee, what can be done inside your knee to improve the problem and your effort at rehabilitation after the surgery.

Preparations

What do I need to know before surgery?

You and your surgeon should make the decision to proceed with surgery together. You need to understand as much about the procedure as possible. If you have concerns or questions, be sure and talk to your surgeon.

Once you decide on surgery, you need to take several steps. Your surgeon may suggest a complete physical examination by your regular doctor. This exam helps ensure that you are in the best possible condition to undergo the operation.

You may also need to spend time with the physical therapist who will be managing your rehabilitation after surgery. This allows you to get a head start on your recovery. One purpose of this preoperative visit is to record a baseline of information. The therapist will check your current pain levels, ability to do your activities, and the movement and strength of each knee.

A second purpose of the preoperative visit is to prepare you for surgery. The therapist will teach you how to walk safely using crutches or a walker. And you’ll begin learning some of the exercises you’ll use during your recovery.

On the day of your surgery, you will probably be admitted for surgery early in the morning. You shouldn’t eat or drink anything after midnight the night before.

Surgical Procedure

What happens during the procedure?

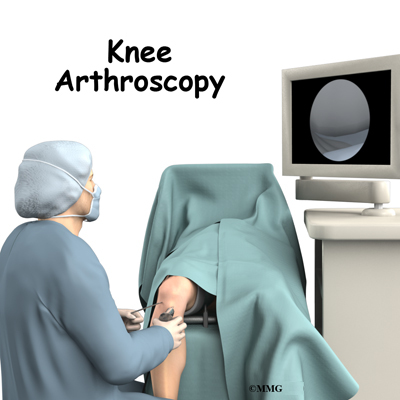
Before surgery you will be placed under either general anesthesia or a type of spinal anesthesia. In simple cases, local anesthesia may be adequate. Special braces are attached to the operating room table. These are used to safely cradle the leg and allows the surgeon to move the leg and bend the knee easily. Finally, sterile drapes are placed to create a sterile environment for the surgeon to work. There is a great deal of equipment that surrounds the operating table including the TV screens, cameras, light sources and surgical instruments.

Knee Arthroscopy

The surgeon begins the operation by making two or three small openings into the knee, called portals. These portals are where the arthroscope and surgical instruments are placed inside the knee. Care is taken to protect the nearby nerves and blood vessels. A small metal or plastic tube (or cannula) will be placed through one of the portals to inflate the knee with sterile saline.

The arthroscope is a small fiber-optic tube that is used to see and operate inside the joint. The arthroscope is a small metal tube about 1/4 inch in diameter (slightly smaller than a pencil) and about seven inches in length. The fiberoptics inside the metal tube of the arthroscope allows a bright light and TV camera to be connected to the outer end of the arthroscope. The light shines through the fiberoptic tube and into the knee joint. A TV camera is attached to the lens on the outer end of the arthroscope. The TV camera projects the image from inside the knee joint on a TV screen next to the surgeon. The surgeon actually watches the TV screen (not the knee joint) while moving the arthroscope to different places inside the knee joint.

Over the years since the invention of the arthroscope, many very specialized instruments have been developed to perform different types of surgery using the arthroscope to see what is going on while the instruments are being used. Today, many surgical procedures that once required large incisions for the surgeon to see and fix the problem can be one with much smaller incisions. For example, simple removal of a torn meniscus or loose body can be done using two small 1/4 inch incisions. More extensive surgical procedures such as ligament reconstruction or fracture repair may require larger incisions.

Knee Arthroscopy

Once the surgical procedure is complete, the arthroscopic portals and surgical incisions will be closed with sutures or surgical staples. A large bandage will be applied from mid thigh to the toes. Wrapping the entire leg with a compressive bandage reduces swelling and helps prevent blood clots in the leg. Once the bandage has been placed, you will be taken to the recovery room.

Complications

What might go wrong?

As with all major surgical procedures, complications can occur during knee arthroscopy. This document doesn’t provide a complete list of the possible complications, but it does highlight some of the most common problems. Some of the most common complications following knee arthroscopy are

  • anesthesia complications
  • thrombophlebitis
  • infection
  • equipment failure
  • slow recovery

Anesthesia Complications

Most surgical procedures require that some type of anesthesia be done before surgery. A very small number of patients have problems with anesthesia. These problems can be reactions to the drugs used, problems related to other medical complications, and problems due to the anesthesia. Be sure to discuss the risks and your concerns with your anesthesiologist.

Thrombophlebitis (Blood Clots)

Thrombophlebitis, sometimes called deep venous thrombosis (DVT), can occur after any operation, but is more likely to occur following surgery on the hip, pelvis, or knee. DVT occurs when blood clots form in the large veins of the leg. This may cause the leg to swell and become warm to the touch and painful. If the blood clots in the veins break apart, they can travel to the lung, where they lodge in the capillaries and cut off the blood supply to a portion of the lung. This is called a pulmonary embolism. (Pulmonary means lung, and embolism refers to a fragment of something traveling through the vascular system.) Most surgeons take preventing DVT very seriously. There are many ways to reduce the risk of DVT, but probably the most effective is getting you moving as soon as possible after surgery. Two other commonly used preventative measures include

  • pressure stockings to keep the blood in the legs moving
  • medications that thin the blood and prevent blood clots from forming

Infection

Following knee arthroscopy, it is possible that a postoperative infection may occur. This is very uncommon and happens in less than 1% of cases. You may experience increased pain, swelling, fever and redness or drainage from the incisions. You should alert your surgeon if you think you are developing an infection.

Infections are of two types: superficial or deep. A superficial infection may occur in the skin around the incisions or portals. A superficial infection does not extend into the joint and can usually be treated with antibiotics alone. If the knee joint itself becomes infected, this is a serious complication and will require antibiotics and possibly another surgical procedure to drain the infection.

Equipment Failure

Many of the instruments used by the surgeon to perform knee arthroscopy are small and fragile. These instruments can be broken resulting in a piece of the instrument floating inside of the knee joint. The broken piece is usually easily located and removed, but this may cause the operation to last longer than planned. There is usually no damage to the knee joint due to the breakage.

Different types of surgical devices (screws, pins, and suture anchors) are used to hold tissue in place during and after arthroscopy. These devices can cause problems. If one breaks, the free-floating piece may hurt other parts inside the knee joint, particularly the articular cartilage. The end of the tissue anchor may poke too far through tissue and the point may rub and irritate nearby tissues. A second surgery may be needed to remove the device or fix problems with these devices.

Slow Recovery

Not everyone gets quickly back to routine activities after knee arthroscopy. Because the arthroscope allows surgeons to use smaller incisions than in the past, many patients mistakenly believe that less surgery was necessary. This is not always true. The arthroscope allows surgeons to do a great deal of reconstructive surgery inside the knee without making large incisions. How fast you recover from knee arthroscopy depends on what type of surgery was done inside your knee. Simple problems that require simple procedures using the arthroscope generally get better faster. Patients with extensive damage to the knee ligaments or articular cartilage tend to require more complex and extensive surgical procedures. These more extensive reconstructions take longer to heal and have a slower recovery. You should discuss this with your surgeon and make sure that you have realistic expectations of what to expect following arthroscopic knee surgery.

After Surgery

What happens after surgery?

Knee arthroscopy is usually done on an outpatient basis meaning that patients go home the same day as the surgery. More complex ligament reconstructions that require larger incisions and surgery that alters bone may require a short stay in the hospital to control pain more aggressively and monitor the situation more carefully. You may also begin physical therapy while in the hospital.

The portals are covered with surgical strips, the larger incisions may have been repaired with either surgical staples or sutures and the knee may be wrapped in an elastic bandage (Ace wrap). Crutches are commonly used after knee arthroscopy. They may only be needed for one to two days after a simple procedure.

Knee Arthroscopy

Patients who have had more complex reconstructive surgery may need to wear a knee brace for several weeks. The brace helps to protect the healing tissue inside the knee joint. You may be allowed to remove the brace at times during the day to do gentle range-of-motion exercises and bathe.

Follow your surgeon’s instructions about how much weight to place on your foot while standing or walking. Avoid doing too much, too quickly. You may be instructed to use a cold pack on the knee and to keep your leg elevated and supported.

Rehabilitation

What will my recovery be like?

Your rehabilitation will depend on the type of surgery required. You may not need formal physical therapy after simple procedures such as a partial meniscectomy. Some patients may simply do exercises as part of a home program after some simple instructions.

Many surgeons have patients take part in formal physical therapy after any type of knee arthroscopy procedure. Generally speaking, the more complex the surgery the more involved and prolonged your rehabilitation program will be. The first few physical therapy treatments are designed to help control the pain and swelling from the surgery. Physical therapists will also work with patients to make sure they are putting only a safe amount of weight on the affected leg.

Today, the arthroscope is used to perform quite complicated major reconstructive surgery using very small incisions. Remember, just because you have small incisions on the outside, there may be a great deal of healing tissue on the inside of the knee joint. If you have had major reconstructive surgery, you should expect full recovery to take several months. The physical therapist’s goal is to help you keep your pain under control and improve the range of motion and strength of your knee. When you are well under way, regular visits to your therapist’s office will end. The therapist will continue to be a resource, but you will be in charge of doing your exercises as part of an ongoing home program.

Shoulder Arthroscopy

A Patient’s Guide to Shoulder Arthroscopy

Introduction

Shoulder Arthroscopy

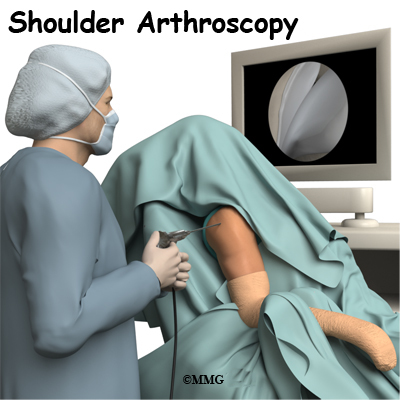
The use of arthroscopy (arthro means joint and scopy means look) has revolutionized many different types of orthopedic surgery. During a shoulder arthroscopy, a small video camera attached to a fiber-optic lens is inserted into the shoulder joint to allow a surgeon to see without making a large incision. Today the shoulder is one of the joints in which the arthroscope is commonly used to both diagnose problems and to perform surgical procedures inside the joint.

This guide will help you understand

  • how the condition develops
  • how doctors diagnose the condition
  • what treatment options are available

Anatomy


Shoulder Arthroscopy

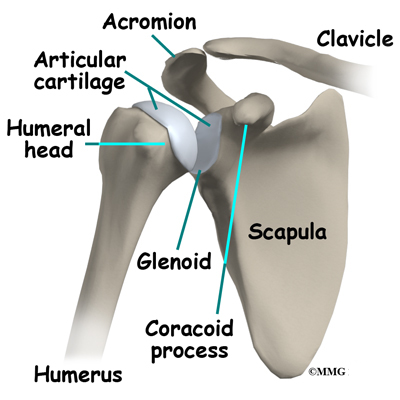
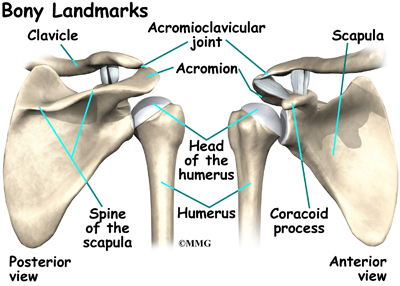
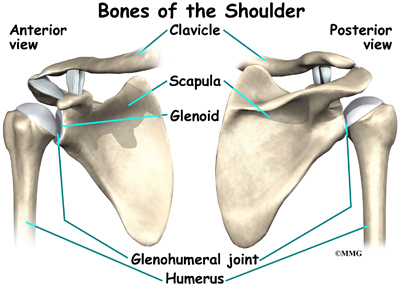
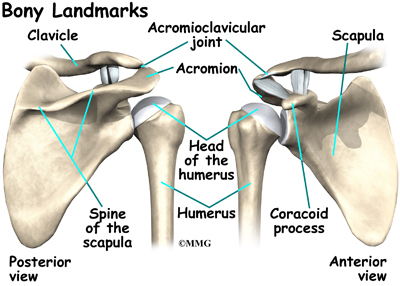
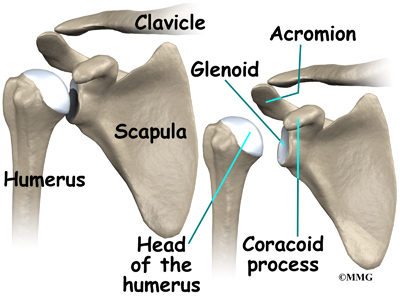
The shoulder is made up of three bones: the scapula (shoulder blade), the humerus (upper arm bone), and the clavicle (collarbone). A part of the scapula, called the glenoid, forms the socket of the shoulder. The glenoid is very shallow and flat, shaped somewhat like a dinner plate rather than a bowl. The humeral head forms the ball portion of the joint. Both the glenoid and the humeral head are covered with articular cartilage. Articular cartilage is the smooth, white material that covers the ends of bones in most joints. Articular cartilage provides a slick, rubbery surface that allows the bones to glide over each other as they move. Articular cartilage also functions as a shock absorber.


Shoulder Arthroscopy

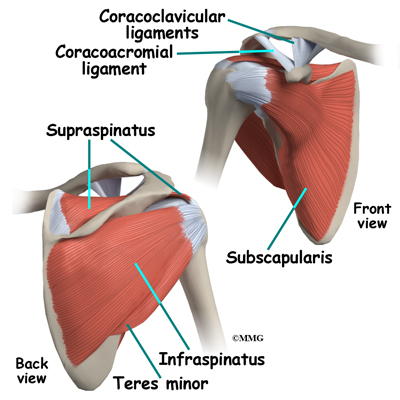
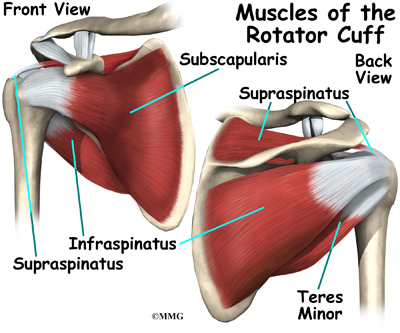
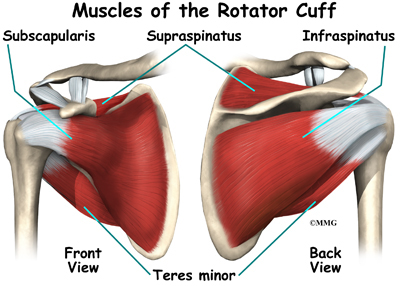
The rotator cuff connects the humerus to the scapula. The rotator cuff is formed by the tendons of four muscles: the supraspinatus, infraspinatus, teres minor, and subscapularis. Tendons attach muscles to bones. Muscles move the bones by pulling on the tendons. The rotator cuff helps raise and rotate the arm. As the arm is raised, the rotator cuff also keeps the humerus tightly in the shoulder socket, the glenoid. The upper part of the scapula that makes up the roof of the shoulder is called the acromion.


Shoulder Arthroscopy

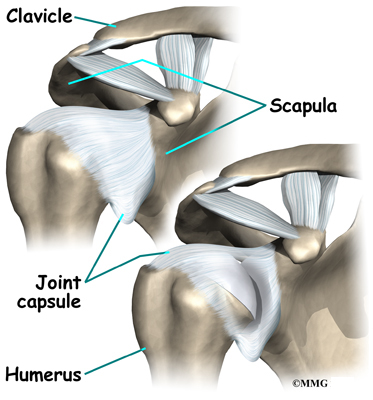
The shoulder joint is surrounded by a water tight pocket called the joint capsule. This capsule is formed by the rotator cuff tendons, ligaments, connective tissue and synovial tissue. When the joint capsule is filled with sterile saline and is distended, the surgeon can insert the arthroscope into the pocket that is formed, turn on the lights and the camera and see inside the shoulder joint as if looking into an aquarium. The surgeon can see nearly everything that is inside the shoulder joint including: (1) the joint surfaces of the glenoid socket and the humeral head (2) the rotator cuff tendons, (3) the glenoid labrum and (4) the synovial lining of the joint.

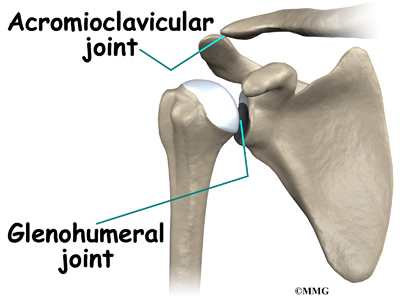
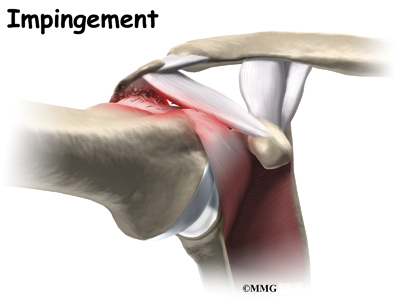
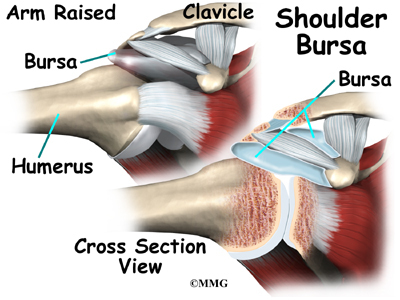
The arthroscope can also be placed in the space outside the shoulder joint known as the subacromial bursa. This bursa is a water tight pocket that sits above the shoulder joint. By placing the arthroscope into this space, the surgeon can see the underside of the distal end of the clavicle (collarbone) and the acromion as well as the joint that is formed where the clavicle and acromion meet, the acromioclavicular (AC) joint.

Related Document: A Patient’s Guide to Shoulder Anatomy

Rationale

What does my surgeon hope to accomplish??

When shoulder arthroscopy first became widely available, it was used primarily to look inside the shoulder joint and make a diagnosis. Today, shoulder arthroscopy is used in performing a wide range of different types of surgical procedures on the shoulder joint including confirming a diagnosis, removing loose bodies, removing or repairing a torn labrum, reconstructing torn ligaments to prevent recurrent dislocation, repairing torn rotator cuff tendons and washing out debris from a shoulder that has become infected. Surgery can also be performed outside the joint in the subacromial bursa including removing bone spurs from the acromion and reconstructing an arthritic acromioclavicular joint.

Your surgeon’s goal is to fix or improve your problem by performing a suitable surgical procedure; the arthroscope is a tool that improves the surgeons ability to perform that procedure. The arthroscope image is magnified and allows the surgeon to see better and clearer. The arthroscope allows the surgeon to see and perform surgery using much smaller incisions. This results in less tissue damage to normal tissue and can shorten the healing process. But remember, the arthroscope is only a tool. The results that you can expect from a shoulder arthroscopy depend on what is wrong with your shoulder, what can be done inside your shoulder to improve the problem and your effort at rehabilitation after the surgery.

Preparations

What do I need to know before surgery?

You and your surgeon should make the decision to proceed with surgery together. You need to understand as much about the procedure as possible. If you have concerns or questions, be sure and talk to your surgeon.

Once you decide on surgery, you need to take several steps. Your surgeon may suggest a complete physical examination by your regular doctor. This exam helps ensure that you are in the best possible condition to undergo the operation.

You may also need to spend time with the physical therapist who will be managing your rehabilitation after surgery. This allows you to get a head start on your recovery. One purpose of this preoperative visit is to record a baseline of information. The therapist will check your current pain levels, ability to do your activities, and the movement and strength of each shoulder.

A second purpose of the preoperative visit is to prepare you for surgery. The therapist will teach you the exercises you’ll use during your recovery.

On the day of your surgery, you will probably be admitted for surgery early in the morning. You shouldn’t eat or drink anything after midnight the night before.

Surgical Procedure

What happens during shoulder arthroscopy?

Before surgery you will be placed under either general anesthesia or a type of regional anesthesia. In simple cases, local anesthesia may be adequate. Sterile drapes are placed to create a sterile environment for the surgeon to work. There is a great deal of equipment that surrounds the operating table including the TV screens, cameras, light sources and surgical instruments.


Shoulder Arthroscopy

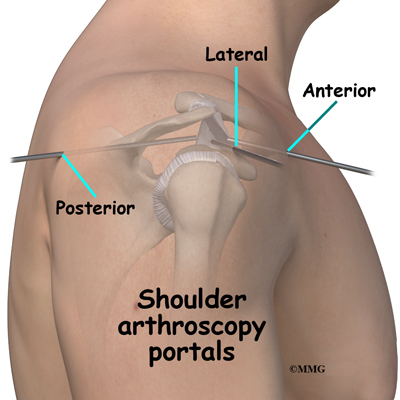
The surgeon begins the operation by making two or three small openings into the shoulder, called portals. These portals are where the arthroscope and surgical instruments are placed inside the shoulder joint. Care is taken to protect the nearby nerves and blood vessels. A small metal or plastic tube (or cannula) will be placed through one of the portals to inflate the shoulder joint with sterile saline.

The arthroscope is a small fiber-optic tube that is used to see and operate inside the joint. The arthroscope is a small metal tube about 1/4 inch in diameter (slightly smaller than a pencil) and about seven inches in length. The fiber-optics inside the metal tube of the arthroscope allows a bright light and TV camera to be connected to the outer end of the arthroscope. The light shines through the fiber-optic tube and into the shoulder joint. A TV camera is attached to the lens on the outer end of the arthroscope.

The TV camera projects the image from inside the shoulder joint on a TV screen next to the surgeon. The surgeon actually watches the TV screen (not the shoulder) while moving the arthroscope to different places inside the shoulder joint.

Over the years since the invention of the arthroscope, many very specialized instruments have been developed to perform different types of surgery using the arthroscope to see what is going on while the instruments are being used. Today, many surgical procedures that once required large incisions for the surgeon to see and fix the problem can be one with much smaller incisions. For example, simple removal of a torn labrum or loose body can be done using two or three small 1/4 inch incisions. More extensive surgical procedures such as ligament reconstruction or rotator cuff repair may require larger incisions.

Once the surgical procedure is complete, the arthroscopic portals and surgical incisions will be closed with sutures or surgical staples. A bandage will be applied to the shoulder. Once the bandage has been placed, you will be taken to the recovery room.

Complications

What might go wrong?

As with all major surgical procedures, complications can occur during shoulder arthroscopy. This document doesn’t provide a complete list of the possible complications, but it does highlight some of the most common problems. Some of the most common complications following shoulder arthroscopy are

  • anesthesia complications
  • thrombophlebitis
  • infection
  • equipment failure
  • slow recovery

Anesthesia Complications

Most surgical procedures require that some type of anesthesia be done before surgery. A very small number of patients have problems with anesthesia. These problems can be reactions to the drugs used, problems related to other medical complications, and problems due to the anesthesia. Be sure to discuss the risks and your concerns with your anesthesiologist.

Thrombophlebitis (Blood Clots)

Thrombophlebitis, sometimes called deep venous thrombosis (DVT), can occur after any operation, but is more likely to occur following surgery on the hip, pelvis, or knee. DVT occurs when blood clots form in the large veins of the leg. This may cause the leg to swell and become warm to the touch and painful. If the blood clots in the veins break apart, they can travel to the lung, where they lodge in the capillaries and cut off the blood supply to a portion of the lung. This is called a pulmonary embolism. (Pulmonary means lung, and embolism refers to a fragment of something traveling through the vascular system.) Most surgeons take preventing DVT very seriously. There are many ways to reduce the risk of DVT, but probably the most effective is getting you moving as soon as possible after surgery. Two other commonly used preventative measures include

Animation of DVT…View animation

  • pressure stockings to keep the blood in the legs moving
  • medications that thin the blood and prevent blood clots from forming

Infection

Following shoulder arthroscopy, it is possible that a postoperative infection may occur. This is very uncommon and happens in less than 1% of cases. You may experience increased pain, swelling, fever and redness, or drainage from the incisions. You should alert your surgeon if you think you are developing an infection.

Infections are of two types: superficial or deep. A superficial infection may occur in the skin around the incisions or portals. A superficial infection does not extend into the joint and can usually be treated with antibiotics alone. If the shoulder joint itself becomes infected, this is a serious complication and will require antibiotics and possibly another surgical procedure to drain the infection.

Equipment Failure

Many of the instruments used by the surgeon to perform shoulder arthroscopy are small and fragile. These instruments can be broken resulting in a piece of the instrument floating inside of the shoulder joint. The broken piece is usually easily located and removed, but this may cause the operation to last longer than planned. There is usually no damage to the shoulder joint due to the breakage.

Different types of surgical devices (screws, pins, and suture anchors) are used to hold tissue in place during and after arthroscopy. These devices can cause problems. If one breaks, the free-floating piece may hurt other parts inside the shoulder joint, particularly the articular cartilage. The end of the tissue anchor may poke too far through tissue and the point may rub and irritate nearby tissues. A second surgery may be needed to remove the device or fix problems with these devices.

Slow Recovery

Not everyone gets quickly back to routine activities after shoulder arthroscopy. Because the arthroscope allows surgeons to use smaller incisions than in the past, many patients mistakenly believe that less surgery was necessary. This is not always true. The arthroscope allows surgeons to do a great deal of reconstructive surgery inside the shoulder without making large incisions. How fast you recover from shoulder arthroscopy depends on what type of surgery was done inside your shoulder.

Simple problems that require simple procedures using the arthroscope generally get better faster. Patients with extensive damage to the shoulder ligaments, rotator cuff tendons, or articular cartilage tend to require more complex and extensive surgical procedures. These more extensive reconstructions take longer to heal and have a slower recovery. You should discuss this with your surgeon and make sure that you have realistic expectations of what to expect following arthroscopic shoulder surgery.

After Surgery

What happens after surgery?

Shoulder arthroscopy is usually done on an outpatient basis meaning that patients go home the same day as the surgery. More complex reconstructions that require larger incisions and surgery that alters bone may require a short stay in the hospital to control pain more aggressively and monitor the situation more carefully. You may also begin physical therapy while in the hospital.

The portals are covered with surgical strips, the larger incisions may have been repaired with either surgical staples or sutures and may be covered with a bandage.

Patients who have had more complex reconstructive surgery may need to wear a sling or shoulder immobilizer for several weeks. The shoulder immobilizer helps to protect the healing tissue inside the shoulder joint. You may be allowed to remove the brace at times during the day to do gentle range-of-motion exercises and bathe.

Rehabilitation

What will my recovery be like?

Your rehabilitation will depend on the type of surgery required. You may not need formal physical therapy after simple procedures. Some patients may simply do exercises as part of a home program after some simple instructions. But, many surgeons have patients take part in formal physical therapy after any type of shoulder arthroscopy procedure. Generally speaking, the more complex the surgery the more involved and prolonged your rehabilitation program will be. The first few physical therapy treatments are designed to help control the pain and swelling from the surgery.

Today, the arthroscope is used to perform quite complicated major reconstructive surgery using very small incisions. Remember, just because you have small incisions on the outside, there may be a great deal of healing tissue on the inside of the shoulder joint. If you have had major reconstructive surgery, you should expect full recovery to take several months. Your physical therapist’s goal is to help you keep your pain under control and improve the range of motion and strength of your shoulder. When you are well under way, regular visits to your therapist’s office will end. Your therapist will continue to be a resource, but you will be in charge of doing your exercises as part of an ongoing home program.

Labral Tears of the Hip

A Patient’s Guide to Labral Tears of the Hip

Introduction


Labral Tears of the Hip

Acetabular labrum tears (labral tears) can cause pain, stiffness, and other disabling symptoms of the hip joint. The pain can occur if the labrum is torn, frayed, or damaged. Active adults between the ages of 20 and 40 are affected most often, requiring some type of treatment in order to stay active and functional. New information from ongoing studies is changing the way this condition is treated from a surgical approach to a more conservative (nonoperative) path.

This guide will help you understand

  • what parts of the hip are involved
  • how the condition develops
  • how doctors diagnose the condition
  • what treatment options are available

Anatomy

What parts of the hip are involved?

The acetabular labrum is a fibrous rim of cartilage around the hip socket that is important in normal function of the hip. It helps keep the head of the femur (thigh bone) inside the acetabulum (hip socket). It provides stability to the joint.

Our understanding of the acetabular labrum has expanded just in the last 10 years. The availability of high-power photography and improved lab techniques have made it possible to take a closer look at the structure of this area of the hip.


Labral Tears of the Hip

The labrum is a piece of connective tissue around the rim of the hip socket (acetabulum). It has two sides: one side is in contact with the head of the femur, the other side touches and interconnects with the joint capsule. The capsule is made up of strong ligaments that surround the hip and help hold it in place while still allowing it to move in many directions,


Labral Tears of the Hip

Finding out that there are two separate zones of the labrum was an important discovery. The extra-articular side (next to the joint capsule) has a good blood supply but the intra-articular zone (next to the joint) is mostly avascular (without blood). That means any damage to the extra-articular side is more likely to heal while the intra-articular side (with a very poor blood supply) does not heal well after injury or surgical repair.

The labrum helps seal the hip joint, thus maintaining fluid pressure inside the joint and providing the overall joint cartilage with nutrition. Without an intact seal, the risk of early degenerative arthritis increases. A damaged labrum can also result in a shift of the hip center of rotation. A change of this type increases the impact and load on the joint. Without the protection of the seal or with a hip that’s off-center, repetitive motion can create multiple small injuries to the labrum and to the hip joint. Over time, these small injuries can add to wear and tear in the hip joint.

Causes

How does this condition develop?

It was once believed that a single injury was the main reason labral tears occurred (running, twisting, slipping). But with improved radiographic imaging and anatomy studies, it’s clear now that abnormal shape and structure of the acetabulum, labrum, and/or femoral head can also lead to the problem.

Injury is still a major cause for labral tears. Anatomical changes that contribute to labral tears combined with repetitive small injuries lead to a gradual onset of the problem. Athletic activities that require repetitive pivoting motions or repeated hip flexion cause these type of small injuries.

What are these “anatomical changes”? The most common one called femoral acetabular impingement (FAI) is a major cause of hip labral tears. With FAI, there is decreased joint clearance between the junction of the femoral head and neck with the acetabular rim.

Related Document: Femoroacetabular Impingement of the Hip


Labral Tears of the Hip

When the leg bends, internally rotates, and moves toward the body, the bone of the femoral neck butts up against the acetabular rim pinching the labrum between the femoral neck and the acetabular rim. Over time, this pinching, or impingement, of the labrum causes fraying and tearing of the edges. A complete rupture is referred to as an avulsion where the labrum is separated from the edge of the acetabulum where it normally attaches.


Labral Tears of the Hip

Changes in normal hip movement combined with muscle weakness around the hip can lead to acetabular labrum tears. Other causes include capsular laxity (loose ligaments), hip dysplasia (shallow hip socket), traction injuries, and degenerative (arthritic) changes associated with aging. Anyone who has had a childhood hip disease (such as Legg-Calvé-Perthes disease, hip dysplasia, slipped capital femoral epiphysis) is also at increased risk for labral tears.

Related Document: Perthes Disease

Related Document: Developmental Dysplasia of the Hip in Children

Related Document: Slipped Capital Femoral Epiphysis

Symptoms

What does this condition feel like?

Pain in the front of the hip (most often in the groin area) accompanied by clicking, locking, or catching of the hip are the main symptoms reported with hip acetabular labral tears. Joint stiffness and a feeling of instability where the hip and leg seem to give away are also common. The pain may radiate (travel) to the buttocks, along the side of the hip, or even down to the knee.


Labral Tears of the Hip

Symptoms get worse with long periods of standing, sitting, or walking. Pivoting on the involved leg is avoided for the same reason (causes pain). Some patients walk with a limp or have a positive Trendelenburg sign (hip drops down on the right side when standing on the left leg and vice versa).

The pain can be constant and severe enough to limit all recreational activities and sports participation.

Diagnosis

How will my doctor diagnose this condition?

The history and physical examination are the first tools the physician uses to diagnose hip labral tears. There may or may not be a history of known trauma linked with the hip pain. When there are anatomic and structural causes or muscle imbalances contributing to the development of labral tears, symptoms may develop gradually over time.

Your doctor will perform several tests. One common test is the impingement sign. This test is done by bending the hip to 90 degrees (flexion), turning the hip inward internal rotation) and bringing the thigh towards the other hip (adduction).

Making the diagnosis isn’t always easy. In fact, this problem is frequently misdiagnosed at first. That’s because there are many possible causes of hip pain. The pain associated with labral tears can be hard to pinpoint. Your doctor must rely on additional tests to locate the exact cause of the pain. For example, injecting a local anesthetic agent (lidocaine) into the joint itself can help determine if the pain is coming from inside (versus outside) the joint.

X-rays provide a visual picture of any changes out of the ordinary of the entire structure and location of the hip position. Magnetic resonance imaging (MRI) gives a clearer picture of the soft tissues (e.g., labrum, cartilage, tendons, muscles).

One other test called a magnetic resonance arthrography (MRA) is now considered the gold standard for diagnosis. Studies show that MRA is highly sensitive and specific for labral tears. This test may replace arthroscopic examination as the main diagnostic tool. Arthroscopic examination is still 100 per cent accurate but requires a surgical procedure.

With MRAs, contrast dye (gadolinium) is injected into the hip joint. Any irregularity in the joint surface will show up when the dye seeps into areas where damage has occurred. MRAs give the surgeon an excellent view of the location and extent of the tear as well as any bony abnormalities that will have to be addressed during surgery.

Treatment

What treatment options are available?

In the past, when arthroscopic surgery was the only way to confirm the presence of a labral tear, the surgeon would just go ahead and remove the torn edges or pieces during the arthroscopic examination procedure. However, studies over the years have called this approach into question. With removal of the labrum, changes in the way the hip functioned, increased friction of the joint, and increased load on the joint led to degenerative changes and osteoarthritis.

Surgeons stopped cutting out the torn labrum and started repairing it instead. Physical therapists started doing studies that showed strengthening muscles and resolving issues of muscle imbalances could reduce the need for surgery with the traditional risks (e.g., bleeding, infection, poor wound healing, negative reactions to anesthesia).

More efforts are being made now to manage labral tears with conservative (nonoperative) care. This is a possibility most often when there are no symptoms of labral pathology. Patients with confirmed labral tears but who have normal hip anatomy or only mild changes in the shape and structure of the hip may also benefit from conservative care.

Nonsurgical Treatment

Physical therapy will probably be suggested. Your physical therapist will carry out an examination of joint motion; hip, trunk, and knee muscle strength; posture; alignment; and gait/movement analysis (looking at walking/movement patterns). A plan of care is designed for each patient based on his or her individual factors and characteristics.

Nonoperative care starts with activity modification. You should avoid pivoting on the involved leg and avoid prolonged periods of weight-bearing activities. You physical therapist will work with you to on strengthen your hip muscles, restore normal neuromuscular control, and improve your posture. All of these things can improve your hip function and reduce your pain.

Tight muscles around the hip can contribute to pinching between the femoral head and acetabulum in certain positions. A program of flexibility and stretching exercises won’t change the bony abnormalities present but can help lengthen the muscles and reduce contact and subsequent impingement.


Labral Tears of the Hip

A special strap called the SERF strap (SERF means Stability through External Rotation of the Femur) made of thin elastic may be applied around the thigh, knee, and lower leg to pull the hip into external rotation. The idea is to use the strap to improve hip control and leg movement during dynamic activities. It is important to strengthen the muscles at the same time to perform the same task and avoid depending on external support on a long-term basis.

Some patients may also benefit from intra-articular injection with cortisone. Cortisone is a very potent antiinflammatory medication. Injection into the hip joint may reduce the symptoms of pain for several weeks to months.

Surgery

Arthroscopy is commonly used to repair the torn labrum. The arthroscope is a small fiber-optic tube that is used to see and operate inside the joint. A TV camera is attached to the lens on the outer end of the arthroscope. The TV camera projects the image from inside the hip joint on a TV screen next to the surgeon. The surgeon actually watches the TV screen (not the hip) while moving the arthroscope to different places inside the hip joint and bursa.


Labral Tears of the Hip

During this procedure, your surgeon will trim the torn and frayed tissue around the acetabular rim and reattach the torn labrum to the bone of the acetabular rim. This procedure is called labral refixation. Each layer of tissue is sewn back together and reattached as closely as possible to its original position along the acetabular rim.


Labral Tears of the Hip

When repair is not possible, then debridement of the torn labral tissue may be necessary. Debridement simply means that the torn or weakened portions of the labrum are simply removed. This prevents the torn fragments from getting caught in the hip joint and causing pain and further damage to the hip joint.

In some cases, open treatment of femoroacetabular impingement and/or correction of bone abnormalities are required. These procedures are much more involved and usually will require a stay of several days in the hospital.

Related Document: A Patient’s Guide to Femoroacetabular Impingement

Rehabilitation

What should I expect after treatment?

Nonsurgical Rehabilitation

The goal of conservative management is to relieve pain and improve function by correcting muscle strength imbalances. When both legs have nearly equal strength, it is possible to resume a full and normal level of all activities as long as there is no pain during any of those movements or activities.

For the young or active adult, this includes activities of daily living as well as recreational and sports participation. Older adults experiencing labral tears from degenerative arthritis may expect to be able to resume normal daily functions, but may still find it necessary to limit prolonged sitting or standing positions.

After Surgery

Correction of the problem causing labral tears can result in improved function and pain relief. The hope is that early treatment can prevent arthritic changes but long-term studies have not been done to proven this idea.

Recovery after surgery needed to address hip labral tears usually takes four to six months. In other words, patients can expect to resume normal activities six months after surgery. Many athletes or highly active adults find this time frame much too long for their goals and preferences.

Patients who follow the recommended rehab plan of care respond well to progression of the exercises and seem to recover faster. Discharge from rehab takes place when the patient can perform all exercises with good form and without pain or other symptoms. Any repeat episodes of groin and/or hip pain must be reported to the orthopedic surgeon for evaluation right away.

Categories Hip

Femoroacetabular Impingement

A Patient’s Guide to Femoroacetabular Impingement of the Hip

Introduction

Femoroacetabular Impingement of the Hip

Femoroacetabular impingement (FAI) occurs in the hip joint. Impingement refers to some portion of the soft tissue around the hip socket getting pinched or compressed. Femoroacetabular tells us the impingement is occurring where the femur (thigh bone) meets the acetabulum (hip socket). There are several different types of impingement. They differ slightly depending on what gets pinched and where the impingement occurs.

This guide will help you understand

    • what parts of the hip are involved
    • how the problem develops
    • how doctors diagnose the condition
    • what treatment options are available

Anatomy

What part of the body is affected?

Femoroacetabular Impingement of the Hip

Femoroacetabular refers to the place in the hip where the round head of the femur (thigh bone) comes in contact with the acetabulum or hip socket. Two types of impingement are known to cause pinching of the soft tissues in this area.

Femoroacetabular Impingement of the Hip

The first is called cam-type impingement. This occurs when the round head of the femur isn’t as round as it should be. It’s more of a pistol grip shape. It’s even referred to as a pistol grip deformity. The femoral head isn’t round enough on one side (and it’s too round on the other side) to move properly inside the socket.

The result is a shearing force on the labrum and the articular cartilage, which is located next to the labrum. The labrum is a dense ring of fibrocartilage firmly attached around the acetabulum (socket). It provides depth and stability to the hip socket. The articular cartilage is the protective covering over the hip joint surface.

Sometimes cam-type impingement occurs as a result of some other hip problem (e.g., Legg-Calvé-Perthes disease, slipped capital femoral epiphysis or SCFE). But most of the time, it occurs by itself and is the main problem. Men are affected by cam-type impingement more often than women.

Femoroacetabular Impingement of the Hip

The second type of impingement is called pincer-type (more common in women). In this type, the socket covers too much of the femoral head. As the hip moves, the labrum comes in contact with the femoral neck just below the femoral head.

Pincer-type impingement is usually caused by some other problem. It could be as a result of 1) hip dysplasia, 2) a complication after osteotomy surgery to correct hip dysplasia, or 3) an abnormal position of the acetabulum called retroversion. Hip dysplasia is a deformity of the hip (either of the femoral head or the acetabulum, or both) that can lead to hip dislocation.

Related Document: Developmental Dysplasia of the Hip in Children

Related Document: Perthes Disease

Related Document: Slipped Capital Femoral Epiphysis

Causes

What causes this problem?

The cause of the problem has been under considerable debate for a long time. Now with better imaging studies, we know that some subtle changes in the shape of the femoral head may be the cause of FAI. Other anatomical changes in the angle of the hip may also contribute to this problem.

The basic problem is that the head of the femur butts up against the cartilage rim around the acetabulum and pinches it. An alternate type of femoral acetabular impingement causes abnormal jamming of the head-neck junction.

Femoroacetabular Impingement of the Hip

Normally, the femoral head moves smoothly inside the hip socket. The socket is just the right size to hold the head in place. If the acetabulum is too shallow or too small, the hip can dislocate. In the case of FAI, the socket may be too deep.

The rim of the cartilage hangs too far over the head. When the femur flexes (bends) and internally rotates, the cartilage gets pinched. Over time, this pinching or impingement of the labrum can cause fraying and tearing of the edges and/or osteoarthritic changes at the impingement site.

At the same time, with changes in the shape and structure of the hip, there are changes in normal hip movement. There may be too much hip adduction and internal rotation. Hip adduction refers to movement of the leg toward the body. Muscle weakness of the hip abductor muscles, hip extensors, and hip external rotators add to the problem. Hip abduction is moving the leg away from the body.

With the combined effects of anatomic changes in the hip and the resultant muscle imbalances, repetitive motions can create mini-traumas to the hip joint. The result can be an additional problem: partial or complete labral tears. A complete rupture is referred to as an avulsion where the labrum is separated from the acetabular cartilage where it normally attaches.

Symptoms

What does this condition feel like?

The first noticeable symptom of femoroacetabular impingement is often deep groin pain with activities that stress hip motion. Prolonged walking is especially difficult. Although the condition is often present on both sides, the symptoms are usually only felt on one side. In some cases, the groin pain doesn’t start until the person has been sitting and starts to stand up. There is often a slight limp because of pain and limited motion.

Groin pain associated with femoroacetabular impingement can be accompanied by clicking, locking, or catching when chronic impingement has resulted in a labral tear.

When femoroacetabular impingement and a labral tear are both present, symptoms get worse with long periods of standing, sitting, or walking. Pivoting on the involved leg is also reproduces the pain. Some patients have a positive Trendelenburg sign (hip drops down on the right side when standing on the left leg and vice versa).

Femoroacetabular Impingement of the Hip

As is often the case, one problem can lead to others. With femoroacetabular impingement, hip bursitis can develop. The gluteal (buttock) muscles may be extra tender or sore from trying to compensate and correct the problem. The pain can be constant and severe enough to limit all recreational activities and sports participation.

Related Document: Labral Tears of the Hip

Diagnosis

How do doctors diagnose the problem?

The diagnosis begins with a patient interview and history. Then the orthopedic surgeon performs a physical exam. The physician looks at pelvic and hip motion and palpates muscles and tendons for areas of tenderness.

Several tests can be done to identify what’s going on. The patient lies on the table on his or her back. The examiner bends the leg up, internally rotates the hip, and presses the knee toward the other leg. This position puts the hip in such a position that impingement occurs and reproduces the painful symptoms.

The clinical exam is followed up by imaging studies including X-rays, MRIs, and CT scans. X-rays show the presence of any extra bone build up as well as the position and alignment of the bones and joint. X-rays show the shape of the femoral head.

Any asymmetries (i.e., where the head is no longer an even round shape) are visible on X-rays. The radiologist and orthopedic surgeon reviewing the radiographs also look for three signs as an indication that there is retroversion: the crossover sign, the posterior wall sign, and the ischial sign.

MRIs can show any damage to the labrum but not necessarily any changes to the surface of the hip joint. The presence of edema (swelling) under the bone may show up and requires further evaluation to decide if it is from femoroacetabular impingement or some other cause (e.g., cyst, tumor, stress fracture). Using MRI with a dye injected into the joint (called magnetic resonance arthrography or MRA) provides greater detail of the joint surface and may be needed.

CT scans help show the exact shape of the bone and reveal any abnormalities in the bone structure. CT scans might be the most helpful when arthroscopic surgery is planned. It gives the surgeon a better idea of what needs to be done to reshape the bone. If the procedure is going to be done with an open incision, then the CT scan isn’t necessary. The surgeon will see everything once the area is opened up.

Treatment

What can be done for this condition?

Once all the test results are available, a course of action is determined. This may be conservative (nonoperative) care with antiinflammatories and physical therapy. In some cases, surgery is recommended right away. Early diagnosis and surgical correction may be able to restore normal hip motion. Delaying surgery is possible for other patients but the long-term effect(s) of putting surgery off have not been determined.

Nonsurgical Treatment

A physical therapist will carry out an examination of joint motion; hip, trunk, and knee muscle strength; posture; alignment; and gait/movement analysis (looking at walking/movement patterns). A plan of care is designed for each patient based on his or her individual factors and characteristics.

Nonoperative care starts with activity modification (e.g., avoiding pivoting on the involved leg when there is a labral tear, avoiding prolonged periods of inactivity or activity). This part of the program must be followed for at least six months (often longer).

Improving biomechanical function of the hip involves strengthening appropriate muscles, restoring normal neuromuscular control, and addressing any postural issues. Tight muscles around the hip can contribute to pinching between the femoral head and acetabulum in certain positions. A program of flexibility and stretching exercises won’t change the bony abnormalities present but can help lengthen the muscles and reduce contact and subsequent impingement.

Some patients may also benefit from intra-articular injection with a numbing agent combined with an antiinflammatory (steroid) medication. Anyone needing surgery will also benefit from physical therapy first to address muscle imbalances resulting in abnormal movement patterns that lead to femoral acetabular impingement.

Surgery

Surgery is advised when there is persistent pain despite a good effort at conservative care and when there are obvious structural abnormalities of the hip. Once it has been decided that surgery is the way to go, the surgeon has three choices: 1) full open incision and correction of the problem, 2) arthroscopic surgery, and 3) osteotomy.

Femoroacetabular Impingement of the Hip

With the fully open surgical procedure, the head of the femur is dislocated from the socket to make the changes and corrections and reshape it. With arthroscopic surgery, dislocation is not required. Osteotomy (reshaping the socket) is done for pincer-type impingement.

Whenever possible, the surgeon tries to save the hip. But when there is extensive damage to the cartilage, hip resurfacing or total joint replacement may be needed. There are many factors to consider when making this decision. The patient’s age, findings on imaging studies, type and severity of deformity, and the presence of arthritic changes are important.

Femoroacetabular Impingement of the Hip

If there is a labral tear, surgery is usually done arthroscopically to repair (whenever possible) the damage. The surgeon trims the acetabular rim and then reattaches the torn labrum. This procedure is called labral refixation.

Each layer of tissue is sewn back together and reattached as closely as possible to its original position (called the footprint) along the acetabular rim. When repair is not possible, then debridement (shaving or removing) the torn tissue or pieces of tissue may be necessary.

Rehabilitation

What should I expect after treatment?

Nonsurgical Rehabilitation

The goal of conservative management is to relieve pain and improve function by correcting muscle strength imbalances. When both legs have nearly equal strength, it is possible to resume a full and normal level of all activities (so long as there is no pain during any of those movements or activities).

For the young or active adult, this includes activities of daily living as well as recreational and sports participation. Older adults experiencing labral tears associated with the impingement problem may expect to be able to resume normal daily functions but may still find it necessary to limit prolonged sitting or standing positions.

After Surgery

Correction of the problem can result in improved function and pain relief. The hope is that early treatment can prevent arthritic changes but long-term studies have not been done to proven this idea.

After surgery, patients will be restricted to a partial weight-bearing status. The exact recommendations will depend on the amount of bone removed and whether or not the labrum was torn and repaired. Activity restriction is important for the first few weeks after surgery in order to avoid fatiguing or overloading the hip muscles.

Stationary bike exercises are allowed early on so long as the bike seat is kept high enough to avoid pinching at the hip during the flexion portion of the pedal cycle. Athletes and sports participants will be guided back to full participation by the physical therapist, usually five to six months after rehab. Many patients report continued improvements in their symptoms even up to the end of the first year after surgery.

Categories Hip

Hip Arthroscopy

A Patient’s Guide to Hip Arthroscopy

Introduction

A hip arthroscopy is a procedure where a small video camera attached to a fiberoptic lens is inserted into the hip joint to allow a surgeon to see without making a large incision. Arthroscopy is now used to evaluate and treat orthopedic problems in many different joints of the body. While not as common as arthroscopy of the knee and shoulder, hip arthroscopy is used to evaluate and treat certain problems affecting the hip joint and the space outside the hip joint known as the greater trochanteric bursa.

This guide will help you understand

  • what parts of the hip are treated during hip arthroscopy
  • what types of conditions are treated with hip arthroscopy
  • what to expect before and after hip arthroscopy

Anatomy

What parts of the hip are involved?

Hip Arthroscopy

The hip joint is one of the true ball-and-socket joints of the body. The hip socket is called the acetabulum and forms a deep cup that surrounds the ball of the upper thigh bone. The thigh bone itself is called the femur, and the ball on the end is the femoral head. The ball and socket arrangement gives the hip a large amount of motion needed for daily activities like walking, squatting, and stair-climbing.

Hip Arthroscopy

The surfaces of the femoral head and the inside of the acetabulum are covered with articular cartilage. This material is about one-quarter of an inch thick in most large joints. Articular cartilage is a tough, slick material that allows the surfaces to slide against one another without damage.

Hip Arthroscopy

The gluteus maximus is the largest of three gluteal muscles of the buttock. This muscle spans the side of the hip and joins the iliotibial band. The iliotibial band is a long tendon that passes over the bursa on the outside of the greater trochanter. It runs down the side of the thigh and attaches just below the outside edge of the knee. Two other buttock muscles attach to the greater trochanter, the gluteus medius and the gluteus minimus. These muscles are known as the abductors because they function to pull the lower leg away from the body – a motion that is called abduction. These muscles can be torn where they attach to the greater trochanter causing pain and and weakness as well as a snapping sensation.

Hip Arthroscopy

Where friction must occur between muscles, tendons, and bones, there is usually a bursa. A bursa is a thin sac of tissue that contains a bit of fluid to lubricate the area where the friction occurs. The bursa is a normal structure, and the body will even produce a bursa in response to friction. The bursa next to the greater trochanter is called the greater trochanteric bursa.

The hip joint is surrounded by a water-tight pocket called the joint capsule. This capsule is formed by ligaments, connective tissue and synovial tissue. When the joint capsule is filled with sterile saline and is distended, the surgeon can insert the arthroscope into the pocket that is formed, turn on the lights and the camera and see inside the hip joint as if looking into an aquarium. The surgeon can see nearly everything that is inside the hip joint including: (1) the joint surfaces of the femoral head and acetabulum (2) the acetabular labrum and (3) the synovial lining of the joint.

Hip Arthroscopy

The arthroscope can also be inserted into the space outside the hip joint – the greater trochanteric bursa. This allows the surgeon to see the attachment of the gluteus medius muscle and the inside of the bursa.

Related Document: A Patient’s Guide to Hip Anatomy

Rationale

What does my surgeon hope to accomplish?

When hip arthroscopy first became available it was used primarily to look inside the hip joint and make a diagnosis. Today, hip arthroscopy is used in performing a wide range of different types of surgical procedures on the hip joint including confirming a diagnosis, removing loose bodies, removing or repairing a torn labrum, debriding excess inflamed bursa tissue, repairing a tear in the gluteus medius tendon and fixing fractures of the joint surface.

Hip Arthroscopy

Your surgeon’s goal is to fix or improve your problem by performing a suitable surgical procedure; the arthroscope is a tool that improves the surgeons ability to perform that procedure. The arthroscope image is magnified and allows the surgeon to see better and clearer. The arthroscope allows the surgeon to see and perform surgery using much smaller incisions. This results in less tissue damage to normal tissue and can shorten the healing process. But remember, the arthroscope is only a tool. The results that you can expect from a hip arthroscopy depend on what is wrong with your hip, what can be done inside your hip to improve the problem and your effort at rehabilitation after the surgery.

Preparations

What do I need to know before surgery?

You and your surgeon should make the decision to proceed with surgery together. You need to understand as much about the procedure as possible. If you have concerns or questions, be sure and talk to your surgeon.

Once you decide on surgery, you need to take several steps. Your surgeon may suggest a complete physical examination by your regular doctor. This exam helps ensure that you are in the best possible condition to undergo the operation.

You may also need to spend time with the physical therapist who will be managing your rehabilitation after surgery. This allows you to get a head start on your recovery. One purpose of this preoperative visit is to record a baseline of information. The therapist will check your current pain levels, ability to do your activities, and the movement and strength of each hip.

A second purpose of the preoperative visit is to prepare you for surgery. The therapist will teach you how to walk safely using crutches or a walker. And you’ll begin learning some of the exercises you’ll use during your recovery.

On the day of your surgery, you will probably be admitted for surgery early in the morning. You shouldn’t eat or drink anything after midnight the night before.

Surgical Procedure

What happens during hip arthroscopy?

Before surgery you will be placed under either general anesthesia or a type of spinal anesthesia. A special operating room table called a traction table will be used.

Hip Arthroscopy

The hip joint is very tight with little space between the ball and the socket. By applying traction, the surgeon is able to increase this space and allow the arthroscope to be inserted into that space. The end of the arthroscope will be moved about in this space to look throughout the joint. Finally, sterile drapes are placed to create a sterile environment for the surgeon to work. There is a great deal of equipment that surrounds the operating table including the TV screens, cameras, light sources, and surgical instruments.

The surgeon begins the operation by making two or three small openings into the hip, called portals. These portals are where the arthroscope and surgical instruments are placed inside the hip. Care is taken to protect the nearby nerves and blood vessels. A small metal or plastic tube (or cannula) will be placed through one of the portals to inflate the hip with sterile saline.

Hip Arthroscopy

The arthroscope is a small fiber-optic tube that is used to see and operate inside the joint. The arthroscope is a small metal tube about 1/4 inch in diameter (slightly smaller than a pencil) and about seven inches in length. The fiberoptics inside the metal tube of the arthroscope allows a bright light and TV camera to be connected to the outer end of the arthroscope. The light shines through the fiberoptic tube and into the hip joint. A TV camera is attached to the lens on the outer end of the arthroscope. The TV camera projects the image from inside the hip joint on a TV screen next to the surgeon. The surgeon actually watches the TV screen (not the hip) while moving the arthroscope to different places inside the hip joint and bursa.

Over the years since the invention of the arthroscope, many very specialized instruments have been developed to perform different types of surgery using the arthroscope to see what is going on while the instruments are being used. Today, many surgical procedures that once required large incisions for the surgeon to see and fix the problem can be done with much smaller incisions. For example, simple removal of a torn labrum or loose body can be done using two or three small 1/4 inch incisions. More extensive surgical procedures may require larger incisions. Your surgeon may decide during the procedure that the problem requires a more traditional open type operation. If this has been discussed before the operation the surgery may be performed immediately; if not, the arthroscopic procedure will be concluded and a later operation planned. Your surgeon will discuss the details of what was found at the time of the arthroscopy and what more needs to be done in the later operation.

Once the surgical procedure is complete, the arthroscopic portals and surgical incisions will be closed with sutures or surgical staples. A large bandage will be applied to the hip. You may be placed in compression stockings; compressive stockings reduce swelling and help prevent blood clots in the leg. Once the bandage has been placed, you will be taken to the recovery room.

Complications

What might go wrong?

As with all major surgical procedures, complications can occur during hip arthroscopy. This document doesn’t provide a complete list of the possible complications, but it does highlight some of the most common problems. Some of the most common complications following hip arthroscopy are

  • anesthesia complications
  • thrombophlebitis
  • infection
  • equipment failure
  • slow recovery

Anesthesia Complications

Most surgical procedures require that some type of anesthesia be done before surgery. A very small number of patients have problems with anesthesia. These problems can be reactions to the drugs used, problems related to other medical complications, and problems due to the anesthesia. Be sure to discuss the risks and your concerns with your anesthesiologist.

Thrombophlebitis (Blood Clots)

Hip Arthroscopy

Thrombophlebitis, sometimes called deep venous thrombosis (DVT), can occur after any operation, but is more likely to occur following surgery on the hip, pelvis, or knee. DVT occurs when blood clots form in the large veins of the leg. This may cause the leg to swell and become warm to the touch and painful. If the blood clots in the veins break apart, they can travel to the lung, where they lodge in the capillaries and cut off the blood supply to a portion of the lung. This is called a pulmonary embolism. (Pulmonary means lung, and embolism refers to a fragment of something traveling through the vascular system.) Most surgeons take preventing DVT very seriously. There are many ways to reduce the risk of DVT, but probably the most effective is getting you moving as soon as possible after surgery. Two other commonly used preventative measures include

  • pressure stockings to keep the blood in the legs moving
  • medications that thin the blood and prevent blood clots from forming

Infection

Following hip arthroscopy, it is possible that a postoperative infection may occur. This is very uncommon and happens in less than 1% of cases. You may experience increased pain, swelling, fever and redness, or drainage from the incisions. You should alert your surgeon if you think you are developing an infection.

Infections are of two types: superficial or deep. A superficial infection may occur in the skin around the incisions or portals. A superficial infection does not extend into the joint and can usually be treated with antibiotics alone. If the hip joint itself becomes infected, this is a serious complication and will require antibiotics and possibly another surgical procedure to drain the infection.

Equipment Failure

Many of the instruments used by the surgeon to perform hip arthroscopy are small and fragile. These instruments can be broken resulting in a piece of the instrument floating inside of the joint. The broken piece is usually easily located and removed, but this may cause the operation to last longer than planned. There is usually no damage to the hip joint due to the breakage.

Hip Arthroscopy

Different types of surgical devices (screws, pins, and suture anchors) are used to hold tissue in place during and after arthroscopy. These devices can cause problems. If one breaks, the free-floating piece may hurt other parts inside the hip joint, particularly the articular cartilage. The end of the tissue anchor may poke too far through tissue and the point may rub and irritate nearby tissues. A second surgery may be needed to remove the device or fix problems with these devices.

Slow Recovery

Not everyone gets quickly back to routine activities after hip arthroscopy. Because the arthroscope allows surgeons to use smaller incisions than in the past, many patients mistakenly believe that less surgery was necessary. This is not always true. The arthroscpe allows surgeons to do a great deal of reconstructive surgery inside the hip without making large incisions. How fast you recover from hip arthroscopy depends on what type of surgery was done inside your hip. Simple problems that require simple procedures using the arthroscope generally get better faster. Patients with extensive damage to the hip articular cartilage tend to require more complex and extensive surgical procedures. These more extensive reconstructions take longer to heal and have a slower recovery. You should discuss this with your surgeon and make sure that you have realistic expectations of what to expect following arthroscopic hip surgery.

After Surgery

What happens after hip arthroscopy?

Hip arthroscopy is usually done on an outpatient basis meaning that patients go home the same day as the surgery. More complex reconstructions that require larger incisions and surgery that alters bone may require a short stay in the hospital to control pain more aggressively and monitor the situation carefully. You may also begin physical therapy while in the hospital.

The portals are covered with surgical strips, the larger incisions may have been repaired with either surgical staples or sutures. Crutches are commonly used after hip arthroscopy. They may only be needed for one to two days after a simple procedures.

Follow your surgeon’s instructions about how much weight to place on your foot while standing or walking. Avoid doing too much, too quickly. You may be instructed to use a cold pack on the hip and to keep your leg elevated and supported.

Rehabilitation

What will my recovery be like?

Your rehabilitation will depend on the type of surgery required. You may not need formal physical therapy after simple procedures such as a labral debridement. Some patients may simply do exercises as part of a home program after some simple instructions.

Many surgeons have patients take part in formal physical therapy after any type of hip arthroscopy procedure. Generally speaking, the more complex the surgery the more involved and prolonged your rehabilitation program will be. The first few physical therapy treatments are designed to help control the pain and swelling from the surgery. Physical therapists will also work with patients to make sure they are putting only a safe amount of weight on the affected leg.

Hip Arthroscopy

Today, the arthroscope is used to perform quite complicated major reconstructive surgery using very small incisions. Remember, just because you have small incisions on the outside, there may be a great deal of healing tissue on the inside of the hip joint. If you have had major reconstructive surgery, you should expect full recovery to take several months. The physical therapist’s goal is to help you keep your pain under control and improve the range of motion and strength of your hip. When you are well under way, regular visits to your therapist’s office will end. The therapist will continue to be a resource, but you will be in charge of doing your exercises as part of an ongoing home program.

Categories Hip

Nursemaid’s Elbow

A Patient’s Guide to Nursemaid’s Elbow

Introduction

Nursemaid's Elbow

Nursemaid’s elbow is a common injury in young children. It occurs most often around age two and rarely seen after age eight. Lifting the child up a step by the hand, giving the hand a sudden jerk, or pulling the child away from a dangerous situation can result in a subluxation or complete dislocation. This condition is also known as pulled elbow or radial head dislocation.

This guide will help you understand

  • how this problem develops
  • how doctors diagnose the condition
  • what treatment options are available

Anatomy

What part of the elbow does this problem affect?

Nursemaid's Elbow

The bones of the elbow are the humerus (the upper arm bone), the ulna (the larger bone of the forearm, on the opposite side of the thumb), and the radius (the smaller bone of the forearm on the same side as the thumb).

Nursemaid's Elbow

The elbow itself is essentially a hinge joint, meaning it bends and straightens like a hinge. But there is a second joint where the end of the radius (the radial head) meets the humerus. The knob on the end of the humerus is called the capitellum. The capitellum fits into the cup-shaped end of the radius, also called the head of the radius, or radial head. This joint is complicated because the radius has to rotate so that you can turn your hand palm up and palm down. At the same time, it has to slide against the end of the humerus as the elbow bends and straightens. The joint is even more complex because the radius has to slide against the ulna as it rotates the wrist as well.

In the elbow, two of the most important ligaments are the medial collateral ligament and the lateral collateral ligament. The medial collateral is on the inside edge of the elbow, and the lateral collateral is on the outside edge. Together these two ligaments connect the humerus to the ulna and keep it tightly in place as it slides through the groove at the end of the humerus. These ligaments are the main source of stability for the elbow. They can be torn when there is a severe injury or dislocation of the elbow. These ligaments are not generally injured in the condition referred to as nursemaid’s elbow.

Nursemaid's Elbow

There is also an important ligament called the annular ligament that wraps around the radial head and holds it tight against the ulna. The word annular means ring-shaped. The annular ligament forms a ring around the radial head as it holds it in place. This ligament can be torn when the entire elbow or just the radial head is dislocated.

Causes

How does this problem develop?

In young children, the annular ligament to the radial head is thin and weak. A sudden pull on the forearm can tear this soft tissue structure. The radial head is pulled down through the tear. The annular ligament slips into the radiohumeral joint and becomes trapped between the two joint surfaces when the arm is let go. This is a radial head subluxation. When the annular ligament is pinched it causes pain.

Nursemaid's Elbow

A sudden jerk on the arm is the main cause of nursemaid’s elbow dislocation in children. As mentioned, lifting the child up a step by the hand, giving the hand a sudden jerk, or pulling the child by the hand or forearm can result in an elbow injury of this type. Many times the child will simply present crying with pain and inability to move the elbow.

This is a common injury in children. It occurs most often around age two and is rarely seen after age eight. Lifting the child up a step by the hand, giving the hand a sudden jerk, or pulling the child away from a dangerous situation can result in the injury. If the child is not old enough to talk, it may be difficult to determine what happened. Playing with other children where one child swings the other around by the arms can result in the injury.

As a child gets older, a true elbow dislocation is often the result of trauma leading to fracture and dislocation. Elbow dislocation with bone fracture is common in children between the ages of three and 10. This is a much different and much more serious injury. The most common site of the fracture associated with dislocation in this age group is a supracondylar fracture. The fracture is located below the humeral shaft (upper arm bone) where the olecranon (tip of the ulnar bone of the forearm) fits into the humerus. The bone is thin here in children. The olecranon is the part of the elbow we feel as the tip of the elbow).

Symptoms

What does nursemaid’s elbow feel like?

These injuries commonly occur in children too young to actually tell a parent or health care provider what happened. In young children, crying and refusing to use the arm while holding it against the body are common behaviors associated with nursemaid’s elbow. Pediatricians, family physicians and orthopedic surgeons usually recognize the pattern quickly because the injury is so common. Once you have seen a child with this condition, it is relatively easy to spot.

Pain and an inability to straighten the elbow or supinate the forearm by turning the palm up is typical. There is often tenderness along the lateral aspect of the elbow (side of the elbow away from the body). Bruising around the elbow several days after the injury is common.

In contrast, if the elbow is fully dislocated, it will look out of joint. There may be dimples or indentations of the skin over the dislocation where the bones have shifted position. Swelling on either side of the elbow may be a sign that there is a bone fracture. Pain can be intense until the arm is relocated.

Diagnosis

How do doctors diagnose the problem?

The history and physical examination are probably the most important tools your physician uses to guide his or her diagnosis. Moving the elbow passively is painful, especially extension and supination. The doctor will check for any signs of injury to the nerves or blood vessels.

X-rays are consistently negative in children with elbow subluxation or dislocation due to the large amount of fibrous cartilage present around the elbow before the bones are fully formed. It is easy to misinterpret the irregular or fragmented growth lines as fractures. Additional views may be needed to help the radiologist make an accurate diagnosis. Before age five (when the bones start to ossify or become bony) a separation of the growth plate at the end of the bone may go undetected. Many health care providers will not order X-rays if they suspect nursemaid’s elbow and will simply try to reduce the subluxation with a gentle manipulation.

Treatment

What treatment options are available?

Nonsurgical Treatment

It is possible for the nursemaid’s elbow to relocate by itself.

Manual (closed) reduction can be done on site by a trained medical professional (e.g., at an athletic event or car accident) in an emergency. Closed reduction refers to the fact that the subluxation of the annular ligament and radial head are put back in place without surgery. Generally this procedure is done in a clinic or hospital setting.

The technique of reduction is relatively simple. Once the health care provider has decided that the situation is most likely a nursemaid’s elbow, the next step is to calm the child and establish trust. The elbow is gently taken through a complete range of motion from completely extended to fully flexed. While flexed the forearm is maximally supinated. In some cases, a small pop is felt or heard. This can indicate that the annular ligament has popped from the joint and back into the normal position. If there is no pop, the child is encouraged to use the arm. In many cases, within minutes the child is using the arm normally.

If the child continues to exhibit pain, X-rays may be ordered to make sure that no other injuries are present in the elbow such as a fracture. If the X-rays are normal, then the child will be placed in a sling and observed for several days and probably schedule to return to the office for re-evaluation in a week or 10 days. Over time, the vast majority of cases of nursemaid’s elbow resolve spontaneously and only in rare circumstances require any additional treatment.

Rehabilitation

What can be expected from treatment?

Nonsurgical Rehabilitation

Nursemaid’s elbow generally doesn’t require rehabilitation after the subluxation is reduced. The child may favor the arm for several days and may feel more secure with a light splint for a day or two. The child should be encouraged to use the arm as tolerated. If there continues to be problems using the arm after several days or weeks, then it should probably be re-evaluated by an orthopedic surgeon.

It’s best to avoid any further traction on the elbow until healing has occurred. Pulling a heavy door open or lifting a heavy backpack are examples of activities and movements that put a traction force through the elbow. These kinds of movements should be avoided until healing occurs.

Parents of small children are cautioned to avoid pulling or lifting by the hand to prevent injuries of this type. Young children should always be picked up under the arms. They should never be forcibly pulled, lifted or swung through the air by the hand or wrist.

Platelet Rich Plasma

A Patient’s Guide to Platelet-Rich Plasma Treatment of Musculoskeletal Problems

Platelet Rich Plasma

Introduction

Platelet-rich plasma (PRP) (also known as blood injection therapy) is a medical treatment being used for a wide range of musculoskeletal problems. Platelet-rich plasma refers to a sample of serum (blood) plasma that has as much as four times more than the normal amount of platelets. This treatment enhances the body’s natural ability to heal itself and is used to improve healing and shorten recovery time from acute and chronic soft tissue injuries.

It has been used for years after plastic surgery and surgery on the mouth, jaw, and neck. It seems to promote bone graft healing. Researchers have found a way to combine this substance with other chemicals to make it into a putty or gel that can be painted on a surgical site to speed up healing.

Blood injection therapy of this type has been used for knee osteoarthritis, degenerative cartilage, spinal fusion, bone fractures that don’t heal, and poor wound healing. This treatment technique is fairly new in the sports medicine treatment of musculoskeletal problems, but gaining popularity quickly.

This guide will help you understand

  • what your surgeon hopes to achieve
  • who can benefit from this procedure
  • what happens during the procedure
  • what to expect as you recover

Anatomy

Platelets are part of the blood that circulate around the body ready to help with blood clotting should you have a cut, broken bone, injury that bleeds internally, or any other type of injury. Besides containing clotting factors, the platelets release growth factors that help start the healing sequence. With a concentrated amount of platelets, larger quantities of these growth factors are released to stimulate a natural healing response. Plasma is the clear portion of the blood in which all the other blood particles such as platelets, red blood cells, and white blood cells travel.

In theory, blood injection therapy could be used in any area where a rapid healing response is desired such as the tendon-muscle junction, muscle injuries, torn ligaments, damaged joints, or inflamed tissue (e.g., plantar fasciitis). Torn tendons and ligaments don’t always heal well because they have a poor blood supply. Connective tissues such as ligaments and tendons heal by filling in with scar tissue that doesn’t bear the brunt of large loads well. This increases the risk of re-injury. Other available treatments for chronic tendon problems do not necessarily improve the tendon’s ability to heal in the same way that PRP does. And injections of PRP don’t have the side effects that can occur with steroid injections or long-term use of non-steroidal anti-inflammatory drugs (NSAIDs).

PRP treatment might also be used on the skin where delayed wound healing has created a site open to infection or for a pressure ulcer that is open and draining. Patients with non-healing ulcers from poor circulation related to diabetes, paralysis, and immobility, and chronic neurologic disorders may be able to receive gel treatments to achieve healing.

Platelet Rich Plasma

Since the early 1990s, it has been injected into non-healing tendon tears, fibrosed (scarred) tendons, and osteoarthritic knees. There has been some limited use with bone fractures. Because the growth factors released by the platelets can stimulate bone mineralization, platelet-rich plasma may help a break in a bone that isn’t healing. It has also been used with bone grafts to help spinal fusion along.

Rationale

What do surgeons hope to achieve?

Platelet Rich Plasma

Patients with chronic tendinitis (e.g., tennis elbow, patellar tendinitis or jumper’s knee, Achilles tendinitis) have also benefited from this treatment. It’s even being tried on hernias, labral (shoulder cartilage) tears, meniscal tears of the knee, and ankle sprains. Some surgeons are using it more and more with any orthopedic surgery involving the soft tissues to augment (reinforce) bone or ligamentous graft materials already being used.

Platelet Rich Plasma

The main purpose of platelet-rich plasma injection is to foster healing where it has not otherwise occurred or to speed up healing as in the case of an acute injury. Platelets release bioactive proteins that enhance tissue regeneration and healing. For example, studies show that after using the platelet-rich plasma (PRP) for tendon problems, new tendon cells (called tenocytes) start to develop in the area treated. Chondrocytes (cartilage cells) form when PRP is injected into damaged cartilage. Growth factors that help build new blood supply to the area are also increased in number. At the same time, there is a build up of type I collagen fibers. Type I collagen makes up the base structure of tendon tissue. This healing response may help restore strength faster than normal but studies are needed to prove this.

Not everyone with a musculoskeletal problem as described can have this treatment. Anyone with a condition called thrombocytopenia (low platelet levels), anyone with a history of cancer, and women who are pregnant or breast-feeding will not qualify. Thrombocytopenia can occur with drug treatment for blood clotting disorders, rheumatoid arthritis, or some forms of chemotherapy for cancer. The use of blood thinners such as Coumadin or Warfarin and the presence of infection in the wound site are also contraindications (reasons why platelet-rich plasma is not an option for you).

Preparation

How will I prepare for this procedure?

The procedure can be used non-surgically when treating tennis elbow, muscle injuries, joint osteoarthritis, or cartilage degeneration. Most non-surgical procedures can be done on an outpatient basis, usually in the office setting. When used during surgery, platelet-rich plasma is inserted in the area where the healing needs to be enhanced before the wound is closed. PRP is added to enhance ligament or tendon repairs such as anterior cruciate ligament (ACL) reconstruction, rotator cuff repairs, or Achilles tendon repair.

Treatment with platelet-rich plasma is broken down into two steps: preparing the platelet-rich plasma for injection and then injection into the affected area. First, blood is drawn from your arm and used to create the injected fluid. The blood is placed (in a test tube) in a machine called a centrifuge. The centrifuge spins the blood fast enough to separate it into layers based on weight. Heavier parts (e.g., red blood cells) stay on the bottom. Platelets and white blood cells spin out just above the red blood cell layer. Lighter particles (plasma without platelets or blood cells) make up the top layer in the test tube.

Once you have had your blood drawn, the sample is prepared right away. You can have the injection as quickly as 30 minutes later.

The Procedure

What happens during the procedure?

Nonsurgical Treatment

Once the PRP has been prepared, it is injected into the damaged area (e.g., tendon, muscle, cartilage, joint, bone). The surgeon may use imaging such as fluoroscopy (real-time, 3-D X-rays) or dynamic musculoskeletal ultrasound to place the needle that delivers the PRP directly into the joint or other area of injury. You will not be asleep or anesthetized unless the plasma is applied during a surgical procedure. When used on an outpatient basis for a nonsurgical treatment, a numbing agent like novacaine (e.g., lidocaine, marcaine) is used so that you don’t feel anything.

Surgery

For open incision or arthroscopic surgeries, such as labral and meniscal repairs or tendon or ligament repairs, the PRP is placed around the anchors and sutures holding the soft tissues together. Tiny clots form quickly, then the surgeon ties the sutures down reducing the tear, thus trapping the PRP clot in the repair site.

Early attempts to use this procedure contained four times the normal amount of platelets but surgeons have found they can use far less than that to achieve the same result. Scientists are still actively studying the best way to use this treatment. It’s not clear yet just how much platelet-rich plasma is needed to get the best healing response. The number of injections needed and the time frame remain yet to be determined as well. In studies done so far, one to three injections have been used with one to two weeks between injections.

Complications

What might go wrong?

This procedure is still considered experimental. It has not been approved yet by the Food and Drug Administration (FDA). But clinical trials are underway in a number of clinics with a wide range of patient problems. There have been very few reports of complications or adverse reactions. Whenever an injection of any kind is given, there is always the risk of infection. A small number of patients have reported increased pain, redness, and swelling at the injection site but this response didn’t last long.

There’s little concern about reactions to the blood, transfer of infection or HIV, or getting cancer cells through someone else’s blood because you donate your own blood to use in the procedure. Donor blood products might be used for individuals with medical issues that prevent them from donating their own blood. Donated blood is carefully screened, so again, the risk of infection or reaction to the blood is very low. The worst that might happen with this treatment is that you won’t get any better or more rarely, the needle might go through a blood vessel or nerve causing bleeding or nerve damage.

With other types of injection treatment, scar tissue and calcification (formation of tiny calcium deposits) can occur around the injection site. This has not been reported with platelet-rich plasma injections, but it is theoretically possible. Also possible but uncommon are allergic reactions to the lidocaine or marcaine used as a numbing agent.

After the Procedure

What happens after the procedure?

Nonsurgical

Immediately after the procedure, you will remain lying down and under observation for a few minutes up to a half an hour. You might have some discomfort in the area of the injection that can last a few days up to a week. In fact, sometimes it can seem like you are worse than before the treatment. That’s because an inflammatory response has just been stimulated. Don’t worry – the temporary worsening of your symptoms usually won’t last.

Once you return home, you can use ice over the injected area, elevate the leg or arm, and limit your activities as much as needed to remain comfortable. Your doctor may suggest using Tylenol for pain relief but ibuprofen or other anti-inflammatories are not advised. That’s because the treatment is designed to set up an inflammatory response, so you don’t want to stop that process with medications.

After Surgery

This depends on the type of surgery performed. Please follow your surgeon’s instructions

Rehabilitation

What should I expect as I recover?

The most surprising aspect of recovery after treatment with platelet-rich plasma is the speed of recovery. For example, high-level athletes find they are able to return to full sports participation and competitive play in half the time expected for acute tendon injuries and with no bad side effects and no scar tissue or adhesions.

Similar findings have been observed in a small number of patients participating in a pilot study when platelet-rich plasma was used during surgery to repair ruptured Achilles tendons and rotator cuff tears. Once again, wound healing was much faster with fewer problems and less scar tissue. The majority of patients report being pain free. And the list of improvements with this treatment continues: patients use less pain medication, patients gain greater joint motion over a shorter period of time, patients get back to regular daily activities with greater speed and ease, and so on.

In some programs where platelet-rich plasma injections have been used for tendon problems, patients were allowed to do light activities after a second injection given 15 days after the first injection. Strengthening exercises were started after a third (and final) injection given 15 days after the second injection.

You may see a physical therapist after this procedure to help you regain motion, strength, motor control, and function. There isn’t a known rehab protocol (standard program to follow) yet. Physical therapists are working with surgeons on a patient-by-patient basis to determine what might be best for each individual. Developing optimal tendon healing and muscle strength, will be a priority especially in high-level professional athletes who are eager to get back into the game.

Elbow Dislocation

A Patient’s Guide to Elbow Dislocation

Introduction

Elbow dislocations

When the joint surfaces of an elbow are forced apart, the elbow is dislocated. The elbow is the second most commonly dislocated joint in adults (after shoulder dislocation). Elbow dislocation can be complete or partial. A partial dislocation is referred to as a subluxation. The amount of force needed to cause an elbow dislocation is enough to cause a bone fracture at the same time. These two injuries (dislocation-fracture) often occur together.

This guide will help you understand

  • how the condition develops
  • how doctors diagnose the condition
  • what treatment options are available

Anatomy

The bones of the elbow are the humerus (the upper arm bone), the ulna (the larger bone of the forearm, on the opposite side of the thumb), and the radius (the smaller bone of the forearm on the same side as the thumb).

Elbow dislocations

The elbow itself is essentially a hinge joint, meaning it bends and straightens like a hinge. But there is a second joint where the end of the radius (the radial head) meets the humerus. This joint is complicated because the radius has to rotate so that you can turn your hand palm up and palm down. At the same time, it has to slide against the end of the humerus as the elbow bends and straightens. The joint is even more complex because the radius has to slide against the ulna as it rotates the wrist as well. As a result, the end of the radius at the elbow is shaped like a smooth knob with a cup at the end to fit on the end of the humerus. The edges are also smooth where it glides against the ulna.

Elbow dislocations

Articular cartilage is the material that covers the ends of the bones of any joint. Articular cartilage can be up to one-quarter of an inch thick in the large, weight-bearing joints. It is a bit thinner in joints such as the elbow, which don’t support weight. Articular cartilage is white, shiny, and has a rubbery consistency. It is slippery, which allows the joint surfaces to slide against one another without causing any damage. In the elbow, articular cartilage covers the end of the humerus, the end of the radius, and the end of the ulna.

There are several important ligaments in the elbow. Ligaments are soft tissue structures that connect bones to bones. The ligaments around a joint usually combine together to form a joint capsule. A joint capsule is a watertight sac that surrounds a joint and contains lubricating fluid called synovial fluid.

Elbow dislocations

Elbow dislocations

In the elbow, two of the most important ligaments are the medial collateral ligament and the lateral collateral ligament. The medial collateral is on the inside edge of the elbow, and the lateral collateral is on the outside edge. Together these two ligaments connect the humerus to the ulna and keep it tightly in place as it slides through the groove at the end of the humerus. These ligaments are the main source of stability for the elbow. They can be torn when there is an injury to or dislocation of the elbow. If they do not heal correctly the elbow can be too loose, or unstable.

Elbow dislocations

There is also an important ligament called the annular ligament that wraps around the radial head and holds it tight against the ulna. The word annular means ring-shaped. The annular ligament forms a ring around the radial head as it holds it in place. This ligament can be torn when the entire elbow or just the radial head is dislocated.

Causes

What causes this condition?

Elbow dislocations

Elbow dislocation is often the result of trauma. The most common trauma resulting in an elbow dislocation is a fall onto an outstretched hand and arm. When the hand hits the ground, the force is transmitted through the forearm to the elbow. This force pushes the elbow out of its socket.

Elbow dislocations

This can also result in a fracture/dislocation. About half of all elbow dislocations in teens and young adults occur as a result of a sports activity. The most common elbow dislocations are associated with sports such as gymnastics, cycling, roller-blading, or skateboarding.

Elbow dislocations

Dislocation can also occur from a sideswipe injury. This type of injury occurs when the driver of an automobile has the elbow out the open window during a car accident. The force of the impact causes a severe fracture-dislocation of the elbow.

Symptoms

What are the symptoms?

If the elbow is fully dislocated, it will look out of joint. There may be dimples or indentations of the skin over the dislocation where the bones have shifted position. Pain can be intense until the arm is relocated. The pain is often relieved immediately after the joint is put back in place. There may be some residual tenderness around the joint.

Elbow dislocations

If ligaments or other soft tissues are torn, there can be swelling and bruising around the elbow. Bruising is not immediately obvious but appears several days after the injury. Injury to any of the three nerves that cross the elbow (median, ulnar, radial nerves) can cause neurologic symptoms such as numbness, tingling, and/or weakness of the forearm, wrist, and hand. If a bone fracture is also involved the fracture can cut or damage a nerve causing temporary or permanent paralysis.

Elbow dislocations

Pain and an inability to straighten the elbow or pain when turning the hand the palm up (supination) is typical. There is often tenderness along the lateral aspect of the elbow (side of the elbow away from the body).

Diagnosis

How do doctors diagnose this condition?

The history and physical examination are probably the most important tools the physician uses to guide his or her diagnosis. Moving the elbow passively is painful, especially extension and supination. The doctor will check for any signs of injury to the nerves or blood vessels.

X-ray is the best way to look for dislocation or fracture-dislocation.

After the joint is relocated, other imaging studies may be ordered to look for damage to the joint cartilage, bone, ligaments, and other soft tissues. If bone detail is difficult to identify on an X-ray, a computed tomography (CT) scan may be done. If it is important to evaluate the ligaments, a magnetic resonance image (MRI) can be helpful.

Treatment

What treatment options are available?

Nonsurgical Treatment

It is possible for the elbow to relocate by itself. This is more likely when there is a subluxation, rather than a complete dislocation. Sometimes the elbow can be reduced or put back in place by a trained medical person applying a quick motion to the forearm. There are several different methods used for manual (closed) reduction. Closed reduction refers to the fact that the elbow can be put back in joint without surgery. An open incision is not needed.

Manual reduction can be done in an emergency on site (e.g., at an athletic event or car accident) by a trained medical person but usually the procedure is done in a clinic or hospital setting. You would be given medications first to help with the pain.

Surgery

If there is too much swelling, it may be necessary to delay surgery for a few days up to a week. The elbow will be reduced right away and the arm immobilized while waiting for the swelling to subside.

If there has been damage to the bones and/or ligaments, surgery may be needed to restore alignment and function. The type of surgery depends on the extent of the damage. Wires, pins, or even an external fixation device may be needed to hold everything together until healing occurs.

Rehabilitation

What should I expect after treatment?

Nonsurgical Rehabilitation

Simple elbow dislocations heal well with few (if any) problems. You may notice a slight loss of elbow motion, especially when trying to straighten the arm. This should not affect your overall motion and function. X-rays may be taken while the elbow heals. This will show if the bones of the elbow joint are healing in a reduced position with good alignment.

The arm may be immobilized for 10 to 14 days to allow the ligament to heal. Gentle range of motion may be allowed during that time but you should rely on your physician to advise you. Type of activities and movements allowed are determined according to the type of injury that’s present.

After immobilization, physical therapy may begin. The goal is to restore normal motion, joint proprioception (sense of position), and motor control. The program will progress to include strengthening.

Rehabilitation for the athlete includes sport-specific training is part of the rehab program. Your physical therapist will guide you through this process. Most athletes can resume sports participation three to six weeks after an elbow dislocation. The timing of return to sports depends on the type of sport (e.g., throwing sports may require a longer rehab). Dislocation of the dominant hand may require longer rehab before full motion and strength are restored.

Some athletes continue to wear a protective splint and/or use taping to stabilize the joint during the transition back into action. This can help protect the joint during motion and activity during the final phase of healing.

It’s best to avoid any further traction on the elbow until healing has occurred. Pulling a heavy door open, carrying a heavy purse, or lifting a heavy backpack are a few examples of activities and movements that put a traction force through the elbow. These kinds of movements should be avoided until healing occurs

After Surgery

Post-operative immobilization is often required, especially for complex injuries. This could be a cast, dynamic splint, or postoperative range-of-motion (ROM) brace. The adjustable ROM brace is used to improve elbow motion gradually while allowing soft tissue healing. It helps minimize scar tissue formation and may contribute to fewer complications (such as arthritis) later on.

After immobilization, physical therapy may begin. The goal is to restore normal motion, joint proprioception (sense of position), and motor control. The program will progress to include strengthening. Rely on your doctor and therapist to guide you through the healing process.

As in conservative care, some athletes continue to wear a protective splint and/or use taping to stabilize the joint during the transition back into action. This can help protect the joint during motion and activity during the final phase of healing.

It’s best to avoid any further traction on the elbow until healing has occurred. Pulling a heavy door open, carrying a heavy purse, or lifting a heavy backpack are a few examples of activities and movements that put a traction force through the elbow. These kinds of movements should be avoided until healing occurs. Your doctor and/or therapist will advise you as you progress through the healing process.
Scar tissue can cause a stiff elbow. Recurrent dislocation is also possible. If either of these problems develops, additional reconstructive surgery may be needed. For some patients, arthritis is a long-term result of elbow injury. This is more likely if there is a history of recurrent elbow dislocations.

Adult Acquired Flatfoot Deformity

A Patient’s Guide to Adult-Acquired Flatfoot Deformity

Introduction

Adult-Acquired Flatfoot Deformity

Adult acquired flatfoot deformity (AAFD) is a painful condition resulting from the collapse of the longitudinal (lengthwise) arch of the foot. As the name suggests, this condition is not present at birth or during childhood. It occurs after the skeleton is fully matured.

In the past it was referred to a posterior tibial tendon dysfunction (or insufficiency). But the name was changed because the condition really describes a wide range of flatfoot deformities. AAFD is most often seen in women between the ages of 40 and 60.

This guide will help you understand

  • how the problem develops
  • how doctors diagnose the condition
  • what treatment options are available

Anatomy

What parts of the foot are involved?

The skeleton of the foot begins with the talus, or ankle bone, that forms part of the ankle joint. The two bones of the lower leg, the large tibia and the smaller fibula, come together at the ankle joint to form a very stable structure.

Adult-Acquired Flatfoot Deformity

The two bones that make up the back part of the foot (sometimes referred to as the hindfoot) are the talus and the calcaneus, or heel bone. The talus is connected to the calcaneus at the subtalar joint. The ankle joint allows the foot to bend up and down. The subtalar joint allows the foot to rock from side to side.

Just down the foot from the ankle is a set of five bones called tarsal bones that work together as a group.

Adult-Acquired Flatfoot Deformity

These bones are unique in the way they fit together. There are multiple joints between the tarsal bones. When the foot is twisted in one direction by the muscles of the foot and leg, these bones lock together and form a very rigid structure. When they are twisted in the opposite direction, they become unlocked and allow the foot to conform to whatever surface the foot is contacting.

The tarsal bones are connected to the five long bones of the foot called the metatarsals. The two groups of bones are fairly rigidly connected, without much movement at the joints.

Adult-Acquired Flatfoot Deformity

The large Achilles’ tendon is the most important tendon for walking, running, and jumping. It attaches the calf muscles to the heel bone to allow us to rise up on our toes. The posterior tibial tendon attaches one of the smaller muscles of the calf to the underside of the foot. This tendon helps support the arch and allows us to turn the foot inward. Failure of the posterior tibial tendon is a major problem in many cases of adult-acquired flatfoot deformity (AAFD).

Adult-Acquired Flatfoot Deformity

The toes have tendons attached that bend the toes down (on the bottom of the toes) and straighten the toes (on the top of the toes). The anterior tibial tendon (tibialis anterior) allows us to raise the foot. Two tendons run behind the outer bump of the ankle (called the lateral malleolus) and help turn the foot outward.

Many small ligaments hold the bones of the foot together. Most of these ligaments form part of the joint capsule around each of the joints of the foot. A joint capsule is a watertight sac that forms around all joints. It is made up of the ligaments around the joint and the soft tissues between the ligaments that fill in the gaps and form the sac.

Adult-Acquired Flatfoot Deformity

The spring ligament complex is often involved in adult-acquired flatfoot. This group of ligaments supports the talonavicular joint. The spring ligament complex works with the posterior tibial tendon and the plantar fascia to support and stabilize the longitudinal arch of the foot.

Adult-Acquired Flatfoot Deformity

Failure of the ligaments that support this arch can contribute to flatfoot deformity. Injury, laxity (looseness), or other dysfunction of the ligament and tendon structures can result in deformity of the foot and/or ankle resulting in AAFD.

Related Document: A Patient’s Guide to Foot Anatomy

Causes

What causes adult-acquired flatfoot deformity?

There are multiple factors contributing to the development of this problem. Damage to the nerves, ligaments, and/or tendons of the foot can cause subluxation (partial dislocation) of the subtalar or talonavicular joints. Bone fracture is a possible cause. The resulting joint deformity from any of these problems can lead to adult-acquired flatfoot deformity.

Dysfunction of the posterior tibial tendon has always been linked with adult-acquired flatfoot deformity (AAFD). The loss of active and passive pull of the tendon alters the normal biomechanics of the foot and ankle. The reasons for this can be many and varied as well. Diabetes, high blood pressure, and prolonged use of steroids are some of the more common causes of adult-acquired flatfoot deformity (AAFD) brought on by impairment of the posterior tibialis tendon. Overstretching or rupture of the tendon results in tendon and muscle imbalance in the foot leading to adult-acquired flatfoot deformity (AAFD).

Rheumatoid arthritis is one of the more common causes. About half of all adults with this type of arthritis will develop adult flatfoot deformity over time. In such cases, the condition is gradual and progressive.

Obesity has been linked with this condition. Loss of blood supply for any reason in the area of the posterior tibialis tendon is another factor. Other possible causes include bone fracture or dislocation, a torn or stretched tendon, or a neurologic condition causing weakness.

Symptoms

What does the condition feel like?

Adult-Acquired Flatfoot Deformity

At first you may notice pain and swelling along the medial (big toe) side of the foot. This is where the posterior tibialis tendon travels from the back of the leg under the medial ankle bone to the foot. As the condition gets worse, tendon failure occurs and the pain gets worse. Some patients experience pain along the lateral (outside) edge of the foot, too.

You may find that your feet hurt at the end of the day or after long periods of standing. Some people with this condition have trouble rising up on their toes. They may be unable to participate fully in sports or other recreational activities.

Diagnosis

How do doctors diagnose the problem?

The history and physical examination are probably the most important tools the physician uses to diagnose this problem. The wear pattern on your shoes can offer some helpful clues. Muscle testing helps identify any areas of weakness or muscle impairment. This should be done in both the weight bearing and nonweight bearing positions.

A very effective test is the single heel raise. You will be asked to stand on one foot and rise up on your toes. You should be able to lift your heel off the ground easily while keeping the calcaneus (heel bone) in the middle with slight inversion (turned inward).

X-rays are often used to study the position, shape, and alignment of the bones in the feet and ankles. Magnetic resonance (MR) imaging is the imaging modality of choice for evaluating the posterior tibial tendon and spring ligament complex.

There are four stages of adult-acquired flatfoot deformity (AAFD). The severity of the deformity determines your stage. For example:

Stage I means there is a flatfoot position but without deformity. Pain and swelling from tendinitis is common in this stage. Stage II there is a change in the foot alignment. This means a deformity is starting to develop. The physician can still move the bones back into place manually (passively). Stage III adult-acquired flatfoot deformity (AAFD) tells us there is a deformity. This means the ankle is stiff or rigid and doesn’t move beyond a neutral (midline) position. Stage IV is characterized by deformity in the foot and the ankle. The deformity may be flexible or fixed. The joints often show signs of degenerative joint disease (arthritis).

Treatment

What treatment options are available?

Nonsurgical Treatment

Conservative (nonoperative) care is advised at first. A simple modification to your shoe may be all that’s needed. Sometimes purchasing shoes with a good arch support is sufficient. For other patients, an off-the-shelf (prefabricated) shoe insert works well.

The orthotic is designed specifically to position your foot in good alignment. Like the shoe insert, the orthotic fits inside the shoe. These work well for mild deformity or symptoms.

Over-the-counter pain relievers or antiinflammatory drugs such as ibuprofen may be helpful. If symptoms are very severe, a removable boot or cast may be used to rest, support, and stabilize the foot and ankle while still allowing function. Patients with longer duration of symptoms or greater deformity may need a customized brace. The brace provides support and limits ankle motion. After several months, the brace is replaced with a foot orthotic.

A physical therapy program of exercise to stretch and strengthen the foot and leg muscles is important. The therapist will also show you how to improve motor control and proprioception (joint sense of position). These added features help prevent and reduce injuries.

Surgery

When conservative care fails to control symptoms and/or deformity, then surgery may be needed. The goal of surgical treatment is to obtain good alignment while keeping the foot and ankle as flexible as possible.

The most common procedures used with this condition include arthrodesis (fusion), osteotomy (cutting out a wedge-shaped piece of bone), and lateral column lengthening. Lateral column lengthening involves the use of a bone graft at the calcaneocuboid joint. This procedure helps restore the medial longitudinal arch (arch along the inside of the foot).

A torn tendon or spring ligament will be repaired or reconstructed. Other surgical options include tendon shortening or lengthening. Or the surgeon may move one or more tendons. This procedure is called a tendon transfer. Tendon transfer uses another tendon to help the posterior tibial tendon function more effectively. A tendon transfer is designed to change the force and angle of pull on the bones of the arch.

It’s not clear yet from research evidence which surgical procedure works best for this condition. A combination of surgical treatments may be needed. It may depend on your age, type and severity of deformity and symptoms, and your desired level of daily activity.

Rehabilitation

What should I expect as I recover?

Nonsurgical Rehabilitation

Pain relief and improved function are the two main changes patients report with effective treatment. It’s not clear yet if these measures prevent or stop the foot deformity from occurring or getting worse. Some short-term studies (one year) show good results with mild to moderate adult-acquired flatfoot deformity (stages I and II deformity) using orthotic support, foot orthotics, and physical therapy.

Any sign of increasing deformity may be an indication that surgery is needed. Careful monitoring over time is needed to assure the best timing for surgery. Waiting too long can mean a less successful surgical result.

After Surgery

Postoperative care may depend on the type of surgery you have. After a tendon transfer and/or osteotomy, you will be in a cast or removable brace for six weeks. In most cases, you won’t be allowed to put weight on the foot during this time. This is especially true if you’ve had a tendon transfer or bone fusion.

A physical therapist will help you progress from nonweight-bearing to full weight-bearing status. You will probably be wearing a removable boot and starting range of motion exercises. Strengthening exercises can begin when the tendon transfer has healed. At this point you may still have some painful symptoms.

Significant improvement occurs gradually over a four-to-six month period of time. During that time, you will progress in your exercise program. The removable boot will be replaced with a foot orthosis and lace-up shoes. For those patients who have a fusion, you can expect some stiffness and loss of motion in the foot and/or ankle. The amount and location of the stiffness depends on which bones were fused together.

Studies show that long-term results of just reconstructing the posterior tibial tendon have been disappointing. As much as a 50 per cent failure rate has been reported. This is probably because of the complexity of soft tissue interactions needed to maintain structural integrity of the foot. Reconstructing the spring ligament complex or using an osteotomy to lengthen the lateral side of the foot along with a tendon transplant is more likely to restore more normal foot and ankle movement with better results.

Prolonged swelling and discomfort are not uncommon even six to 10 months after the surgery. Standing on your feet for a long time or walking long distances can also cause foot pain or discomfort.

Limping in Children

A Patient’s Guide to Limping in Children

Introduction

Limping in a child is a concern. Limping in a child is never normal. It can be caused by many things, sometimes by something minor, like a blister or cut. The most common cause of a limp in young children is a fracture. Sometimes it is caused by a serious infection. Although rare, it can be caused by a tumor.

This guide will help you understand

  • what can cause this condition
  • what the symptoms are
  • how your doctor will diagnose the condition
  • what treatment options are available

Anatomy

What parts of the body can be involved?

Sources of limping can involve many parts of the body. The hip, knee, shin bone, ankle, and foot are common parts that can cause limping. Limping can also be caused by problems in the back or pelvis.

Limping in Children

The hip is a ball-and-socket joint. It is covered by a tough lining called the synovium. The ball of the joint is the end of the thigh bone, called the femur. Like other ends of bones in children, the ball has an area called a growth plate. A growth plate has cells that produce new bone. The growth plate is weaker than other parts of the bone. This makes this area more likely to fracture.

The socket part of the hip joint is called the acetabulum. It is actually part of the pelvis. The acetabulum forms a cup where the ball of the femur sits. It is covered with articular cartilage. Articular cartilage is the material that covers the ends of the bone of any joint. It’s a rubbery, slippery substance that allows the surfaces to slide against one another without damage to either surface.

The knee joint is made up of the other end of the femur and the end of the shin bone. The knee cap, or patella, also is part of the knee joint. In children, pain in the knee can actually be caused by a problem in the hip.

The lower leg is made up of two main bones. The larger bone is the shin bone, called the tibia. The smaller bone runs along the outside of the tibia it’s called the fibula. These bones, along with a saddle shaped bone at the top of the foot called the talus form the ankle.

The foot has many bones. There are short bones below the ankle towards the back of the foot called the cuboids. The long bones of the foot from the arch to the joints of the toes are called the metatarsals.

Causes

How can this condition develop?

The most common cause of a limp in small children is a fracture. Toddler’s fractures involve buckling or bowing of the tibia (shin bone). This usually happens when a child trips or falls up stairs.

Bunk-bed fractures are caused by jumping. The cuboid bone and first metatarsal in the foot are the bones that are usually broken in this type of injury.

Limping in Children

In children from two to ten years old, the most common cause of hip pain is transient synovitis (TS). This involves swelling or inflammation of the synovium of the hip. The synovium is a tough covering of the joint. Often, the child will have had a cold or viral infection just before the hip pain started. Transient synovitis usually lasts ten days. It generally gets better on its own.

Related Document: A Patient’s Guide to Transient Synovitis of the Hip in Children

Joint infection of the hip causes a more sudden onset of pain. Children will usually not walk at all when the joint is infected.

Osteomyelitis is an infection of the bone. It usually happens near the ends of the bones, close to the growth plate.

Limping in Children

Overuse syndromes are common in active adolescents. Stress fractures of the foot, patellofemoral joint problems, and Osgood-Schlatter’s disease are examples of overuse syndromes.

Related Document: A Patient’s Guide to Osgood-Schlatter Lesion of the Knee

Limping in Children

Legg-Calvé-Perthes disease typically affects boys between the ages of five and ten. It is also called osteonecrosis and avascular necrosis of the hip. It literally means death of bone. The ball of the hip dies because the blood supply has been cut off. When this happens, the femoral head and acetabulum will change their shapes over one to three years. The ball of the femur will flatten out. This problem with the hip is often missed at first. It is frequently misdiagnosed as synovitis of the hip.

Limping in Children

Related Document: A Patient’s Guide to Perthe’s Disease

Slipped Capital Femoral Epiphysis is the slipping of the growth plate of the ball of the hip joint. It usually happens in obese, older children.

Related Document: A Patient’s Guide to Slipped Capital Femoral Epiphysis

Tumors in bone are rare in children. Ewing’s sarcoma is a cancerous tumor that starts in the bone. More often, a tumor found in the bone is from cancer somewhere else in the body. Neuroblastoma and leukemia are both known to cause destruction of bones.

Rheumatoid arthritis is an auto-immune disease. It can affect children. When it does it is called juvenile onset rheumatoid arthritis. When left untreated it can destroy the synovium of joints, causing deformity, pain, and loss of mobility.

Neuromuscular disease such as muscular dystrophy or other genetic problems may also cause limping.

Back problems, appendicitis, or other problems in the abdomen or pelvis can cause limping, usually in older children.

Symptoms

What does the condition feel like?

In addition to limping, or not walking at all, other symptoms may occur.

Swelling or redness near a joint often means infection or inflammation. Fever or chills can also mean infection. Tenderness of a specific area could be suspicious for a fracture.

Transient synovitis often happens after having a cold or viral infection.

Diagnosis

How will your doctor diagnose the condition?

Making a diagnosis can be difficult. It is not surprising that it can require more than one evaluation by more than one doctor. In many cases, laboratory testing and imaging tests (x-rays) are needed to make the right diagnosis.

Your child’s doctor will want to do a thorough history and physical examination.
It is important to know whether or not the limping started suddenly. It is important to determine if there has been an accident or fall. Repetitive or strenuous activity may also be the cause of limping. Your doctor will want to know if your child has had any recent illness, such as a cold, or strep throat.

Your child’s doctor will want to look at your child’s skin and joints. He/She is looking for things such as cuts, blisters, rash, insect bites, joint swelling and deformity of bones. Range of motion of the joints may also be evaluated.

Since fractures are the most common cause of limping in children, x-rays are done in most cases. In young children, x-rays of the pelvis, hips, and lower legs are recommended.

Magnetic resonance imaging (MRI) allows your doctor to look at slices of the area in question. The MRI machine uses magnetic waves, not x-rays, to show the soft tissues of the body. It is best at evaluating soft-tissue injury and tumors. The test may require the use of dye in an IV. Children may need to have sedation or anesthesia in order to lie still for the test.

Computed tomography (CT) scan may be ordered. It is best for evaluating problems with bones. It is usually tolerated by children, however, it exposes them to radiation.

Bone scans, also called nuclear scans can be used to detect fractures, osteomyelitis, and Legg-Calvé-Perthes disease. A radioactive tracer, Technetium, is injected into your child’s vein. Where there is an increase in metabolic activity, such as in the case with inflammation, fracture, infection, or tumor, the Technetium will be more concentrated.

Ultrasound is another form of imaging that may be used. It uses sound waves to create a picture. Ultrasound of the hip can show osteomyelitis, septic arthritis, transient synovitis, and Legg-Calvé-Perthes disease.

Laboratory studies may help your child’s doctor make a diagnosis. Most common is a complete blood count (CBC). This checks the white blood cell count which can increase during an infection. When inflammation and infection are present, your erythrocyte sedimentation rate (ESR) and C-reactive protein increase, these lab tests may also be done. Other lab tests may be done, such as rheumatoid factor, sickle cell tests, and lyme disease tests.

If joint or bone infection is suspected, blood cultures can be helpful. Your child’s doctor will likely want the joint aspirated. The bone may need to have a biopsy. A needle is placed in the joint or bone, and some of the fluid is removed and tested. In the case of infection, the bacteria causing the infection can be determined and an appropriate antibiotic treatment can then be chosen.

Treatment

What treatment options are available?

Nonsurgical Treatment

Most of the causes of limping can be treated without surgery. Most children respond well to therapy and resume walking normally without any long-term problems.

In toddler’s fractures and bunk-bed fractures, sometimes casts must be used. Limiting weight bearing when walking may mean your child will have to use crutches, or be in a wheelchair for awhile.

Overuse syndromes require rest from activity. Stress fractures and Osgood-Schlatter’s usually respond well to a discontinuation of the activity that caused them. Exercises like swimming and exercise biking are usually encouraged to maintain conditioning. Patellofemoral joint problems usually respond to physical therapy, taping, and bracing.

Transient synovitis usually responds to anti-inflammatory medication and rest. Symptoms generally improve after 10 days, with an eventual return to activity.

In the case of infection, six weeks of intravenous (IV) antibiotics is usually required. Sometimes antibiotics taken by mouth can be effective instead of such a long period of IV antibiotics. Your child may need to be in the hospital for a few days at first. Sometimes surgery is necessary to drain the area that is infected.

Referral to a doctor who specializes in arthritis will be necessary if your child is diagnosed with rheumatoid arthritis.

Although tumors are rare in children, they do occur. Some tumors may respond to chemotherapy or radiation. Sometimes the tumor has to be surgically removed.

Surgery

Surgical treatment is specific to the cause of the problem.

In the case of slipped capital femoral epiphysis, surgery is often required. The femur can be pinned through the skin (percutaneous pinning). The surgeon may need to open the joint to place pins in it. Sometimes the hip that is not affected is also pinned because it is also likely to slip.

Legg-Calve-Perthes often requires surgery to shape the hip joint.

Tumors are rare in children but they do occur. Your child will probably be referred to a specialist to determine the best method of treatment for the type of tumor discovered. Some tumors respond to chemotherapy or radiation. Surgical excision (removal) may be necessary.

Osteomyelitis sometimes requires a surgeon to open the area. This allows drainage of the infectious fluid and removal of damaged tissue and bone if needed.

Rehabilitation

What should I expect after treatment?

Nonsurgical Rehabilitation

Depending on the cause of limping, physical therapy may be recommended. Range of motion exercises may be given to you by a physical therapist to do with your child in the home. Conditioning programs for older children can allow activity without making the problem worse. Taping, bracing, the use of modalities such as heat or cold, and anti-inflammatories can also benefit some causes of limping.

Your child’s doctor will want to follow up periodically. Sometimes this requires repeat blood work and/or imaging studies.

After Surgery

The particular type of surgical procedure required will have rehabilitation guidelines specific to that surgery. Your healthcare providers will talk with you and your child about what to expect during the rehabilitation process.

After a period of immobility, your child’s surgeon will likely prescribe physical therapy. The physical therapist will work on walking, range of motion, and strengthening.

Periodic follow-up will be necessary. This will probably include the need for repeat imaging and lab tests.

Rotational Deformities in Children

A Patient’s Guide to Rotational Deformities in Children

Introduction

Rotational deformities of the legs and feet in children are often a cause of concern for parents. Most people think of the deformities as either toeing in or toeing out. The deformity actually comes from rotation of the femur and the tibia. Rotation of the legs at birth is normal. Most of the time, the deformities correct themselves by age seven or eight.

Rotational deformities are usually due to position and pressure in the uterus during pregnancy. It is important to determine if the deformity is from this, or from something more serious – like a neurological problem.

This guide will help you understand

  • what parts of the body are affected
  • how the condition develops
  • how doctors diagnose the condition
  • what treatment options are available

Anatomy

What parts of the body are affected?

Rotational Deformities in Children

The two main long bones of the leg are the femur and the tibia. The femur is the bone of the upper leg or thigh. The tibia is the larger bone in the lower leg. The front part of the tibia forms the shinbone. The smaller lower leg bone is called the fibula. Excessive rotation (also called torsion) of the femur and/or tibia will cause the foot to appear to either toe in or toe out.

The anatomy of the hip also affects the rotation of the entire leg. The femoral shaft, or thigh bone, attaches to the femoral neck near the hip joint. The femoral neck in turn attaches to the femoral head, the round ball that actually fits into the hip socket. How the femoral neck attaches to the femoral shaft affects how the entire leg lines up with the body.

Rotational Deformities in Children

There are two angles between the femoral shaft and the femoral neck that are important. Looking at the front of the body, there is an angle formed where the femoral neck joins the femoral shaft. Looking at the shaft of the femur from the top (along the axis of the femoral shaft), there is also an angle formed between the knee joint and the femoral neck. Doctors call this angle the version of the femoral neck. If the angle is more to the front (anterior) it is called anteversion and if it is more to the back (posterior) it is called retroversion. Normally the version of the hip in the adult is about 15 degrees anteversion.

Rotational Deformities in Children

Version can be difficult to understand – even for physicians. But remember, the end result is that too much or too little anteversion will make the entire leg look like it is twisted – either the toes turn in or they turn out. Too much femoral anteversion and the toes turn in; too little and they turn out.

Causes

How does this problem develop?

Rotational Deformities in Children

The vast majority of rotational deformities that are seen in children – and worry their parents and grandparents – are normal variations that will improve with time. The infant skeleton is made up of mostly cartilage. It is immature bone. It has not been calcified. This makes it fairly flexible. Babies are packed inside the uterus tightly. This affects the how our legs look when we are born. Immediately at birth, changes begin to take place. Throughout childhood, the femur and tibia (and the version of the hip) will continue to change and move towards what is normal for the adult.

Rotational Deformities in Children

Rotation of the legs at birth is not abnormal. The infant skeleton is made up of mostly cartilage. It is immature bone. It has not been calcified. This makes the infant skeleton fairly flexible. Position and compression in the uterus can shape the cartilage. Most fetuses are in a crossed-leg position in the uterus.

There are usually contractures (tightness of certain soft tissues and ligaments) in the hip and knee joints at birth. This also comes from positioning in the uterus. This can be a part of the cause of these various deformities. Positions for sleeping and play may also help shape the various deformities.

Sometimes the rotation at birth is excessive. Five in 10,000 children born will have rotational deformities of the legs. The most common cause is position and pressure in the uterus. An unstretched uterus in a first pregnancy causes greater pressure. This makes the first-born child more prone to rotational deformities. The unborn child grows a lot during the last 10 weeks. The compression or pressure in the uterus increases.

Premature infants have less rotational deformities than full-term infants. This is possibly due to decreased pressure in the uterus. Twins tend to be crowded in the uterus. They are more likely to have rotational deformities.

Sometimes, what is thought to be a rotational deformity is something different. Bowed legs are not necessarily considered a rotational deformity. When rotation is not involved the deformity is called an angular deformity. What looks like bowing of the lower leg can actually be caused by internal rotation of the tibia (lower leg). Because of this, the calf muscles lie on the outside of the leg instead of in the back of the leg. This gives the leg a bowed appearance.

Symptoms

What are the symptoms?

Rotational deformities are most often painless. The exception is with exaggerated femoral internal torsion (or femoral anteversion). Some teenagers with exaggerated femoral internal torsion may develop pain in the front of the knee. Climbing stairs usually aggravates this. Rotational deformities normally do not cause problems in adulthood.

Rotational Deformities in Children

Children with internal femoral torsion may have a habit of sitting in a “W” position, or on their feet, rather than crossed legged. Some children will trip over their feet if they toe in excessively. There is not a delay in the normal development of sitting, crawling, and walking.

Diagnosis

How do doctors diagnose this condition?

Your doctor will want to take a medical history. He/she may ask about the pregnancy, labor, and delivery of your child. Your doctor will need to know when the deformity was first noticed. Some are noticed right after birth. Some are noticed when the child starts to stand or walk. Some are not noticed until after age three. Your doctor will also want to know if it has gotten worse or better over time.

Your doctor will want to examine your child’s legs while your child is in different positions. If your child walks, he will want to watch him/her walk. Your child’s doctor will likely want to feel range of motion of the joints, to see if deformities can be corrected. The legs of the parents may also be examined to see if there is a similar deformity in adulthood.

Your child’s doctor may want to perform a neurological examination as well. This is to make sure there are no symptoms of cerebral palsy, or muscle disease that could be causing the deformity.

The diagnosis of rotational deformity is usually made by the findings of the physical examination. X-rays or other imaging is rarely needed.

There are four rotational deformities that affect the leg:

  • Internal tibial torsion (ITT) – causes toeing in
  • External tibial torsion (ETT) – causes toeing out
  • Internal femoral torsion (IFT) – causes toeing in
  • External femoral torsion (EFT) – causes toeing out

Internal tibial torsion (ITT) is the most common of the rotational deformities. It causes toeing in. It is usually noticed at birth or early infancy. Your child being cross-legged during growth in the uterus causes it. It often goes unnoticed until your child begins walking. The deformity is more obvious when standing. It usually goes away by age two or three. If internal tibial torsion is significant, and lasts past the age of five, surgery to derotate the tibia may be necessary, although this is very rare.

Rotational Deformities in Children

External tibial torsion (ETT) causes toeing out. While the child is in the uterus, the foot is held in extreme dorsiflexion. This means that the top of the foot lies against the shin of the same leg. This causes the foot to be in an externally (outward) rotated position. When your child stands, the foot will appear to toe out.

Internal femoral torsion (IFT) is the most common cause of toeing in after age three. If the tibia and femur are both internally rotated, toeing in may be even worse. This occurs more often in girls than boys. IFT can be diagnosed by comparing internal and external rotation range of motion of the hip. Your child will be placed on their stomach with knees bent. Normal children have equal amounts of internal and external rotation. In children with IFT there is an increase in the amount of internal hip rotation (torsion). Children with internal femoral torsion will want to sit in a “W” position, or on their feet, rather than crossed legged.

Rotational Deformities in Children

External femoral torsion (EFT) is much less common. This is because the usual position in the uterus makes the femur rotate internally, not externally. External femoral torsion can also be a cause of toeing out.

A significant difference between the left and right leg may mean that a deformity is caused by something else. Tumors, abnormal bone formation, fracture, and infection of the bone are possible causes. Excessive toeing out of one foot can be a sign of hip disease. Further evaluation is necessary. A child with progressive bowed legs after 20 months may have a pathological deformity known as Blount’s disease. Rickets can also cause bowed or knocked knees. Rickets is a vitamin D deficiency. It is also seen in kidney problems. Neurological and muscular disorders can also cause deformities of the legs.

Related Document: A Patient’s Guide to Blount’s Disease

Treatment

What treatment options are available?

Nonsurgical Treatment

The vast majority of children with rotational deformities need no specific treatment. The rotational deformity will change towards normal with time. Letting Mother Nature work things out is usually the best course of action. Sculpting of the body is a natural process. It includes the muscles, ligaments, and bones. Genetics also play a part. Muscle pull, lifting against gravity, and learning new postures all help with the normal development of the skeleton.

If your child’s foot looks normal when not weight bearing, then most likely no treatment is needed. Bracing or orthotics is not needed. External femoral torsion is much less common. Usually no specific treatment is necessary. Splints, orthotics, and corrective shoes are not usually beneficial.

Braces, casts, twister cables, exercises, and orthopedic shoes have been used to treat rotational deformities. Some studies show they may not be all that helpful. Their results are similar to no treatment at all. Stretching exercises, and encouraging certain positions for sleep and play cause no harm. But understand that these interventions may just make parents feel good that they are doing something for their child. Parents should consider the psychological effects of any type of rigid, disciplined program that restricts the child’s ability to interact normally with their surroundings.

Rotational deformities generally do not cause problems in adulthood. Many parents worry that these problems may cause arthritis in the joints when the child is grown. This is highly unlikely.

Surgery

Surgery is rarely needed to correct the majority of rotational deformities in either the femur or tibia. If external tibial torsion (rotation) is very severe and lasts longer than age four, surgery may be recommended to better align the tibia. Similarly, if surgery on the femur is recommended, it is usually done after the age of eight.

Surgery to correct the deformity is done only when the deformity is severe and affects the child’s function. In general, the type of surgery performed to improve the rotational deformity is called a derotational osteotomy. Derotation means to remove the rotation and osteotomy means to cut the bone.

A derotational osteotomy requires the surgeon to cut the bone, rotate it to improve the alignment and hold the bones in that positon while they heal. Some type of metal hardware is generally used to hold the bones in place until they heal.

Rotational Deformities in Children

The younger the child, the faster they heal. When the tibia is involved an osteotomy just below the knee or just above the ankle can be done and held in place with one or two metal pins through the skin. These pins can be easily removed in four to six weeks once the bone has healed. In the older child, a metal plate and screws attached on the outside of the bone or metal rod placed inside the marrow cavity of the tibia may be necessary to provide support for the longer period of time necessary for healing.

Rotational Deformities in Children

When surgery is recommended to derotate the femur, the intramedullary rod is commonly used to hold the bone in place. Children who require this surgery are generally older. A stronger type of fixation is required for a longer period of time. The intramedullary rod is placed through a small incision in the over the hip and the patient can be up and walking nearly immediately. The rod does not necessarily need to be removed in the older adolescent child. If the child is younger and the growth plates of the femur are still open, other fixation may need to be considered so there is no damage to the growth plates.

Rotational Deformities in Children

Another option is an external fixator. This device uses metal pins that are placed through the skin and into the bone. They are placed above and below the cut in the bone. The pins are then connected to bars on the outside of the leg that hold the bones in place while they heal. The pins are removed at a later date (usually four to eight weeks) when the surgeon feels the bone is strong enough. Pin removal can easily be done in day surgery. This can be safer when the growth plates are still open.

Rehabilitation

What can be expected after treatment?

Nonsurgical Rehabilitation

Most children require no active treatment whatsoever. There are no restrictions generally placed on children. Being a child IS the treatment. Allowing the child to pursue normal activity will result in a completely acceptable outcome.

Rotational Deformities in Children

If internal tibial torsion (ITT) lasts 18 months after the start of walking, some doctors will suggest the use of a Denis-Browne splint. A bar is attached to the sole of high-top shoes. The splint is worn at bedtime. The feet are forced into a toeing out position.

Some teenagers with exaggerated femoral internal torsion may develop pain in the front of the knee. Physical therapy may be beneficial for the knee pain. Use of ice, heat, taping, strengthening, and gait training may be helpful.

Your child’s doctor may want you to follow up periodically. This is to make sure the skeleton is developing as expected. Most rotational deformities correct themselves by age eight.

After Surgery

Your child will likely be hospitalized for several days after a derotational osteotomy. Because the bone is cut, it may take at least eight to 12 weeks to heal. Your child’s surgeon will want to see your child frequently following surgery. X-rays will need to be repeated. This allows the doctor to evaluate bone healing. If the bone does not heal, further surgery may be necessary.

When pins are used to hold the bone in place, cleaning them daily is important. This is to decrease the risk of infection. You will be taught how to do this before leaving the hospital. It is important that you contact your child’s surgeon immediately if you suspect an infection.

Your child will most likely need to be in a wheelchair to protect the bone. Physical therapy may be helpful for range of motion of other joints and to maintain strengthening.

Unless your child has had a surgical procedure that would allow immediate weight bearing, your child will not be allowed to stand on the leg until after the bone starts to heal. Weight bearing will be increased gradually. Usually by three months, your child will be allowed to walk alone. Walking should eventually appear normal.

An occupational therapist may also be helpful during recovery. They will assist with equipment to make dressing, transferring, and bathing easier. They can also help with wheelchair fitting.

When the bone has healed, your child may benefit from physical therapy if there is stiffness or weakness that does not get better on its own.

Flat Feet

A Patient’s Guide to Congenital Flatfoot (Pes Planus) in Children

Introduction

Flatfeet (also known as pes planus) describes a condition in which the longitudinal (lengthwise) and/or medial (crosswise) arches of the foot are dropped down or flat. The entire bottom of the bare foot is in contact with the floor or ground surface during standing, walking, and other weight bearing activities.

The condition is often present at birth (congenital) in one or both feet. When only one foot is affected, the problem is referred to as unilateral pes planus or flatfoot. When both feet are involved, the condition is bilateral flatfeet.

This guide will help you understand

  • what parts of the foot are affected
  • how the problem develops
  • how doctors diagnose the condition
  • what treatment options are available

Anatomy

What parts of the foot are involved?

The anatomy of the foot is very complex. When everything works together, the foot functions correctly. When one part becomes damaged, it can affect every other part of the foot and lead to problems. With a flatfoot deformity, bones, ligaments, and muscles are all affected. A combination of malalignments results in the flatfoot appearance.

Bones

Congenital Flatfoot (Pes Planus) in Children

The skeleton of the foot begins with the talus, or ankle bone, that forms part of the ankle joint. The two bones of the lower leg, the large tibia and the smaller fibula, come together at the ankle joint to form a very stable structure known as a mortise and tenon joint.

The two bones that make up the back part of the foot (sometimes referred to as the hindfoot) are the talus and the calcaneus, or heel bone. The talus is connected to the calcaneus at the subtalar joint. The ankle joint allows the foot to bend up and down.

The subtalar joint allows the foot to rock from side to side. People with flatfeet usually have more motion at the subtalar joint than people who do not have flatfeet. The increased flexibility of the subtalar joint results in many compensatory actions of the foot and ankle in order to keep proper foot alignment during standing and walking.

Congenital Flatfoot (Pes Planus) in Children

Just down the foot from the ankle is a set of five bones called tarsal bones. The tarsal bones work together as a group. They are unique in the way they fit together. There are multiple joints between the tarsal bones. When the foot is twisted in one direction by the muscles of the foot and leg, these bones lock together and form a very rigid structure. When they are twisted in the opposite direction, they become unlocked and allow the foot to conform to whatever surface the foot is contacting.

The tarsal bones are connected to the five long bones of the foot called the metatarsals. The two groups of bones are fairly rigidly connected, without much movement at the joints. Finally, there are the bones of the toes, the phalanges.

Ligaments and Tendons

Ligament are the soft tissues that attach bones to bones. Ligaments are very similar to tendons. The difference is that tendons attach muscles to bones. Both of these structures are made up of small fibers of a material called collagen. The collagen fibers are bundled together to form a rope-like structure.

Congenital Flatfoot (Pes Planus) in Children

The large Achilles’ tendon is the most important tendon for walking, running, and jumping. It attaches the calf muscles to the heel bone to allow us to rise up on our toes. The posterior tibial tendon attaches one of the smaller muscles of the calf to the underside of the foot. This tendon helps support the arch and allows us to turn the foot inward. Failure of the posterior tibial tendon is a major problem in many cases of pes planus.

Many small ligaments hold the bones of the foot together. Most of these ligaments form part of the joint capsule around each of the joints of the foot. A joint capsule is a watertight sac that forms around all joints. It is made up of the ligaments around the joint and the soft tissues between the ligaments that fill in the gaps and form the sac.

Congenital Flatfoot (Pes Planus) in Children

The spring ligament complex is often involved in the flatfoot condition. This group of ligaments supports the talonavicular joint. The spring ligament complex works with the posterior tibial tendon and the plantar fascia to support and stabilize the longitudinal arch of the foot.

Congenital Flatfoot (Pes Planus) in Children

Failure of the ligaments that support this arch can contribute to flatfoot deformity. Injury, laxity (looseness), or other dysfunction of the ligament and tendon structures can result in deformity of the foot and/or ankle resulting in pes planus.

Muscles

Most of the motion of the foot is caused by the stronger muscles and tendons in the lower leg that connect to the foot. Contraction of the muscles in the leg is the main way that we move our feet to stand, walk, run, and jump.

Congenital Flatfoot (Pes Planus) in Children

There are numerous small muscles in the foot. While these muscles are not nearly as important as the small muscles in the hand, they do affect the way that the toes work. Damage to some of these muscles can cause problems.

Most of the muscles of the foot are arranged in layers on the sole of the foot (the plantar surface). There they connect to and move the toes as well as provide padding underneath the sole of the foot.

Related Document: A Patient’s Guide to Foot Anatomy

Causes

What causes this problem?

Flexible flatfoot refers to a foot that looks flat when standing but appears to have an arch when the foot isn’t resting on the floor or against a flat surface. Sometimes the term fallen arches is used, but doctors prefer not to use this term in favor of the more accurate medical term pes planus.

Most babies and young children have what looks like flat feet. This is normal. Before the bones are formed, much of the foot and ankle are still made up of soft tissue, fat, and cartilage. The arch has not formed fully yet. The joints are still hypermobile when the child starts to get up on feet to walk. This is when the flatfoot deformity becomes obvious and parents may become concerned that something is wrong with their child’s foot. The vast majority of children will grow out of their flat foot deformity. Even if the deformity does not fully correct with age, it is unlikely to cause the child any difficulty in the future.

Congenital Flatfoot (Pes Planus) in Children

Stress and activities during early childhood requiring strength in the feet are actually the training needed to develop normal muscle, tendon, ligaments, and bone in the foot and ankle. But in some cases, the arch doesn’t form and the foot remains flat into adulthood. Flatfeet do tend to occur in families as an inherited condition.

There are many possible causes for the flatfoot condition. Biomechanically, many soft tissue structures must connect and support one another to prevent a flatfoot deformity. Tibial (lower leg bone) rotation, hindfoot alignment, and position of the joints of the foot, midfoot, hindfoot, and ankle are all important factors. There is no one cause of flatfoot deformity that can be identified.

In the flexible flatfoot, the bones are usually normal – but the supporting ligaments are lax or loose. The joints are hypermobile. As the soft tissues and joints of the foot and ankle try to maintain a normal foot position, increased stress is placed on them. This can lead to fatigue and loss of strength resulting in a sagging of the arch. This can affect the chain of anatomical structures all the way up the leg.

There are some uncommon causes of flatfoot that do affect the bones. A tarsal coalition refers to a condition where two or more bones in the midfoot or hindfoot fail to form separately during development. They remain connected together, altering the bone structure of the foot and limiting flexibility of the foot. This is a different type of flatfoot deformity altogether and is commonly referred to as a spastic flatfoot. This type of flatfoot deformity is not flexible. In fact, the foot is quite rigid due to the abnormal connection between the bones of the foot. This condition can be painful.

Related Document: A Patient’s Guide to Tarsal Coalition

Symptoms

What does the condition feel like?

For most children, the flexible flatfoot deformity causes no symptoms. They do not suffer from pain, swelling, or sore feet. Children with flexible flatfoot deformity may wear out shoes a bit different from a normal person, but there usually is not any reason to be concerned.

In moderate to severe cases, the patient may report fatigue and tired, sore feet after standing on them all day. During those times, they may limit their own activities.

In the uncommon severe cases, calluses may appear where pressure occurs as the bones make contact with the floor or hard surface. The loss of joint stability may alter the foot’s ability to absorb the load and conform to uneven ground or surfaces.

Rarely, the flatfoot deformity may get worse with age. Excess pressure on the surrounding soft tissues (ligaments, capsules, tendons, muscles) can lead to other problems such as malalignment of the patella (kneecap), hallux valgus (bunions), and rotation of the knee and hip.

When the flatfoot deformity is the result of a tarsal coalition, the situation is different. The foot may become painful. The child may begin to complain of foot and ankle pain after a minor twisting injury and the pain not resolve after a normal healing period. The symptom of pain combined with decreased motion and flatfoot deformity should suggest a more serious problem in the foot.

Diagnosis

How do doctors diagnose the problem?

The history and physical examination are probably the most important tools the physician uses to diagnose this condition. Clinical tests can be done to differentiate flexible flatfoot from rigid flatfoot. The examiner will check mobility in the forefoot, hindfoot, and ankle. Muscle weakness and/or muscle tightness will be assessed. The wear pattern on the shoes can offer some helpful clues.

X-rays or other more advanced imaging such as CT scans or MRIs may be ordered but these are rarely needed. The examiner may be able to see and feel a prominent bump with tenderness around the area when an accessory navicular bone is present. X-rays will show if there is an accessory navicular or tarsal coalition as part of the problem.

A very simple test called the wet footprint can be done at home or in the doctor’s office. The patient places the foot in water and then places the foot down on a piece of paper or thin cardboard. After making a footprint, the foot is lifted off the paper. Someone with a flat foot will leave a complete footprint where the sole makes contact with the paper.

The physician may have you perform a single heel raise. You will be asked to stand on one foot and rise up on your toes. You should be able to lift your heel off the ground easily while keeping the calcaneus (heel bone) in the middle with slight inversion (turned inward).

Treatment

What treatment options are available?

Nonsurgical Treatment

There may be no treatment needed for mild cases of flatfeet, especially flexible flatfeet. This condition often corrects itself in time as the child grows and develops. Young children should be encouraged to walk barefoot whenever it is safe to do so. This will increase sensory input into the foot. At the same time, navigating various floor and ground surfaces helps build strength and stability.

For older children and adults, a simple modification to the shoe may reduce the fatigue and discomfort in the foot. Sometimes purchasing shoes with a good arch support is sufficient. Try to find a comfortable shoe with an arch support, firm heel counter (back of the heel), and a flexible sole (bottom). Supporting the arch helps decrease the tension in the posterior tibialis tendon. Stretching the Achilles’ tendon helps maintain normal motion of the hindfoot, which in turn, helps maintain alignment of the midfoot.

For other patients, an off-the-shelf (prefabricated) shoe insert works well. The goal is to support the foot and prevent further stretching of lax ligaments and tendons. These supports will not reverse the structural deformity and they will not build and arch by wearing them over time. These inserts simply help the shoe better fit the foot and support the structures of the foot. Improving alignment can take tension off the soft tissue structures, reduce fatigue, and improve the biomechanics of standing and gait (walking).

Further treatment is usually not needed for the flexible flatfoot deformity. Surgery is rarely needed for this condition. Patients with severe symptoms that do not respond to conservative care may benefit from further orthopedic evaluation and treatment. In rare cases, surgical intervention to correct the problem and realign the foot may be suggested.

Surgery

For children with a shortened Achilles’ tendon, a program of stretching exercises or serial casting may help reduce pressure on the talus bone and offer significant pain relief. Severe cases of flatfoot (pes planus) may require surgery to reconstruct the arch or fuse the bones. This is very rare as conservative (nonoperative) care is usually sufficient.

Children with tarsal coalition or an accessory navicular bone require orthopedic evaluation and management. Surgery is done to correct the problem by the early teen years (before skeletal maturity).

Rehabilitation

What should I expect after treatment?

Nonsurgical Rehabilitation

Flatfeet seen in very young children just starting to walk often resolve with time. The very act of gripping with the toes to maintain support and balance along with the development of the bones forms the arches.

For older children who still have flatfeet, stretching and strengthening exercises won’t cause an arch to form where there isn’t one anatomically. But these activities can help ease any pain or discomfort caused by the condition. The same is true for any supports or shoe inserts that are used.

After Surgery

Corrective surgery is only done in cases of severe, painful and disabling flatfoot position. This is very rare. Reconstructive surgery for tarsal coalition or an accessory navicular bone requires a period of immobilization in a cast followed by rehabilitation to restore strength in the foot and ankle. In some cases, more than one operation is needed as the child grows and develops. Pain relief and joint stability are the goals.

Weightlifter’s Shoulder

A Patient’s Guide to Weightlifter’s Shoulder (Distal Clavicular Osteolysis)

Introduction

Weightlifter's Shoulder

Weightlifter’s shoulder is a painful deterioration of the distal end of the clavicle (collar bone). It is an overuse phenomenon that causes tiny fractures along the end of the clavicle. A breakdown of the bone (osteolysis) occurs.

Weightlifters aren’t the only ones affected. Female bodybuilders, air-hammer operators, soldiers, handball players, and others can develop this problem. For that reason, it is also known as distal clavicular osteolysis (DCO). Osteolysis refers to the resorption of bone at the site of the injury.

This guide will help you understand

  • how the problem develops
  • how doctors diagnose the condition
  • what treatment options are available

Weightlifter's Shoulder

Anatomy

What parts of the shoulder are affected?

The shoulder is made up of three bones: the scapula (shoulder blade), the humerus (upper arm bone), and the clavicle (collarbone).

The acromioclavicular (AC) joint is affected most often. This is where the end of the collarbone (closest to the shoulder) attaches to the acromion. The acromion is a curved piece of bone that comes from the shoulder blade across the top of the shoulder. The clavicle and acromion meet to form the AC joint in front of the shoulder.

Ligaments and soft tissues hold the AC joint together and provide stability. These include the coracoclavicular ligament, superior and inferior AC ligaments, and the AC joint capsule. There is also a fibrocartilaginous disc between the clavicle and acromion to provide cushion and help transmit and offload forces on the joint.

Related Document: A Patient’s Guide to Shoulder Anatomy

Cause

What causes this condition?

Weightlifter's Shoulder

Repetitive trauma or stress from training and lifting causes tiny fractures of the distal end of the clavicular bone. Excessive traction on the AC joint from bench presses or chest fly exercises occurs when the elbows drop below or behind the body. This places the shoulders in a position of excess extension. Because the bone doesn’t have a chance to heal before the next training session begins, the bone actually starts to dissolve.

There may be a history of an acute injury of the AC joint. But the condition can occur without any known trauma. In most cases, there is repetitive stress to the affected upper extremity. Weight training, intensive lifting, and operating an air hammer are examples of the activities leading to acute distal clavicular osteolysis.

Weightlifter's Shoulder

There is evidence that the body tries to heal itself but the bone dissolves or is resorbed by the body instead. A network of blood vessels forms in the area during the attempted healing process. Chronic inflammation with scar tissue called fibrosis is commonly found when tissue from the area is examined under a microscope.

The synovial lining of the joint starts to overproduce itself. Invasion of the underlying bone begins. Degenerative joint disease occurs as an end-result of the pathologic process.

Symptoms

What are the symptoms?

You feel an aching pain in the front of the shoulder at the AC joint. Pressing on the AC joint causes increased pain and tenderness. There is often weakness associated with the degenerative bone changes. For the weightlifter, symptoms are the most severe the night after a weightlifting competition or program.

Moving the arm across the body hurts. It gets worse with weight training involving the upper extremities (arms). Activities such as push-ups, bench presses, power clean exercises, dips on the parallel bars, and throwing motions make the symptoms worse. . Lying on the affected side can disrupt sleep.

Diagnosis

How will my doctor diagnose this condition?

The history and physical examination are probably the most important tools the physician uses to diagnose. Your doctor may move and feel your sore joint. This may hurt, but it is very important that your doctor understand exactly where your joint hurts and what movements cause you pain.

The diagnosis is made using X-rays, scintigraphy (bone scan), and steroid injection. CT-guided injection is actually a diagnostic tool and a treatment. Pain relief with steroid injection into the AC joint confirms that the pain is coming from the AC joint.

Treatment

What treatment options are available?

Nonsurgical Treatment

Treatment begins with conservative (nonoperative) care. This may include rest and/or changes in weight-training activities and techniques. Avoiding over-training and smoking are two very effective ways to prevent this condition. If it does develop, take quick steps to modify weightlifting techniques and avoid over-training.

A weight-trainer or physical therapist can help you with activity modification and specific strength training for this problem. For example, you can narrow your hand spacing on the barbells. This takes the stress off the distal clavicle. End your bench presses two inches above the chest. Some lifters place a two-inch folded towel on the chest as a reminder.

The power clean or power jerk can also be modified. Don’t rack the bar. Start with the elbows even with or above the shoulders and lift. This eliminates the power pull. Certain activities such as the bench press, dips, and push-ups should be avoided for a while. Apply an ice massage and take ibuprofen after each workout or exercise session.

Athletes must be careful to follow all recommendations for program modifications. There is a tendency to work through the pain and not really modify the program.

Surgery

Surgery may be needed for those athletes who do not improve with conservative care or who are unwilling to change the training or performance routine. The surgeon removes the end of the clavicle. This is called a distal clavicle resection. The procedure can be done with an open incision or through tiny puncture holes with an arthroscope.

Weightlifter's Shoulder

Repair of any torn soft tissue in the area is done at the same time. Some surgeons transfer the coracoacromial ligament over the end of the bone that has been cut. This helps stabilize the joint.

It’s possible to modify the procedure just a bit to stabilize the joint for a quick return-to-sport. The coracoacromial ligament can be transferred over the end of the bone that has been cut. This helps protect and stabilize the joint. It makes power lifting more comfortable for many athletes.

Rehabilitation

What should I expect after treatment?

Nonsurgical Rehabilitation

You may experience a gradual lessening of painful symptoms until you are pain free. The therapist will help you gradually resume all activities without bringing back the problem.

For athletes who progress through the pain without activity modification, they may perform surgery on themselves. In this form of self-surgery, the clavicle will resect on its own. However, there may be an inflammatory response with increased symptoms setting you back in your program.

After Surgery

Many experienced weightlifters are able to continue training carefully. They can resume their program as early as three days after surgery. Most are back in full swing by the end of a week.

Pain is relieved in a majority of patients. Weightlifters are pleased that without the pain, they can quickly get back to their pre-operative level of lifting within a week or two. In fact, some even report exceeding their training weight once the pain is gone. Likewise, there are reports of manual laborers returning to full work duties. The turn around time is very short.

Patients should be warned that there could be some problems. Abnormal motion of the AC joint can lead to a poor result. In such cases, pain is not relieved. There can be muscle injury, prolonged bleeding, infection, and fracture of the clavicle during the procedure. Smokers are at greater risk of poor wound healing and failed surgery.

Transient Synovitis

A Patient’s Guide to Transient Synovitis of the Hip in Children

Introduction

Transient synovitis of the hip is an acute inflammatory condition of the inner lining of the hip. Transient means it is temporary and doesn’t last long. Transient synovitis is also known as toxic synovitis or irritable hip.

This condition affects young children (boys more than girls) most often. In fact, it’s the most common cause of acute hip pain in young children between the ages of three and 10. However, there are reports of transient synovitis in children less than one year old and in adults.

This guide will help you understand

  • how the condition develops
  • how doctors diagnose the condition
  • what treatment options are available

Anatomy

Transient Synovitis

What parts of the hip are affected?

The hip joint is a true ball-and-socket joint. The bones of the hip are the femur (the thighbone) and the pelvis. The top end of the femur is shaped like a ball. This ball is called the femoral head. The femoral head fits into a round socket on the side of the pelvis. This socket is called the acetabulum.

Transient Synovitis

Transient synovitis affects the inner lining of the hip joint including the synovium and joint capsule. The synovium is a membrane that seals the synovial fluid in the joint to lubricate the joint surface. It is between the articular cartilage and the joint capsule. The joint capsule is a watertight sac that surrounds a joint. In the hip, the joint capsule is formed by a group of three strong ligaments that connect the femoral head to the acetabulum. These ligaments are the main source of stability for the hip. They help hold the hip in place.

Articular cartilage is the material that covers the ends of the bones of any joint. Articular cartilage is about one-quarter of an inch thick in the large, weight-bearing joints like the hip. In the hip, articular cartilage covers the end of the femur and the socket portion of the acetabulum in the pelvis. The cartilage is especially thick in the back part of the socket, as this is where most of the force occurs during walking and running.

Articular cartilage is white and shiny and has a rubbery consistency. It is slippery, which allows the joint surfaces to slide against one another without causing any damage. The function of articular cartilage is to absorb shock and provide an extremely smooth surface to make motion easier. We have articular cartilage essentially everywhere that two bony surfaces move against one another, or articulate.

Causes

What causes this condition?

The exact cause of this problem is unknown. In some cases, it may develop after a recent viral infection (such as a cold or upper respiratory infection). In a smaller number of children, trauma to the hip is followed by transient synovitis.

There is much debate about a possible link between transient synovitis and another condition called Legg-Calve-Perthes disease. In Perthes disease, the blood supply to the growth center of the hip (the capital femoral epiphysis) is disturbed, causing the bone in this area to die. The blood supply eventually returns, and the bone heals.

Transient Synovitis

Only a small number of children with transient synovitis develop Legg-Calvé-Perthes disease. It’s possible the prolonged increase in pressure inside the joint causes loss of blood supply to the hip. Some experts suspect children who develop Perthes disease may have undetected transient synovitis before collapse of the femoral head occurs.

Related Document: A Patient’s Guide to Perthe’s Disease

Symptoms

What are the symptoms?

Inflammation and effusion (swelling) can cause sudden hip pain. Usually only one hip is involved. The child may refuse to walk or may limp when walking as the first sign of a problem. Younger children who aren’t walking yet stop crawling or change the way they get around. They may cry at night or when having the diaper changed.

Your child may have a slight fever. A high fever is usually a sign of something more serious such as septic arthritis (bacterial infection of the hip) or osteomyelitis (bone infection).

In all age groups, there is usually a loss of hip motion. The child doesn’t want to put weight on that leg. The painful symptoms may travel to the thigh, groin, or knee on the same side. Sometimes there isn’t hip pain but just groin, thigh, or knee pain.

Your child may want to keep the hip and leg in a resting position of flexion (bent), external rotation (turned outward), and abduction (away from the other leg). This position opens up the joint capsule helps reduce the pain by taking pressure off the soft tissue structures.

Diagnosis

How do doctors diagnose this condition?

The history and physical examination are probably the most important tools the physician uses to diagnose transient synovitis of the hip. Motion is usually limited and painful. The hip is tender to palpation.

Transient Synovitis

X-rays are usually taken. Though radiographs don’t show synovitis, they do help the physician rule out a fracture, tumor, or slipped capital femoral epiphysis (slippage of the growth plate). More advanced imaging such as MRI or bone scan may be needed if there is a need to rule out other more serious problems.

A blood test will show mild inflammation. If needed, the physician may order an ultrasound of the hip. This test will show any effusion (fluid collection) in the hip joint. Drawing the fluid out with a needle called needle aspiration will show if there is pus in the joint from septic (bacterial) arthritis. The fluid is clear in transient synovitis.

Related Document: A Patient’s Guide to Slipped Capital Femoral Epiphysis

Treatment

What treatment options are available?

Nonsurgical Treatment

Home treatment with rest and antiinflammatory drugs are the main treatment techniques. It is okay if your child keeps the leg turned out. Any position that is comfortable will help the healing process. The child is usually already limiting how much weight is put on that leg. If not, every effort should be made to avoid weight-bearing.

Vigorous physical activities such as running, jumping, and participating in sports activities should be avoided during the acute phase. Your doctor will let you know if crutches are needed to help limit weight-bearing through that leg. If crutches are advised, they will only be needed for a few weeks.

Surgery

Surgery is not usually necessary. In severe cases of transient synovitis children may be hospitalized for observation and leg traction. Applying pull on the hip through the leg can reduce the pressure inside the joint capsule. If the child is cooperative, home traction may be possible.

Rehabilitation

What should I expect as I recover?

Nonsurgical Rehabilitation

A rehab program isn’t usually needed. Most of the time, this condition resolves (goes away) within a week or two. The child will naturally start to increase activity as he or she starts to feel better. The condition can come back. If this happens, it will most often occur during the first six months after it first appears.

Follow-up with your doctor is important. If the symptoms aren’t improved or improving after seven to 10 days, then contact your child’s doctor. There could be something else wrong with your child’s hip. Further diagnostic testing may be required. Even if your child has recovered fully, a repeat X-ray is advised. This should be done about six months after the first episode occurs. It will help identify any early signs of Legg-Calve-Perthes disease.

Rotator Cuff Tear Arthropathy

A Patient’s Guide to Rotator Cuff Tear Arthropathy

Introduction

Rotator Cuff Tear Arthropathy

The rotator cuff is a unique structure in the shoulder that is formed by four tendons. These four tendons attach to four muscles that help keep the shoulder stabilized in the socket (or glenoid) and help rotate the upper arm inward and outward. If the rotator cuff is torn and is not repaired, a type of wear and tear arthritis of the shoulder can develop over time. This condition is sometimes called arthropathy and the term cuff tear arthropathy is used to describe this type of arthritis of the shoulder that develops when the rotator cuff is damaged. If you develop this condition, your shoulder will be painful. Movement and strength of the shoulder will be decreased. Moving the arm away from the body and raising it over your head can be especially difficult.

This guide will help you understand

  • what parts of the shoulder are involved
  • what causes this condition
  • how doctors diagnose the condition
  • what treatment options are available

Anatomy

Rotator Cuff Tear Arthropathy

What parts of the shoulder are involved?

The bones of the shoulder are the humerus (the upper arm bone), the scapula (the shoulder blade), and the clavicle (the collar bone). The roof of the shoulder is formed by a part of the scapula called the acromion. The shoulder joint is also called the glenohumeral joint. One of the bones of the glenohumeral joint is the humerus (the long bone of the upper arm).

Rotator Cuff Tear Arthropathy

It has a ball, called the humeral head on the top end. The humeral head fits into a small, shallow cup called the glenoid fossa. It makes up the other part of the glenohumeral joint. The glenoid fossa is part of the shoulder blade. A large ligament runs from the front of the acromion to another part of the shoulder blade called the coracoid process. This ligament is called the coracoacromial ligament. It adds stability to the front of the shoulder.

The rotator cuff is made up of tough, fibrous tissue. It forms a cuff (or capsule) covering the shoulder joint. There are four tendons that help form the rotator cuff. The muscles that form the tendons are the supraspinatus, infraspinatus, teres minor, and subscapularis. These muscles rotate the shoulder outward and inward. Along with another muscle, the deltoid, they also help lift the arm away from the body.

The rotator cuff slides between the humeral head and the acromion as we raise our arm. As this sliding occurs over and over, the rotator cuff tendons will often be pinched as you use the shoulder everyday. This pinching is called impingement. Over time this pinching can lead to damage and weakening of the rotator cuff tendons.

Related Document: A Patient’s Guide to Shoulder Anatomy

Related Document: A Patient’s Guide to Rotator Cuff Tears

Causes

What causes this condition?

Dr. Charles Neer actually described rotator cuff tear arthropathy (RCTA) in 1977. Today, doctors generally refer to this as simply cuff tear arthropathy. Cuff tear arthropathy is actually a type of wear and tear, or degenerative arthritis of the shoulder that develops over time after the rotator cuff is damaged.

Normally, when the rotator cuff muscles contract, they pull the head of the humerus tightly into the socket of the shoulder. This stabilizes the shoulder and allows the the large deltoid muscle to raise the arm over the head as it rotates the humeral head like a pulley. This motion needs the rotator cuff and deltoid muscles to work together – in balance. When the rotator cuff is torn, the shoulder becomes unbalanced. The deltoid muscle pulls the head of the humerus up into the acromion in a sliding motion.

Rotator Cuff Tear Arthropathy

When the top of the humerus hits the underside of the acromion, the deltoid may be able to pull the arm part way up as it levers against the underside of the acromion. But, over time this abnormal sliding motion causes wear and tear on the joint surfaces. Arthritis develops and any motion becomes painful. The shoulder becomes weaker and weaker until you can no longer raise the arm above the head.

Rotator cuff tears are very common. Trauma, such as falls, lifting, and pulling forcefully can also cause a rotator cuff tear. When this happens, it is called an acute tear. Although the rotator cuff can be damaged from a single traumatic injury, damage to the rotator cuff usually occurs gradually. Age can be a factor. As we age, the tendons of the rotator cuff become weaker and more likely to be injured. The blood supply to the tendons diminishes with age. Rotator cuff tears are much more likely to occur after the age of 40.

Certain activities can increase the wear and tear on the rotator cuff. Repetitive overhead activity such as painting, plastering, racquetball, weightlifting, and swimming can cause wear and tear of the rotator cuff.

Surgeons generally will recommend surgery to repair a rotator cuff tear when it occurs. A successful surgical repair of a torn rotator cuff tear can make the development of cuff tear arthropathy much less likely. But, sometimes a rotator cuff tear cannot be repaired. The tissue is simply too damaged and cannot fixed. This is not an uncommon situation in older patients with rotator cuff tears.

Rotator Cuff Tear Arthropathy

In other cases, the patient simply elects not to have surgery to repair a rotator cuff tear and chooses to simply live with the discomfort. Over several years, both of these situations can result in the later development of rotator cuff arthropathy.

Symptoms

What does this condition feel like?

The most common symptom of rotator cuff tear arthropathy is pain in and around the shoulder. The pain can also radiate into your neck, arm, even into your wrist or hand. The shoulder can be especially painful when trying to lift the arm, or rotate it outward. The pain is usually worse at night. It can interrupt your sleep, especially if you try to sleep on the affected shoulder. If untreated, the pain can be nearly continuous and can be severe.

Weakness of the shoulder makes it difficult, if not impossible to lift the arm overhead. Often, even starting this motion can be difficult. The tendency is to shrug the shoulder in order to lift the arm part of the way. With time, weakness of the rotator cuff muscles will worsen. Range of motion can be quite limited. You will often find it difficult to do routine things, like reaching behind your back, reaching into a cabinet, or combing your hair. You may notice a crackling or popping sensation. When there is arthritis of the glenohumeral joint, there is often a creaking or grating sound.

Diagnosis

How do doctors diagnose this condition?

Rotator Cuff Tear Arthropathy

Your doctor will want to do a history and physical examination. He will ask you about activities or trauma that could have injured your shoulder. He will want to know the level of your pain, and what limitations you have. A physical examination is done. Range of motion and strength of the shoulder muscles will be evaluated. Your doctor will want to look at your shoulder to see if there is bony deformity, or atrophy (shrinkage) of the muscles. With a complete rotator cuff tear, moving the arm away from the body can be nearly impossible. If your doctor lifts your arm for you, and you cannot hold it up, this is called a positive Drop Arm Test. This usually means the rotator cuff is torn.

Other areas such as the neck may also need evaluation. A pinched nerve in the neck can mimic a rotator cuff tear. A neurological examination to include checking reflexes and sensation may be included. Your doctor may want you to have an electromyogram (EMG). This checks the function of the muscles of the shoulder. An EMG uses a small needle in the muscle being tested. It measures the electrical activity of the muscle at rest, and when tightened.

Your doctor will request X-rays of your shoulder. X-rays show the shape of the bones and joints. When the rotator cuff is torn, the shoulder will often ride high, meaning that it sits higher in the joint than it should. It can also show how much damage ahs occurred to the joint surfaces.

Magnetic resonance imaging (MRI) allows your doctor to look at slices of the area in question. The MRI machine uses magnetic waves, not X-rays to show the muscle, tendons, and ligaments of the shoulder. MRIs will show tears of the rotator cuff tendons. Atrophy of the muscles can also be evaluated with MRI. A computerized tomography (CT) scan shows slices of bone. Like X-rays, it uses radiation. A CT scan can help to more accurately determine the degree of damage of the glenohumeral joint. A CT scan is especially useful to plan surgery if an artificial shoulder replacement is considered for treatment.

Treatment

What treatment options are available?

Nonsurgical Treatment

Conservative care that includes physical therapy, ice, heat, and anti-inflammatories is tried first. The goal of treatment is to reduce pain, and increase range of motion and function. Corticosteroid injection into the shoulder joint is also sometimes helpful. Steroids are very powerful anti-inflammatory medications that can reduce pain temporarily. These injections will not heal the tear but may give pain relief for several weeks to months. If arthritis of the shoulder is advanced, and pain is continuous and severe, surgery may be the best option available.

Rotator Cuff Tear Arthropathy

Surgery

Cuff tear arthropathy is the result of long standing lack of rotator cuff function. In almost all cases, repair of the rotator cuff tear is no longer an option. Surgery for cuff tear arthropathy is done when pain and decreased motion continue after conservative care. The simplest surgical procedure to try and improve the situation is a debridement. During a debridement,

Rotator Cuff Tear Arthropathy

the surgeon will surgically remove (debride) any inflammed tissue, bones spurs and loose flaps of tendon tissue that may be catching in the joint and causing pain. This procedure may reduce pain, however, it does not always improve range of motion, strength, or function of the shoulder.

Rotator Cuff Tear Arthropathy

Patients with this type of arthritis would seem to be good candidates for a shoulder replacement, but replacing the shoulder in the typical fashion has not been successful. Replacing the shoulder with a special type of artficial shoulder joint is becoming more popular. This procedure is called a reverse shoulder replacement.

The “normal” artificial shoulder was designed to copy our real shoulder. The glenoid component (the socket) was designed to replace our normal shoulder socket with a thin, shallow plastic cup. The humeral head component was designed to replace the ball of the humerus with a metal ball that sits on top of the glenoid. This situation has been compared to placing a ball on a shallow saucer. Without something to hold it in place, the metal ball simply slides around on the saucer. In the shoulder that something is the rotator cuff and the muscles that attach to the tendons. Without a rotator cuff to hold the metal ball centered in the plastic socket, the metal quickly wore out the plastic socket and the joint became painful once again.

The answer to this dilemma was to rethink the mechanics of the shoulder joint and design an artificial shoulder that worked differently than the real shoulder joint. The solution was to reverse the socket and the ball, placing the ball portion of the shoulder where the socket use to be and the socket where the ball or humeral head use to be. This new design led to a much more stable shoulder joint that could function without a rotator cuff. The artificial joint itself provided more stability by creating a deeper socket that prevented the ball from sliding up and down as the shoulder was raised. The large deltoid muscle that covers the shoulder could be used to more effectively lift the arm, providing better function of the shoulder. The final result is a shoulder that functions better, is less painful and can last for years without loosening.

Related Document: A Patient’s Guide to Reverse Shoulder Arthroplasty

Rehabilitation

What should I expect after treatment?

Nonsurgical Rehabilitation

Your physical therapist will show you how to use ice or heat to help with pain. You will also be instructed in exercises to strengthen your shoulder girdle as much as possible. Showing you joint protection tips, or motion that you can expect to do safely without causing more harm to your shoulder is also important. The goal is to reduce pain, increase range of motion and function, and prevent further arthritis.

After Surgery

A physical or occupational therapist will see you the day after surgery to begin your rehabilitation program. Therapy treatments will gradually improve the movement in your shoulder. Your therapist will go over your exercises and make sure you are safe getting in and out of bed and moving about in your room.

When you go home, you may get home therapy visits. By visiting your home, your therapist can check to see that you are safe getting around in your home. Treatments will also be done to help improve your range of motion and strength. In some cases, you may require up to three visits at home before beginning outpatient therapy.

Out patient therapy at a facility can often more effective and is often preferred over home physical therapy. The first few outpatient treatments will focus on controlling pain and swelling. Ice and electrical stimulation treatments may help. Your therapist may also use massage and other types of hands-on treatments to ease muscle spasm and pain. Continue to use your shoulder sling as prescribed.

As the rehabilitation program evolves, more challenging exercises are chosen to safely advance the shoulder’s strength and function. Finally, a select group of exercises can be used to simulate day-to-day activities, like grooming your hair or getting dressed.

Reverse Shoulder Arthroplasty

A Patient’s Guide to Reverse Shoulder Arthroplasty

Introduction

Reverse Shoulder Arthroplasty

Shoulder joint replacement surgery (also called shoulder arthroplasty) can effectively ease pain from shoulder arthritis. Most people experience improved shoulder function after this surgery. But, certain patients are not candidates for joint replacement of the shoulder because they lack the muscle function necessary to stabilize the joint. A different type of shoulder replacement, called reverse shoulder replacement, may be available for many of these patients and provide pain relief as well as a stable functioning shoulder.

This guide will help you understand

  • how the shoulder works
  • what parts of the shoulder are replaced in reverse shoulder replacement
  • how reverse shoulder replacement differs from shoulder replacement
  • what to expect after reverse shoulder replacement surgery

Reverse Shoulder Arthroplasty

Anatomy

What parts of the shoulder are involved?

The shoulder is made up of three bones: the scapula (shoulder blade), the humerus (upper arm bone), and the clavicle (collarbone).

The rotator cuff connects the humerus to the scapula.

Reverse Shoulder Arthroplasty

The rotator cuff is formed by the tendons of four muscles: the supraspinatus, infraspinatus, teres minor, and subscapularis.

Reverse Shoulder Arthroplasty

Muscles move bones by pulling on the tendons. The rotator cuff helps raise and rotate the arm. As the arm is raised, the rotator cuff also keeps the humerus tightly in the socket. A part of the scapula, called the glenoid, makes up the socket of the shoulder. The glenoid is very shallow and flat.

Reverse Shoulder Arthroplasty

The part of the scapula that connects to the shoulder is called the acromion. A bursa is located between the acromion and the rotator cuff tendons. A bursa is a lubricated sac of tissue that cuts down on the friction between two moving parts. Bursae are located all over the body where tissues must rub against each other. In this case, the bursa protects the acromion and the rotator cuff from grinding against each other.

The humeral head of the shoulder is the ball portion of the joint. The humeral head has several blood vessels, which enter at the base of the articular cartilage. Articular cartilage is the smooth, white material that covers the ends of bones in most joints. Articular cartilage provides a slick, rubbery surface that allows the bones to glide over each other as they move. Cartilage also functions as sort of a shock absorber.

Reverse Shoulder Arthroplasty

The shoulder joint is surrounded by a watertight sac called the joint capsule. The joint capsule holds fluids that lubricate the joint. The walls of the joint capsule are made up of ligaments. Ligaments are connective tissues that attach bones to bones. The joint capsule has a considerable amount of slack, loose tissue, so that the shoulder is unrestricted as it moves through its large range of motion.

Related Document: A Patient’s Guide to Shoulder Anatomy

Rationale

What conditions lead to reverse shoulder joint replacement?

Reverse Shoulder Arthroplasty

The most common reason for undergoing shoulder replacement surgery is osteoarthritis. Osteoarthritis is caused by the degeneration of the joint over time, through wear and tear. Osteoarthritis can occur without any injury to the shoulder, but that is uncommon. Because the shoulder is not a weight-bearing joint, it does not suffer as much wear and tear as other joints. Osteoarthritis is more common in the hip and knee.

Reverse Shoulder Arthroplasty

Rotator cuff problems are a common condition in the shoulder, especially as we grow older. Degeneration or wear and tear of the rotator cuff tendons occurs as we age. Over time this can lead to weakening of the tendons and may result in a rotator cuff tear. Surgery to repair a rotator cuff tear is fairly common in people who are middle aged and older. Most rotator cuff repairs are successful, but in a portion of patients, the tendon has become so degenerated that the tendon can simply not be repaired. Small, medium and many large tears can be repaired either through arthroscopic or open surgical procedures. Unfortunately, many large tears that are untreated for a long time may retract and become unfixable.

A shoulder joint without an intact rotator cuff may still function relatively well. Some patients will have weakness, some pain and may not be able to completely raise the arm. But, they get by without their rotator cuff fairly well. There are many people who choose not to have surgery to repair a rotator cuff tear and will simply live with the limitations. Patients with massive rotator cuff tears may not be able to lift the arm without significant pain and weakness. When the arm cannot be lifted, this is called a pseudoparalytic shoulder.

The shoulder needs a functioning rotator cuff to remain stable as well as to create a joint capsule to hold the joint fluid that lubricates the joint. Over time, a shoulder without an intact rotator cuff becomes arthritic – the shoulder joint wears out due to the abnormal motion, the instability, and lack of lubrication from the joint fluid. This type of wear and tear arthritis in the shoulder is called (rotator) cuff tear arthropathy.

Reverse Shoulder Arthroplasty

Cuff tear arthropathy is difficult to treat. The shoulder is weak and painful. Patients may not be able to raise the arm above shoulder level. Patients with this type of arthritis would seem to be good candidates for a shoulder replacement, but replacing the shoulder in the typical fashion has not been successful.

Reverse Shoulder Arthroplasty

The “normal” artificial shoulder was designed to copy our real shoulder. The glenoid component (the socket) was designed to replace our normal shoulder socket with a thin, shallow plastic cup. The humeral head component was designed to replace the ball of the humerus with a metal ball that sits on top of the glenoid. This situation has been compared to placing a ball on a shallow saucer. Without something to hold it in place, the metal ball simply slides around on the saucer. In the shoulder that something is the rotator cuff and the muscles that attach to the tendons. Without a rotator cuff to hold the metal ball centered in the plastic socket, the metal quickly wore out the plastic socket and the joint became painful once again.

The answer to this dilemma was to rethink the mechanics of the shoulder joint and design an artificial shoulder that worked differently than the real shoulder joint. The solution was to reverse the socket and the ball, placing the ball portion of the shoulder where the socket use to be and the socket where the ball or humeral head use to be. This new design led to a much more stable shoulder joint that could function without a rotator cuff. The artificial joint itself provided more stability by creating a deeper socket that prevented the ball from sliding up and down as the shoulder was raised. The large deltoid muscle that covers the shoulder could be used to more effectively lift the arm, providing better function of the shoulder. The final result is a shoulder that functions better, is less painful and can last for years without loosening.

Other reasons to consider a reverse shoulder replacement include failed rotator cuff surgery leading to a pseudoparalytic shoulder even without arthritis. A pseudoparalytic shoulder refers to a situation where you can not raise the shoulder. Pseudo means false and paralysis usually means that the nerves that control the muscle no longer control the muscles. A pseudoparalytic shoulder appears paralyzed, but the reason that you cannot raise the shoulder is because the rotator cuff tendons that attach the muscles (that raise the shoulder) to the humerus bone are torn. The power of the muscles cannot be transmitted to the humerus to raise the shoulder.

Older patients with very severe fractures of the head of the humerus appear to do very well with reverse shoulder replacements as opposed to a standard shoulder replacement. Patients who have had previous shoulder replacements that have failed of become loose will also require a reverse shoulder replacement to fix the loose or painful prosthesis.

In most cases, doctors see a shoulder replacement as the last option. Sometimes there is a benefit to delaying shoulder replacement surgery as long as possible. Your doctor will probably want you to try nonsurgical measures to control your pain and improve your shoulder movement, including medications and physical or occupational therapy.

Like any arthritic condition, cuff tear arthropathy of the shoulder may respond to anti-inflammatory medications such as aspirin or ibuprofen. Acetaminophen (Tylenol ®) may also be prescribed to ease the pain. Some of the newer medications such as glucosamine and chondroitin sulfate are more commonly prescribed today. They seem to be effective in helping reduce the pain of arthritis in all joints. There are also new injectable medications that lubricate the arthritic joint. These medications have been studied mainly in the knee. It is unclear if they will help the arthritic shoulder. These lubrication injections are presently being studied in the shoulder. Although they are safe in the knee, they are not presently approved for use in the shoulder.

Physical or occupational therapy may be suggested to help you regain as much of the motion and strength in your shoulder as possible before you undergo surgery. In many cases, however, therapy may not be indicated for severe shoulder arthritis since it may aggravate the pain. This is a matter to be discussed with your orthopedic surgeon.

An injection of cortisone into the shoulder joint may give temporary relief. Cortisone is a powerful anti-inflammatory medication that can ease inflammation and reduce pain, possibly for several months. Most surgeons only allow two or three cortisone shots into any joint. If the shots don’t provide you with lasting relief, your doctor may suggest surgery.

Preparation

What do I need to do to get ready for surgery?

When cuff tear arthropathy of the shoulder requires replacement of the painful shoulder with an artificial shoulder joint, a reverse shoulder replacement may be recommended. You and your surgeon should make the decision to proceed with surgery together. You need to understand as much about the procedure as possible. If you have concerns or questions, you should talk to your surgeon.

Once you decide on surgery, you need to take several steps. Your surgeon may suggest a complete physical examination by your regular doctor. This exam helps ensure that you are in the best possible condition to undergo the operation.

Special x-rays will be needed. Plain x-rays of the shoulder will allow your surgeon to evaluate the severity of arthritis and the status of the rotator cuff. A CT scan is always required before any kind of shoulder replacement to determine the degree of damage to the bones (glenoid and humeral head) for surgical planning.

You may also need to spend time with the physical or occupational therapist who will be managing your rehabilitation after surgery. This allows you to get a head start on your recovery. One purpose of this pre-operative visit is to record a baseline of information. Your therapist will check your current pain levels, ability to do your activities, and the movement and strength of each shoulder.

A second purpose of the pre-operative visit is to prepare you for surgery. You’ll begin learning some of the exercises you will use during your recovery. Your therapist can help you anticipate any special needs or problems you might have at home, once you’re released from the hospital.

On the day of your surgery, you will probably be admitted to the hospital early in the morning. You shouldn’t eat or drink anything after midnight the night before. Come prepared to stay in the hospital for several nights. The length of time you will spend in the hospital depends a lot on you.

Surgical Procedure

What happens during shoulder replacement surgery?

Before we describe the procedure, let’s look first at the reverse artificial shoulder itself.

The Reverse Artificial Shoulder

Reverse Shoulder Arthroplasty

The reverse shoulder prosthesis (artificial joint) is made up of two parts. The humeral component replaces the humeral head, or the ball of the joint. The glenoid component replaces the socket of the shoulder, which is actually part of the scapula.

In the “normal” artificial shoulder prosthesis, the glenoid prosthesis is a shallow socket made of plastic and the humeral component is a metal stem attached to a metal ball that nearly matches the anatomy of the normal shoulder. In the reverse shoulder replacement, the ball and the socket are reversed.

The humeral component is combination of a metal stem that fits into the marrow cavity of the upper humerus and, on top of the metal stem, a plastic socket. This plastic socket fits onto the humeral component to create a ball and socket type bearing. The glenoid component is usually made of two parts. A metal tray (base plate) attaches directly to the bone. The glenoid base plate is inserted into a small peg hole drilled into the bone and is secured with special screws through the base plate into the bone. Attached to that metal tray, a metal ball is attached that will fit into the plastic socket attached to the humeral component. The plastic is very tough and very slick, much like the articular cartilage it is replacing. In fact, you can ice skate on a sheet of this plastic without causing it much damage.

The Operation

The reverse shoulder replacement surgery is performed almost identically to the normal shoulder replacement – except different artificial parts are inserted.

You will most likely need general anesthesia for shoulder replacement surgery. General anesthesia puts you to sleep. It is difficult to numb only the shoulder and arm in a way that makes such a major surgery possible. While nerve blocks can be helpful with postoperative pain control, they are not usually effective enough to be used as the only anesthetic for this kind of operation.

Reverse Shoulder Arthroplasty

Shoulder replacement surgery is done through an incision on the front of your shoulder. This is called an anterior (deltopectoral) approach. For reverse shoulder replacements, especially for patients with multiple previous surgeries, a superior approach through the deltoid muscle may be used. The surgeon cuts through the skin and then isolates the nerves and blood vessels and moves them to the side. The muscles are also moved to the side.

The surgeon enters the shoulder joint itself by cutting into the joint capsule. This allows the surgeon to see the joint. In more advanced cases of cuff tear arthropathy, and in patients with previous surgery, there may be no capsule and rotator cuff remaining.

At this point, the surgeon can prepare the bone for attaching the replacement parts. The ball portion of the humeral head is removed with a bone saw. The hollow inside of the upper humerus is prepared using a rasp. This lets your surgeon mold the space to anchor the metal stem of the humeral component inside the bone.

View animation of drilling the humerus

View animation of removing the humeral head

The glenoid will be replaced with a ball of metal. The arthritic glenoid surface is prepared by grinding away any remaining cartilage and flattening the surface. This is done with an instrument called a reamer. The surgeon usually uses the reamer to drill holes into the bone of the scapula and to flatten the deformed glenoid surface so the base plate rests on a smooth, flat surface. This is where the stem of the glenoid component is anchored.

View animation of reaming the glenoid

View animation of drilling the glenoid

View animation of
inserting the glenoid base plate

Reverse Shoulder Arthroplasty

Finally, the humeral component and the glenoid component are inserted.

View animation of reaming the humerus

View animation of inserting the glenoid sphere

View animation of inserting the humerus implants

View animation of the completed implant

Once the joint is anchored, the surgeon tests for proper fit. When the surgeon is satisfied with the fit, the joint capsule is stitched together. The muscles are then returned to their correct positions, and the skin is also stitched up.

Your incision will be covered with a bandage, and your arm will be placed in a sling. You will then be woken up and taken to the recovery room.

Complications

What might go wrong?

As with all major surgical procedures, complications can occur. This document doesn’t provide a complete list of the possible complications, but it does highlight some of the most common problems. Some of the most common complications following reverse artificial shoulder replacement are

  • anesthesia
  • infection
  • fracture
  • dislocation
  • loosening
  • nerve or blood vessel injury

Anesthesia

Most surgical procedures require that some type of anesthesia be done before surgery. A very small number of patients have problems with anesthesia. These problems can be reactions to the drugs used, problems related to other medical complications, and problems due to the anesthesia. Be sure to discuss the risks and your concerns with your anesthesiologist.

Infection

Infection following reverse joint replacement surgery can be very serious. The chances of developing an infection following artificial joint replacement, however, are low (about one percent). Sometimes infections show up very early, before you leave the hospital. Other times infections may not show up for months, or even years, after the operation.

Infection can also spread into the artificial joint from other infected areas. Once an infection lodges in your joint, it is almost impossible for your immune system to clear it. You may need to take antibiotics when you have dental work or surgical procedures on your bladder and colon. The antibiotics reduce the risk of spreading germs to the artificial joint.

Fracture

During the surgery, the humerus is prepared by cutting off the deformed humeral head and reaming the canal to allow for insertion of the humeral stem. The glenoid is reamed to create a bone tunnel, and flattened to seat the glenoid base plate. In patients with weak bone, fractures can occur during this part of the procedure that may require restricted activity after the surgery while the fracture heals.

Dislocation

Just like your real shoulder, an artificial shoulder can dislocate. A shoulder dislocation occurs when the ball comes out of the socket. There is a greater risk of dislocation right after surgery, before the tissues have healed around the new joint. But there is always a slightly increased risk of dislocation with an artificial joint. Your therapist will teach you how to avoid activities and positions that tend to cause shoulder dislocation. A shoulder that dislocates more than once may need another operation to make it more stable.
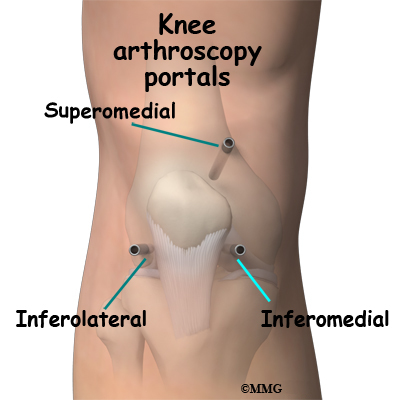
Related Document: A Patient’s Guide to Shoulder Dislocations

Loosening

The major reason that artificial joints eventually fail is that they loosen where the metal or cement meets the bone. A loose joint prosthesis causes pain. Once the pain becomes unbearable, another operation will probably be needed to fix the artificial joint.
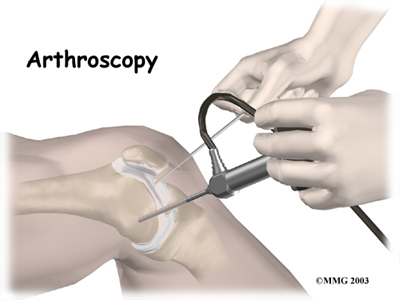
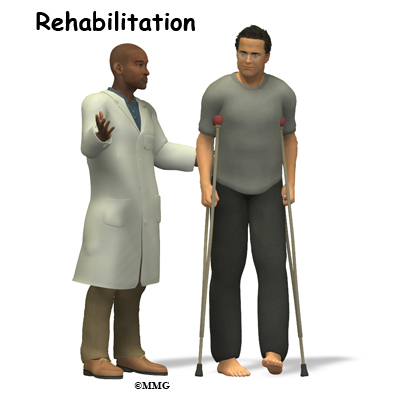
There have been great advances in extending the life of artificial joints. However, most will eventually loosen and require another surgery. In the case of artificial knees, you can expect about 12 to 15 years, but artificial shoulder joints tend to loosen sooner.

Nerve or Blood Vessel Injury

All of the large nerves and blood vessels to the arm and hand travel through the armpit. (This area is called the axilla.) Because shoulder replacement surgery takes place so close to the axilla, it is possible that the nerves or blood vessels may be injured during surgery. The resulting problems may be temporary if the injury was caused by stretching to hold the nerves out of the way. The nerves and blood vessels rarely suffer any kind of permanent injury after reverse shoulder replacement surgery, but this type of injury can happen.

After Surgery

What happens after surgery?

After surgery, you’ll be transported to the recovery room. You will have a dressing wrapped over your shoulder that will need to be changed frequently over the next few days. Your surgeon may have inserted a small drainage tube into the shoulder joint to help keep extra blood and fluid from building up inside the joint. An intravenous line (IV) will be placed in your arm to give you needed antibiotics and medication.

Rehabilitation

What will my recovery be like?

A physical or occupational therapist will see you the day after surgery to begin your rehabilitation program. Therapy treatments will gradually improve the movement in your shoulder. Your therapist will go over your exercises and make sure you are safe getting in and out of bed and moving about in your room.

When you go home, you may get home therapy visits. By visiting your home, your therapist can check to see that you are safe getting around in your home. Treatments will also be done to help improve your range of motion and strength. In some cases, you may require up to three visits at home before beginning outpatient therapy. Out patient therapy at a facility can often more effective and is often preferred over home physical therapy.
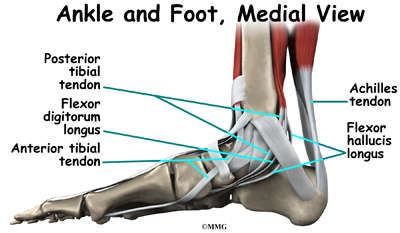
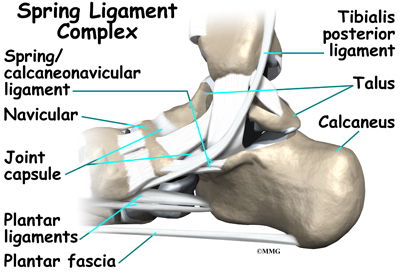
The first few outpatient treatments will focus on controlling pain and swelling. Ice and electrical stimulation treatments may help. Your therapist may also use massage and other types of hands-on treatments to ease muscle spasm and pain. Continue to use your shoulder sling as prescribed.

As the rehabilitation program evolves, more challenging exercises are chosen to safely advance the shoulder’s strength and function.

Finally, a select group of exercises can be used to simulate day-to-day activities, like grooming your hair or getting dressed. Specific exercises may also be chosen to simulate work or hobby demands.

When your shoulder range of motion and strength have improved enough, you’ll be able to gradually get back to normal activities. Ideally, you’ll be able to do almost everything you did before. However, you may need to avoid heavy or repeated shoulder actions.

You may be involved in a progressive rehabilitation program for two to four months after surgery to ensure the best results from your artificial joint. In the first six weeks after surgery, you should expect to see your therapist two to three times a week. At that time, if everything is still going as planned, you may be able to advance to a home program. Then you will only check in with your therapist every few weeks.

Many patients with a reverse shoulder replacement will be able to lift the arm overhead with little or no pain. Some patients, however, may take many months to recover their range of motion. While these patients will usually have excellent pain relief, motion recovery may be very slow due to years of disuse and deconditioning of the deltoid muscle.