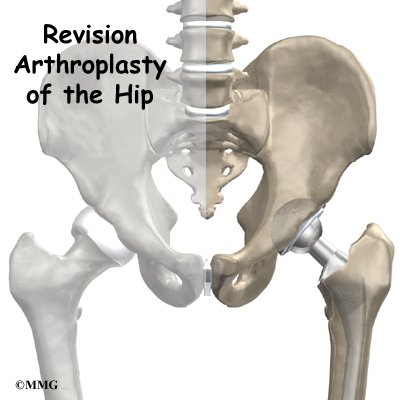
A Patient’s Guide to Revision Arthroplasty of the Hip
Introduction
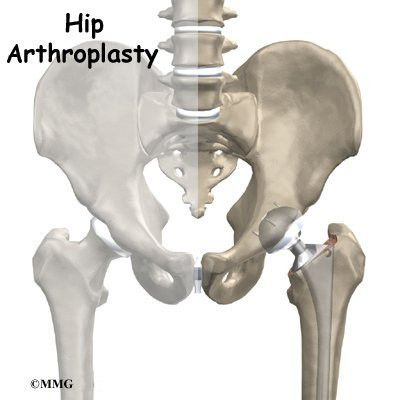
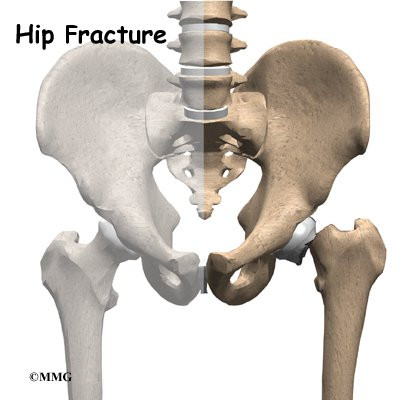
Over the past 30 years, artificial hip replacements have become increasingly common. Millions of people have gotten a new hip joint. The first time a joint is replaced with an artificial joint, the operation is called a primary joint replacement. As people live longer and more people receive artificial joints, some of those joints begin to wear out and fail. When an artificial hip joint fails, a second operation is required to replace the failing joint. This procedure is called a revision arthroplasty.
This guide will help you understand
- why revision surgery becomes necessary
- what happens during the operation
- what to expect during your recovery
Related Document: A Patient’s Guide to Artificial Joint Replacement of the Hip
Anatomy
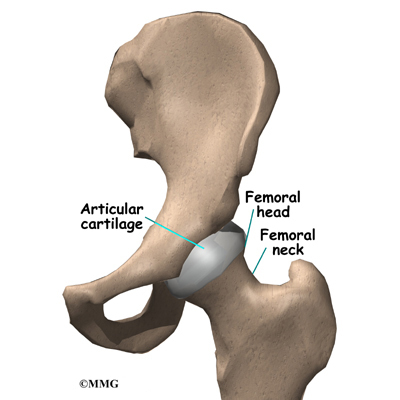
How is the hip designed?

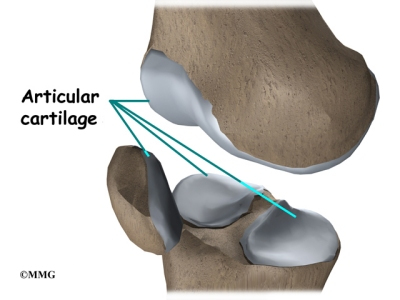
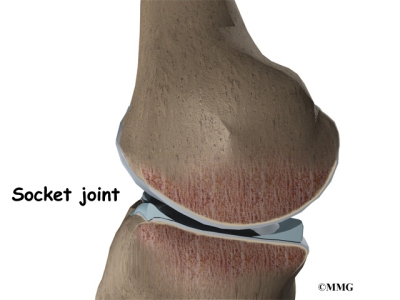
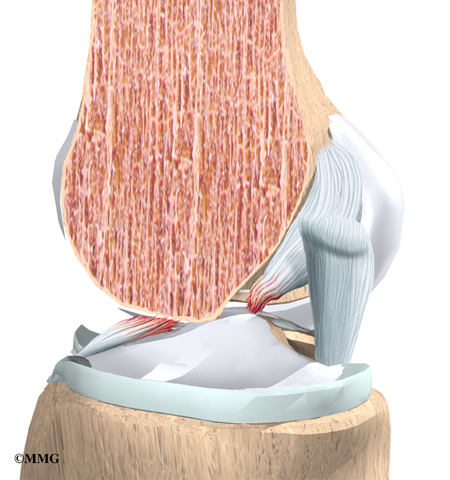
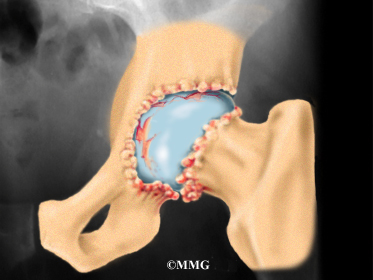
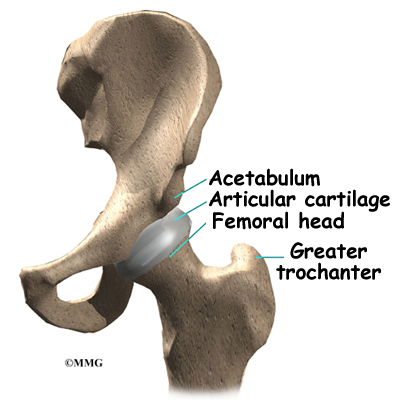
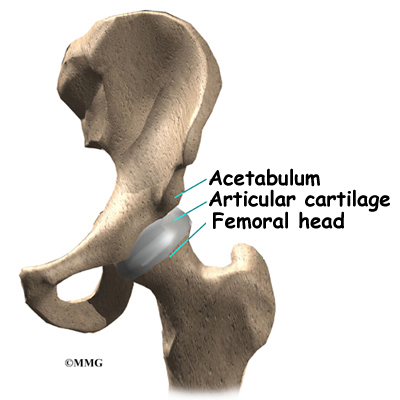
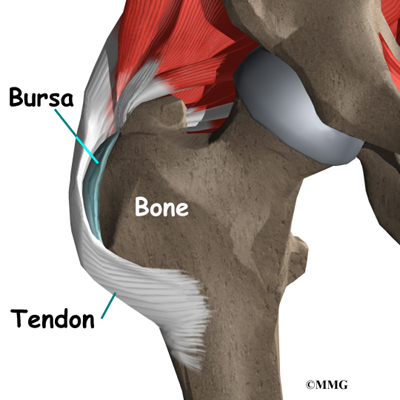
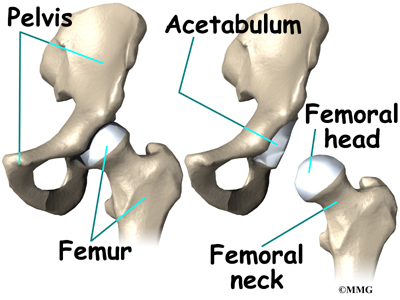
The hip joint is one of the true ball-and-socket joints of the body. The hip socket is called the acetabulum and forms a deep cup that surrounds the ball of the upper thighbone, or femoral head. Thick muscles of the buttock at the back and the thick muscles of the thigh in the front surround the hip.
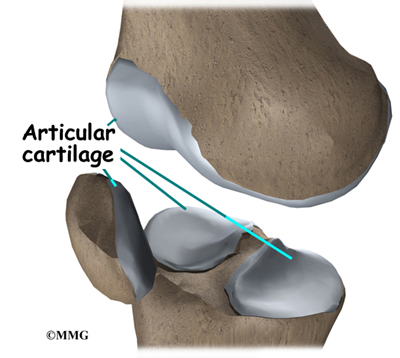
The surface of the femoral head and the inside of the acetabulum are covered with articular cartilage. This material is about one-quarter of an inch thick in most large joints. Articular cartilage is a tough, slick material that allows the surfaces to slide against one another without damage.
Related Document: A Patient’s Guide to Hip Anatomy
Rationale
Why do revisions become necessary?
The most common reasons that a revision needs to be done are
- mechanical loosening
- infection in the joint
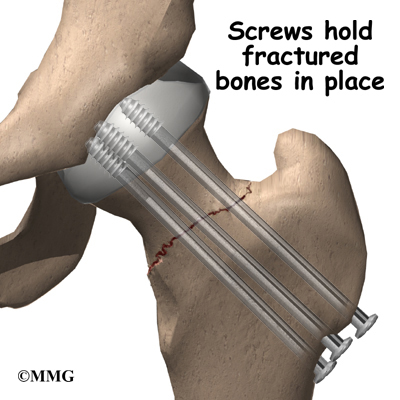
- fracture of the bone around the joint
- instability of the implant
- wear of one or more parts of the implant
- breakage of the implant
Mechanical Loosening
Mechanical loosening means that for some reason (other than infection) the attachment between the artificial joint and the bone has become loose. There are many reasons why this can occur. It may be that, given enough time, all artificial joints will eventually become loose. This is one reason that surgeons like to wait until absolutely necessary to put in an artificial joint. The younger you are when an artificial joint is put in, the more likely it is that the joint will loosen and require a revision. Mechanical loosening can occur in cemented or uncemented artificial joints. (The different types of joints are described later.)
Infection
If an artificial joint becomes infected, it may become stiff and painful. It may also begin to lose its attachment to the bone. An infected artificial joint will probably have to be revised to try to cure the infection. In the hip joint, an infected artificial joint may be able to be exchanged for a new artificial joint at the same operation. You will still need to be placed on antibiotics for several weeks or months after the exchange operation.
Fractures
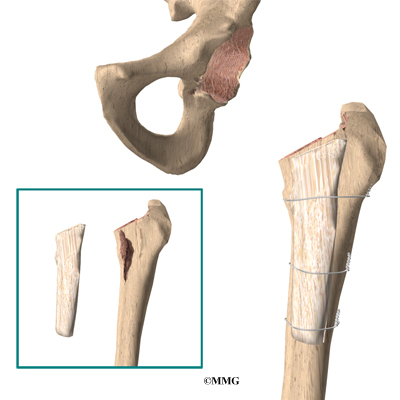
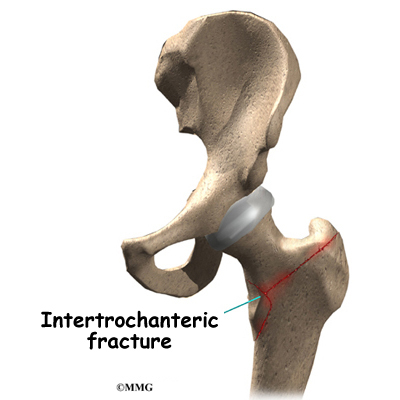
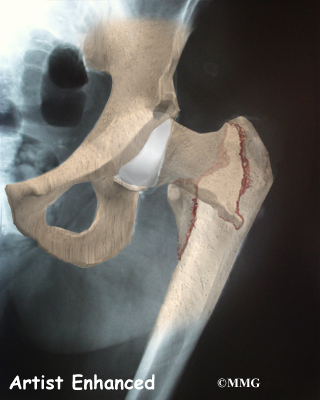
A fracture may occur near an artificial joint. It is sometimes necessary to use a new artificial joint to fix the fracture. For example, if the femur (thighbone) breaks right below the stem of an artificial hip, it may be easier to replace the femoral part of the artificial joint with a new joint with a longer stem to hold the fracture together while it heals, similar to fixing the fracture with a metal rod.
Instability
Instability means that the joint dislocates (the metal ball slips out of the plastic socket). This is very painful when it happens. If it happens more than once, it’s time to consider revising the artificial hip joint to keep it from coming out of joint.
Wear
As surgeons have become better at understanding how to put in an artificial joint so that it does not loosen as fast, we have begun to see actual wear of the plastic parts of the artificial joints. In some cases, if the wear is discovered in time, the revision may only require changing the plastic part of the artificial joint. If the wear continues until metal is rubbing on metal, the whole joint may need to be replaced.
Breakage
Finally, another type of wear can occur that breaks the metal due to the constant stress that the artificial joint undergoes everyday. In weight-bearing joints such as the hip, this is greatly affected by how much you weigh and how active you are.
Preparations
What happens before surgery?
Your surgeon will carefully plan the revision operation. Before the operation, many possible options and complications will have to be taken into account. Your surgeon will discuss these with you. Be sure to ask if there are parts of the procedure, your recovery, or the risks associated with a revision joint replacement that you have questions about.
Once the decision to proceed with surgery is made, several things may need to be done. Your orthopedic surgeon may suggest a complete physical examination by your medical or family doctor. This is to ensure that you are in the best possible condition to undergo the operation.
You may be scheduled for a bone scan so the surgeon can check for loosening of the artificial joint. When an artificial joint is loose, the bone around the artificial joint reacts by trying to form new bone, a process called remodeling. The bone scan is done by injecting you with a weak radioactive chemical. Several hours later, a large camera is used to take a picture of the bone around the artificial joint. If the artificial joint is loose and there is remodeling going on, the picture will show a hot spot where the chemical has been added to the newly forming bone. The brighter the hot spot, the more likely that the artificial joint is loose.
If your surgeon suspects that the artificial hip joint is loose, other tests may be necessary to find out why the hip joint is loose. Before any plans are made to revise the artificial joint, most orthopedic surgeons will want to make sure that the hip is not loose due to infection. Your surgeon may order blood tests to look for signs of infection and may suggest placing a needle into the joint and removing fluid to send to the laboratory and check for infection. Replacing any artificial joint that is infected is much more involved than replacing a noninfected, loose artificial joint. In some cases, infection will make a revision impossible.
You may also need to spend time with the physical therapist who will manage your rehabilitation after the surgery. The therapist will begin the teaching process before surgery to ensure that you are ready for rehabilitation afterwards. One purpose of the preoperative visit is to record a baseline of information. This includes measurements of your current pain levels, functional abilities, and the movement and strength of each hip.
A second purpose of the preoperative therapy visit is to prepare you for your upcoming surgery. You will begin to practice some of the exercises you will use just after surgery. You will also be trained in the use of either a walker or crutches.
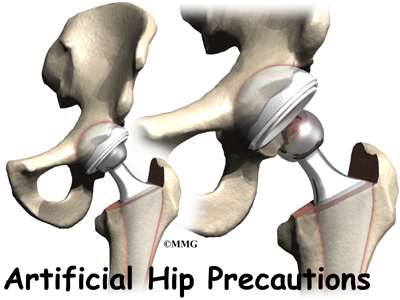
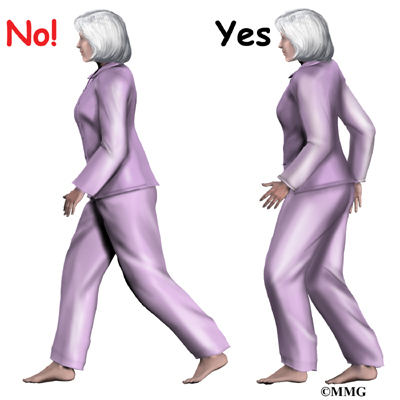
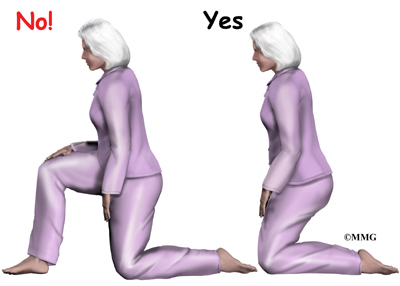
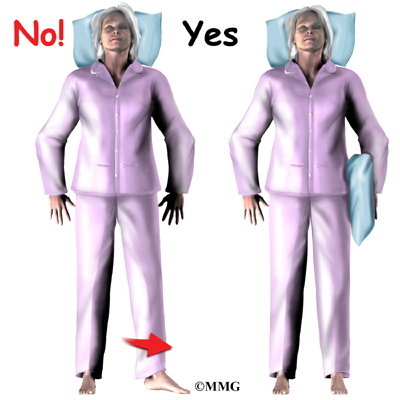
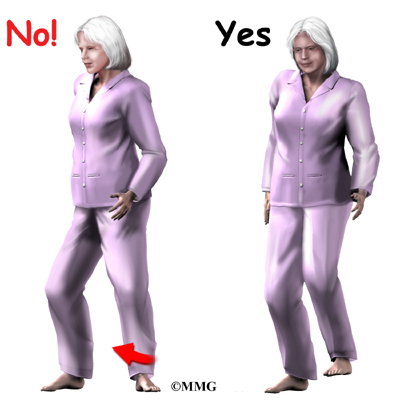
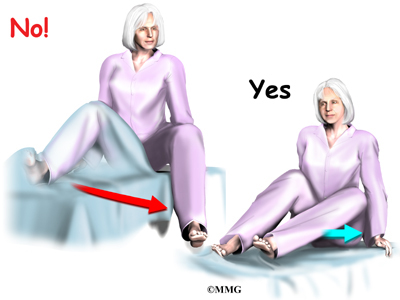
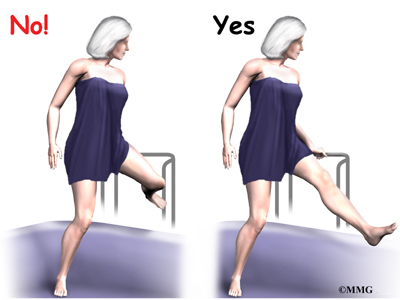
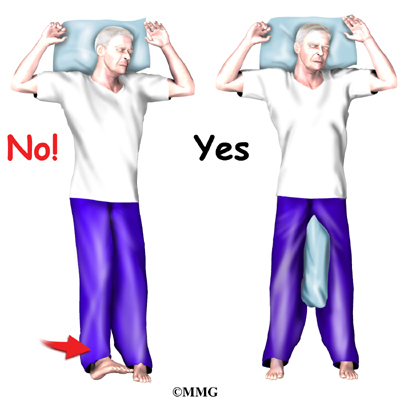
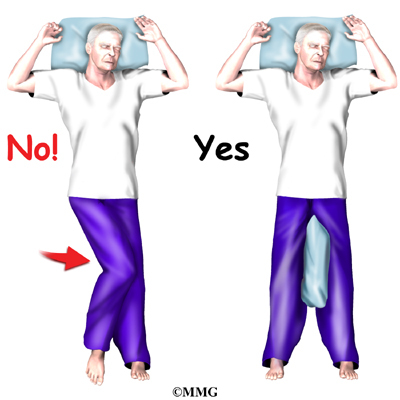
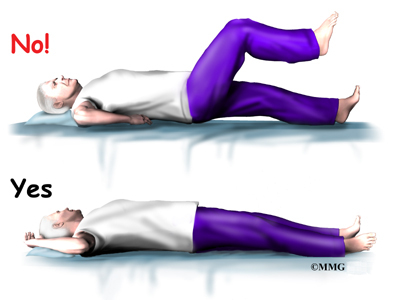
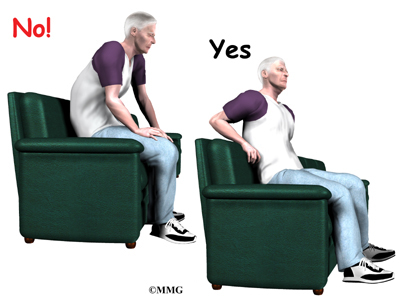
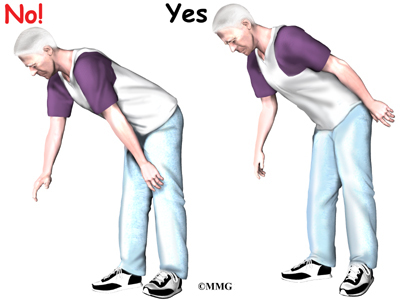
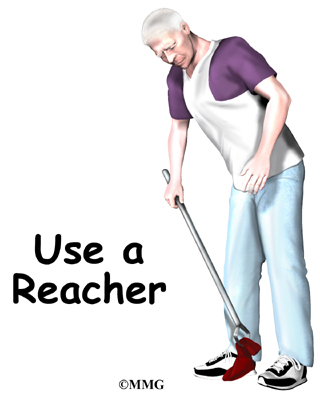
This surgery requires the surgeon to open up the hip joint to revise the artificial replacement. This puts the hip at some risk for dislocation after surgery. To prevent dislocating their hip, patients follow strict guidelines about which hip positions they are to avoid, called hip precautions. Your therapist will go over these precautions with you in the preoperative visit and will drill you often to make sure you practice them at all times for six to 12 weeks after surgery.
Related Document: A Patient’s Guide to Artificial Hip Dislocation Precautions
Finally, the physical therapist will assess any needs you may have at home once you’re released from the hospital.
You may be asked to donate some of your own blood before the operation. This blood can be donated three to five weeks earlier. Your body will make new blood cells to replace the loss. If you need to have a blood transfusion during the operation, you will receive your own blood back from the blood bank.
Surgical Procedure
What happens during the operation?
Before describing the revision procedure, let’s look at the revision prosthesis itself.
The Revision Prosthesis
There are two major types of revision implants:
- cemented prosthesis
- uncemented prosthesis
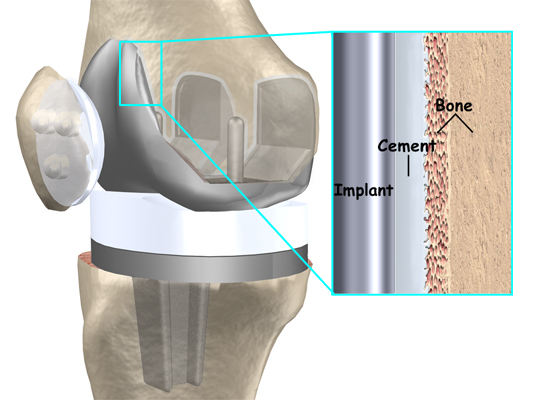
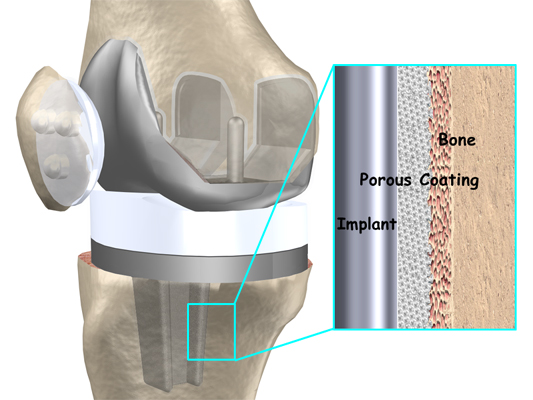
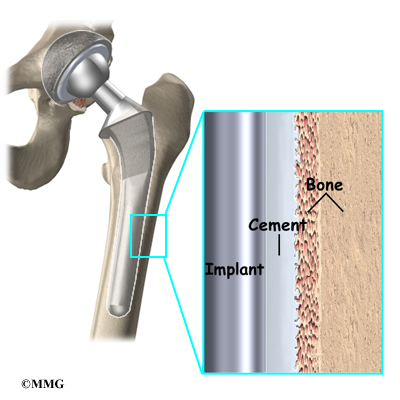
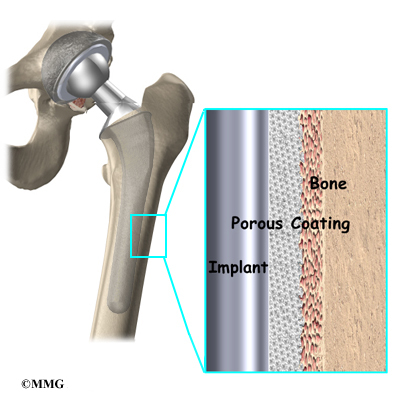
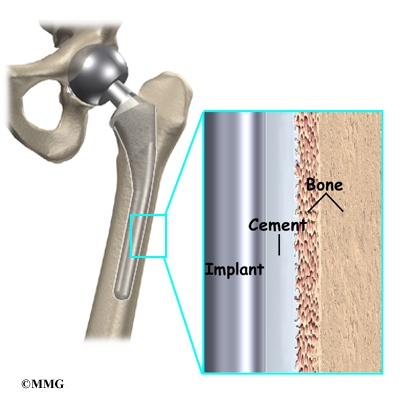
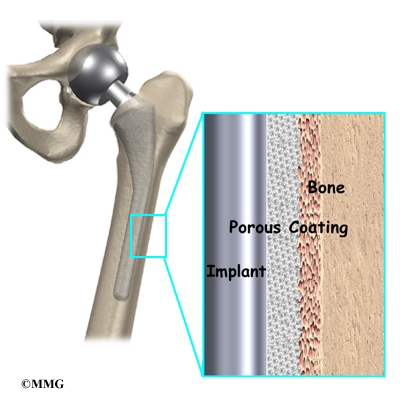
A cemented prosthesis is held in place by a type of epoxy cement that attaches the metal to the bone. An uncemented prosthesis has a fine mesh of holes on the surface that allows bone to grow into the mesh and attach the prosthesis to the bone.
Both are widely used in revision hip surgery. In some cases, a combination of the two types is used in which the ball portion of the prosthesis is cemented into place, and the socket not cemented. The decision about whether to use a cemented or uncemented prosthesis during the revision surgery is usually made by the surgeon based on your age, your lifestyle, and the surgeon’s experience.
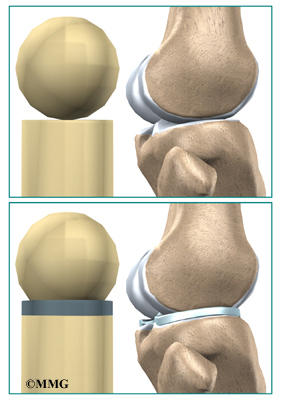
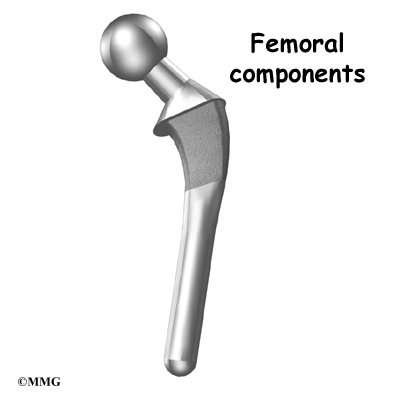
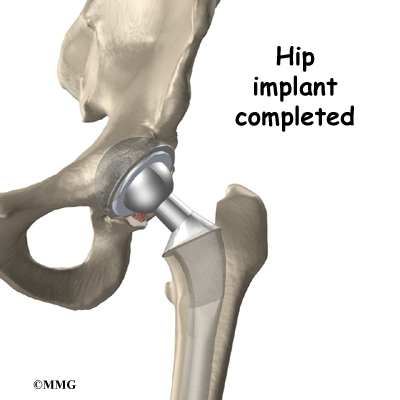
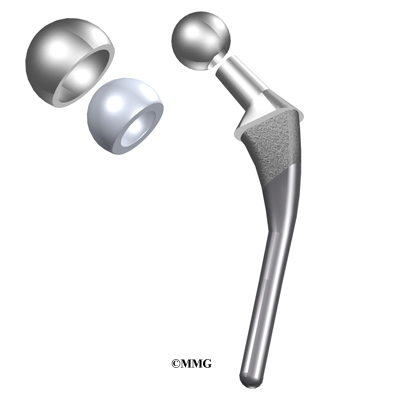
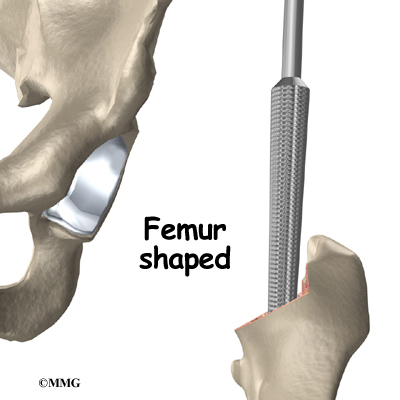
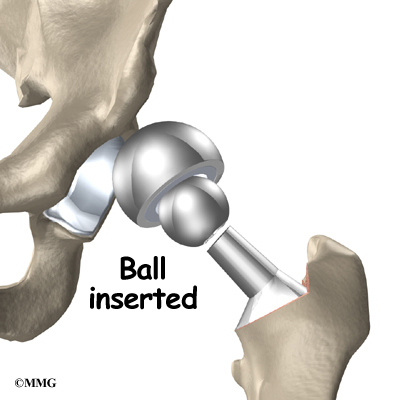
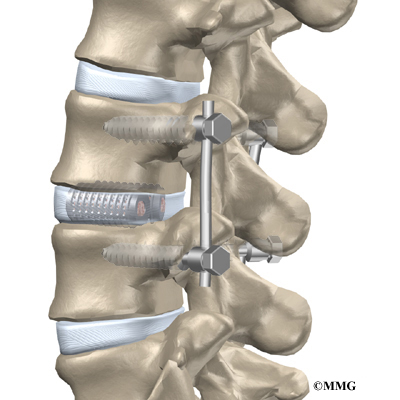
Each prosthesis is made of two main parts. The acetabular component (socket) replaces the acetabulum. The acetabular component is made of a metal shell with a plastic inner liner that provides the bearing surface. The plastic used is very tough and slick, so tough and slick that you could ice skate on a sheet of the plastic without damaging it much.
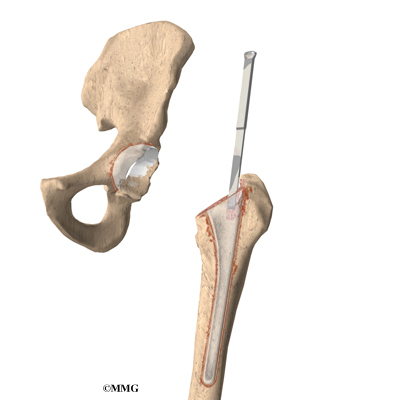
A special type of acetabular component may be used during the revision surgery. This is because the bone of the pelvis may have worn away somewhat since the initial replacement was done. The bone may be weaker, or areas of the bone may be missing. These special components are designed to spread the weight across a wider area on the acetabulum. They attach to the stronger bone outside the area of wear and tear.
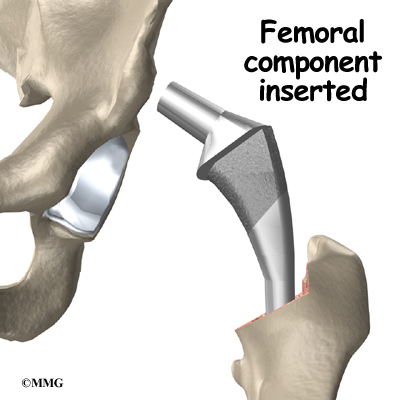
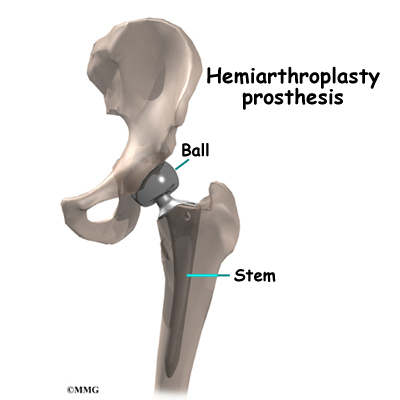
The femoral component (stem and ball) replaces the femoral head. The femoral component is made of metal. Sometimes, the metal stem is attached to a ceramic ball.
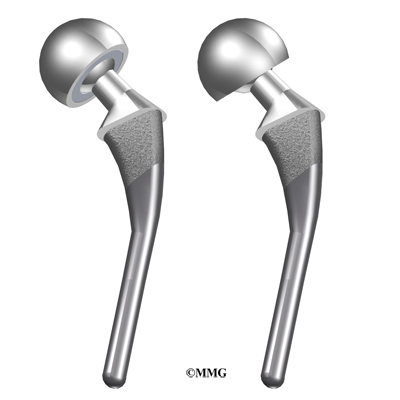
There are special types of revision stems as well. This is because the bone of the femur is usually not the same as when the initial replacement was done. The bone may be weaker, or areas of the bone may be missing. A longer stem can reach further down the femoral shaft and distribute your body weight better.
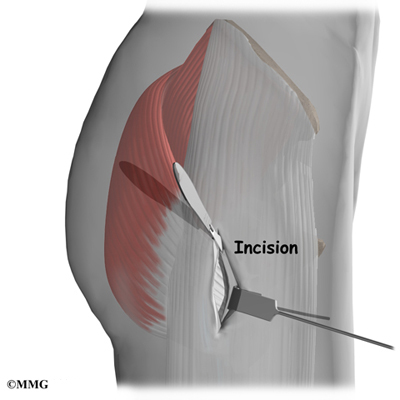
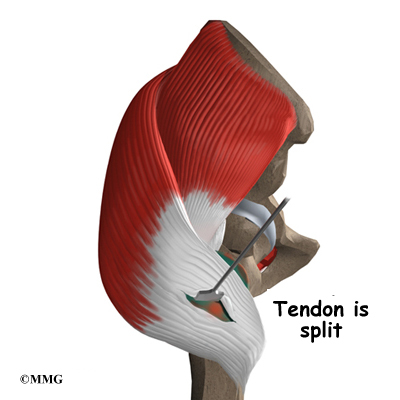
The Operation
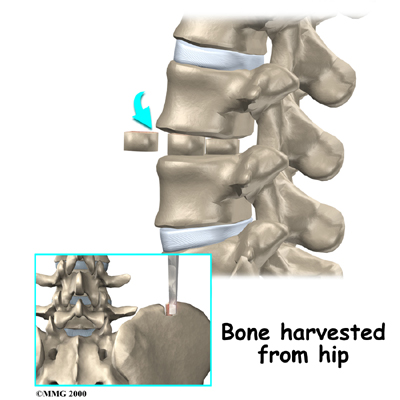
Revision joint replacements are much different from primary joint replacements. One reason that revision procedures are not routine is that there is almost always bone loss around the primary prosthesis. The surgeon deals with this problem by placing a bone graft or some other material around the artificial joint to reinforce the bone. This bone graft may come from your own body, such as bone taken from the pelvis during the same operation. This is commonly called an autograft.
If the amount of bone needed is too large to take from your body, your surgeon may choose to use bone graft from the bone bank. This type of bone graft has been taken from someone else and placed in the bone bank. This type of transplant is called an allograft.
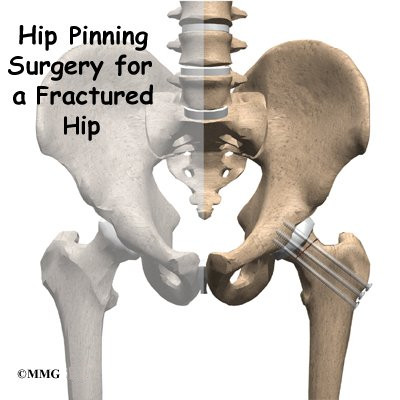
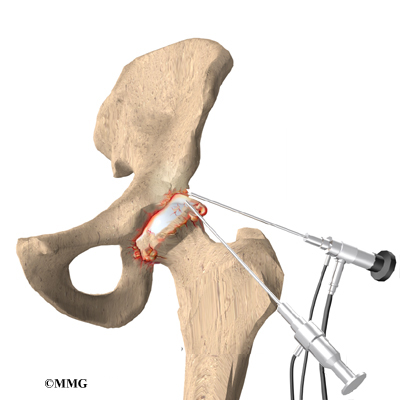
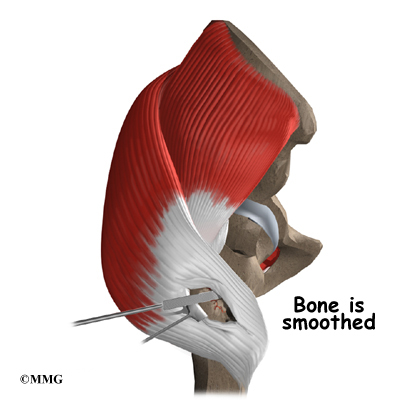
When the primary artificial joint has been put in using cement, the cement has to be removed from the socket of the hip as well as from the femoral canal (the bone marrow space in the thighbone).
Because the bone is often fragile and the cement is hard, removing the cement sometimes can lead to a fracture of the femur during the operation. This is not unusual, and in most cases the surgeon will simply continue with the operation and fix the fracture as well. In some cases, the femur must be broken open to remove all the cement and the artificial joint. This is one reason that revisions are challenging.
During the operation, samples of bone and marrow tissue are usually removed and sent to a laboratory to see if any infection is present.
If the laboratory tests show an infection, a new artificial hip joint will probably be put in, and you will be placed on antibiotics for several months.
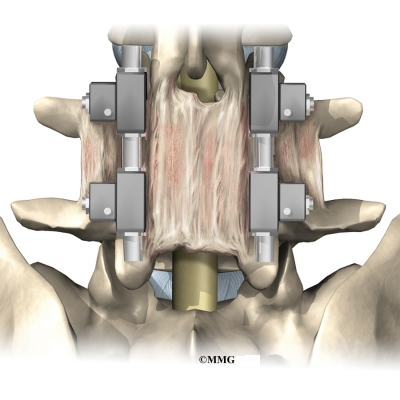
After application of bone and other materials to rebuild the socket and the femur, a new prosthesis is implanted. Because the natural shape can hardly ever be imitated after rebuilding the bone, most of the time a specially designed prosthesis has to be used. All of this is carefully planned by the surgeon before the operation.
A revision joint replacement of the hip is more complex and unpredictable than a primary joint replacement. Since many factors can influence its longevity, your surgeon will not be able to say exactly how long your revision will last.
In some cases, if an artificial joint fails, it may not be possible to put another artificial joint back in. This can occur if the primary joint has failed because of an infection that cannot be controlled, if the bone has been destroyed so much that it will not support an artificial joint, or if your medical condition will not tolerate a major operation.
Sometimes a choice other than hip revision is best because a big operation might result in a failure, or even death. Removing the prosthesis and not replacing it doesn’t mean the patient can’t walk anymore, but walking will be much more difficult because the leg grows shorter and the power in the leg is reduced.
Complications
What might go wrong?
As with all major surgical procedures, complications can occur. This document doesn’t provide a complete list of the possible complications, but it does highlight some of the most common problems. Some of the most common complications following revision arthroplasty of the hip include
- anesthesia complications
- thrombophlebitis
- infection
- dislocation
- myositis ossificans
- loosening
Anesthesia Complications
Most surgical procedures require that some type of anesthesia be done before surgery. A very small number of patients have problems with anesthesia. These problems can be reactions to the drugs used, problems related to other medical complications, and problems due to the anesthesia. Be sure to discuss the risks and your concerns with your anesthesiologist.
Thrombophlebitis (Blood Clots)
View animation of pulmonary embolism
Thrombophlebitis, sometimes called deep venous thrombosis (DVT), can occur after any operation, but it is more likely to occur following surgery on the hip, pelvis, or knee. DVT occurs when the blood in the large veins of the leg forms blood clots. This may cause the leg to swell and become warm to the touch and painful. If the blood clots in the veins break apart, they can travel to the lung, where they lodge in the capillaries and cut off the blood supply to a portion of the lung. This is called a pulmonary embolism. (Pulmonary means lung, and embolism refers to a fragment of something traveling through the vascular system.) Most surgeons take preventing DVT very seriously. There are many ways to reduce the risk of DVT, but probably the most effective is getting you moving as soon as possible. Two other commonly used preventative measures include
- pressure stockings to keep the blood in the legs moving
- medications that thin the blood and prevent blood clots from forming
Infection
Infection can be a very serious complication following an artificial joint revision. Some infections may show up very early, even before you leave the hospital. Others may not become apparent for months, or even years, after the operation. Infection can spread into the artificial joint from other infected areas. Your surgeon may want to make sure that you take antibiotics when you have dental work or surgical procedures on your bladder and colon to reduce the risk of spreading germs to the joint.
The risk of infection is higher in revision joint replacement than in primary joint replacement. In a primary hip replacement, the risk of infection is 0.5 to one percent. It goes up to two percent or more in revision cases. These figures are only an estimate and vary between different scientific studies.
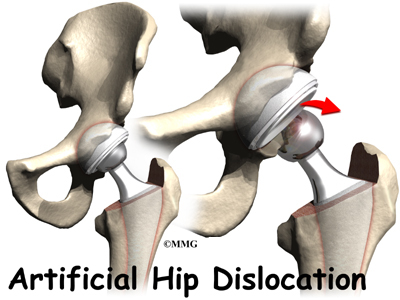
Dislocation
Just like your real hip, the revised artificial hip can dislocate if the ball comes out of the socket. There is a greater risk just after surgery, before the tissues have healed around the new joint, but there is always a risk. A physical therapist will instruct you very carefully on how to avoid activities and positions that may have a tendency to cause a hip dislocation.
Myositis Ossificans
Myositis ossificans is a curious problem that can affect the hip after both a primary hip replacement and a revision hip replacement. The condition occurs when the soft tissue around the hip joint begins to develop calcium deposits. Myositis means inflammation of muscle and ossificans refers to the formation of bone. This can lead to a situation where bone actually forms completely around the hip joint. This leads to stiffness in the hip resulting in much less motion in the hip joint than normal. It also causes pain.
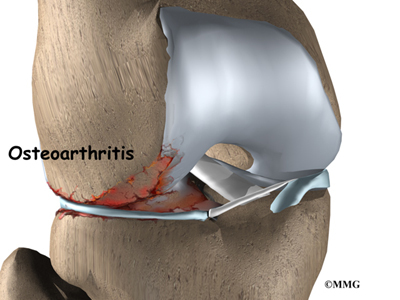
Myositis ossificans is more common in people who have a long history of osteoarthritis with multiple bones spurs. Something about the genetic makeup in these people makes them more likely to produce bone tissue. Major reconstruction operations such as a hip revision seem to do more damage to the surrounding tissues than primary hip replacements. The operation is simply longer and harder to do. Calcium deposits are also more likely to form.
The treatment of myositis ossificans may actually begin before you get it. In cases where you are at high risk for developing this condition, your surgeon may recommend that you take medications such as indomethacin after surgery. This medication reduces the tendency for bone to form and may protect you from developing myositis ossificans.
A much more effective method that has been used a great deal to prevent the development of myositis ossificans involves radiation treatments immediately after surgery. These are the same type of radiation treatments used to treat cancer. Several short radiation treatments begun the day after surgery and continued for three to five days seem to drastically reduce the risk of developing myositis ossificans.
If myositis ossificans forms despite these precautions, treatment will depend on how much it affects your hip–how much pain it causes and how much it restricts motion. In some severe cases, you may choose to have a second operation to remove the calcified tissue that has formed. This is usually followed by radiation treatments to prevent the calcium deposits from returning.
Loosening
The major reason that artificial joints eventually fail continues to be a process of loosening where the metal or cement meets the bone. A loose revised prosthesis is a problem because it causes pain. Once the pain becomes unbearable, another revision surgery may be needed. The rate of loosening of revision arthroplasties is higher than in primary arthroplasties.
After Surgery
What happens after surgery?
After surgery, your hip is covered with a padded dressing. Special boots or stockings are placed on your feet to help prevent blood clots from forming. A triangle-shaped cushion may be positioned between your legs to keep your legs from crossing or rolling in.
If your surgeon used a general anesthesia, a nurse or respiratory therapist will visit your room to guide you in a series of breathing exercises. You’ll use an incentive spirometer to improve breathing and avoid possible problems with pneumonia.
Physical therapy treatments are scheduled one to three times each day as long as you remain in the hospital. Your first treatment is scheduled soon after you wake up from surgery. Your therapist will begin by helping you move from your hospital bed to a chair. By the second day, you’ll begin walking longer distances using your crutches or walker.
You may not be allowed to put weight on the affected leg for a period of time. This varies from surgeon to surgeon and is also affected by how well your surgeon thinks the operation went.
Your therapist will go over exercises to begin toning and strengthening the thigh and hip muscles. Ankle and knee movements are used to help pump swelling out of the leg and to prevent the formation of blood clots.
You will need to follow hip dislocation precautions–just like after your first artificial hip replacement. The risk of dislocation after a revision is higher than after a primary hip replacement.
Patients are usually able to go home after spending four to seven days in the hospital. You’ll be on your way home when you can demonstrate a safe ability to get in and out of bed, walk up to 75 feet with your crutches or walker, go up and down stairs safely, and consistently remember to use your hip precautions. Patients who require extra care may be sent to a different unit until they are safe and ready to go home.
Most of the time your surgeon will see you one or more times during outpatient visits. Depending on what is learned from the examination and X-rays, you may start to put full weight on your leg. Because the operation is more complicated than primary replacement surgery and the period of walking on crutches may take longer, you must realize that it will take at least a year to be able to perform all normal daily activities. In some patients the possibilities are more limited than before. Be aware that a revision hip prosthesis is not as good as a primary prosthesis. There is always a chance that the donor bone will disappear in time because it is dead material and will be reabsorbed by the body. This means that loosening can occur once more. Today no other materials are available that are superior to donor bone.
Most orthopedic surgeons recommend that you have routine checkups after your revision surgery. How often you need to be seen varies from every six months to every five years, according to your situation and what your surgeon recommends. You should always consult your orthopedic surgeon if you begin to have pain in your artificial joint or if you begin to suspect something is not working correctly.
Rehabilitation
What should I expect during my recovery?
After you are discharged from the hospital, your physical therapist may see you for one to six in-home treatments. This is to ensure you are safe in and about the home and getting in and out of a car. Your therapist will review your exercise program, continue working with you on your hip precautions, and make recommendations about your safety.
These recommendations may include that you use a raised commode seat and bathtub bench, and that you raise the surfaces of couches and chairs in your home. This keeps your hip from bending too far when you sit down. Bath benches and handrails can improve safety in the bathroom. Other suggestions include the use of strategic lighting and the removal of loose rugs or electrical cords from the floor.
You should continue to use your walker or crutches as instructed. If you had a cemented procedure, you’ll advance the weight you place through your sore leg as much as you feel comfortable. If you had a noncemented procedure, your surgeon may want you to place only the toes down for up to six weeks after surgery. Most patients progress to using a cane in four to six weeks.
Your staples will be removed two weeks after surgery. Patients are usually able to drive within three weeks and walk without a walking aid by two to three months. Upon the approval of the surgeon, patients are generally able to resume sexual activity by one to two months after surgery.
Home therapy visits end when you are safe to get out of the house, which may take up to three weeks.
The need for physical therapy usually ends when home care is completed. A few additional visits in outpatient physical therapy may be needed for patients who are still having problems walking or who need to get back to heavier types of work or activities.
Your therapist may use heat, ice, or electrical stimulation if you have swelling or pain.
Therapists sometimes treat their patients in a pool. Exercising in a swimming pool puts less stress on the hip joint, and the buoyancy lets you move and exercise easier. Once you’ve gotten your pool exercises down and the other parts of your rehab program advance, you may be instructed in an independent program.
When you are safe in putting full weight through the leg, several types of balance exercises can be chosen to further stabilize and control the hip.
Finally, a select group of exercises can be used to simulate day-to-day activities, such as going up and down steps, squatting, and walking on uneven terrain. Specific exercises may then be chosen to simulate work or hobby activities.
Many patients have less pain and better mobility after hip revision surgery. Your therapist will work with you to help keep your revised joint healthy for as long as possible. This may require that you adjust your activity choices to keep from putting too much strain on your revised hip joint. Heavy sports that require running, jumping, quick stopping and starting, and cutting are discouraged. Patients may need to consider alternate jobs to avoid work activities that require heavy lifting, crawling, and climbing.
The therapist’s goal is to help you maximize strength, walk normally, and improve your ability to do your activities. When you are well under way, regular visits to the therapist’s office will end. Your therapist will continue to be a resource, but you will be in charge of doing your exercises as part of an ongoing home program.