Foot
Adult Acquired Flatfoot Deformity
A Patient’s Guide to Adult-Acquired Flatfoot Deformity
Introduction
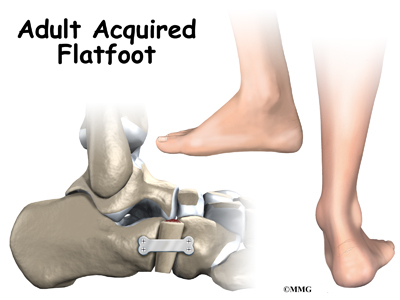
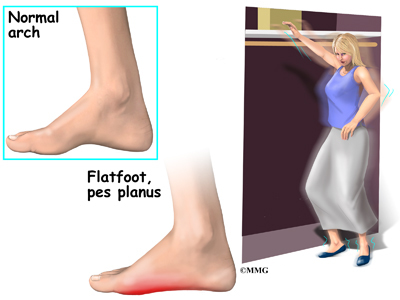
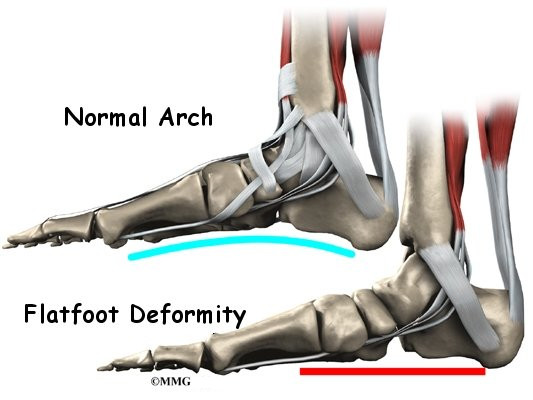
Adult acquired flatfoot deformity (AAFD) is a painful condition resulting from the collapse of the longitudinal (lengthwise) arch of the foot. As the name suggests, this condition is not present at birth or during childhood. It occurs after the skeleton is fully matured.
In the past it was referred to a posterior tibial tendon dysfunction (or insufficiency). But the name was changed because the condition really describes a wide range of flatfoot deformities. AAFD is most often seen in women between the ages of 40 and 60.
This guide will help you understand
- how the problem develops
- how doctors diagnose the condition
- what treatment options are available
Anatomy
What parts of the foot are involved?
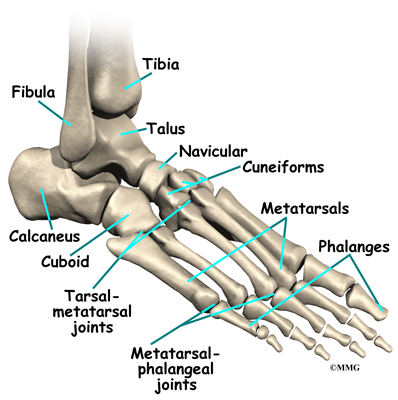
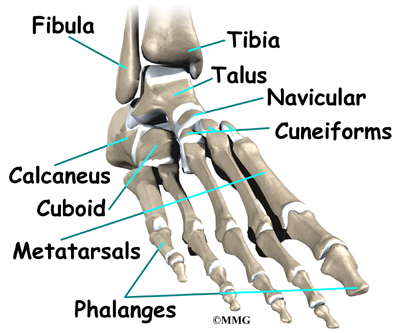
The skeleton of the foot begins with the talus, or ankle bone, that forms part of the ankle joint. The two bones of the lower leg, the large tibia and the smaller fibula, come together at the ankle joint to form a very stable structure.
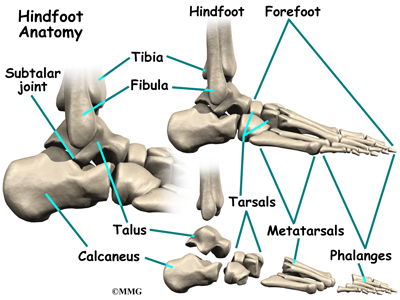
The two bones that make up the back part of the foot (sometimes referred to as the hindfoot) are the talus and the calcaneus, or heel bone. The talus is connected to the calcaneus at the subtalar joint. The ankle joint allows the foot to bend up and down. The subtalar joint allows the foot to rock from side to side.
Just down the foot from the ankle is a set of five bones called tarsal bones that work together as a group.
These bones are unique in the way they fit together. There are multiple joints between the tarsal bones. When the foot is twisted in one direction by the muscles of the foot and leg, these bones lock together and form a very rigid structure. When they are twisted in the opposite direction, they become unlocked and allow the foot to conform to whatever surface the foot is contacting.
The tarsal bones are connected to the five long bones of the foot called the metatarsals. The two groups of bones are fairly rigidly connected, without much movement at the joints.
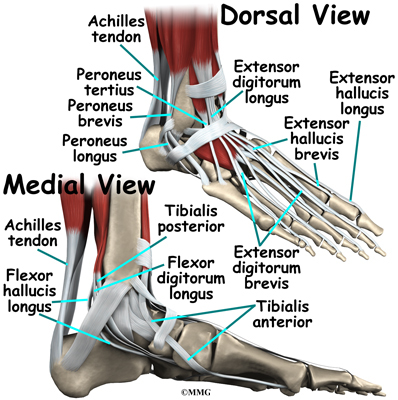
The large Achilles’ tendon is the most important tendon for walking, running, and jumping. It attaches the calf muscles to the heel bone to allow us to rise up on our toes. The posterior tibial tendon attaches one of the smaller muscles of the calf to the underside of the foot. This tendon helps support the arch and allows us to turn the foot inward. Failure of the posterior tibial tendon is a major problem in many cases of adult-acquired flatfoot deformity (AAFD).
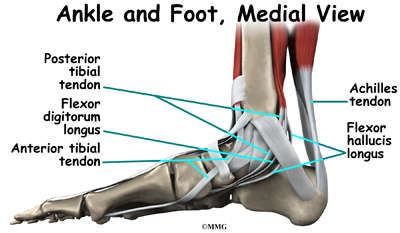
The toes have tendons attached that bend the toes down (on the bottom of the toes) and straighten the toes (on the top of the toes). The anterior tibial tendon (tibialis anterior) allows us to raise the foot. Two tendons run behind the outer bump of the ankle (called the lateral malleolus) and help turn the foot outward.
Many small ligaments hold the bones of the foot together. Most of these ligaments form part of the joint capsule around each of the joints of the foot. A joint capsule is a watertight sac that forms around all joints. It is made up of the ligaments around the joint and the soft tissues between the ligaments that fill in the gaps and form the sac.
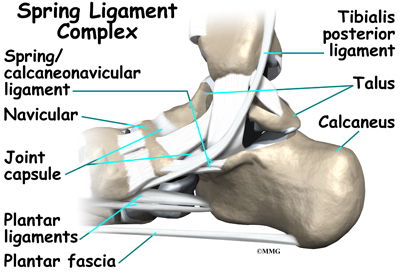
The spring ligament complex is often involved in adult-acquired flatfoot. This group of ligaments supports the talonavicular joint. The spring ligament complex works with the posterior tibial tendon and the plantar fascia to support and stabilize the longitudinal arch of the foot.

Failure of the ligaments that support this arch can contribute to flatfoot deformity. Injury, laxity (looseness), or other dysfunction of the ligament and tendon structures can result in deformity of the foot and/or ankle resulting in AAFD.
Related Document: A Patient’s Guide to Foot Anatomy
Causes
What causes adult-acquired flatfoot deformity?
There are multiple factors contributing to the development of this problem. Damage to the nerves, ligaments, and/or tendons of the foot can cause subluxation (partial dislocation) of the subtalar or talonavicular joints. Bone fracture is a possible cause. The resulting joint deformity from any of these problems can lead to adult-acquired flatfoot deformity.
Dysfunction of the posterior tibial tendon has always been linked with adult-acquired flatfoot deformity (AAFD). The loss of active and passive pull of the tendon alters the normal biomechanics of the foot and ankle. The reasons for this can be many and varied as well. Diabetes, high blood pressure, and prolonged use of steroids are some of the more common causes of adult-acquired flatfoot deformity (AAFD) brought on by impairment of the posterior tibialis tendon. Overstretching or rupture of the tendon results in tendon and muscle imbalance in the foot leading to adult-acquired flatfoot deformity (AAFD).
Rheumatoid arthritis is one of the more common causes. About half of all adults with this type of arthritis will develop adult flatfoot deformity over time. In such cases, the condition is gradual and progressive.
Obesity has been linked with this condition. Loss of blood supply for any reason in the area of the posterior tibialis tendon is another factor. Other possible causes include bone fracture or dislocation, a torn or stretched tendon, or a neurologic condition causing weakness.
Symptoms
What does the condition feel like?
At first you may notice pain and swelling along the medial (big toe) side of the foot. This is where the posterior tibialis tendon travels from the back of the leg under the medial ankle bone to the foot. As the condition gets worse, tendon failure occurs and the pain gets worse. Some patients experience pain along the lateral (outside) edge of the foot, too.
You may find that your feet hurt at the end of the day or after long periods of standing. Some people with this condition have trouble rising up on their toes. They may be unable to participate fully in sports or other recreational activities.
Diagnosis
How do doctors diagnose the problem?
The history and physical examination are probably the most important tools the physician uses to diagnose this problem. The wear pattern on your shoes can offer some helpful clues. Muscle testing helps identify any areas of weakness or muscle impairment. This should be done in both the weight bearing and nonweight bearing positions.
A very effective test is the single heel raise. You will be asked to stand on one foot and rise up on your toes. You should be able to lift your heel off the ground easily while keeping the calcaneus (heel bone) in the middle with slight inversion (turned inward).
X-rays are often used to study the position, shape, and alignment of the bones in the feet and ankles. Magnetic resonance (MR) imaging is the imaging modality of choice for evaluating the posterior tibial tendon and spring ligament complex.
There are four stages of adult-acquired flatfoot deformity (AAFD). The severity of the deformity determines your stage. For example:
Stage I means there is a flatfoot position but without deformity. Pain and swelling from tendinitis is common in this stage. Stage II there is a change in the foot alignment. This means a deformity is starting to develop. The physician can still move the bones back into place manually (passively). Stage III adult-acquired flatfoot deformity (AAFD) tells us there is a deformity. This means the ankle is stiff or rigid and doesn’t move beyond a neutral (midline) position. Stage IV is characterized by deformity in the foot and the ankle. The deformity may be flexible or fixed. The joints often show signs of degenerative joint disease (arthritis).
Treatment
What treatment options are available?
Nonsurgical Treatment
Conservative (nonoperative) care is advised at first. A simple modification to your shoe may be all that’s needed. Sometimes purchasing shoes with a good arch support is sufficient. For other patients, an off-the-shelf (prefabricated) shoe insert works well.
The orthotic is designed specifically to position your foot in good alignment. Like the shoe insert, the orthotic fits inside the shoe. These work well for mild deformity or symptoms.
Over-the-counter pain relievers or antiinflammatory drugs such as ibuprofen may be helpful. If symptoms are very severe, a removable boot or cast may be used to rest, support, and stabilize the foot and ankle while still allowing function. Patients with longer duration of symptoms or greater deformity may need a customized brace. The brace provides support and limits ankle motion. After several months, the brace is replaced with a foot orthotic.
A physical therapy program of exercise to stretch and strengthen the foot and leg muscles is important. The therapist will also show you how to improve motor control and proprioception (joint sense of position). These added features help prevent and reduce injuries.
Surgery
When conservative care fails to control symptoms and/or deformity, then surgery may be needed. The goal of surgical treatment is to obtain good alignment while keeping the foot and ankle as flexible as possible.
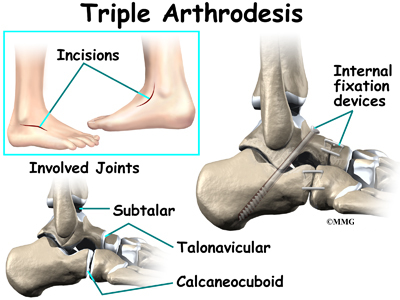


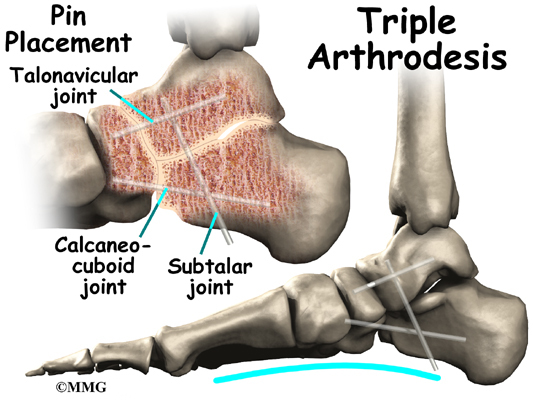
The most common procedures used with this condition include arthrodesis (fusion), osteotomy (cutting out a wedge-shaped piece of bone), and lateral column lengthening. Lateral column lengthening involves the use of a bone graft at the calcaneocuboid joint. This procedure helps restore the medial longitudinal arch (arch along the inside of the foot).
A torn tendon or spring ligament will be repaired or reconstructed. Other surgical options include tendon shortening or lengthening. Or the surgeon may move one or more tendons. This procedure is called a tendon transfer. Tendon transfer uses another tendon to help the posterior tibial tendon function more effectively. A tendon transfer is designed to change the force and angle of pull on the bones of the arch.
It’s not clear yet from research evidence which surgical procedure works best for this condition. A combination of surgical treatments may be needed. It may depend on your age, type and severity of deformity and symptoms, and your desired level of daily activity.
Rehabilitation
What should I expect as I recover?
Nonsurgical Rehabilitation
Pain relief and improved function are the two main changes patients report with effective treatment. It’s not clear yet if these measures prevent or stop the foot deformity from occurring or getting worse. Some short-term studies (one year) show good results with mild to moderate adult-acquired flatfoot deformity (stages I and II deformity) using orthotic support, foot orthotics, and physical therapy.
Any sign of increasing deformity may be an indication that surgery is needed. Careful monitoring over time is needed to assure the best timing for surgery. Waiting too long can mean a less successful surgical result.
After Surgery
Postoperative care may depend on the type of surgery you have. After a tendon transfer and/or osteotomy, you will be in a cast or removable brace for six weeks. In most cases, you won’t be allowed to put weight on the foot during this time. This is especially true if you’ve had a tendon transfer or bone fusion.
A physical therapist will help you progress from nonweight-bearing to full weight-bearing status. You will probably be wearing a removable boot and starting range of motion exercises. Strengthening exercises can begin when the tendon transfer has healed. At this point you may still have some painful symptoms.
Significant improvement occurs gradually over a four-to-six month period of time. During that time, you will progress in your exercise program. The removable boot will be replaced with a foot orthosis and lace-up shoes. For those patients who have a fusion, you can expect some stiffness and loss of motion in the foot and/or ankle. The amount and location of the stiffness depends on which bones were fused together.
Studies show that long-term results of just reconstructing the posterior tibial tendon have been disappointing. As much as a 50 per cent failure rate has been reported. This is probably because of the complexity of soft tissue interactions needed to maintain structural integrity of the foot. Reconstructing the spring ligament complex or using an osteotomy to lengthen the lateral side of the foot along with a tendon transplant is more likely to restore more normal foot and ankle movement with better results.
Prolonged swelling and discomfort are not uncommon even six to 10 months after the surgery. Standing on your feet for a long time or walking long distances can also cause foot pain or discomfort.
Hammer toe
A Patient’s Guide to Claw Toes and Hammer toes
Introduction

Claw toe and hammer toe conditions are fairly common in cultures that wear shoes. In most cases, these problems can be traced directly to ill-fitting shoes.
This guide will help you understand
- how claw toe and hammer toe conditions develop
- how the conditions cause problems
- what treatment options are available
Anatomy

What part of the toe is affected?
The forefoot and toes are made up of several bones. Each of the four smaller toes starts with a metatarsal bone within the forefoot. Moving down the foot from the metatarsal bone are three smaller bones, called phalanges. The first of these small bones is called the proximal phalanx. (Proximal means closer.) Next comes the middle phalanx, and last is the distal phalanx. (Distal means further away.)

The toe bones connect to form the toe joints. The metatarsophalangeal joint (or MTP joint) is the first joint that connects the toe to the foot. The ball of the foot is formed by the MTP joints. The second joint is the proximal interphalangeal joint (or PIP joint), and the last is the distal interphalangeal joint (or DIP joint). Each joint is surrounded by a joint capsule made of ligaments that hold the bones together. Two tendons run along the bottom of each toe that allow us to curl our toes, and one tendon runs along the top that raises the toe.

In a hammer toe deformity, the first joint (MTP) is cocked upward, and the middle joint (PIP) bends downward. A claw toe deformity has a cocked up MTP joint, and both the middle joint (PIP) and the tiny joint at the end of the toe (the DIP) are curled downward like a claw.
Related Document: A Patient’s Guide to Foot Anatomy
Causes
Why do I have this problem?
Both of these problems can be the result of wearing a shoe that is too short. In many people, the second toe is actually longer than the big toe, and if shoes are sized to fit the big toe, the second and maybe even the third toe will have to bend to fit into the shoe. Shoes that are pointed make matters even worse. Combine pointed shoes with high heels, and the foot is constantly being pushed downhill into a wall with the toes squished like an accordion.
A hammer toe in the second toe is also common in people who have a bunion in the big toe. The big toe angles too far toward the middle of the foot, and the second toe can end up with a hammer toe deformity.
Related Document: A Patient’s Guide to Bunions
Claw toes are common in people with high arches. And they can come from a muscle imbalance in which the deeper (intrinsic) toe muscles are weaker than the surface (extrinsic) muscles of the toes. This type of muscle imbalance can occur from more serious nerve problems.
Symptoms
What does the condition feel like?
Eventually, toes that are squished day after day become fixed in that position and will not straighten out. When this occurs, pressure builds in three places:
- at the end of the toe
- over the PIP joint
- under the MTP joint
Painful calluses develop as a result of pressure from the shoe.
Diagnosis
How do doctors identify the condition?
Diagnosis of these two conditions is usually obvious from the physical exam. In some cases, it is important to check to make sure no other nerve problems are to blame for the condition, particularly when claw toes are present. Other special tests may be required.
Treatment
What can be done for the problem?
Nonsurgical Treatment
Treatment depends on how far along the process is. Early on, simply switching to shoes that fit properly may stop the deformity and return the toes to a more normal condition. If the condition is more advanced and the toes will not completely straighten out on their own, a contracture may exist. A contracture occurs when scar tissue tightens a joint and keeps it from moving through its normal range of motion.
Pressure points and calluses caused by a contracture can be treated by switching to shoes that have more room in the toe or by placing pads over the calluses to relieve the pressure.
Surgery
If all else fails, surgery may be suggested to correct the alignment of the toe. The main type of procedure performed for these conditions is referred to as an arthroplasty. Arthroplasty is the reconstruction or replacement of a joint.
DIP Joint Arthroplasty
For the hammer toe deformity, an arthroplasty of the DIP joint may be suggested. This procedure is performed through a small incision in the top of the toe over the DIP joint. Once the joint is entered, an arthroplasty is performed by removing one side of the joint. This releases the tension on the ligaments and tendons around the joint and allows the toe to be realigned in the proper position. Once the toe is in the proper position, it is held with sutures (stitches) or a metal pin while it heals.
PIP Joint Arthroplasty

One of the most common procedures to correct the claw toe deformity is an arthroplasty of the PIP joint. In this procedure an incision is made over the joint. Once the surgeon can see the joint, the end of the proximal phalanx is removed to shorten the toe and relax the contracture around the joint. The toe is then either held with metal pins or sutures in the straight position until it heals.
As the joint heals, scar tissue forms, connecting the two bones together and replacing the area where the joint once was. Surgeons refer to this as a false joint (or pseudo joint) because the scar tissue allows a bit of motion to occur between the two bones while keeping them from rubbing together and causing pain.
MTP Joint Release
If clawing is a problem, then the MTP joint may also have to be released to relieve the contracture of this joint and allow the proximal phalanx to come into the correct position. This procedure is performed by making an incision on the top of the toe over the MTP joint. The surgeon then releases the tight ligaments and tendons until the toe easily moves back into the proper alignment. The toe may be held in the proper alignment with a metal pin until the soft tissues heal. The pin may remain in place for three or four weeks.
Rehabilitation
What should I expect after treatment?
Nonsurgical Rehabilitation
Patients with hammer toe or claw toe deformities may benefit from four to six physical therapy treatments. Your therapist can design a pair of shoe insoles or orthotics to correct associated problems, such as high arches. Recommendations may be given of shoes that have extra depth in the forefoot. The added depth gives the toes room so that bony areas won’t rub inside your shoes. Therapists apply small cushions over callused or irritated areas of the toes.
A series of stretching and strengthening exercises may be designed to improve muscle balance between the deep (intrinsic) toe muscles and the surface (extrinsic) muscles of the toe.
After Surgery
Patients are usually fitted with a post-op shoe. This shoe has a stiff, wooden sole that protects the toes by keeping the foot from bending. Any pins are usually removed after the bone begins to mend (usually two to four weeks).
You will probably wear a bandage or dressing for about a week following the procedure. The stitches are generally removed in 10 to 14 days. However, if your surgeon chose to use sutures that dissolve, you won’t need to have the stitches taken out.
Haglund’s Deformity
A Patient’s Guide to Haglund’s Deformity of the Foot
Introduction
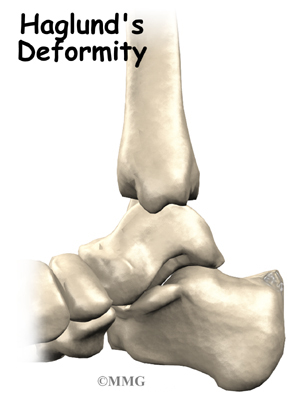
Sometimes the shape of a bone can cause problems in the foot. One example of this is Haglund’s deformity, a condition caused by a prominent bump on the back of the heel.
This guide will help you understand
- where the condition develops
- how it causes problems
- what can be done for your pain
Anatomy
What part of the foot is affected?
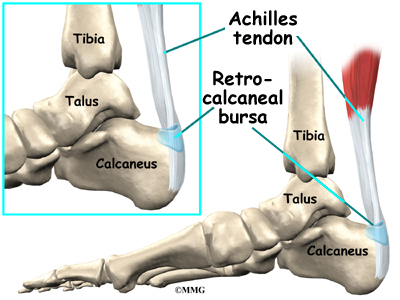
The calcaneus (or heelbone) is the largest bone of the foot. The large Achilles tendon attaches to the back of the calcaneus. Between the bone and the Achilles tendon rests a bursa, a lubricated sac of tissue that allows the tendon to slide easily against the bone during movement of the foot. Bursae are found in many places in the body where tissues must move against one another.
Related Document: A Patient’s Guide to Foot Anatomy
Causes
Why do I have this problem?
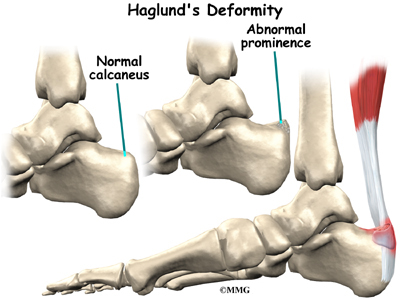
The primary cause of Haglund’s deformity is pressure on the back of the heel from shoes. The calcaneus is shaped differently in different people. People who have a prominent bump underneath the attachment of the Achilles tendon are more likely to develop Haglund’s deformity. This prominent bump squeezes the soft tissues between the bone and the back of the shoe. Over time, this irritates the soft tissues and causes inflammation. This can cause swelling and thickening of the tissues, which makes the pressure even worse.
Symptoms
What does the condition feel like?
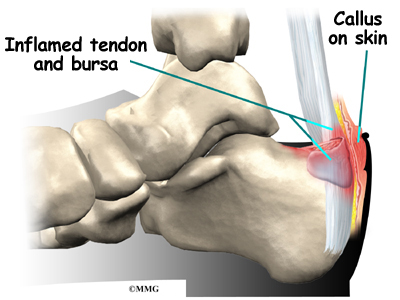
The primary symptom of Haglund’s deformity is pain at the back of the heel. Over time the tissues also usually thicken over the bone bump, causing a callus to form. The callus can grow quite thick and become inflamed while you are wearing shoes. The bursa on the back of the heel can become swollen and inflamed as well, causing bursitis. The bumps do not usually cause any problems with function, such as walking, except for the pain that occurs when the area is inflamed.
Diagnosis
How do doctors identify the problem?
The diagnosis begins with a complete history and physical examination by your surgeon. Usually the condition is quite obvious from the appearance of the back of the heel. X-rays will usually be required to allow the surgeon to see how the calcaneus is shaped and to make sure there is no other cause for your heel pain. Generally no other tests are required.
Treatment
What can be done for a Haglund’s deformity?
Treatment of Haglund’s deformity can be divided into nonsurgical treatment and surgical treatment. In the vast majority of cases, treatment usually begins with nonsurgical measures. Surgery usually is considered when all other measures have failed to control your problem and the pain becomes intolerable.
Nonsurgical Treatment
The primary cause of the problem is shoe wear. The shape of the calcaneus probably would not matter much if we all went barefoot. One easy way to remove the pressure from the back of the heel is to wear shoes with no back, such as clogs. If you must wear shoes with backs, pads placed over the back of the heel may give some relief. Staying out of shoes as much as possible will usually reduce the inflammation and the bursitis due to Haglund’s deformity.
Surgery
Several surgical procedures have been designed to treat Haglund’s deformity. The goal of these procedures is to reduce the prominence on the back of the heel so that the pressure from the shoe does not occur. Over time the thickened tissues will shrink back to near normal size if the pressure is removed.
Bump Removal

Many surgeons simply remove the bump. This procedure is done through a small incision on the back of the heel. The Achilles tendon is retracted (moved away) so that the surgeon can see the back of the calcaneus. Some bone is then removed, and the calcaneus is shaped and rounded so that the pressure does not occur. The incision is closed with stitches, and you are placed in a bulky bandage to protect the foot while it heals. You may be placed in a splint from the knee to the toes.
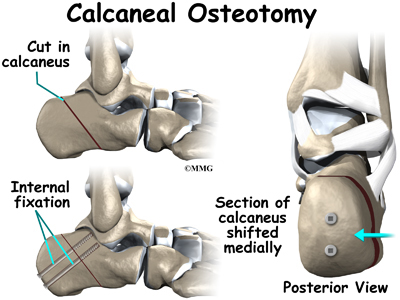
Wedge Osteotomy
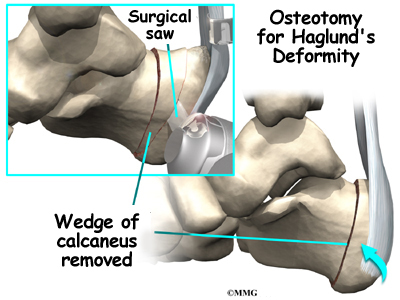
Another way to accomplish the same thing is to take out a wedge of bone from the calcaneus, shortening it. This is referred to by surgeons as a wedge osteotomy. This procedure is performed much the same as removing the bump.
Rehabilitation
What should I expect following treatment?
Nonsurgical Rehabilitation
Patients with an inflamed and painful Haglund’s deformity may benefit from four to six physical therapy treatments. Your therapist can offer ideas of pads or cushions that help take pressure off the back of the heel. You might get recommendations on shoes that keep pressure off the sore area.
These simple changes to your footwear may allow you to resume normal walking immediately, but you should probably cut back on more vigorous activities for several weeks to allow the inflammation and pain to subside.
Treatments directed to the painful area help control pain and swelling. Examples include ultrasound, moist heat, and soft-tissue massage. Therapy sessions sometimes include iontophoresis, which uses a mild electrical current to push anti-inflammatory medicine to the sore area.
After Surgery
You may require crutches for a few days after surgery. A physical therapist or nurse may teach you how to properly use your crutches.
The incision is protected with a bandage or dressing for about one week after surgery. The stitches are generally removed in 10 to 14 days. However, if your surgeon chose to use sutures that dissolve, you won’t need to have the stitches taken out. You should be released to full activity in about six weeks.
Hallux Rigidus
A Patient’s Guide to Hallux Rigidus
Introduction
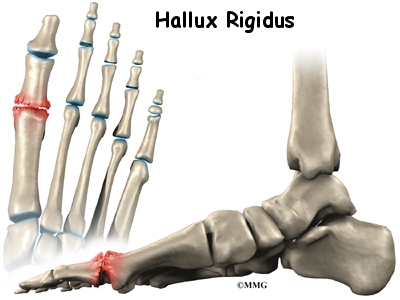
Hallux rigidus is a degenerative type of arthritis that affects the large joint at the base of the big toe. Degenerative arthritis results from wear and tear on the joint surface over time. The condition may follow an injury to the joint or, in some cases, may arise without a well-defined injury.
This guide will help you understand
- how hallux rigidus develops
- how the condition is diagnosed
- what can be done for the problem
Anatomy
Where does hallux rigidus occur?
The joint at the base of the big toe is called the metatarsophalangeal, or MTP, joint. Like any other joint in the body, the joint is covered with articular cartilage, a slick, shiny covering on the end of the bone. If this material is injured, it begins a slow process of wearing out, or degeneration. The articular surface can wear away until raw bone rubs against raw bone.
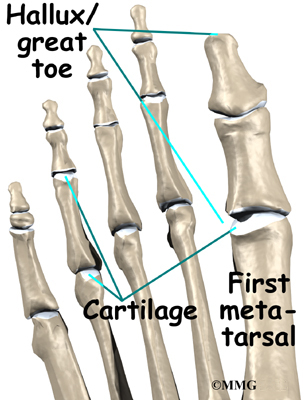
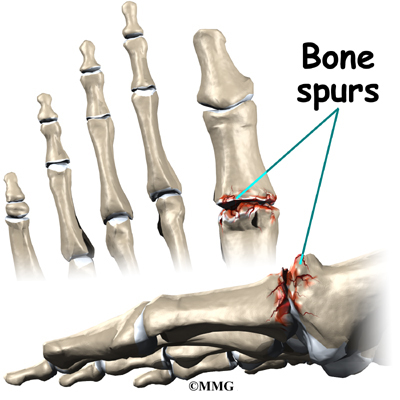
Bone spurs form around the joint as part of the degenerative process. The spurs, or bony outgrowths, may restrict the motion in the joint, especially the ability of the toe to bend upward when the foot moves forward.
Related Document: A Patient’s Guide to Foot Anatomy
Causes
Why do I have this problem?
Doctors remain uncertain about the true cause of hallux rigidus. Many surgeons feel that, in many cases, the condition begins with an injury to the articular cartilage lining the joint, such as from stubbing the big toe. The injury sets in motion a degenerative process that may last for years before symptoms occur that need treatment.
The condition can occur in younger adults but most often affects those who are 50 years old or older. Women seem to develop this problem more often than men. There may be a hereditary factor since two-thirds of patients have a positive family history. Patients who have other family members with hallux rigidus tend to have the problem in both feet (bilateral).
Other cases of hallux rigidus seem to arise without any type of serious injury. This suggests that there may be other reasons for the development of the condition. Minor differences in the anatomy of the foot may make it more likely that certain individuals develop hallux rigidus. This could be a slight change in the shape of the end of the bone (e.g., flatter than normal or oddly-shaped). The fascia (connective tissue) under the foot may be contracted (tight) increasing pressure on the MTP joint. These minor abnormalities may increase the stress that is placed on the joint while walking. Over many years, this may add up to degenerative arthritis of the joint.
Symptoms
What does hallux rigidus feel like?
The degeneration causes two problems–pain and loss of motion in the MTP joint. Without the ability of the MTP to move enough to allow the foot to roll through a full step, walking can become painful and difficult. Pain is most noticeable just before toe-off. Pain is increased when wearing shoes that have elevated heels. Bone spurs that develop with this condition can also put pressure on nearby nerves, causing numbness along the inside edge of the big toe.
Diagnosis
How do doctors identify the problem?
Diagnosis is usually apparent on physical examination, but X-rays are usually required to appreciate the extent of the degeneration and bone spur formation. X-rays also show the shape of the metatarsal head, amount of joint space, and presence of cartilage loss. This information can help direct treatment. MRIs or CT scans are only needed when the X-rays come back normal but some type of lesion is suspected.
Treatment
What can be done for the condition?
Nonsurgical Treatment
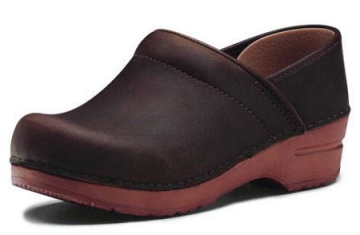
Treatment begins with anti-inflammatory medications to control the pain, swelling, heat, and redness of the degenerative arthritis. Special shoes that reduce the amount of bend in the toe during walking will also help the symptoms initially. A rocker type of sole allows the shoe to take some of the bending force, and may be combined with a metal brace in the sole to limit the flexibility of the sole of the shoe and reduce the motion needed in the MTP joint.
An injection of cortisone into the joint may give temporary relief of symptoms. Your doctor may suggest an injection in conjunction with trying special shoes to control your pain while walking. As with any injection into a joint, a small risk of infection exists with this procedure.
Surgery
Surgery may be suggested if all else fails. Several types of procedures are useful in treating this condition.
Cheilectomy

In some cases, bone spurs that form on the top of the joint can bump together when the big toe bends upward, or extends. This causes a problem when walking, because the big toe needs to bend upward when the foot is behind the body, getting ready to make the next step. The constant irritation when the bone spurs bump together leads to pain and difficulty walking.
A cheilectomy is a procedure to remove the bone spurs at the top of the joint so that they don’t bump together when the toe extends. This allows the toe to bend better and reduces the amount of pain while walking. To perform a cheilectomy, an incision is made along the top of the joint. The bone spurs that are blocking the joint from extending are identified and removed from both the bones that make up the joint. A little extra bone may be taken off to ensure that nothing rubs when the hallux is raised. The skin is closed and allowed to heal.
Joint Fusion
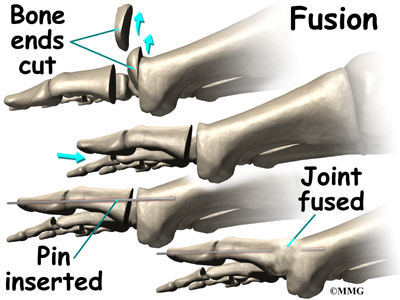
Many surgeons favor arthrodesis, or fusion, of the MTP joint to relieve the pain. To fuse a joint means to allow the two bones that form a joint to grow together and become one bone. The joint between the two bones is removed and the two bones are allowed to fuse. This results in a joint that no longer moves. Wearing a rocker-soled shoe is usually necessary following a fusion to improve your manner of walking, or gait.
View animation of joint surfaces removed
View animation of pin fixation
To perform a fusion, an incision is made into the MTP joint. The joint surfaces are removed. The two surfaces are then fixed with either a metal pin or screw, with the toe turned slightly upward to allow for walking. The bones are then allowed to fuse. The fusion usually takes about three months to become solid.
Artificial Joint Replacement
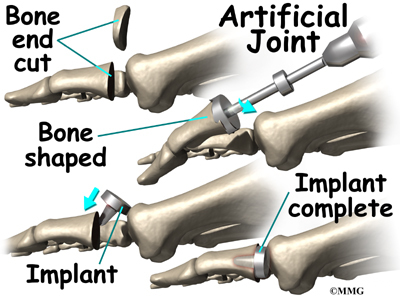
Some surgeons favor replacing the joint with an artificial joint, similar to what is done in the knee or hip, only much smaller. Replacing the joint with an artificial joint is usually recommended for moderately involved joints. (But, many surgeons think that arthrodesis or fusion still produces better results for patients with severe hallux rigidus).
In this procedure, one of the joint surfaces is removed and replaced with a plastic or metal surface. This procedure may relieve the pain and preserve the joint motion. The major drawback to this procedure is that the artificial joint probably will not last a lifetime and will require more operations later if it begins to fail.
View animation of proximal phalanx joint surface removed
View animation of proximal phalanx reamed
To perform an artificial joint replacement, an incision is first made on the top of the big toe over the MTP joint. Once the joint is entered, the arthritic joint surface of the proximal phalanx (the first bone of the big toe) is removed. The hollow marrow area of the proximal phalanx is prepared with special instruments so that the artificial joint surface will fit snugly into the bone. Different sized implants are tried, and the toe is moved through a range of motion to help determine if the fit is proper.
Once the surgeon is satisfied that everything fits, the artificial joint surface is implanted. The joint capsule and skin incision are then closed with small stitches.
There are actually several different ways to accomplish a joint replacement for hallux rigidus. A total joint replacement removes and replaces both sides of the joint. This type of procedure requires a conical stem that sits down inside the toe bones on either side of the joint. The implants can be made of ceramic, titanium, cobalt-chrome, or titanium combined with polyethylene (plastic) parts.
Metatarsal hemiarthroplasty replaces just one side of the joint — between the bone closest to the big toe joint (metatarsal) and the middle phalangeal bone. Limited studies have been done using this approach but patient satisfaction is reportedly high (100 per cent) with no implant failures or need for revision surgery.
Other Procedures
There are other surgical procedures that are slight variations of these three approaches. For example, cheilectomy may be combined with a phalangeal osteotomy. The surgeon removes a wedge-shaped piece of bone from the middle toe bone in order to take pressure off the joint. Some patients can be successfully treated with just the osteotomy procedure.
Another alternative approach (more for the younger patient) is the interpositional arthroplasty. In this procedure, the surgeon removes the base of the toe bone (phalange) and places a “spacer” in the hole left. The spacer is made up of a rolled up piece of tendon. The surgeon may have to release the tendon that inserts into the base of the phalange for this to work best. This decision is made at the time of the surgery.
Rehabilitation
What should I expect following treatment?
Nonsurgical Rehabilitation
If your doctor recommends nonsurgical treatment, you should begin to see some improvement in your symptoms within a few days. Anti-inflammatory medications may take up to seven to 10 days to become effective. A cortisone shot usually works within 24 hours. Alterations to your shoe wear may take several weeks to have an effect.
After Surgery
It will take about eight weeks before the bones and soft tissues are well healed. You may be placed in a wooden-soled shoe or a cast during this period to protect the bones while they heal. You will probably need crutches briefly. A physical therapist may be consulted to help you learn to use your crutches.
The incision is protected with a bandage or dressing for about one week after surgery. The stitches are generally removed in 10 to 14 days. However, if your surgeon used sutures that dissolve, you won’t need to have the stitches taken out.
During your follow-up visits, X-rays will probably be taken so that the surgeon can follow the healing of the bones if a fusion was performed. X-rays are also important if an artificial joint was used to make sure the implant is properly aligned and positioned.
Plantar Fasciitis
A Patient’s Guide to Plantar Fasciitis (Heel Pain)
Introduction

Plantar fasciitis is a painful condition affecting the bottom of the foot. It is a common cause of heel pain and is sometimes called a heel spur. Plantar fasciitis is the correct term to use when there is active inflammation. Plantar fasciosis is more accurate when there is no inflammation but chronic degeneration instead. Acute plantar fasciitis is defined as inflammation of the origin of the plantar fascia and fascial structures around the area. Plantar fasciitis or fasciosis is usually just on one side. In about 30 per cent of all cases, both feet are affected.
This guide will help you understand
- how plantar fasciitis develops
- how the condition causes problems
- what can be done for your pain
Anatomy
Where is the plantar fascia, and what does it do?

The plantar fascia (also known as the plantar aponeurosis) is a thick band of connective tissue. It runs from the front of the heel bone (calcaneus) to the ball of the foot. This dense strip of tissue helps support the arch of the foot by acting something like the string on an archer’s bow. It is the source of the painful condition plantar fasciitis.
The plantar fascia is made up of collagen fibers oriented in a lengthwise direction from toes to heel (or heel to toes). There are three separate parts: the medial component (closest to the big toe), the central component, and the lateral component (on the little toe side). The central portion is the largest and most prominent.
Both the plantar fascia and the Achilles’ tendon attach to the calcaneus. The connections are separate in the adult foot. Although they function separately, there is an indirect relationship. If the toes are pulled back toward the face, the plantar fascia tightens up. This position is very painful for someone with plantar fasciitis. Force generated in the Achilles’ tendon increases the strain on the plantar fascia. This is called the windlass mechanism. Later, we’ll discuss how this mechanism is used to treat plantar fasciitis with stretching and night splints.
Related Document: A Patient’s Guide to Foot Anatomy
Causes
How does plantar fasciitis develop?
Plantar fasciitis can come from a number of underlying causes. Finding the precise reason for the heel pain is sometimes difficult.
As you can imagine, when the foot is on the ground a tremendous amount of force (the full weight of the body) is concentrated on the plantar fascia. This force stretches the plantar fascia as the arch of the foot tries to flatten from the weight of your body. This is just how the string on a bow is stretched by the force of the bow trying to straighten. This leads to stress on the plantar fascia where it attaches to the heel bone. Small tears of the fascia can result. These tears are normally repaired by the body.
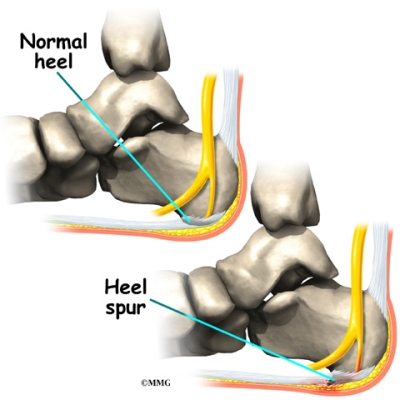
As this process of injury and repair repeats itself over and over again, a bone spur (a pointed outgrowth of the bone) sometimes forms as the body’s response to try to firmly attach the fascia to the heelbone. This appears on an X-ray of the foot as a heel spur. Bone spurs occur along with plantar fasciitis but they are not the cause of the problem.
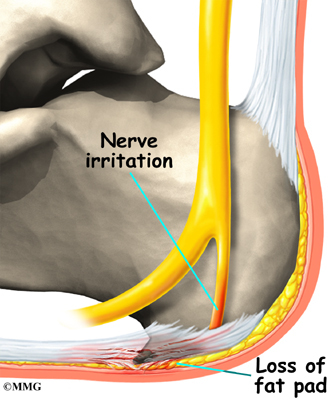
As we age, the very important fat pad that makes up the fleshy portion of the heel becomes thinner and degenerates (starts to break down). This can lead to inadequate padding on the heel. With less of a protective pad on the heel, there is a reduced amount of shock absorption. These are additional factors that might lead to plantar fasciitis.
Other factors that may contribute to the development of plantar fasciitis include obesity, trauma, weak plantar flexor muscles, excessive foot pronation (flat foot) or other alignment problems in the foot and/or ankle, and poor footwear.
Some physicians feel that the small nerves that travel under the plantar fascia on their way to the forefoot become irritated and may contribute to the pain. But some studies have been able to show that pain from compression of the nerve is different from plantar fasciitis pain. In many cases, the actual source of the painful heel may not be defined clearly.
Symptoms
What does plantar fasciitis feel like?
The symptoms of plantar fasciitis include pain along the inside edge of the heel near the arch of the foot. The pain is worse when weight is placed on the foot especially after a long period of rest or inactivity. This is usually most pronounced in the morning when the foot is first placed on the floor. This symptom called first-step pain is typical of plantar fasciitis.
Prolonged standing can also increase the painful symptoms. It may feel better after activity but most patients report increased pain by the end of the day. Pressing on this part of the heel causes tenderness. Pulling the toes back toward the face can be very painful.
Diagnosis
How do doctors diagnose the condition?
The diagnosis of plantar fasciitis is generally made during the history and physical examination. There are several conditions that can cause heel pain, and plantar fasciitis must be distinguished from these conditions. Pain can be referred to the heel and foot from other areas of the body such as the low back, hip, knee, and/or ankle. Special tests to challenge these areas are performed to help confirm the problem is truly coming from the plantar fascia.

An X-ray may be ordered to rule out a stress fracture of the heel bone and to see if a bone spur is present that is large enough to cause problems. Other helpful imaging studies include bone scans, MRI, and ultrasound. Ultrasonographic exam may be favored as it is quick, less expensive, and does not expose you to radiation.
Laboratory investigation may be necessary in some cases to rule out a systemic illness causing the heel pain, such as rheumatoid arthritis, Reiter’s syndrome, or ankylosing spondylitis. These are diseases that affect the entire body but may show up at first as pain in the heel.
Treatment
What can be done for my pain?
Nonsurgical Treatment
Most patients get better with the help of nonsurgical treatments. Stretches for the calf muscles on the back of the lower leg take tension off the plantar fascia.
A night splint can be worn while you sleep. The night splint keeps your foot from bending downward. It places a mild stretch on the calf muscles and the plantar fascia. Some people seem to get better faster when using a night splint. They report having less heel pain when placing the sore foot on the ground in the morning.
There have been a few studies that reported no significant benefit from adding night splinting to a program of antiinflammatory meds and stretching. Other studies report the benefits of short-term casting to unload the heel, immobilize the plantar fascia, and reduce repetitive microtrauma.
Supporting the arch with a well fitted arch support, or orthotic, may also help reduce pressure on the plantar fascia. Placing a special type of insert into the shoe, called a heel cup, can reduce the pressure on the sore area. Wearing a silicone heel pad adds cushion to a heel that has lost some of the fat pad through degeneration.
Shock wave therapy is a newer form of nonsurgical treatment. It uses a machine to generate shock wave pulses to the sore area. Patients generally receive the treatment once each week for up to three weeks. It is not known exactly why it works for plantar fasciitis. It’s possible that the shock waves disrupt the plantar fascial tissue enough to start a healing response. The resulting release of local growth factors and stem cells causes an increase in blood flow to the area. Recent studies indicate that this form of treatment can help ease pain, while improving range of motion and function.
Clinical trials are underway investigating the use of radiofrequency to treat plantar fasciitis. It is a simple, noninvasive form of treatment. It allows for rapid recovery and pain relief within seven to 10 days. The radio waves promote angiogenesis (formation of new blood vessels) in the area. Once again, increasing blood flow to the damaged tissue encourages a healing response.
Antiinflammatory medications are sometimes used to decrease the inflammation in the fascia and reduce your pain. Studies show that just as many people get better with antiinflammatories as those who don’t have any improvement. Since these medications are rarely used alone, it’s difficult to judge their true effectiveness.
A cortisone injection into the area of the fascia may be used but has not been proven effective. Studies show better results when ultrasound is used to improve the accuracy of needle placement. Cortisone should be used sparingly since it may cause rupture of the plantar fascia and fat pad degeneration and atrophy, making the problem worse.
Botulinum toxin A otherwise known as BOTOX has been used to treat plantar fasciitis. The chemical is injected into the area and causes paralysis of the muscles. BOTOX has direct analgesic (pain relieving) and antiinflammatory effects. In studies so far, there haven’t been any side effects of this treatment.
Surgery
Surgery is a last resort in the treatment of heel pain. Physicians have developed many procedures in the last 100 years to try to cure heel pain. Most procedures that are commonly used today focus on several areas:
- remove the bone spur (if one is present)
- release the plantar fascia (plantar fasciotomy)
- release pressure on the small nerves in the area
Usually the procedure is done through a small incision on the inside edge of the foot, although some surgeons now perform this type of surgery using an endoscope. An endoscope is a tiny TV camera that can be inserted into a joint or under the skin to allow the surgeon to see the structures involved in the surgery. By using the endoscope, a surgeon can complete the surgery with a smaller incision and presumably less damage to normal tissues. It is unclear whether an endoscopic procedure for this condition is better than the traditional small incision.
Surgery usually involves identifying the area where the plantar fascia attaches to the heel and releasing the fascia partially from the bone. If a small spur is present this is removed. The small nerves that travel under the plantar fascia are identified and released from anything that seems to be causing pressure on the nerves. This surgery can usually be done on an outpatient basis. This means you can leave the hospital the same day.


Rehabilitation
What should I expect after treatment?
Nonsurgical Rehabilitation
Nonsurgical management of plantar fasciitis is successful in 90 per cent of all cases. Patients with plantar fasciitis are commonly prescribed physical therapy. Therapists design exercises to improve flexibility in the calf muscles, Achilles’ tendon, and the plantar fascia.
Treatments directed to the painful area help control pain and swelling. Examples include ultrasound, ice packs, taping, and soft-tissue massage. Therapy sessions sometimes include iontophoresis, which uses a mild electrical current to push anti-inflammatory medicine to the sore area.
A customized foot orthotic may be designed to support the arch of the foot and to help cushion the heel. Or your therapist may recommend you use a heel cup. Healing is fostered by off-loading the plantar fascia and allowing it time to heal without daily (repeated) microtrauma. The pressure of the cup or orthotic against the skin may also interrupt sensory input and pain messages going to the brain.
Ideas are offered for you to use at home, such as doing your stretches for the calf muscles and the plantar fascia. You may also be fit with a night splint to wear while you sleep. As mentioned earlier, the night splint is designed to put a gentle stretch on the calf muscles and plantar fascia as you sleep.
Many times it takes a combination of different approaches to get the best results. There isn’t a one-size-fits-all plan. Some patients do best with a combination of heel padding, medications, and stretching. If this doesn’t provide relief from symptoms within four to six weeks, then physical therapy and orthotics may be added. There is some evidence that an orthotic in the first few weeks after symptoms appear followed by stretching is an effective approach.
Finding the right combination for you may take some time. Don’t be discouraged if it takes a few weeks to a few months to find the right fit for you. Most of the time, the condition is self-limiting. This means it doesn’t last forever but does get better with a little time and attention. But in some cases, it can take up to a full year or more for the problem to be resolved.
After Surgery
It will take several weeks before the tissues are well healed. The incision is protected with a bandage or dressing for about one week after surgery. You will probably use crutches briefly, and a physical therapist may be consulted to help you learn to use your crutches.
The stitches are generally removed in 10 to 14 days. However, if your surgeon used sutures that dissolve, you won’t need to have the stitches taken out. You should be released to full activity in about six weeks.
Surgical release of the plantar fascia decreases stiffness in the arch. But it can lead to collapse of the longitudinal (lengthwise) arch of the foot. Releasing the fascia alters the biomechanics of the foot and may decrease stability of the foot arch. The result may be increased stress on the other plantar ligaments and bones. Fractures and instability have been reported in up to 40 per cent of patients who have a plantar fasciotomy.
Ingrown Toenail
A Patient’s Guide to Ingrown Toenail
Introduction

Ingrown toenail is a condition that most commonly affects the hallux, or big toe. This condition usually results when pressure from improper shoe wear and improper care of the toenails leads to pain and overgrowth of the tissue at the side of the nail.
This guide will help you understand
- how an ingrown toenail develops
- why it causes problems
- what can be done to treat the condition
Anatomy
How does a toenail normally grow?
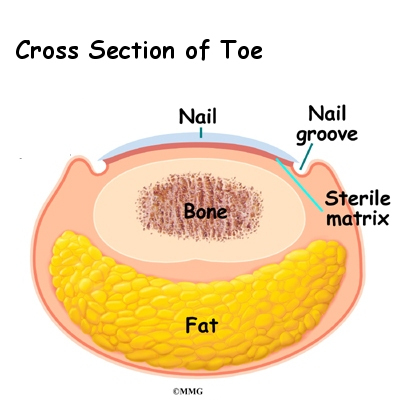
The toenail (and any other nail) is produced by the nail’s germinal matrix (special nail-generating tissue) and grows forward to the end of the toe. Most of us have lost either a fingernail or toenail and watched as the nail regrew slowly over several months. The area under the nail that attaches the nail to the toe is called the sterile matrix. The sterile matrix doesn’t produce the nail. The sterile matrix just attaches the nail to the toe. On either side of the nail is an area called the nail groove, where the skin of the toe meets the nail matrix and the edge of the toenail.

Related Document: A Patient’s Guide to Foot Anatomy
Causes
How does the problem develop?

In the case of the ingrown toenail, the nail groove begins to disappear, probably due to pressure from ill fitting shoes. The chronic pressure of the nail edge rubbing against the nail groove causes irritation and swelling of the surrounding skin. If the condition continues, hypertrophy, or overgrowth, of the tissue, leads to permanent changes in the tissue. These changes only make the situation worse. Eventually, an infection can occur in the area, leading to even more pain and swelling. Improper trimming of the toenail can also cause problems. If the corner of the toenail is not allowed to grow out past the skin at the end of the nail groove, it may dig into the skin. This makes the pressure from the shoe even more painful.
Symptoms
What does an ingrown toenail feel like?
The primary symptom of an ingrown toenail is pain. The toe is red and painful to the touch, and it can be difficult to wear shoes. If infection is present, pus may drain from the area as well.
Diagnosis
How will my doctor confirm it’s an ingrown toenail?
Diagnosis is generally easily made on examination. No X-rays or tests are usually required, unless your doctor suspects that the infection may have spread to the bone.
Treatment
What can be done for the condition?
Nonsurgical Treatment

If caught early, nonsurgical treatment may suffice. Pressure on the toe should be reduced to a minimum with sandals or simply not wearing a shoe for several days. The temptation to trim the corner of the toenail off should be avoided. This can lead to a worse condition where the toenail forms a fish hook deformity that further grows into the nail groove. The goal of nonsurgical treatment is to allow the toenail to grow out to the end of the toe beyond the nail groove. Intermittent soaks in a warm saline solution may be suggested. If the area is infected, antibiotics may be necessary to eliminate the infection.
Once the condition has resolved, shoes should be found that do not put too much pressure on the big toe. The nails should be trimmed straight across and never below the end of the nail groove.
Surgery
If the condition has resulted in permanent hypertrophy of the tissue surrounding the nail margin, surgery may be required to treat the condition.
Wedge Resection

In mild cases, removal of a portion of the hypertrophied tissue may reduce the pressure and irritation. In this procedure, a wedge of tissue is removed and the healing process allows the nail groove to reform itself.
Partial Nail and Matrix Removal
More severe cases may require removal of a portion of the toenail and the germinal matrix that produces that portion of the nail.
Nail and Matrix Ablation

Finally, in cases of severe deformity, the entire nail and its germinal matrix may need to be removed. This is called a nail ablation. No new toenail will grow back. This should be done only as last resort.
These procedures can usually be done in your doctor’s office under local anesthetic.
Rehabilitation
What should I expect after treatment?
Nonsurgical Rehabilitation
If your doctor recommends nonsurgical treatment, you should begin to see some improvement in your symptoms within a few days.
Soaking the sore foot and making simple changes to your footwear may allow you to resume normal walking nearly immediately. But you should probably cut back on more vigorous activities for several weeks to allow the inflammation and pain to subside.
After Surgery
It will take several weeks before the tissues are healed. You will probably wear a bandage or dressing for about a week following the procedure. Your surgeon may recommend soaking the toe in warm salt water each day for the first week after surgery.
Morton’s Neuroma
A Patient’s Guide to Interdigital Neuroma
Introduction
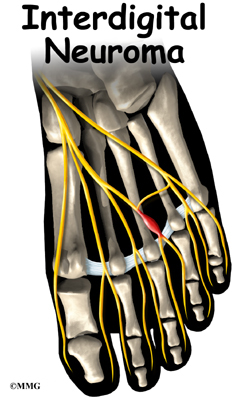
Interdigital neuroma (sometimes called a Morton’s neuroma) is the medical term for a painful growth in the forefoot. The pain is most commonly felt between the third and fourth toes but can also occur in the area between the second and third toes. The exact cause of this problem is not clear. Some studies suggest that it is due to swelling, scarring, or a noncancerous tumor in one of the small nerves of the foot. The symptoms seem to be caused by irritation of the nerve that runs in the space between each toe.
This guide will help you understand
- what is known about the condition
- how the condition causes problems
- what can be done for your pain
Anatomy
What part of the foot is involved?

The nerves of the foot run into the forefoot and out to the toes between the long metatarsal bones of the feet. Each nerve splits at the end of the metatarsal bone and continues out to the end of the toe. Each nerve ending supplies feeling to two different toes. The interdigital neuroma occurs in the nerve just before it divides into the two branches, the area under the ball of the foot. A neuroma is formed by the swelling or thickening in this part of the nerve.
Related Document: A Patient’s Guide to Foot Anatomy
Causes
Why does the condition develop?
It is not entirely understood why an interdigital neuroma forms. Most likely, it results from repeated injury to the nerve in this area. Many theories have been put forth as to the cause of the chronic injury, but none has been proven.
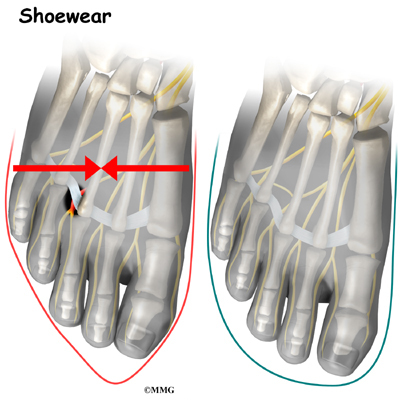
The most common cause of pain is thought to be irritation on the nerve. The chronic nerve irritation is believed to cause the nerve to scar and thicken, creating the neuroma. Many foot surgeons feel that the problem may arise because the metatarsal bones squeeze in on the nerve, and the ligament that joins the two bones irritates, or entraps, the nerve. Entrapment of the nerve is thought to lead to the chronic irritation and pain.
Symptoms
What does an interdigital neuroma feel like?
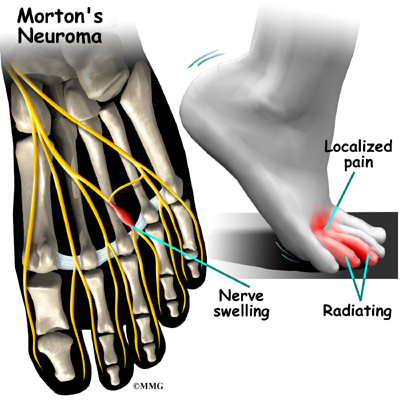
The neuroma usually causes pain in the ball of the foot when weight is placed on the foot. Many people with this condition report feeling a painful catching sensation while walking, and many report sharp pains that radiate out to the two toes where the nerve ends. You may feel swelling between the toes or a sensation similar to having a rock in your shoe. This can feel like electric shocks, similar to hitting the funny bone on your elbow.
Diagnosis
How will my doctor know it’s an interdigital neuroma?
The diagnosis is usually made on history and physical examination alone. X-rays are only useful to make sure the pain is not coming from something else. In some confusing cases, an injection of lidocaine and cortisone into the area may help decide if the diagnosis of an interdigital neuroma is correct. This treatment should result in a reduction of symptoms temporarily.
Treatment
What can be done for my pain?
Nonsurgical Treatment
Treatment of an interdigital neuroma usually begins with changes in shoe wear. Sometimes simply moving to a wider shoe will reduce or eliminate the symptoms. A firm, crepe-soled shoe may help. The firm sole decreases the amount of stretch in the forefoot as you take a step. This lessens the degree of irritation on the nerve.
Also, an injection of lidocaine and cortisone into the area may help temporarily relieve symptoms. This is usually short-lived (days to weeks) and is mainly useful to help the doctor make a diagnosis.
Surgery
If these nonsurgical measures fail to resolve the pain, surgery may be suggested. There are several different approaches to treating the neuroma surgically.
Neuroma Removal
The more traditional procedure involves removing the neuroma. Since the neuroma is part of the nerve, the nerve is removed, or transected, as well. This results in permanent numbness in the area supplied by the nerve.
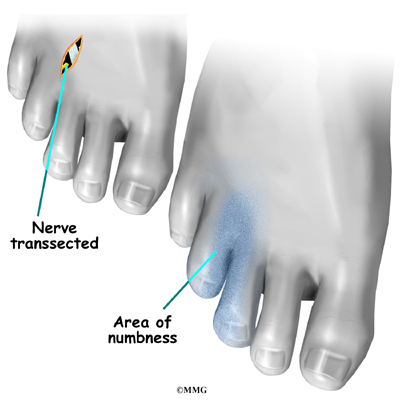

To remove a neuroma surgically, a small incision is made in the skin between the two toes that are affected by the neuroma. The neuroma is located and removed by cutting the nerve. The skin incision is repaired with stitches and a dressing applied.
Ligament Release
Many foot surgeons believe that removing the nerve as the initial surgery may be too radical. These surgeons suggest that a simple operation to release the ligament between the metatarsal bones will reduce the squeezing action by the metatarsals and remove the irritation on the nerve by the ligament. If this surgery fails, the more traditional approach to removing the nerve can be done later. One of the benefits to this procedure is that you are not left with any numbness in the toes.
These surgical procedures can be done either under general anesthesia, where you are put to sleep, or with a type of regional anesthesia. Regional anesthesia means that the nerves of the foot are blocked by injecting a local anesthetic, similar to lidocaine, into the area around the nerves leading to the foot. Only the foot goes to sleep. The surgery is most commonly done as an outpatient procedure, meaning you can go home the same day.
Rehabilitation
What should I expect following treatment?
Nonsurgical Rehabilitation
Patients with a painful interdigital neuroma may benefit from four to six physical therapy treatments. Your therapist can offer ideas of firm-soled shoes that have a wide forefoot, or toe box. The added space in this part of the shoe keeps the metatarsals from getting squeezed inside the shoe. A special metatarsal pad can also be placed within the shoe under the ball of the foot. The pad is designed to spread the metatarsals apart and take pressure off the neuroma.
These simple changes to your footwear may allow you to resume normal walking immediately. But you should probably cut back on more vigorous activities for several weeks to allow the inflammation and pain to subside.
Treatments directed to the painful area help control pain and swelling. Examples include ultrasound, moist heat, and soft-tissue massage. Therapy sessions sometimes include iontophoresis, which uses a mild electrical current to push anti-inflammatory medicine to the sore area. This treatment is especially helpful for patients who can’t tolerate injections.
After Surgery
You may require crutches for a few days after surgery. The foot will remain tender for several days. The incision is protected with a bandage or dressing for about one week after surgery. The stitches are generally removed in 10 to 14 days. However, if your surgeon chose to use sutures that dissolve, you won’t need to have the stitches taken out.
Osteochondritis Dissecans of the Talus
A Patient’s Guide to Osteochondritis Dissecans of the Talus
Introduction

Osteochondritis dissecans (OCD) is a problem that causes pain and stiffness of the ankle joint. It can occur in all age groups. Most cases of OCD usually follow a twisting injury to the ankle and are actually fractures of the joint surface.
This guide will help you understand
- how OCD develops
- how the condition causes problems
- what can be done for your pain
Anatomy


Where does OCD develop?
The talus is one of the large bones in the back part of the foot that helps form the ankle joint. The area where OCD occurs is located at the top of the talus. Depending on how the ankle is injured, the problem can occur on the side of the talus closest to the other foot or on the outside part.
The top of the talus is part of the joint and is covered with articular cartilage, the white, slippery material that covers all joint surfaces. On the talus, this covering is about one-eighth of an inch thick. This material allows the bones of the joint to slide against each other without much friction. Right below the articular cartilage is the bone of the talus.
Related Document: A Patient’s Guide to Foot Anatomy
Causes
How does OCD develop?
The cause of most cases of OCD are thought to be actual chip-type fractures. These fractures occur with severe ankle sprains. Which side of the talus the chip is on depends on how the ankle was twisted during the initial injury.

The chip fracture can vary in size and severity. If the bone underneath the cartilage is crushed or cracked and the articular cartilage is intact, the fragment is less likely to move. If the articular cartilage is broken as well, the bone fragment may move out of position, or displace, making healing less likely and later problems more likely.
Because the bone chip is separated from the rest of the talus, the blood vessels traveling to the fragment through the bone of the talus are torn, and the blood supply of the bone fragment is lost. If the fragment displaces, these blood vessels cannot grow back. The fragment loses its blood supply and actually dies. This makes healing less likely.
There is some evidence that the twisting injury may not cause a chip fracture initially. However, it may injure the bone’s blood supply, leading to an area of the bone actually dying. This may explain some cases of OCD that appear without a well-defined history of a recent serious twisting injury.
Symptoms
What does OCD feel like?
Initially, OCD behaves like any other ankle sprain injury. You will feel swelling and pain and have difficulty placing weight on the ankle. No special symptoms suggest a chip fracture has occurred inside the joint. X-rays are the best way to determine whether a chip fracture has occurred.
Later, continued problems with the fragment may cause swelling and a generalized ache in the ankle. You may also feel a catching sensation with the ankle in certain positions. This is because the chip can get caught in the ankle joint as it moves, causing pain and the sensation of catching.
Diagnosis
How will the doctor know it’s OCD?
The diagnosis of OCD may be suggested by the history and physical examination. X-rays of the ankle will usually show a problem on the top of the talus (sometimes called the talar dome). Special tests such as a computerized tomography (CT) or a magnetic resonance imaging (MRI) scan may be necessary to determine the full extent of the area involved.
Treatment
What can be done for my pain?
Nonsurgical Treatment
Treatment for OCD depends on when the problem is discovered. If the problem is discovered immediately after a twisting injury to the ankle, immobilization in a cast for six weeks may be suggested to see if the bone injury heals. You may need to keep weight off the foot and use crutches during this period of immobilization.
Surgery
If the problem is not recognized early, the bone fragment may not heal and may continue to cause problems. Surgery may be required to try to reduce your symptoms at this point.

Surgery usually involves removing the loose fragment of cartilage and bone from the ankle joint and drilling small holes in the injured bone. When the fragment is removed, a defect shaped like a small crater is left in the talar dome. It is this area where the drill holes are made. The drill holes allow new blood vessels to grow into the defect and help to form scar tissue to fill the area. Eventually this new scar tissue smoothes out the defect and allows the ankle to move more easily.
View animation of chip removal
Arthroscopic Method
In some cases the surgery may be done using an arthroscope. An arthroscope is a special miniature TV camera that is inserted into the joint through a very small incision. Special instruments are inserted into the ankle through other small incisions. By watching on the TV screen, the surgeon removes the fragment and drills the defect.
Open Method
The ankle is a small joint, so it is sometimes difficult to get the arthroscope into certain areas. If the defect is in an area of the ankle difficult to reach with the arthroscope, an open incision may be required. This incision is usually made in the front of the ankle to allow the surgeon to see into the joint. Special instruments are used to remove the fragment and drill the injured area.
Rehabilitation
What should I expect following treatment?
Nonsurgical Rehabilitation
If your surgeon recommends nonsurgical care with a cast or boot, you will probably use crutches for at least six weeks. During follow-up office visits, X-rays are taken so that the surgeon can follow the healing of the fragment and determine whether surgery will be necessary.
After Surgery
Patients normally require crutches to keep from putting weight on the ankle for four to six weeks. Surgeons may have their patients start doing motion exercises very soon after surgery. Patients wear a splint that can easily be removed to do the exercises throughout the day.
You will probably wear a bandage or dressing for a week following the procedure. The stitches are generally removed in 10 to 14 days. However, if your surgeon used sutures that dissolve, you won’t need to have the stitches taken out.
Your surgeon may have you take part in formal physical therapy after surgery. The first few physical therapy treatments are designed to help control the pain and swelling from the surgery. Physical therapists will also work with you to make sure you are only putting a safe amount of weight on the affected leg.
The physical therapist will choose exercises to help improve ankle motion and to get the muscles toned and active again. At first, emphasis is placed on exercising the ankle in positions and movements that don’t strain the healing part of the cartilage. As the program evolves, more challenging exercises are chosen to safely advance the ankles’ strength and function.
Some of the exercises you’ll do are designed to get your leg and ankle working in ways that are similar to the activities you do every day, such as rising on your toes, walking, and going up and down stairs.
The physical therapist’s goal is to help you keep your pain under control, ensure safe weight bearing, and improve your strength and range of motion. When you are well underway, regular visits to the therapist’s office will end. Your therapist will continue to be a resource, but you will be in charge of doing your exercises as part of an ongoing home program.
Posterior Tibial Tendon Problems
A Patient’s Guide to Posterior Tibial Tendon Problems
Introduction
Because we use our feet continuously, tendonitis in the foot is a common problem. One of the most frequently affected tendons is the posterior tibial tendon.
This guide will help you understand
- how posterior tendonitis develops
- how the condition causes problems
- what can be done to treat it
Anatomy
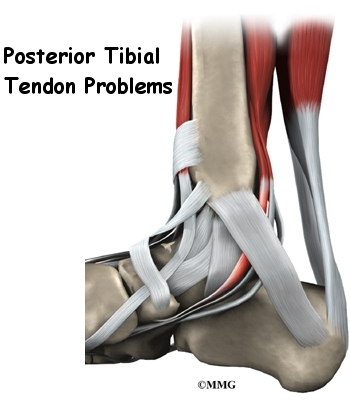
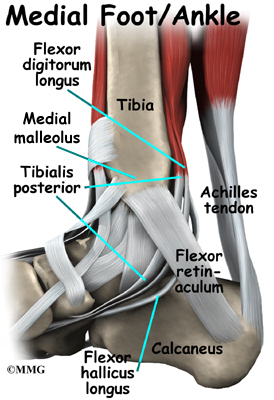
Where is the posterior tibial tendon, and what does it do?
The posterior tibial tendon runs behind the inside bump on the ankle (the medial malleolus), across the instep, and into the bottom of the foot. The tendon is important in supporting the arch of the foot and helps turn the foot inward during walking.

Related Document: A Patient’s Guide to Foot Anatomy
Causes
How does tendonitis of the foot develop?
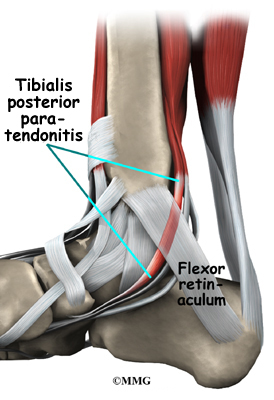
Problems with the posterior tibial tendon seem to occur in stages. Initially, irritation of the outer covering of the tendon, called the paratenon, causes paratendonitis. This means the tendon is inflamed where it runs through the tunnel behind the medial malleolus.
As we age, our tendons can degenerate, or wear down and weaken over time. Degeneration in a tendon usually shows up as a loss of the normal arrangement of the fibers of the tendon.
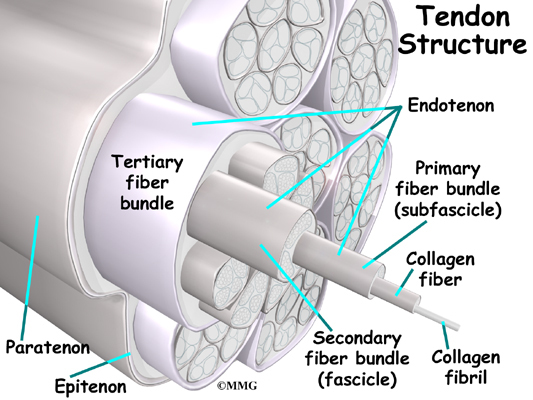
Tendons are made up of strands of a material called collagen. Think of a tendon as similar to a nylon rope and the strands of collagen as the nylon strands. Some of the individual strands of the tendon become jumbled because of degeneration, other fibers break, and the tendon loses strength.
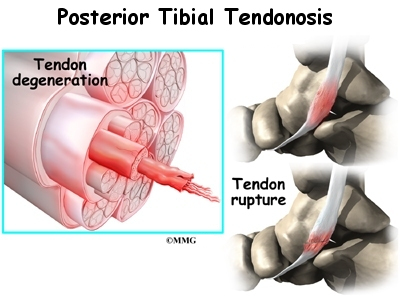
As the tendon heals itself from wear and tear, scar tissue forms, thickening the tendon. This process can continue to the extent that a nodule, or knot, forms within the tendon. This condition is called tendonosis. The area of tendonosis in the tendon is weaker than normal tendon. The weakened tendon sets the stage for the possibility of rupture of the tendon. Tendonosis may develop into tendonitis if the weakened area becomes inflamed.
Symptoms
What does tendonitis of the foot feel like?
The symptoms of tendonitis of the posterior tibial tendon include pain in the instep area of the foot and swelling along the course of the tendon. In some cases the tendon may rupture, due to weakening of the tendon by the inflammatory process. Rupture of the tendon leads to a fairly pronounced flatfoot deformity that is easily recognizable.
Diagnosis
How do doctors identify tendonitis?
Diagnosis of posterior tibial tendonitis is usually apparent on physical examination. In some difficult cases, a magnetic resonance imaging (MRI) scan may be necessary to confirm whether the tendon has ruptured. This is seldom the case. The MRI machine uses magnetic waves rather than X-rays to show the soft tissues of the body. The MRI creates images that look like slices and shows the tendons and ligaments very clearly. This test does not require any needles or special dye and is painless.
Treatment
What can be done for the condition?
Nonsurgical Treatment
Treatment of posterior tibial tendonitis begins with the use of a firm arch support inserted into you shoe. The arch support is useful because it supports the arch and takes some of the stress off the tendon. To rest the tendon, you may need to decrease the time you spend up on your feet. Additionally, your doctor may prescribe anti-inflammatory medications, such as ibuprofen or aspirin.
A cortisone injection, sometimes used to ease inflammation in other types of injuries, is usually not appropriate for this condition, since the tendon is more likely to rupture following injection. Some physicians recommend a slightly different cortisone treatment (rather than injection) called iontophoresis. Iontophoresis is a treatment that uses electric current to deliver cortisone medicine through the skin to the inflamed tendon. The risk of tendon rupture is much less when this method is used.
Surgery
If all else fails to resolve your condition, surgery may be required.
Tendon Debridement
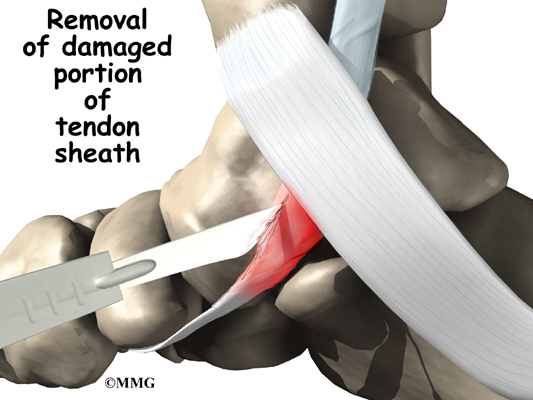
If the problem appears to be primarily tendonitis with thickening of the tissue around the tendon (the tendon sheath), a tendon debridement operation can be performed to remove the thickened tissue around the tendon. This is done to try to decrease the symptoms of pain and to prevent rupture of the tendon.
This procedure is usually done through a small incision in the instep of the foot just over the posterior tibial tendon. The surgeon simply identifies the tendon and removes the thickened tissue.
Tendon Repair
A degenerated tendon that has not ruptured may only need to be repaired. The surgeon divides the sheath around the tendon. Areas where the tendon is degenerated are carefully removed. Tears within the tendon are sutured along the length of the tendon. If the surgeon is concerned that the repaired tendon is at risk for rupturing, a graft procedure to add strength to the tendon may be needed (described below). The tendon sheath is repaired, and the skin is closed with sutures.
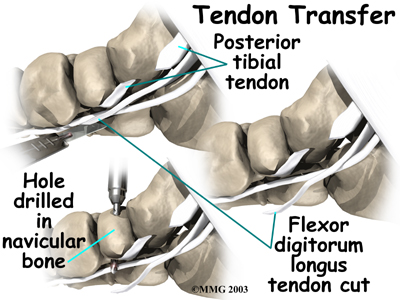
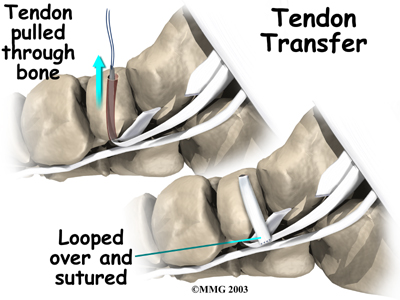
Tendon Graft
A badly degenerated or a ruptured tendon may require a tendon graft. Usually, another tendon in the foot, such as the tendon that flexes the four smaller toes (the flexor digitorum longus), is used as a tendon graft to work in place of the posterior tibial tendon.
View selecting a another tendon
View securing the tendon graft
Fusion
Finally, in cases which have been neglected and a fixed flatfoot deformity is present, a fusion (or arthrodesis) of the foot may be required. A fusion is an operation where a joint between two bones is removed and the two bones on either side of the joint are allowed to grow together, or fuse. This type of operation is used to stop pain from joints that are worn out. It can be used to realign the bones when the mechanisms for maintaining normal alignment are lost, such as when the tendons and ligaments no longer work properly. Usually, several joints must be fused to control a flatfoot deformity that develops after a posterior tibial tendon rupture.
Rehabilitation
What should I expect following treatment?
Nonsurgical Rehabilitation
Patients with posterior tibialis tendon problems may benefit with physical therapy treatments. Treatments directed to the painful area help control pain and swelling. Examples include ultrasound, moist heat, and soft-tissue massage. Therapists design stretches to improve flexibility in the calf muscles and to encourage healing in the posterior tibialis tendon.
Exercises to strengthen the posterior tibialis muscle and the small muscles within the feet (the intrinsics) help support the arch.
Therapists also design orthotics to support the arches of the feet. Wearing orthotics in your shoes may be allow you to resume normal walking immediately, but you should probably cut back on more vigorous activities for several weeks to allow the inflammation and pain to subside.
After Surgery
It will take about eight weeks before the soft tissues are well healed after surgery. If the tendon has been repaired or grafted, you will be placed in a cast or cast boot during this period to protect the tendon while it heals. You will probably need crutches as well. A physical therapist may be consulted to help you learn to use your crutches.
You will likely wear a bandage or dressing for about a week following the procedure. The stitches will be removed in 10 to 14 days. If your surgeon used dissolvable stitches, these will not need to be removed.
Physical therapy may be needed after a repair or graft procedure for up to four months. Ice, massage, and whirlpool treatments may be used at first to control swelling and pain. Massage and ultrasound help heal and strengthen the tendon.
Treatments progress to include more advanced mobility and strengthening exercises, some of which may be done in a pool. The buoyancy of the water enables people to walk and exercise safely without putting too much tension on the healing tendon.
As your symptoms ease and your strength improves, you will be guided through advancing stages of exercise. Athletes begin running, cutting, and jumping drills by the fourth month after surgery. They are usually able to get back to their sport by six full months after surgery.
The physical therapist’s goal is to help you keep your pain and swelling under control, improve your range of motion and strength, and ensure you regain a normal walking pattern. When you are well under way, regular visits to the therapist’s office will end. Your therapist will continue to be a resource, but you will be in charge of doing your exercises as part of an ongoing home program.
Sesamoid
A Patient’s Guide to Sesamoid Problems
Introduction

Two pea-sized bones, called sesamoids, are embedded within the soft tissues under the main joint of the big toe. Even though they are small in size, the sesamoids play an important role in how the foot and big toe work. If the sesamoids are injured, they can be a source of severe pain and disability.
This guide will help you understand
- how the sesamoid bones in the foot work
- how sesamoiditis develops
- what can be done for the condition
Anatomy
Where are the sesamoids, and what do they do?
The main joint of the big toe forms the inside edge of the ball of the foot. The two small sesamoid bones are located on the underside of this joint. There is one sesamoid bone on each side of the base of the big toe.
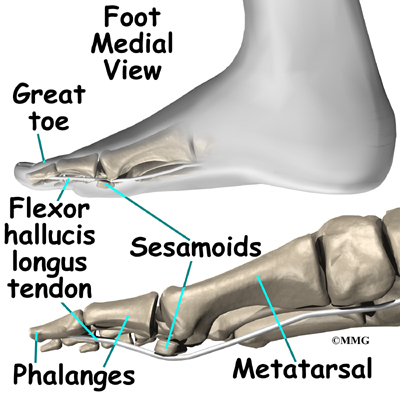

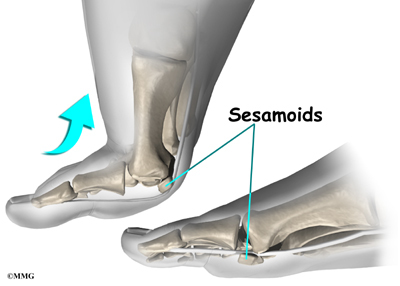
The muscles that bend the big toe down (the toe flexors) pass underneath the main joint of the big toe, crossing over the bump formed by the sesamoid bones. This bump acts as a fulcrum point for the toe flexors, giving these muscles extra leverage and power. The sesamoids also help absorb pressure under the foot during standing and walking, and they ease friction in the soft tissues under the toe joint when the big toe moves.
Related Document: A Patient’s Guide to Foot Anatomy
Causes
How does sesamoiditis develop?
Sesamoid pain can develop a number of different ways. When the tissues around the sesamoid bones become inflamed, doctors call the condition sesamoiditis. Sesamoiditis is often caused by doing the same types of toe movements over and over again, which happens in activities like running and dancing.
Fractures can also cause pain in the sesamoids. Fractures can occur when a person falls and lands bluntly on the ball of the foot. Stress fractures can also occur in the sesamoid bones. Stress fractures are usually caused by the strain of overworking the soft tissues. Athletes most often suffer stress fractures of the sesamoids because of the heavy and repeated demands that training places on the soft tissues of the foot and big toe.
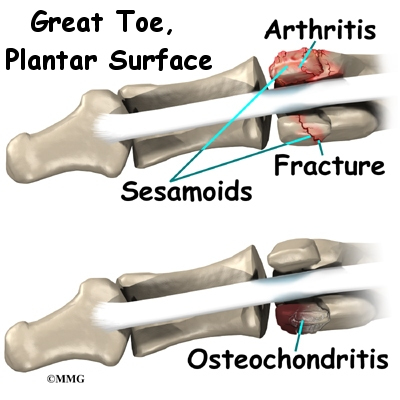
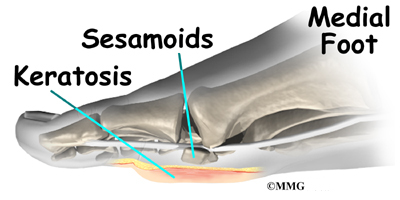
Arthritis can develop where the sesamoids glide under the bone of the big toe. The sesamoid bones create a joint where they move against the bone of the big toe. Like other joints in the body, this joint can also develop arthritis. Arthritis is more likely to be a problem in people who have high arches in their feet. The high arch causes the main joint of the big toe to become rigid. This focuses strain and pressure on the sesamoids.
In some cases, blood supply to the sesamoid bone is decreased. This condition is called osteochondritis. Osteochondritis causes a piece of the bone to actually die. The body’s attempts to heal the area may build up extra calcium around the dead spot.
Sometimes sesamoid pain comes from extra tissue under the big toe joint, similar to a corn. Doctors call this extra tissue an intractable plantar keratosis.
Symptoms
What does sesamoiditis feel like?
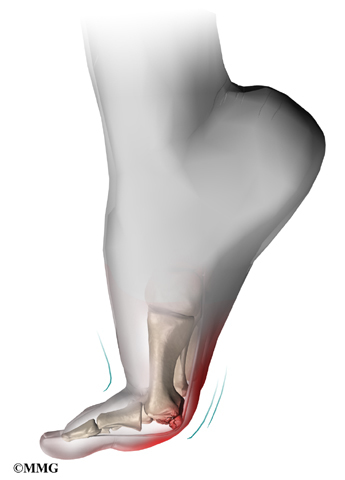
People with sesamoid problems usually feel vague pain under the main joint of the big toe. The sesamoids typically feel tender when touched. Movement of the big toe is often limited. People tend to notice pain mostly when their big toe is stretched upward, which can happen when the back foot pushes off for the next step. Occasionally the joint catches or pops. The catching or popping is often followed by increased pain, which usually eases after resting. Some people report feelings of numbness in the web of the first two toes.
Diagnosis
How do doctors identify this problem?
Your doctor will ask many questions about your medical history. You will be asked about your current symptoms and whether you’ve had other foot and joint problems in the past. Your doctor will then examine your painful toe by feeling it and moving it. This may hurt, but it is important that your doctor locates the source of the pain and determines how well the toe is moving. You may also be asked to walk back and forth.
Your doctor will probably order an X-ray. The axial view gives doctors a good idea whether there are problems in the sesamoids. To get an axial view, the X-ray is angled to show the space between the sesamoids and the bottom part of the big toe joint.
The X-ray image may show a sesamoid bone that looks like it is divided into two or more separate bones, as though it were fractured. This is normal in about 10 percent of people. If the small space between the bone pieces is smooth, it’s probably okay. If the space is jagged, there could be a fracture. Further tests may be needed to make the diagnosis.
Doctors may order a bone scan when the X-ray appears normal, or if there is a question about whether the division inside the bone is a fracture. A bone scan involves giving intravenous agents that travel through the blood and then show up in a scan. The agents accumulate in areas where there is a great deal of stress to the bone tissue. More intravenous agents will likely appear on the painful sesamoid bone than on the sesamoids of the other foot.
Your doctor may want to do other imaging tests, such as magnetic resonance imaging (MRI). An MRI scan may help determine whether the bone is infected. More testing may help to make the final diagnosis.
Treatment
What can be done for the condition?
Many cases of sesamoiditis can heal completely with careful treatment. There are two methods for treating sesamoid problems, nonsurgical treatment and surgery. Surgery is most often used as a last resort, when other forms of treatment aren’t helping.
Nonsurgical Treatment
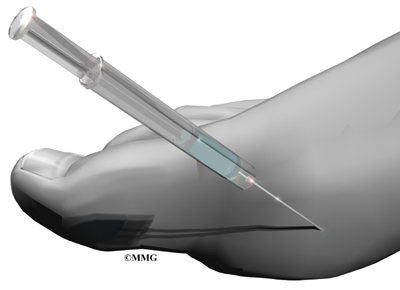
Doctors prefer to begin with nonsurgical treatment. Your doctor may recommend treating the inflammation and pain of sesamoiditis with nonsteroidal anti-inflammatory drugs (NSAIDs), such as aspirin and ibuprofen. Special padding in the shape of a J can be placed inside your shoe to ease pressure on the sesamoids as you stand and walk. You may need to limit the amount of weight placed on your foot when you’re up and about. Shoes with low heels may also ease the pressure. Occasionally, doctors inject steroid medication into the soft tissues around the sesamoids to decrease the inflammation.
Some doctors place a patient with a fracture in a cast for about six weeks. Afterward, the patient must wear a stiff-soled shoe until the pain goes away. The stiff sole of the shoe keeps the toe steady and prevents it from bending while you walk. Other doctors prefer not to cast fractures. Instead, they have their patients wear a stiff-soled shoe right away.
Stress fractures are a bit more complicated. If a stress fracture doesn’t heal, it becomes a nonunion fracture, an extremely painful condition that can cause significant disability. If the problem isn’t better in eight to 12 weeks, surgery may be needed to remove the pieces of unhealed bone. To avoid the problems of a nonunion fracture, some doctors use a cast and require patients to avoid putting any weight on the foot for up to eight weeks.
Surgery
If surgery becomes necessary, several procedures are available to treat sesamoid problems. Which one your surgeon chooses will depend on your specific condition.
Bone Removal
Your surgeon may recommend removing part or all of the sesamoid bone. When bone is removed from only one sesamoid, the other sesamoid bone can still provide a fulcrum point for the toe flexors. However, if both of the bones are taken out, the toe flexors lose necessary leverage and can’t function. When this happens, the big toe will either bend up like a claw or slant severely toward the second toe. Thus, surgeons usually try to avoid taking both sesamoids out.
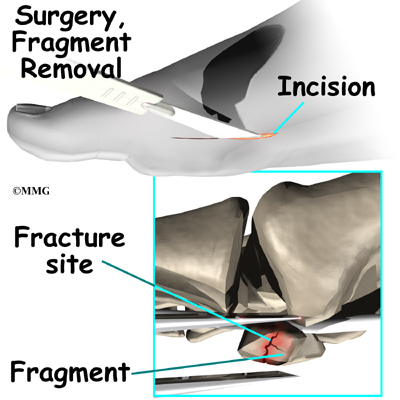
When a sesamoid bone is fractured in a sudden injury, surgery may be done to remove the broken pieces. To remove the sesamoid on the inside edge of the foot, an incision is made along the side of the big toe. The soft tissue is separated, taking care not to damage the nerve that runs along the inside edge of the big toe. The soft tissues enclosing the sesamoid are opened, and bone is removed. The tissues next to the sesamoid are stitched up. Then the soft tissues are laid back in place, and the skin is sewed together.
Surgery is similar for the sesamoid closer to the middle of the foot. The only difference is that the surgeon makes the incision either on the bottom of the big toe or in the web space between the big toe and the second toe.
Scraping
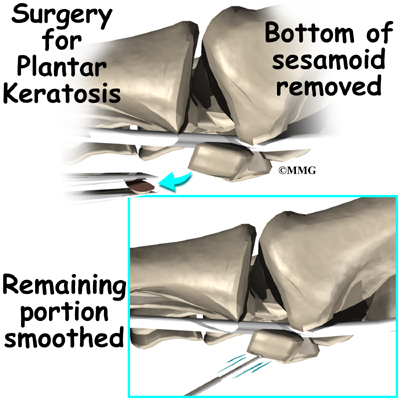
For patients diagnosed with stubborn plantar keratosis, surgeons generally perform surgery to scrape off the extra tissue. Your surgeon may decide to shave off only the affected part of the bone. The bottom half of the sesamoid is cut off, and the rough edges of the remaining part of the bone are filed with a special tool to leave a smooth shell. This surgery is easier on the body than procedures that completely remove the sesamoid.
Bone Graft

When patients continue to have problems with nonunion stress fractures, a bone graft may help the parts of the bone heal together. Surgeons mostly use this type of surgery for high performance athletes to keep the fulcrum point intact. The surgeon makes an incision along the inside edge of the main joint of the big toe. This exposes the sesamoid bone. The surgeon gathers small bits of bone from a nearby part of the big toe bone. The bone fragments are then packed into the unhealed area of the sesamoid. The soft tissue surrounding the sesamoid is stitched closed. Then the soft tissues are laid back in place, and the skin is sutured together.
Rehabilitation
What should I expect after treatment?
Nonsurgical Rehabilitation
Patients with sesamoid problems may benefit from four to six physical therapy treatments. Your therapist can offer ideas of pads or cushions that help take pressure off the sesamoid bones.
Treatments directed to the painful area help control pain and swelling. Examples include ultrasound, moist heat, and soft-tissue massage. Therapy sessions sometimes include iontophoresis, which uses a mild electrical current to push anti-inflammatory medicine to the sore area.
If simple modifications are made to your shoes you may be allowed to resume normal walking immediately. But you should probably cut back on more vigorous activities for several weeks to allow the inflammation and pain to subside. More aggressive treatment may require you to use crutches for several weeks to keep weight off the foot.
After Surgery
After a surgical procedure to shave or remove bone, patients are generally placed in either a rigid-soled shoe or a cast for two to three weeks. Most are instructed to use crutches and to limit the weight they put on the foot during this period.
Treatment is more cautious after bone graft surgery. Patients usually wear a cast for up to four weeks. Then they wear a short walking cast for another two months, at which time active exercises can start.
About 12 weeks after surgery, surgeons begin computed tomography (CT) scans on a regular basis to keep track of how the bone graft is healing. The CT scan uses X-rays that are interpreted by a powerful computer to create images that appear as slices through the body. With a CT scan the surgeon can see the bones of the sesamoid better to determine if it is healing.
Tarsal Tunnel Syndrome
A Patient’s Guide to Tarsal Tunnel Syndrome
Introduction

Tarsal tunnel syndrome is a condition that occurs from abnormal pressure on a nerve in the foot. The condition is similar to carpal tunnel syndrome in the wrist. The condition is somewhat uncommon and can be difficult to diagnose.
This guide will help you understand
- where the tarsal tunnel is located
- how tarsal tunnel syndrome develops
- what can be done to treat the condition
Anatomy
Where is the tarsal tunnel, and what does it do?

The tibial nerve runs into the foot behind the medial malleolus, the bump on the inside of the ankle. As it enters the foot, the nerve runs under a band of fibrous tissue called the flexor retinaculum. The flexor retinaculum is a dense band of fibrous tissue that forms a sort of tunnel, or tube. Several tendons, as well as the nerve, artery, and veins that travel to the bottom of the foot pass through this tunnel. This tunnel is called the tarsal tunnel. The tarsal tunnel is made up of the bone of the ankle on one side and the thick band of the flexor retinaculum on the other side.
Related Document: A Patient’s Guide to Foot Anatomy
Causes
What causes tarsal tunnel syndrome?
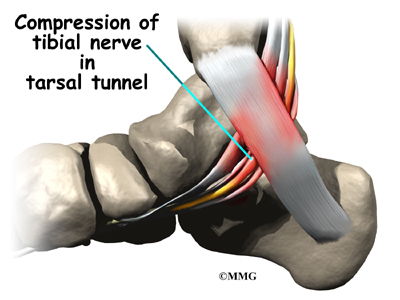
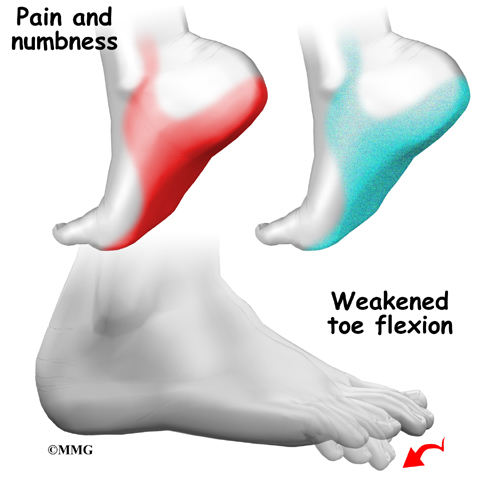
In many cases, doctors aren’t sure what causes tarsal tunnel syndrome. Inflammation in the tissues around the tibial nerve may contribute to the problem by causing swelling in the tissues and pressure on the nerve.
Anything that takes up space in the tarsal tunnel can increase pressure in the area because the flexor retinaculum cannot stretch very much. This can occur from swollen varicose veins, a tumor (noncancerous) on the tibial nerve, and swelling caused by other conditions, such as diabetes. As pressure increases in the tarsal tunnel, the nerve is the most sensitive to the pressure and is squeezed against the flexor retinaculum. This causes problems in the nerve that may lead to symptoms of tarsal tunnel syndrome.
In the case of a nerve, the area of skin supplied by the nerve usually feels numb, and the muscles controlled by the nerve may become weak. Pain is sometimes felt near the area where the nerve is squeezed or pinched.
Symptoms
What does tarsal tunnel syndrome feel like?
Tarsal tunnel syndrome usually causes a vague pain in the sole of the foot. Most patients describe this pain as a burning or tingling sensation. The symptoms are typically made worse by activity, especially standing and walking for long periods. Symptoms are generally reduced by rest. You may feel pain if you touch your foot along the course of the nerve. If the condition becomes worse, your foot may feel numb and weak.
Diagnosis
How do doctors identify tarsal tunnel syndrome?
The diagnosis of tarsal tunnel syndrome begins with a complete history and physical examination. A Tinel’s sign may be present. This is a tingling sensation that shoots what feel like electric shocks into the foot when the skin above the nerve is tapped with a finger at the level of the irritation.
If more information is needed to make the diagnosis, a nerve conduction velocity (NCV) test may be suggested by your doctor. This test measures how fast nerve impulses travel along a nerve. If the test shows that the impulses are traveling slowly across the ankle, this may confirm a diagnosis of tarsal tunnel syndrome.
Treatment
What can be done for the condition?
Nonsurgical Treatment
Treatment for this condition depends on what is contributing to the pressure on the nerve. Anti-inflammatory medication and rest may be suggested to control the symptoms initially. Anti-inflammatory medications help reduce the inflammation and swelling of the tissues around the tibial nerve in the tarsal tunnel and may ease the irritation on the nerve.
People who have problems of pronation (flattened arches) may need specialized inserts, called orthotics, for their shoes. Pronation is a common condition in which the inside edge of the foot rolls in, causing the arch to flatten. When this happens, the tibial nerve within the tarsal tunnel can become stretched. If your tarsal tunnel syndrome is being aggravated by an abnormal position of the foot such as pronation, orthotics may be suggested to relieve the problem. Orthotics worn inside your shoe can help support the arch and take tension off the tibial nerve.
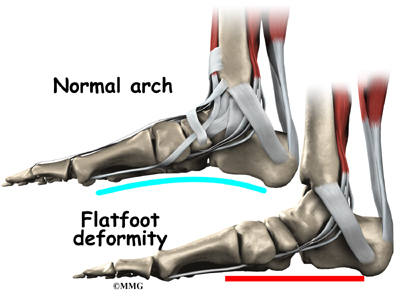
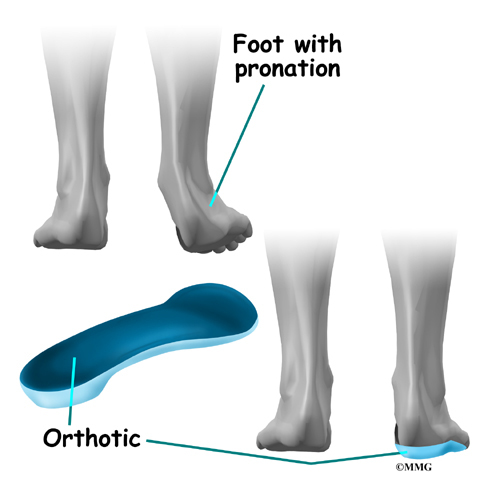
A cortisone injection may give temporary relief of symptoms. The cortisone is injected into the tarsal tunnel so that it bathes the nerve and other tissues. This may decrease the inflammation and swelling of the tissues in the tarsal tunnel and reduce the irritation on the nerve.
If your symptoms fail to respond to nonsurgical treatments, surgery to relieve the pressure on the tibial nerve may be suggested.
Related Document: A Patient’s Guide to Adult-Acquired Flatfoot Deformity
Surgery
The procedure to release the flexor retinaculum can usually be done using either a spinal type anesthetic or a general anesthetic. Once you have anesthesia, your surgeon will make sure the skin of your leg and ankle are free of infection by cleaning the skin with a germ-killing solution.

The surgeon then makes a small incision in the skin behind the inside ankle bone (medial malleolus). The incision is made along the course of the tibial nerve where it curves behind the malleolus. The nerve is located and released by cutting the flexor retinaculum. The surgeon will then surgically follow the nerve into the foot, making sure the nerve is free of pressure throughout its course.
The flexor retinaculum is left open to give the nerves more space. Eventually, the gap between the two ends of the flexor retinaculum fills in with scar tissue. Following surgery, the skin is repaired with stitches.
This surgery can usually be done on an outpatient basis, meaning you can leave the hospital the same day.
Rehabilitation
What should I expect after treatment?
Nonsurgical Rehabilitation
If your doctor recommends nonsurgical treatment, you should begin to see some improvement in your symptoms within a few days. Anti-inflammatory medications may take up to seven to 10 days to become effective. A cortisone shot usually works within 24 hours. Alterations to your shoe wear, such as using orthotics, may take several weeks to have an effect.
Patients with tarsal tunnel syndrome may also benefit from physical therapy treatments. Your therapist can design stretching exercises to improve flexibility in the calf muscles and to encourage the tibial nerve to glide within the tarsal tunnel.
Treatments directed to the painful area help control pain and swelling. Examples include ultrasound, moist heat, and soft-tissue massage. Therapy sessions sometimes include iontophoresis, which uses a mild electrical current to push anti-inflammatory medicine to the sore area.
After Surgery
Pain and symptoms generally begin to improve with surgery, but you may have tenderness in the area of the incision for several months after the procedure.
Your ankle will be supported in a plaster splint for 10 days after surgery. During this time, you may also be instructed to use crutches to keep from placing weight on your foot while you stand or walk.
Take time during the day to support your leg with the ankle and foot elevated above the level of your heart. You are encouraged to move your ankle and toes occasionally during the day. Keep the dressing on your foot until you return to the doctor. Avoid getting the stitches wet. Your stitches will be removed 10 days after surgery, at which time you will switch to a supportive walking boot.
Your surgeon may have you attend physical therapy sessions for up to eight weeks after surgery. Full recovery could take several months. You’ll begin by doing active movements and range of motion exercises for the ankle and toes. Therapists also use ice packs, soft-tissue massage, and hands-on stretching to help with the range of motion. When the stitches are removed, you’ll begin doing exercises to help strengthen the muscles that support the ankle and arch. Therapists also use special stretches to encourage the tibial nerve to slide inside the tarsal tunnel.
Some of the exercises you’ll do are designed to get your leg and ankle working in ways that are similar to the activities you do every day, such as rising on your toes, walking, and going up and down stairs.
Your therapist will help you find ways to do your tasks that don’t put too much stress on your ankle and foot. Before your therapy sessions end, your therapist will teach you a number of ways to avoid future problems.
Bunions
A Patient’s Guide to Bunions
Introduction
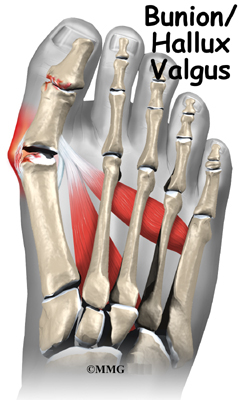
Hallux valgus is a condition that affects the joint at the base of the big toe. The condition is commonly called a bunion. The bunion actually refers to the bump that grows on the side of the first metatarsophalangeal (MTP) joint. In reality, the condition is much more complex than a simple bump on the side of the toe. Interestingly, this condition almost never occurs in cultures that do not wear shoes. Pointed shoes, such as high heels and cowboy boots, can contribute to the development of hallux valgus. Wide shoes, with plenty of room for the toes, lessen the chances of developing the deformity and help reduce the irritation on the bunion if you already have one.
This guide will help you understand
- how hallux valgus develops
- how the condition causes problems
- what treatment options are available
Anatomy
What part of the foot is affected?
The term hallux valgus actually describes what happens to the big toe. Hallux is the medical term for big toe, and valgus is an anatomic term that means the deformity goes in a direction away from the midline of the body. So in hallux valgus the big toe begins to point towards the outside of the foot. As this condition worsens, other changes occur in the foot that increase the problem.
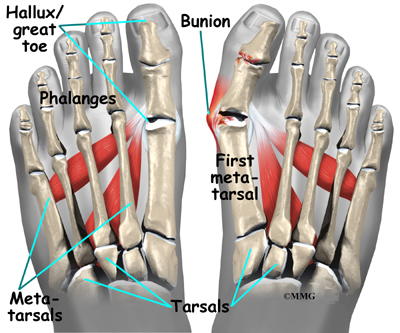
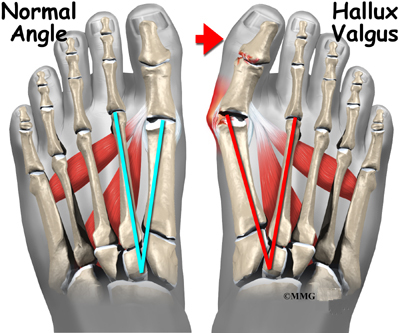
One of those changes is that the bone just above the big toe, the first metatarsal, usually develops too much of an angle in the other direction. This condition is called metatarsus primus varus. Metatarsus primus means first metatarsal, and varus is the medical term that means the deformity goes in a direction towards the midline of the body. This creates a situation where the first metatarsal and the big toe now form an angle with the point sticking out at the inside edge of the ball of the foot. The bunion that develops is actually a response to the pressure from the shoe on the point of this angle. At first the bump is made up of irritated, swollen tissue that is constantly caught between the shoe and the bone beneath the skin. As time goes on, the constant pressure may cause the bone to thicken as well, creating an even larger lump to rub against the shoe.
Related Document: A Patient’s Guide to Foot Anatomy
Causes
Why do I have this problem?
Many problems that occur in the feet are the result of abnormal pressure or rubbing. One way of understanding what happens in the foot due to abnormal pressure is to view the foot simply. Our simple model of a foot is made up of hard bone covered by soft tissue that we then put a shoe on top of. Most of the symptoms that develop over time are because the skin and soft tissue are caught between the hard bone on the inside and the hard shoe on the outside.

Any prominence, or bump, in the bone will make the situation even worse over the bump. Skin responds to constant rubbing and pressure by forming a callus. The soft tissues underneath the skin respond to the constant pressure and rubbing by growing thicker. Both the thick callus and the thick soft tissues under the callus are irritated and painful. The answer to decreasing the pain is to remove the pressure. The pressure can be reduced from the outside by changing the pressure from the shoes. The pressure can be reduced from the inside by surgically removing any bony prominence.
Symptoms
What does hallux valgus feel like?
The symptoms of hallux valgus usually center on the bunion. The bunion is painful. The severe hallux valgus deformity is also distressing to many and becomes a cosmetic problem. Finding appropriate shoe wear can become difficult, especially for women who want to be fashionable but have difficulty tolerating fashionable shoe wear. Finally, increasing deformity begins to displace the second toe upward and may create a situation where the second toe is constantly rubbing on the shoe.
Diagnosis
How do doctors identify the condition?
Diagnosis begins with a careful history and physical examination by your doctor. This will usually include a discussion about shoe wear and the importance of shoes in the development and treatment of the condition. X-rays will probably be suggested. This allows your doctor to measure several important angles made by the bones of the feet to help determine the appropriate treatment.
Treatment
What can be done for the condition?
Nonsurgical Treatment
Treatment of hallux valgus nearly always starts with adapting shoe wear to fit the foot. In the early stages of hallux valgus, converting from a shoe with a pointed toe to a shoe with a wide forefoot (or toe box) may arrest the progression of the deformity. Since the pain that arises from the bunion is due to pressure from the shoe, treatment focuses on removing the pressure that the shoe exerts on the deformity. Wider shoes reduce the pressure on the bunion. Bunion pads may reduce pressure and rubbing from the shoe. There are also numerous devices, such as toe spacers, that attempt to splint the big toe and reverse the deforming forces.
Surgery
If all nonsurgical measures fail to control the symptoms, then surgery may be suggested to treat the hallux valgus condition. Well over 100 surgical procedures exist to treat hallux valgus. The basic considerations in performing any surgical procedure for hallux valgus are
- to remove the bunion
- to realign the bones that make up the big toe
- to balance the muscles around the joint so the deformity does not return
Bunionectomy
In some very mild cases of bunion formation, surgery may only be required to remove the bump that makes up the bunion. This operation, called a bunionectomy, is performed through a small incision on the side of the foot immediately over the area of the bunion. Once the skin is opened the bump is removed using a special surgical saw or chisel. The bone is smoothed of all rough edges and the skin incision is closed with small stitches.

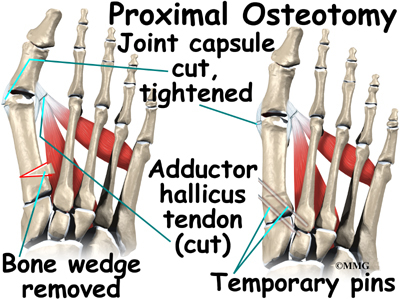
It is more likely that realignment of the big toe will also be necessary. The major decision that must be made is whether or not the metatarsal bone will need to be cut and realigned as well. The angle made between the first metatarsal and the second metatarsal is used to make this decision. The normal angle is around nine or ten degrees. If the angle is 13 degrees or more, the metatarsal will probably need to be cut and realigned.
When a surgeon cuts and repositions a bone, it is referred to as an osteotomy. There are two basic techniques used to perform an osteotomy to realign the first metatarsal.
Distal Osteotomy
In some cases, the far end of the bone is cut and moved laterally (called a distal osteotomy). This effectively reduces the angle between the first and second metatarsal bones. This type of procedure usually requires one or two small incisions in the foot. Once the surgeon is satisfied with the position of the bones, the osteotomy is held in the desired position with one, or several, metal pins. Once the bone heals, the pin is removed. The metal pins are usually removed between three and six weeks following surgery.
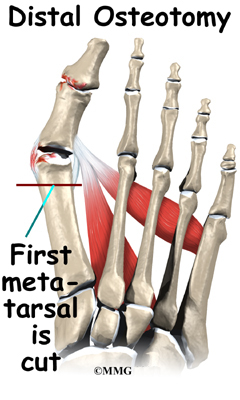
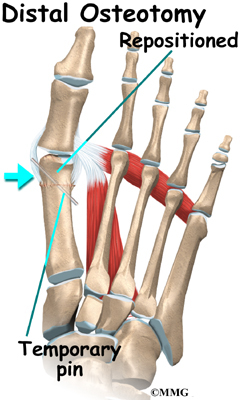
Proximal Osteotomy
In other situations, the first metatarsal is cut at the near end of the bone (called a proximal osteotomy. This type of procedure usually requires two or three small incisions in the foot. Once the skin is opened the surgeon performs the osteotomy. The bone is then realigned and held in place with metal pins until it heals. Again, this reduces the angle between the first and second metatarsal bones.
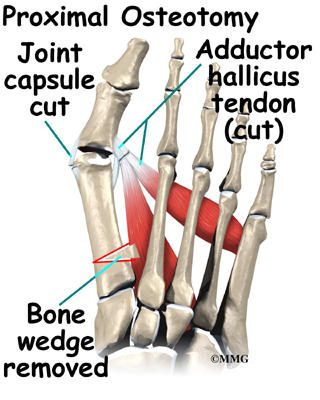

Realignment of the big toe is then done by releasing the tight structures on the lateral, or outer, side of the first MTP joint. This includes the tight joint capsule and the tendon of the adductor hallucis muscle. This muscle tends to pull the big toe inward. By releasing the tendon, the toe is no longer pulled out of alignment. The toe is realigned and the joint capsule on the side of the big toe closest to the other toe is tightened to keep the toe straight, or balanced.
Once the surgeon is satisfied that the toe is straight and well balanced, the skin incisions are closed with small stitches. A bulky bandage is applied to the foot before you are returned to the recovery room.
Rehabilitation
What can I expect following treatment?
Nonsurgical Rehabilitation
Patients with a painful bunion may benefit from four to six physical therapy treatments. Your therapist can offer ideas of shoes that have a wide toe box (mentioned earlier). The added space in this part of the shoe keeps the metatarsals from getting squeezed inside the shoe. A special pad can also be placed over the bunion. Foot orthotics may be issued to support the arch and hold the big toe in better alignment.
These changes to your footwear may allow you to resume normal walking immediately, but you should probably cut back on more vigorous activities for several weeks to allow the inflammation and pain to subside.
Treatments directed to the painful area help control pain and swelling. Examples include ultrasound, moist heat, and soft-tissue massage. Therapy sessions sometimes include iontophoresis, which uses a mild electrical current to push anti-inflammatory medicine to the sore area. This treatment is especially helpful for patients who can’t tolerate injections.
After Surgery
It will take about eight weeks before the bones and soft tissues are well healed. You may be placed in a wooden-soled shoe or a cast during this period to protect the bones while they heal. You will probably need crutches briefly after surgery, and a physical therapist may be consulted to help you use your crutches.
You will probably wear a bandage or dressing for about a week following the procedure. The stitches are generally removed in 10 to 14 days. However, if your surgeon chose to use sutures that dissolve, you won’t need to have the stitches taken out.
During your follow-up visits, X-rays will probably be taken so that the surgeon can follow the healing of the bones and determine how much correction has been achieved.
Bunionette (Tailor’s Bunion)
A Patient’s Guide to Bunionette (Tailor’s Bunion)
Introduction

A bunionette is similar to a bunion, but it develops on the outside of the foot. It is sometimes referred to as a tailor’s bunion because tailors once sat cross-legged all day with the outside edge of their feet rubbing on the ground. This produced a pressure area and callus at the bottom of the fifth toe.
This guide will help you understand
- where a bunionette develops
- why a bunionette causes problems
- what can be done to treat a bunionette


Anatomy
Where does a bunionette develop?
A bunionette occurs over the area of the foot where the small toe connects to the foot. This area is called the metatarsophalangeal joint, or MTP joint. The metatarsals are the long bones of the foot. The phalanges are the small bones in each toe. The big toe has two phalanges, and the other toes have three phalanges each.
Related Document: A Patient’s Guide to Foot Anatomy
Causes
How does a bunionette develop?
Today a bunionette is most likely caused by an abnormal bump over the end of the fifth metatarsal (the metatarsal head) rubbing on shoes that are too narrow. Some people’s feet widen as they grow older, until the foot splays. This can cause a bunion on one side of the foot and a bunionette on the other if they continue to wear shoes that are too narrow. The constant pressure produces a callus and a thickening of the tissues over the bump, leading to a painful knob on the outside of the foot.
Related Document: A Patient’s Guide to Bunions
Many problems that occur in the feet are the result of abnormal pressure or rubbing. One way of understanding what happens in the foot as a result of abnormal pressure is to view the foot simply. Essentially a foot is made up of hard bone covered by soft tissue that we then put a shoe on top of. Most of the symptoms that develop over time are because the skin and soft tissue are caught between the hard bone on the inside and the hard shoe on the outside.
Any prominence, or bump, in the bone will make the situation even worse over the bump. Skin responds to constant rubbing and pressure by forming a callus. The soft tissues underneath the skin respond to the constant pressure and rubbing by growing thicker. Both the thick callus and the thick soft tissues under it are irritated and painful. The answer to decreasing the pain is to remove the pressure. The pressure can be reduced from the outside by changing the pressure from the shoes. The pressure can be reduced from the inside by surgically removing any bony prominence.
Symptoms
What do bunionettes feel like?
The symptoms of a bunionette include pain and difficulty buying shoes that will not cause pain around the deformity. The swelling in the area causes a visible bump that some people find unsightly.
Diagnosis
How do doctors identify a bunionette?
The diagnosis of a bunionette is usually obvious on physical examination. X-rays may help to see if the foot has splayed and will help decide what needs to be done if surgery is necessary later.
Treatment
What can be done for a bunionette?
Nonsurgical Treatment
Treatment initially is directed at obtaining proper shoes that will accommodate the width of the forefoot. Pads over the area of the bunionette may help relieve some of the pressure and reduce pain. These pads are usually sold in drug and grocery stores. They are small and round with a hole in the middle, like a small doughnut.
Surgery
If all else fails, surgery may be recommended to reduce the deformity. Surgery usually involves removing the prominence of bone underneath the bunion to relieve pressure. Surgery may also be done to realign the fifth metatarsal if the foot has splayed.

Bunionette Removal
To remove the prominence, the surgeon makes a small incision in the skin over the bump. The bump is then removed with a small chisel, and the bone edges are smoothed. Once enough bone has been removed, the skin is closed with small stitches.
Distal Osteotomy

If your doctor decides that the angle of the metatarsal is too great, the fifth metatarsal bone may be cut and realigned. This is called an osteotomy. Once the surgeon has performed the osteotomy, the bones are realigned and held in position with metal pins. The metal pins remain in place while the bones heal.
Rehabilitation
What should I expect after treatment?
Nonsurgical Rehabilitation
Patients with a painful bunionette may benefit from four to six physical therapy treatments. Your therapist can offer ideas of shoes that have a wide forefoot, or toe box. The added space in this part of the shoe keeps the metatarsals from getting squeezed inside the shoe. A special pad can also be placed over the bunionette.
These simple changes to your footwear may allow you to resume normal walking immediately, but you should probably cut back on more vigorous activities for several weeks to allow the inflammation and pain to subside.
Treatments directed to the painful area help control pain and swelling. Examples include ultrasound, moist heat, and soft-tissue massage. Therapy sessions sometimes include iontophoresis, which uses a mild electrical current to push anti-inflammatory medicine to the sore area. This treatment is especially helpful for patients who can’t tolerate injections.
After Surgery
Patients are usually fitted with a post-op shoe. This shoe has a stiff, wooden sole that protects the toes by keeping the foot from bending. Any pins are usually removed after the bone begins to mend (usually three or four weeks). You will probably need crutches briefly after surgery, and a therapist may be consulted to help you use your crutches.
You will probably wear a bandage or dressing for about a week following the procedure. The stitches are generally removed in 10 to 14 days. However, if your surgeon chose to use sutures that dissolve, you won’t need to have the stitches taken out.
During your follow-up visits, X-rays will probably be taken so that the surgeon can follow the healing of the bones and determine how much correction has been achieved.
Accessory Navicular Problems
A Patient’s Guide to Accessory Navicular Problems
Introduction

Not everyone has the same number of bones in his feet. It is not uncommon for both the hands and the feet to contain extra small accessory bones, or ossicles, that sometimes cause problems.
This guide will help you understand
- where the accessory navicular is located
- why the extra bone can cause problems
- how doctors treat the condition
Anatomy
Where is the accessory navicular located?
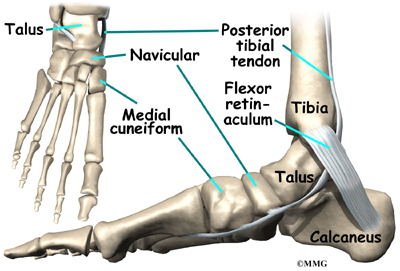
The navicular bone of the foot is one of the small bones on the mid-foot. The bone is located at the instep, the arch at the middle of the foot. One of the larger tendons of the foot, called the posterior tibial tendon, attaches to the navicular before continuing under the foot and into the forefoot. This tendon is a tough band of tissue that helps hold up the arch of the foot. If there is an accessory navicular, it is located in the instep where the posterior tibial tendon attaches to the real navicular bone.

The accessory navicular is a congenital anomaly, meaning that you are born with the extra bone. As the skeleton completely matures, the navicular and the accessory navicular never completely grow, or fuse, into one solid bone. The two bones are joined by fibrous tissue or cartilage. Girls seem to be more likely to have an accessory navicular than boys.
Related Document: A Patient’s Guide to Foot Anatomy
Causes
How does an accessory navicular cause problems?
Just having an accessory navicular bone is not necessarily a bad thing. Not all people with these accessory bones have symptoms. Symptoms arise when the accessory navicular is overly large or when an injury disrupts the fibrous tissue between the navicular and the accessory navicular. A very large accessory navicular can cause a bump on the instep that rubs on your shoe causing pain.

An injury to the fibrous tissue connecting the two bones can cause something similar to a fracture. The injury allows movement to occur between the navicular and the accessory bone and is thought to be the cause of pain. The fibrous tissue is prone to poor healing and may continue to cause pain. Because the posterior tibial tendon attaches to the accessory navicular, it constantly pulls on the bone, creating even more motion between the fragments with each step.
Symptoms
What does the condition feel like?
The primary reason an accessory navicular becomes a problem is pain. There is no need to do anything with an accessory navicular that is not causing pain. The pain is usually at the instep area and can be pinpointed over the small bump in the instep. Walking can be painful when the problem is aggravated. As stated earlier, the condition is more common in girls. The problem commonly becomes symptomatic in the teenage years.
Diagnosis
How do doctors identify the problem?
The diagnosis begins with a complete history and physical examination by your surgeon. Usually the condition is suggested by the history and the tenderness over the area of the navicular. X-rays will usually be required to allow the surgeon see the accessory navicular. Generally no other tests are required.
Treatment
What can be done for a painful accessory navicular?
The treatment for a symptomatic accessory navicular can be divided into nonsurgical treatment and surgical treatment. In the vast majority of cases, treatment usually begins with nonsurgical measures. Surgery usually is only considered when all nonsurgical measures have failed to control your problem and the pain becomes intolerable.
Nonsurgical Treatment
If the foot becomes painful following a twisting type of injury and an X-ray reveals the presence of an accessory navicular bone, your doctor may recommend a period of immobilization in a cast or splint. This will rest the foot and perhaps allow the disruption between the navicular and accessory navicular to heal. Your doctor may prescribe anti-inflammatory medication. Sometimes an arch support can relieve the stress on the fragment and decrease the symptoms. If the pain subsides and the fragment becomes asymptomatic, further treatment may not be necessary.
Surgery
If all nonsurgical measures fail and the fragment continues to be painful, surgery may be recommended.
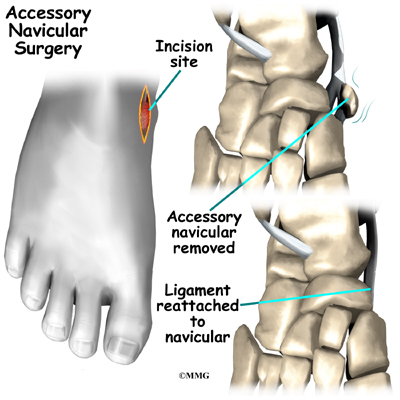
The most common procedure used to treat the symptomatic accessory navicular is the Kidner procedure. A small incision is made in the instep of the foot over the accessory navicular. The accessory navicular is then detached from the posterior tibial tendon and removed from the foot. The posterior tibial tendon is reattached to the remaining normal navicular. Following the procedure, the skin incision is closed with stitches, and a bulky bandage and splint are applied to the foot and ankle.
Rehabilitation
What should I expect from treatment?
Nonsurgical Rehabilitation
Patients with a painful accessory navicular may benefit with four to six physical therapy treatments. Your therapist may design a series of stretching exercises to try and ease tension on the posterior tibial tendon. A shoe insert, or orthotic, may be used to support the arch and protect the sore area.
This approach may allow you to resume normal walking immediately, but you should probably cut back on more vigorous activities for several weeks to allow the inflammation and pain to subside.
Treatments directed to the painful area help control pain and swelling. Examples include ultrasound, moist heat, and soft-tissue massage. Therapy sessions sometimes include iontophoresis, which uses a mild electrical current to push anti-inflammatory medicine to the sore area.
After Surgery
You may need to use crutches for several days after surgery. Your stitches will be removed in 10 to 14 days (unless they are the absorbable type, which will not need to be taken out). You should be safe to be released to full activity in about six weeks.
Achilles Tendon Problems
A Patient’s Guide to Achilles Tendon Problems
Introduction

Problems that affect the Achilles tendon include tendonitis, tendinopathy, tendocalcaneal bursitis, and tendonosis. Each of these conditions will be described and explained. These problems affect athletes most often, especially runners, basketball players, and anyone engaged in jumping sports. They are also common among both active and sedentary (inactive) middle-aged adults. These problems cause pain at the back of the calf. Severe cases may result in a rupture of the Achilles tendon.
This guide will help you understand
- where the Achilles tendon is located
- what kinds of Achilles tendon problems there are
- how an injured Achilles tendon causes problems
- what treatment options are available

Anatomy
Where is the Achilles tendon, and what does it do?
The Achilles tendon is a strong, fibrous band that connects the calf muscle to the heel. The calf is actually formed by two muscles, the underlying soleus and the thick outer gastrocnemius. Together, they form the gastroc-soleus muscle group.

When they contract, they pull on the Achilles tendon, causing your foot to point down and helping you rise on your toes. This powerful muscle group helps when you sprint, jump, or climb. Several different problems can occur that affect the Achilles tendon, some rather minor and some quite severe.
Tendocalcaneal Bursitis

A bursa is a fluid-filled sac designed to limit friction between rubbing parts. These sacs, or bursae, are found in many places in the body. When a bursa becomes inflamed, the condition is called bursitis. Tendocalcaneal bursitis is an inflammation in the bursa behind the heel bone. This bursa normally limits friction where the thick fibrous Achilles tendon that runs down the back of the calf glides up and down behind the heel.
Achilles Tendonitis

A violent strain can cause trauma to the calf muscles or the Achilles tendon. Sometimes this is referred to as tendonitis. This injury can happen during a strong contraction of the muscle, as when running or sprinting. Landing on the ground after a jump can force the foot upward, also causing injury. The strain can affect different portions of the muscles or tendon. For instance, the strain may occur in the center of the muscle. Or it may happen where the muscles join the Achilles tendon (called the musculotendinous junction).
Achilles Tendinopathy/Tendonosis
Chronic overuse may contribute to changes in the Achilles tendon as well, leading to degeneration and thickening of the tendon. Studies show there is no sign of inflammation with overuse injuries of tendons. Most experts now refer to this condition as tendinopathy or tendonosis instead of tendonitis.
Achilles Tendon Rupture
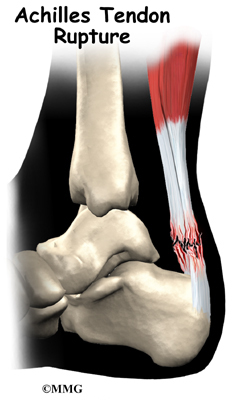
In severe cases, the force of a violent strain may even rupture the tendon. The classic example is a middle-aged tennis player or weekend warrior who places too much stress on the tendon and experiences a tearing of the tendon. In some instances, the rupture may be preceded by a period of tendonitis, which renders the tendon weaker than normal.
Related Document: A Patient’s Guide to Foot Anatomy
Causes
How do these problems develop?
It’s not entirely clear why these problems develop in some people but not in others. Changes in the normal alignment of the foot and leg may be part of the problem. Anyone with one leg shorter than the other is at increased risk of Achilles tendon problems.
For the athlete, sudden increases in training may be a key factor. Runners may add on miles or engage in excessive hill training while other athletes increase training intensity. Other risk factors include obesity, diabetes (or other endocrine disorders), aging, exposure to steroids, and taking fluoroquinolones (antibiotics).
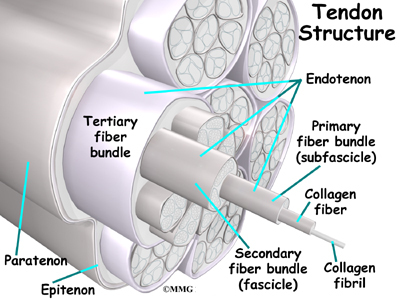
Problems with the Achilles tendon seem to occur in different ways. Initially, irritation of the outer covering of the tendon, called the paratenon, causes paratendonitis. Paratendonitis is simply inflammation around the tendon. Inflammation of the tendocalcaneal bursa (described above) may also be present with paratendonitis. Either of these conditions may be due to repeated overuse or ill-fitting shoes that rub on the tendon or bursa.
As we age, our tendons can degenerate. Degeneration means that wear and tear occurs in the tendon over time and leads to a situation where the tendon is weaker than normal. Degeneration in a tendon usually shows up as a loss of the normal arrangement of the fibers of the tendon. Tendons are made up of strands of a material called collagen. (Think of a tendon as similar to a nylon rope and the strands of collagen as the nylon strands.) Some of the individual strands of the tendon become jumbled due to the degeneration, other fibers break, and the tendon loses strength.
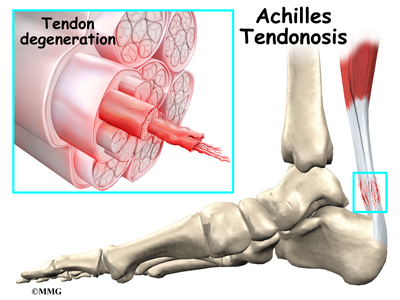
The healing process in the tendon causes the tendon to become thickened as scar tissue tries to repair the tendon. This process can continue to the extent that a nodule forms within the tendon. This degenerative condition without inflammation is called tendonosis. The area of tendonosis in the tendon is weaker than normal tendon. Tiny tears in the tissue around the tendon occur with overuse. The weakened, degenerative tendon sets the stage for the possibility of actual rupture of the Achilles tendon.
Symptoms
What do these conditions feel like?
Tendocalcaneal bursitis usually begins with pain and irritation at the back of the heel. There may be visible redness and swelling in the area. The back of the shoe may further irritate the condition, making it difficult to tolerate shoe wear.

Achilles tendonitis usually occurs further up the leg, just above the heel bone itself. The Achilles tendon in this area may be noticeably thickened and tender to the touch. Pain is present with walking, especially when pushing off on the toes.
An Achilles tendon rupture is usually an unmistakable event. Some bystanders may report actually hearing the snap, and the victim of a rupture usually describes a sensation similar to being violently kicked in the calf. Following rupture the calf may swell, and the injured person usually can’t rise on his toes.
Diagnosis
How do doctors identify the problem?
Diagnosis is almost always by clinical history and physical examination. The physical examination is used to determine where your leg hurts. The doctor will probably move your ankle in different positions and ask you to hold your foot against the doctor’s pressure. By stretching the calf muscles and feeling where these muscles attach on the Achilles tendon, the doctor can begin to locate the problem area.
The doctor may run some simple tests if a rupture is suspected. One test involves simply feeling for a gap in the tendon where the rupture has occurred. However, swelling in the area can make it hard to feel a gap.
Another test is done with your leg positioned off the edge of the treatment table. The doctor squeezes your calf muscle to see if your foot bends downward. If your foot doesn’t bend downward, it’s highly likely that you have a ruptured Achilles tendon.
When the doctor is unsure whether the Achilles tendon has been ruptured, a magnetic resonance imaging (MRI) scan may be necessary to confirm the diagnosis. This is seldom the case. The MRI machine uses magnetic waves rather than X-rays to show the soft tissues of the body. The MRI creates images that look like slices and shows the tendons and ligaments very clearly. This test does not require any needles or special dye and is painless.
Your doctor may order an ultrasound test. An ultrasound uses high-frequency sound waves to create an image of the body’s organs and structures. The image can show if an Achilles tendon has partially or completely torn. This test can also be repeated over time to see if a tear has gotten worse.
By using the MRI and ultrasound tests, doctors can determine if surgery is needed. For example, a small tear may mean that a patient might only need physical therapy and not surgery.
Treatment
What treatment options are available?
Nonsurgical Treatment
Tendonitis/Tendinopathy
In the past, nonsurgical treatment for tendocalcaneal bursitis and Achilles tendonitis started with a combination of rest, ice, and anti-inflammatory medications such as aspirin or ibuprofen.
Since it is now recognized that many tendon problems occur without inflammation, the use of antiinflammatories and ice have come under question. In the case of true inflammation, the overuse of these modalities may prevent a normal, healing inflammatory process. Preventing inflammation needed to clean up cellular debris in the injured area may lead to delayed or incomplete healing. The result may be future chronic problems of tendonosis and/or tendinopathy.
Many experts suggest when there is any doubt about inflammation, treatment should proceed as if there are no inflammatory cells present. This approach focuses on pain relief and restoring proper motion and weight-bearing so you can return to your usual activities.
If there is an inflammatory process, then the condition should respond fairly quickly to drug and antiinflammatory interventions. Limiting, but not eliminating, inflammation is the new goal.
Physical therapy may be recommended for any of these tendon problems. Treatment will depend on what type of problem (tendonitis or tendinopathy/tendonosis) is present.
Your therapist will know when and how to apply cold modalities to reduce swelling and pain but still allow the healing inflammatory process. Physical therapy for chronic tendon problems may also include a special program of stretching and eccentric strengthening exercises. Your therapist will instruct you in a home care program.
Low-energy shock wave therapy has been used successfully for chronic tendinopathy. The procedure does not require anesthesia but it may take several treatment sessions. The vibration produced by the energy waves is applied to areas of tenderness while the affected foot and ankle are gently moved in all directions. Shock wave therapy works by turning off nerves responsible for pain without affecting motor function. It also stimulates soft-tissue healing by increasing blood supply to the area treated.
Tendonosis
If the problem is one of tendon tissue degeneration, healing and recovery may take longer. The injury will not respond to treatment designed to reduce inflammation. Correct treatment of tendonosis involves fostering new collagen tissue growth and improving the strength of the tendon. Rehabilitation following rupture of the tendon is quite different and is described later.
An acute injury needs rest. This can be done by limiting activities like walking on the sore leg. A small (one-quarter inch) heel lift placed in your shoe can minimize stress by putting slack in the calf muscle and Achilles tendon. Be sure to place a similar sized lift in the other shoe to keep everything aligned. A cortisone injection is not advised for this condition, due to the increased risk of rupture of the tendon following injection.
Tendon Rupture
Nonsurgical treatment for an Achilles tendon rupture is somewhat controversial. It is clear that treatment with a cast will allow the vast majority of tendon ruptures to heal, but the incidence of rerupture is increased in those patients treated with casting for eight weeks when compared with those undergoing surgery. In addition, the strength of the healed tendon is significantly less in patients who choose cast treatment. For these reasons, many orthopedists feel that Achilles tendon ruptures in younger active patients should be surgically repaired.
Surgery
Surgical treatment for Achilles tendonitis is not usually necessary for most patients. Surgery options range from a tenotomy (a simple release of the tendon) to a more involved, open approach of repair.
In some cases of persistent tendonitis and tendonosis a procedure called debridement of the Achilles tendon may be suggested to help treat the problem.
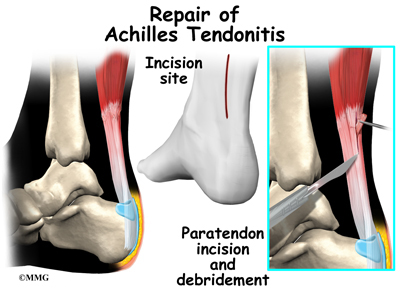
This procedure is usually done through an incision on the back of the ankle near the Achilles tendon. The tendon is identified, and any inflamed paratenon tissue (the covering of the tendon) is removed. The tendon is then split, and the degenerative portion of the tendon is removed. The split tendon is then repaired and allowed to heal. It is unclear why, but removing the degenerative portion of the tendon seems to stimulate repair of the tendon to a more normal state.

Surgery may also be suggested if you have a ruptured Achilles tendon. Reattaching the two ends of the tendon repairs the torn Achilles tendon. This procedure is usually done through an incision on the back of the ankle near the Achilles tendon. Numerous procedures have been developed to repair the tendon, but most involve sewing the two ends of the tendon together in some fashion. Some repair techniques have been developed to minimize the size of the incision.
In the past, the complications of surgical repair of the Achilles tendon made surgeons think twice before suggesting surgery. The complications arose because the skin where the incision must be made is thin and has a poor blood supply. This can lead to an increase in the chance of the wound not healing and infection setting in. Now that this is better recognized, the complication rate is lower and surgery is recommended more often.
Rehabilitation
What can I expect following treatment?
Nonsurgical Rehabilitation
Patients with mild symptoms of tendocalcaneal bursitis or Achilles tendonitis often do well with two to four weeks of physical therapy. Treatments such as ultrasound, moist heat, and massage are used to control pain and inflammation. As pain eases, treatment progresses to include stretching and strengthening exercises.
In cases of Achilles tendinopathy, or when a partial tendon tear is being treated without surgery, patients may require two to three months of physical therapy. A heel lift placed in your shoe helps take tension off the painful tendon. Ultrasound and massage are used to help the tendon heal.
Injured tendons shorten and need to be stretched. Only gentle stretches for the calf muscles and Achilles tendon are used at first. As the tendon heals and pain eases, more aggressive stretches are given.
As your condition improves, exercises to strengthen the calf muscles begin. Strengthening starts gradually using isometrics, exercises that work the muscles but protect the healing area. Eventually, specialized strengthening exercises, called eccentrics, are used. Eccentrics work the calf muscle while it lengthens. For example, if you stand on your tiptoes, the calf muscles work eccentrically to carefully lower your heels back to the ground.
Patients are gradually able to get back to normal activities. Athletes are guided in rehabilitation that is specific to their type of sport.
Nonsurgical treatment for a ruptured Achilles tendon is handled differently. This approach might be considered for the aging adult who has an inactive lifestyle. Nonsurgical treatment in this case allows the patient to heal while avoiding the potential complications of surgery. The patient’s foot and ankle are placed in a cast for eight weeks. Casting the leg with the foot pointing downward brings the torn ends of the Achilles tendon together and holds them until scar tissue joins the damaged ends. A large heel lift is worn in the shoe for another six to eight weeks after the cast is taken off.
After Surgery
Traditionally, patients would be placed in a cast or brace for six to eight weeks after surgery to protect the repair and the skin incision. Crutches would be needed at first to keep from putting weight onto the foot. Complications can occur such as delayed healing, infection, and scarring. More serious problems such as tendon rupture and nerve damage can also occur.
Conditioning exercises during this period help patients maintain good general muscle strength and aerobic fitness. Upon removing the cast, a shoe with a fairly high heel is recommended for up to eight more weeks, at which time physical therapy begins.
Immobilizing the leg in a cast can cause joint stiffness, muscle wasting (atrophy), and blood clots. To avoid these problems, surgeons may have their patients start doing motion exercises very soon after surgery. Patients wear a splint that can easily be removed to do the exercises throughout the day. A crutch or cane may be used at first to help you avoid limping.
In this early-motion approach, physical therapy starts within the first few days after surgery. Therapy may be needed for four to five months. Ice, massage, and whirlpool treatments may be used at first to limit (but not completely prevent) swelling and pain. Massage and ultrasound help heal and strengthen the tendon.
Treatments progress to include more advanced mobility and strengthening exercises, some of which may be done in a pool. The buoyancy of the water helps people walk and exercise safely without putting too much tension on the healing tendon. The splint is worn while walking for six to eight weeks after surgery.
As your symptoms ease and your strength improves, you will be guided through advancing stages of exercise. Athletes begin running, cutting, and jumping drills by the fourth month after surgery. They are usually able to get back to their sport by six full months after surgery.
The physical therapist’s goal is to help you keep your pain and swelling under control, improve your range of motion and strength, and ensure you regain a normal walking pattern. When you are well under way, regular visits to the therapist’s office will end. Your therapist will continue to be a resource, but you will be in charge of doing your exercises as part of an ongoing home program.
Foot Anatomy
A Patient’s Guide to Foot Anatomy
Introduction

Our feet are constantly under stress. It’s no wonder that 80 percent of us will have some sort of problem with our feet at some time or another. Many things affect the condition of our feet: activity level, occupation, other health conditions, and perhaps most importantly, shoes. Many of the problems that arise in the foot are directly related to shoes, so it is very important to choose shoes that are good for your feet.
The foot is an incredibly complex mechanism. This introduction to the anatomy of the foot will not be exhaustive but rather highlight the structures that relate to conditions and surgical procedures of the foot.
In addition to reading this article, be sure to watch our Foot Anatomy Animated Tutorial Video.
This guide will help you understand
- what parts make up the foot
- how the foot works
Important Structures
The important structures of the foot can be divided into several categories. These include
- bones and joints
- ligaments and tendons
- muscles
- nerves
- blood vessels
Bones and Joints
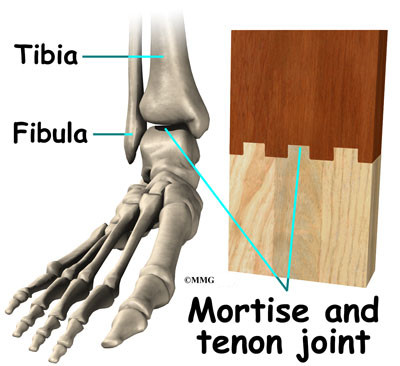
The skeleton of the foot begins with the talus, or ankle bone, that forms part of the ankle joint. The two bones of the lower leg, the large tibia and the smaller fibula, come together at the ankle joint to form a very stable structure known as a
mortise and tenon joint.
The mortise and tenon structure is well known to carpenters and craftsmen who use this joint in the construction of everything from furniture to large buildings. The arrangement is very stable.
The two bones that make up the back part of the foot (sometimes referred to as the hindfoot) are the talus and the calcaneus, or heelbone. The talus is connected to the calcaneus at the subtalar joint. The ankle joint allows the foot to bend up and down. The subtalar joint allows the foot to rock from side to side.
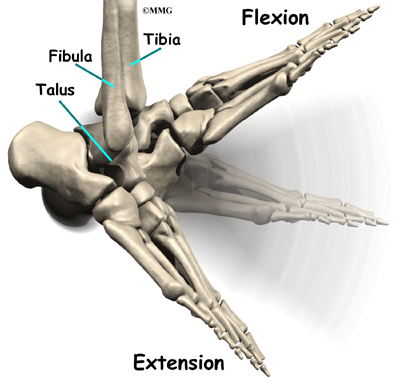
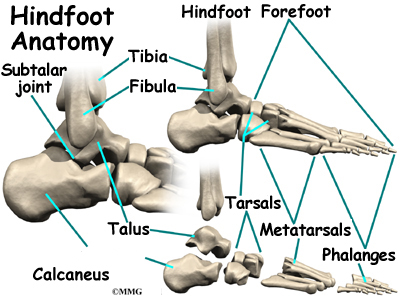
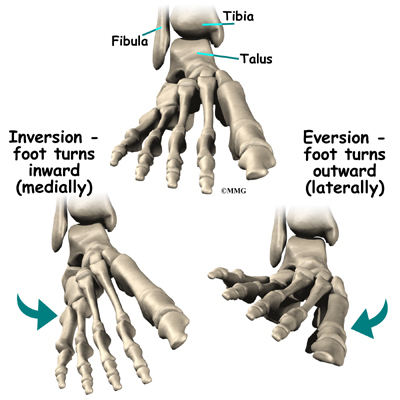
Just down the foot from the ankle is a set of five bones called tarsal bones that work together as a group. These bones are unique in the way they fit together. There are multiple joints between the tarsal bones. When the foot is twisted in one direction by the muscles of the foot and leg, these bones lock together and form a very rigid structure. When they are twisted in the opposite direction, they become unlocked and allow the foot to conform to whatever surface the foot is contacting.

The tarsal bones are connected to the five long bones of the foot called the metatarsals. The two groups of bones are fairly rigidly connected, without much movement at the joints.
Finally, there are the bones of the toes, the phalanges. The joints between the metatarsals and the first phalanx is called the metatarsophalangeal joint (MTP). These joints form the ball of the foot, and movement in these joints is very important for a normal walking pattern.
Not much motion occurs at the joints between the bones of the toes. The big toe, or hallux, is the most important toe for walking, and the first MTP joint is a common area for problems in the foot.
Ligaments and Tendons
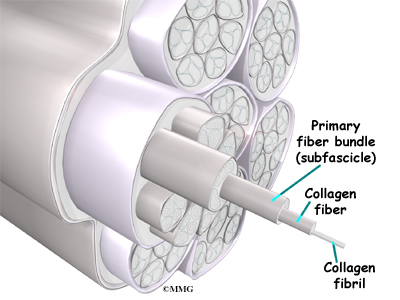
Ligaments are the soft tissues that attach bones to bones. Ligaments are very similar to tendons. The difference is that tendons attach muscles to bones. Both of these structures are made up of small fibers of a material called collagen. The collagen fibers are bundled together to form a rope-like structure. Ligaments and tendons come in many different sizes, and like rope, are made up of many smaller fibers. The thicker the ligament (or tendon) the stronger the ligament (or tendon) is.

The large Achilles tendon is the most important tendon for walking, running, and jumping. It attaches the calf muscles to the heel bone to allow us to raise up on our toes. The posterior tibial tendon attaches one of the smaller muscles of the calf to the underside of the foot. This tendon helps support the arch and allows us to turn the foot inward. The toes have tendons attached that bend the toes down (on the bottom of the toes) and straighten the toes (on the top of the toes). The anterior tibial tendon allows us to raise the foot. Two tendons run behind the outer bump of the ankle (called the lateral malleolus) and help turn the foot outward.
Many small ligaments hold the bones of the foot together. Most of these ligaments form part of the joint capsule around each of the joints of the foot. A joint capsule is a watertight sac that forms around all joints. It is made up of the ligaments around the joint and the soft tissues between the ligaments that fill in the gaps and form the sac.
Muscles
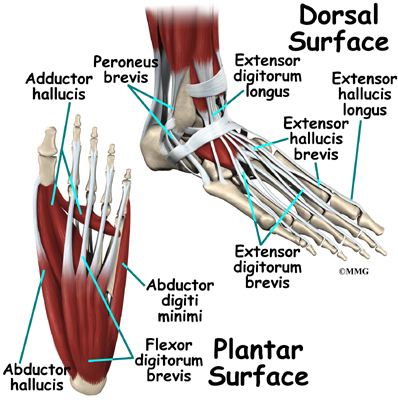
Most of the motion of the foot is caused by the stronger muscles in the lower leg whose tendons connect in the foot. Contraction of the muscles in the leg is the main way that we move our feet to stand, walk, run, and jump.
There are numerous small muscles in the foot. While these muscles are not nearly as important as the small muscles in the hand, they do affect the way that the toes work. Damage to some of these muscles can cause problems.
Most of the muscles of the foot are arranged in layers on the sole of the foot (the plantar surface). There they connect to and move the toes as well as provide padding underneath the sole of the foot.
Nerves
The main nerve to the foot, the tibial nerve, enters the sole of the foot by running behind the inside bump on the ankle, the medial malleolus. This nerve supplies sensation to the toes and sole of the foot and controls the muscles of the sole of the foot. Several other nerves run into the foot on the outside of the foot and down the top of the foot. These nerves primarily provide sensation to different areas on the top and outside edge of the foot.
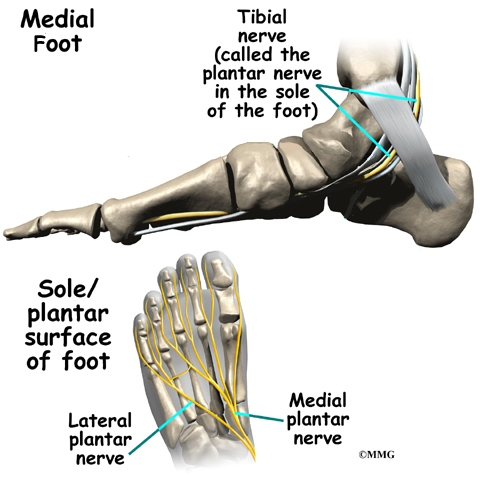
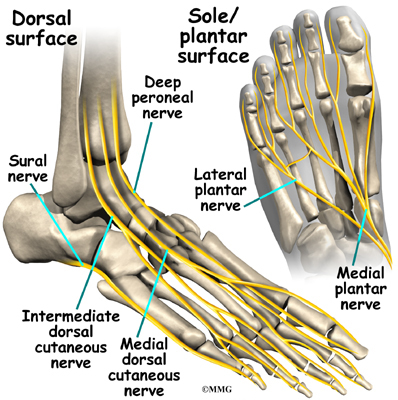
Blood Vessels
The main blood supply to the foot, the posterior tibial artery, runs right beside the nerve of the same name. Other less important arteries enter the foot from other directions. One of these arteries is the dorsalis pedis that runs down the top of the foot. You can feel your pulse where this artery runs in the middle of the top of the foot.
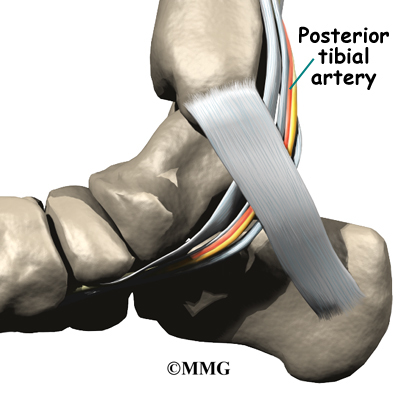
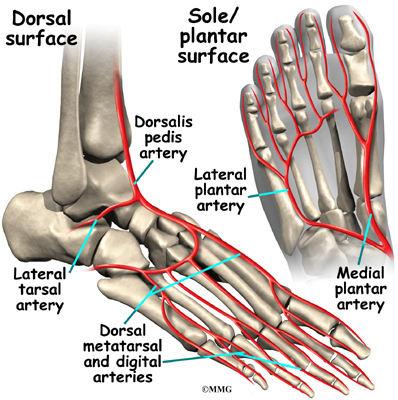
Summary
As you can see, the anatomy of the foot is very complex. When everything works together, the foot functions correctly. When one part becomes damaged, it can affect every other part of the foot and lead to problems.